Monday, November 21, 2022

Shape Castles in Paint, Chalk and Oil Pastel Inspired by Paul Klee and Mary Blair


Recently I shared that my students were doing Shape Stations (or centers) in the art room. I did this after the success of both our Dot Day and Line Study stations. I'm loving the exploration the kids are able to do and the kids are loving it...for the same reasons. Not to mention, it's just FUN to try a whole bunch of new ways to create in just a few art classes. Here's a look at our Shape Stations:

And what we did during our Line Study:

And some behind-the-scenes tips on these stations:

Here is a look at the Dot Day stations that started it all:

And since we did two days worth of fun:

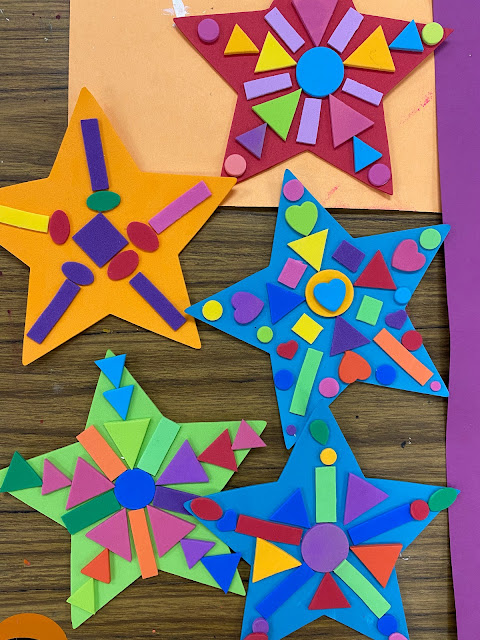
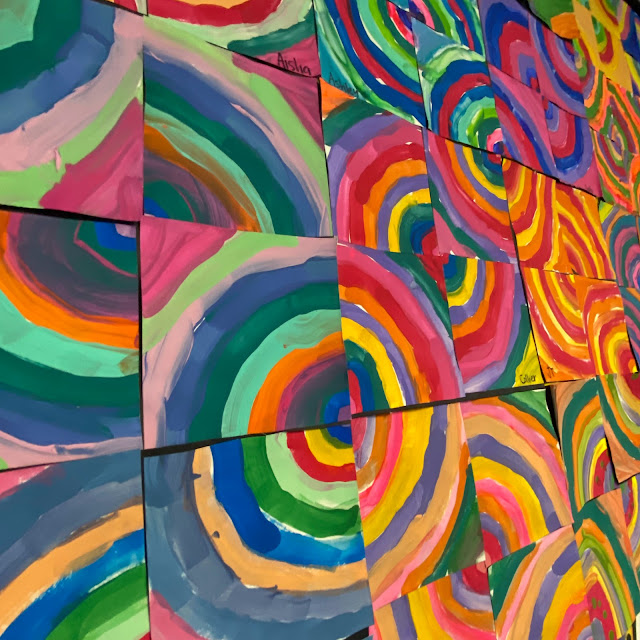
Once we finished creating artwork from our line study (lessons which I've yet to share here!), I ventured into shape. Currently, I'm doing shape stations with 2-4th only as kindergarten and first are in the middle of other projects. I do think that these shape stations would work for k-1st except maybe the radial symmetry design. But it's always worth throwing the idea out there to see what the kids come up with, right?

Here's a little look at what the back table in my art room looked like after I began prepping for our shape study. Initially we were going to do some shape stamps (seen in the upper left hand corner) but after giving that a run through with one class, I decided it was too similar to the sponge stamping. We switched to the bleeding tissue paper shapes in the end. 
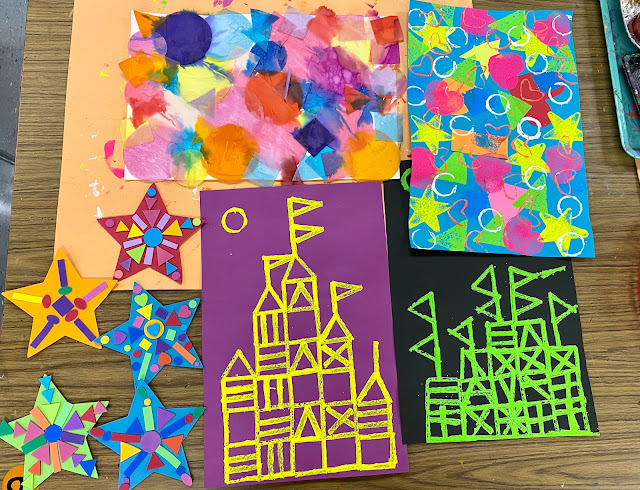
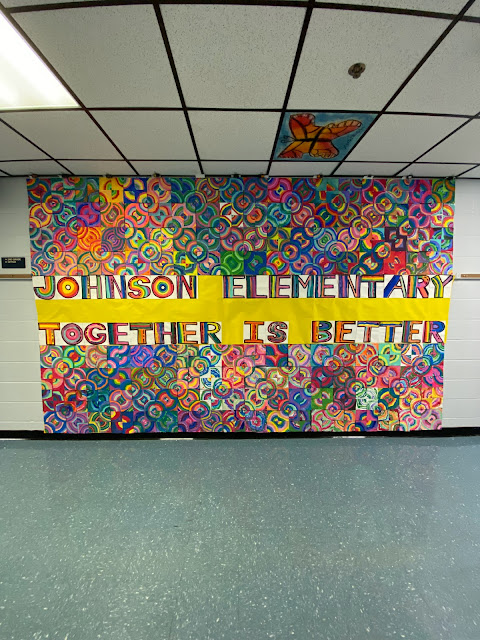
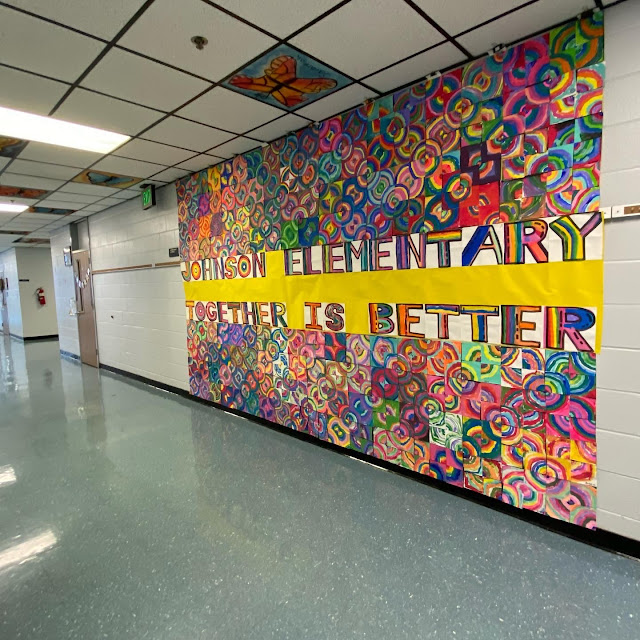
Now when I'm working through these station ideas, I also gotta start thinking: what are we gonna do with all of these papers and things we create? Here's a little look at what I've come up with...
First grade is currently working on the self portrait in the upper left hand corner. This is a lesson I've done many times, you can check out the lesson here. As for 2-4th, well...I am currently having them all work on those castles! We will all do printing with our stars...and do some embossing too...but as of right now, we are all learning about Mary Blair. Here's the video I created. 

The kids are enjoying working with chalk and oil pastel. I'm excited to give them another opportunity to really explore a variety of supplies. 

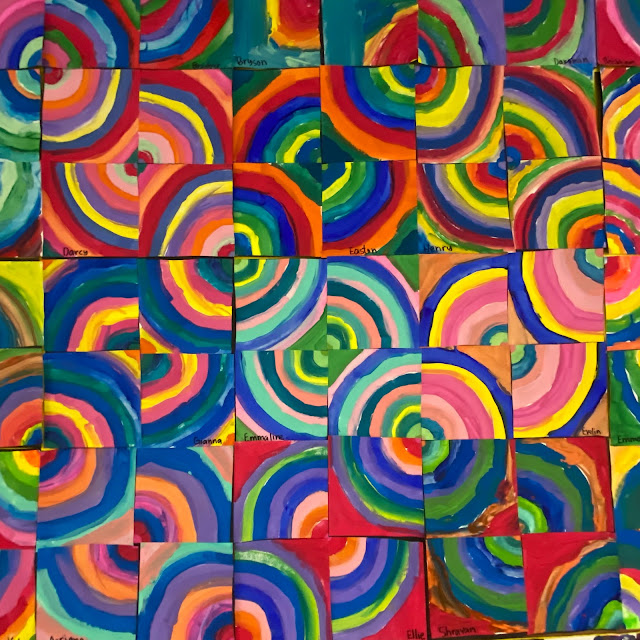
Above is my example and below is a class of I think thrid graders examples. I will say this...stations means the kids will often work quickly and not always at a slow and 'careful' pace. I'm fine with that. However, I did have a small handful of students later decide the wanted to redo theirs, knowing it was not their best work. I allowed that too. 

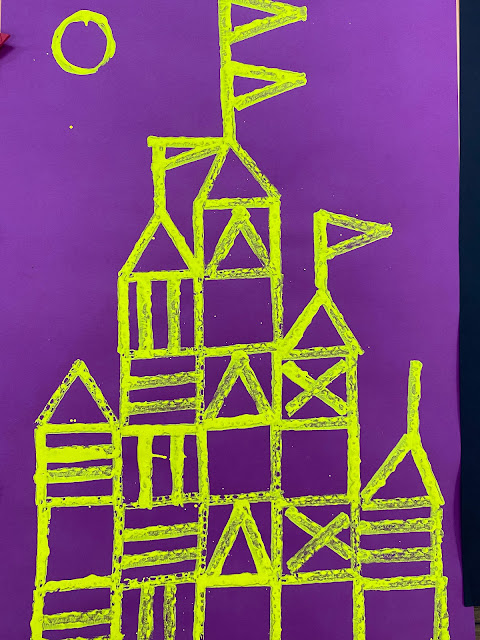
So far, we've gotten the castles chalked in and now we are ready for the oil pastel. 

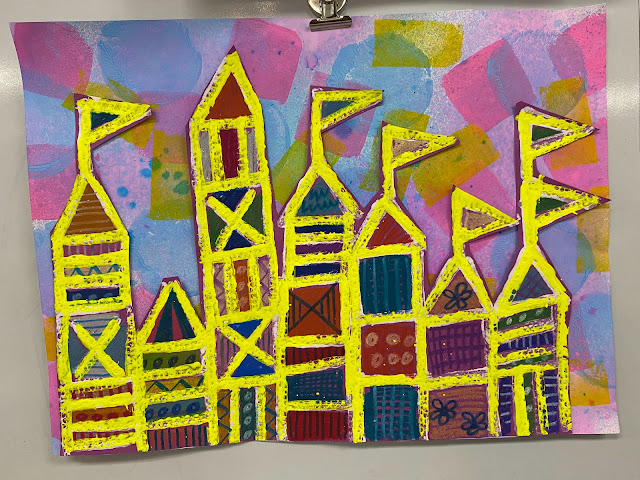
Our backgrounds will be our bleeding tissue paper. Since winter is coming, we are turning it into a winter wonderland with snow...and a little bit of sparkle on the frame. Oh...and PUFFY PAINT. Everyone's favorite!
photo signature_zpsd10b3273.png

Saturday, November 5, 2022

3 Fun Art Lessons to Show Gratitude

Over the years, I've done a handful of gratitude style projects that my students have not only enjoyed but really sparked joy around the school. I'm breaking these down from most involved to easiest incase you are uncertain which you'd like to do.

Let's start with my favorite: Gallery of Gratitude Modeling Clay Portraits!
For all the lesson details, you can visit my first blog post where I created a video I shared with my students. This introduced a modeling clay artist as well as walked them through the steps. 
I did this lesson with my fourth grade students. They could choose who to create a portrait of...but, as you can imagine, that got a little tricky. Several students volunteered to create a portrait of a teacher or staff member whom they didn't know well. We talked about how everyone in the school is important, their role in the school and how they make our school better. After the first two 30 minute art classes, we got about this far. 
You can see their completed portraits here, framed in a sparkly Hobby Lobby plate! Students also had to type up why they appreciated the staff member. This was printed on framed paper and hung with the clay piece. Many teachers still have these portraits in their classroom!
This Gallery of Gratitude was created by all of my students, kindergarten through fourth grade. My older students created the portraits while my kindergarten and first graders added the High Fives and the hearts. 
Here was the set up for my students to create their framed portraits. Teachers names were laid out as well as sparkly paper for the frame. 
Like the other project, students had to express their gratitude toward the chosen staff member. 
If you need a shorter lesson or one that is more student-focused, try this Tiny Gallery of Gratitude on for size! You can download it for free right here!
There is even a simplified version for younger students, also free, right here. Have fun!


photo signature_zpsd10b3273.png

Tuesday, November 1, 2022

Exploring with Shapes: Shape Centers in the Art Room

Hey there! Not too long ago I shared that I have been creating art-makin' centers or stations or whatever you wanna call them for my students. So far, we've made it through the Line Stations and have recently been using the papers there to create works of art. Now that we've wrapped up that (and the kids loved it so much I assumed it was a hit), we are ready to move on to shape! Here is a look at what my 2nd through 4th grade stations look like:
These stations are a little longer than the line making ones. So, for my 30 minute classes, students will get to MAYBE two stations before moving on. I'm keeping the format of them changing stations more open: if they are finished, they are to tidy their area, put away their artwork (with name on it, pretty please!) and move on to any station with an open seat. 

Just like the papers created with the Line Stations, these are just the starting point of our project. Each grade will create something different with their shape explorations. I've been sharing what my students created with their papers, you can check it out on my Instagram. Details to come, I promise!
In these centers, students will focus on geometric shapes. We will learn more about organic shapes soon. Cardboard printing expanded from line making to creating castles in this station. I can't wait for students to work on these later in class.

Students will explore cutting geometric shapes as well as printing them in this station.

Students learned about radial symmetry in this station. I had foam stars on hand...but may use different shapes with other grades. I'll keep ya posted! I'm excited how these turned out!


I have a ton of bleeding tissue paper shapes that we are creating a design with in this last station. I have plans for these...stay tuned!
Since my kindergarten and first graders are working on something else, I'm glad I have an empty table to pile everything on. It's...a lot to keep up with but the kids are having a blast and that's all that matters. 


photo signature_zpsd10b3273.png

Saturday, October 29, 2022

The Dot School-Wide Collaborative

Hello, friends! I'm excited to share that the school-wide collaborative my first through fourth grade students created at THE BEGINNING of the school year (yikes!) is finally installed. Like, finally.

Y'all, while I do love having all students creating a collab at the start of the school year, why do I do it to myself? It's so much work on my end! All the attaching to bulletin board paper and hanging...it's so much! AND I always procrastinate! And yet I do it year after year. Such a glutton for punishment, I guess.

Here's a look inside the process of hanging this beast with some of my tips:


When hanging something this heavy, it takes everything in your tool belt (as well as a helpful music teacherin' friend). Check out my tip on binder clips and long tabs of paper. It helps!


I've not done an official post on how we created these dot paintings but I'll tell you: it was super easy! In fact, it's one of my fave kindergarten lessons which you can find the details on here

All students began with a dot in the middle of their paper. The paper was prefolded so that each dot was exactly in the middle. Meaning I quarter folded the paper, once in half one way and then in half the other. Dot was placed at the intersection of those two folded lines. 

Like the kidnergarten lesson, each student was then instructed to paint concentric circles around their dot using any colors of tempera paint they liked!
Once dry, the paintings were cut along those folded lines. They were then rearranged and glued to a black piece of construction paper. This part was tricky so students helped one another. 

Early finishers painted the wording of the sign!
And then the beast was hung...where it shall stay for a LONG, LONG time. Or the end of the school year where I'll have the students cut it apart to take home their circles (maybe. Or I may leave it up until next year!). 


photo signature_zpsd10b3273.png

Wednesday, October 19, 2022

Creating Lines with Modeling Clay

I recently shared that I created line-making stations for all of my students. You can check out a video and blog post on that here. While I was out, I created this video and sheet as a sub plan for all grades. I've since decided to add it to my early finisher centers! Check out the video I created for the kids here:

And here's how I plan to use it as an earlier finisher center. The kids loved working with it while I was away so this should be a fun activity choice for them!


photo signature_zpsd10b3273.png

Saturday, October 1, 2022

Favorite Fall Lessons!

It's the time of year, my very favorite time of the year: fall! We are gearing up for some fun fall art makin' stations and I thought I'd share a bit about that as well as my favorite fall lessons. Many of these links include videos for you to share in your art room. Let's start with this one, a fourth grade favorite: Spooky Starry Nights!

Now I just mentioned art makin' stations which has become my new favorite thing of late! With 30 minute art classes, it's been a fun way for my students to really roll up their sleeves, move around the room and explore several different art makin' activities. You can find out how we did stations for Dot Day here and here and how we are doing it for learning the elements of art LINE here and here...all with videos for you to share in your art room and some videos that are just my tips and tricks for YOU! Here's a blog post about the stations I did on Halloween in my art room here.  I plan to do a week long stations this year so all of my classes can experience the fun. The above pumpkin prints is one I will be adding to the mix. I can't wait!

Monsters are always fun to do during this season and my students LOVE creating them! This lesson, with video, is one I know your students will love!

This one is fun for all ages especially if you want to introduce color mixing, painting, printing and collage. Another lesson with video right here!

Speaking of fall trees, check out this amazing weaving lesson! If you've never woven with your students, I recommend doing a short paper weaving first before diving into this activity. I would give this a go with fourth grade and up if students are new to weaving. Lesson and video here!
Speaking of weaving, my students love this weaving project! All the weaving details can be found in this blog post!

Wanna do printing with your students but don't want to deal with the mess? This leaf printing lesson with just markers and water is sure to be a hit! Here's more.

Speaking of printing...check out this Warhol-inspired sunflower print idea! You'll love it!

How about more monsters? Maybe even ones that glow under black light? All the details and videos can be found here!

Need more monsters? Look no further...than here!
Before Gelli-Plates and the like, we had to make our own sort of gelatin printing plate. 10 years ago, I posted this lesson and it's still one of the most visited on my blog. However, I no longer make the stinky gelatin (not to mention, it's not vegan friendly...I'm not a vegan, but I don't like using it) so you may want to try the same method but with the longer lasting plates. Here's the details.
Another super popular lesson that always yields amazing results is this one! I've done a variation of this type of lesson with students of all ages. More info here. 

Have fun, friends!


photo signature_zpsd10b3273.png

Sunday, September 25, 2022

Creating Line-Making Stations in the Art Room

Hi! I shared earlier this week that all of my students, kindergarten through fourth would be doing line-making stations for 2, 30 minute art classes as an introduction for some and a review for most. I created a short video to walk them through each station and you can check it out here to see what we were up to:

On my Instagram, I got some questions about where I got the line spinner and the other resources I used...I made them! And it was so easy, I thought I'd show you how I did it in case you are interested. So here's the how-to video:

I've already decided what each grade level will do with their collection of line-making papers and I'll share soon. In the meantime, I'm already thinking of ways to expand on this idea of stations. The kids are loving it and it really helps with the wiggles. We have the need to move and this helps. Although a balance of calm days will definitely be sprinkled into the mix! 
Because my students do stations in PE, this concept was something they easily understood. Honestly, the only thing holding me back on doing this sooner was...me! I'm not great with change but this year, I am excited to try all sorts of new things. It's helping me get outta of my burnout that I was experiencing since 2020.
I think that's one of the reasons I slowed down so much on blogging this last year: I just felt stale. I'm feeling excited now...and I think the kids are too.
Anyway, I just wanted to share how we created these centers in case you are interested. I hope you have a relaxing weekend!


photo signature_zpsd10b3273.png