Showing posts with label halloween. Show all posts

Thursday, October 26, 2017

Halloween Crafts: How to Make a Monster Head!

First of all, can I just tell you how SAD I am that next Tuesday is Halloween?! I still have two more Halloween DIY's in the queue to share with y'all! If you are looking for some spooky crafts this weekend, look no further...I've got you covered! I'll be sharing a dozen or more in this here blog post. I kinda went bananas with the Halloween crafts this year...but it truly is my most favorite thing ever. I'm gonna be super sad to pack all of this up next week. Tho, let's be honest, it will probably stay up a pinch beyond Halloween. I mean, there is Day of the Dead to consider, after all!

But, on with the craftin' of these Monster Mash Heads!
 Let's talk supplies:

* Styro Monster Heads. I picked mine up here last year after Halloween for next to nuthin. They still have them this year too! 

* Sta-Flo Liquid Starch. This stuff is my jam, y'all. I have used it for that super fabulous chalk project and for a MILLION Halloweenie crafts. I've been asked where to get it...I found it on the cheap here

* Cheesecloth. You can find this both at the craft stores and at the grocery. It's probably the cheapest online. 

* Acrylic Paint. Durable and leaves a shine...I love the stuff. Even the cheap stuff!
Now I did mention Halloween crafts...I thought I crafted hard for the spooky holidays last year. Well, this year, really went all out. Lemme share with y'all what I created:
Draculas! These dudes just might be my favorite.
Chatter teeth were super easy to create. 
No, wait. These dudes were def my favorite!
Although these eyeballs were definitely the most easy to crank out.
If you need a fun, fast and easy craft, check this one out!
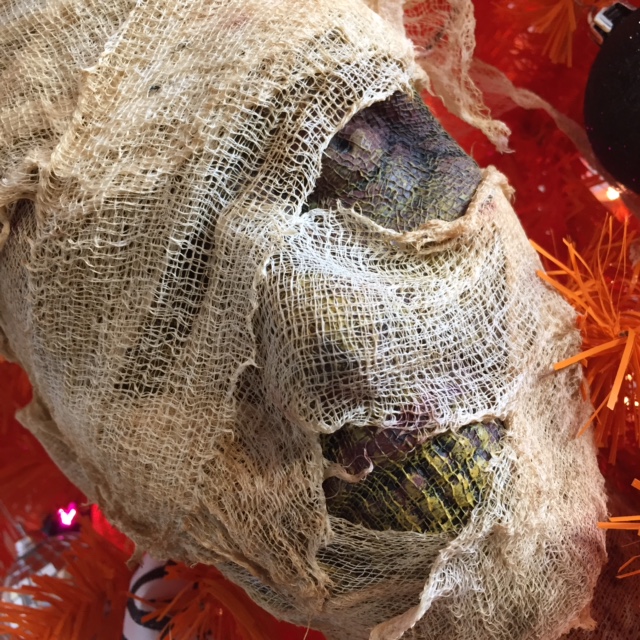
 Okay, the hubs takes total credit for how The Mummy came to be. I think the original intention of that styrofoam head is for it to be a zombie...but zombies weren't in my vintage movie line up. So hubs suggested wrapping him in strips of cheesecloth and YES! Look! He's so stinkin' spooky!
 Who's your dentist, bro? You might wanna ask for a refund.
 Frank is quite the looker, don't you think? Bride didn't know what she had, silly girl!
 Best part about having these in my tree was that I didn't have to hang them or do anything...just place them on the branches!
 I love using the cheesecloth because I love the effect I can get with the textured surface. Painting the entire thing black and then going over it with a dry brush is my new favorite thing on the planet. It's so freeing for an uptight and particular artist like me. 
Oh, what's that? You need more Halloween crafts? Here you go!
Check out my Top Ten Halloween Crafts from last year, right here! 

 photo signature_zpsd10b3273.png
Read more »

Tuesday, October 17, 2017

DIY: Halloween Crafts, Dracula!

News Flash! I have a Halloween Crafting Addition! 
Oh, wait, that's nothing new. Now, I vant to show you how to do dis super simple craft. But first I must count out the supplies...for that I'll need a little help.
Okay, not gonna lie: when I first started these Dracula's, I totally had The Count in mind...I knew I didn't want to portray them super realistically as the surface of the Celluclay doesn't really lend itself to painting easily. So, I decided to go the silly kind of cartoon route and The Count was what came to mind. BUT I suppose I'm getting head of myself. Let's count out the supplies for making this super easy blood-sucker!

1. Aluminum foil! I like the cheap precut sheets you can find at the Dollar Make You Hollar Tree.

2. Celluclay! Y'all know I love the stuff. You do have to mix it yourself...just don't ask me what the measurements are. I don't measure stuff because math is gross and makes my head hurt.

3. Rigid Wrap! I love this stuff and it adheres to the Celluclay without any glue.

4. Acrylic Paint! 

5. Extra: Black Sparkly Glitter! It makes everything better. 

Now, on with the show: 
Seriously, it's that easy! Don't forget to dry in front of a fan and rotate often. Otherwise, mold. And that's just nasty.
Now, when I started to paint the faces, I had no intention of going to mobster-town but, what can I say, they gave me an offer I couldn't refuse. Maybe it's because of my summertime bender of re-watching all the Godfather movies and Goodfellas...who knows? All I know is, when I started to paint, these faces appeared and I just went with it. Cuz, why not?
 I started by mixing up a light tint of purple and creating a large T shape for the forehead and the nose. Then I used black for the beady eyes and the eyebrows. From there, I painted a slash for the mouth and some fangs...
 Once the paint dried a pinch more, I went back and added more details: darker purple under the eyes and more highlights to the face. 
 I love it when art takes you to unexpected and unintended places! This is totally not what I had in mind and yet I totally dig it!
A little pinstripe for the paints and white for the socks and I was done. Oh and glitter because, duh, glitter. That fine black sparkle glitter is where it's at, man.
 I added the glitter with some glue and some sprinkling. I will officially be finding black glitter in my house for the rest of time. 
 There's a reason I keep that stuff far, far away in my art room. But at home, I'm all LET THE GLITTER FLY! 
 I'm sure the Godfather would approve. 
 So, up next for these guys, I'll be adding a hanger to the back and adding them to my Candy Corn Tree...where I can find the space. By the way, if you are looking for some Halloween Crafts, I'm uploading more all the time on my YouTube channel...I have a serious backlog of stuff for y'all! 
Until I get the rest of the goblins and ghouls uploaded on this here blog, I'll leave you with these lovelies. 
 Blood-suckingly handsome, don't you think?

 photo signature_zpsd10b3273.png
Read more »

Monday, October 9, 2017

Monster Mash Halloween Tree and a Giveaway!

Big GIVEAWAY and discount offered in this here blog post...keep reading for your chance to win!

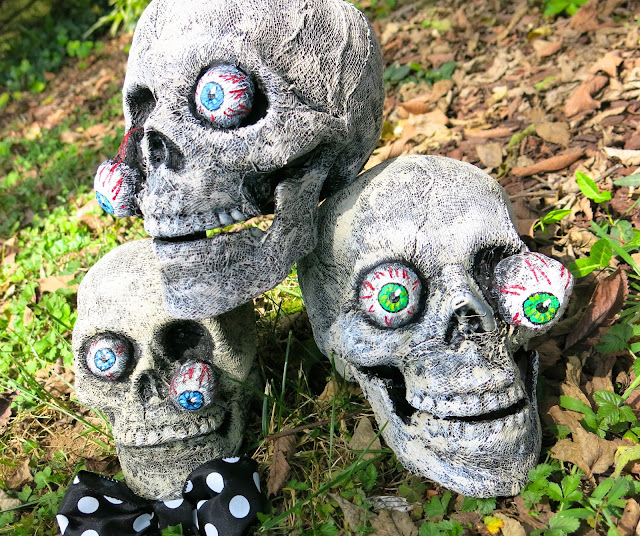
Hello, Goblins and Ghouls...I'm super stoked to share with you my Monster Mash Halloween Tree! I was recently given this amazing Candy Corn Tree from Treetopia and tasked with coming up with a theme to not only decorate it...but create the ornaments for the tree as well. For the creation of the decorations, I reached out to my friends at Activa Products for some of my favorite sculpting supplies. I'll be sharing one of my favorite creations here in this blog post, the Spooky Scary Skeletons! 

But first...my tree!
 I received my tree from Treetopia lightening fast. I was surprised when I unpacked it just how big, full and bright it is. I absolutely love this big ole candy corn tree. I will say, I was a little overwhelmed at first: how was I going to decorate this tree? It already looked fabulous enough as it was. Here's a peek at my unboxing of the beast:
Super easy to assemble and such a full tree! I love that I don't have bald spots in my tree.
Back to decorating...I was like, HOW?! But then I got to thinking: I've always loved the classic Universal Studios horror movies like Frankenstein, Dracula, Bride of Frank, The Mummy...you name it. With that in mind, when Monster Mash came on while I was playing Halloween music in my art room, I knew THAT had to be my theme. So, Monster Mash Halloween Tree it was!
Nothing says a dance party like some disco balls, amirite?!
Over the next couple of days, I'll be sharing with you a TON of Halloweenie How-to's as I show you how I created nearly every bit of spooky decoration on this tree. Today, I thought I'd share how I created these Eye-Popping Spooky Scary Skeletons! 
Here's your list of supplies:

* A plastic skull. I found mine at a local craft store...but right now, you can find a plastic skull just about everywhere. 

* Aluminum foil. I like the cheap stuff from the Dollar Tree because it comes in precut sheets that are the perfect size.

* Rigid Wrap Plaster Strips. I love plaster strips because they dry so fast! I used them in the making of the eyeballs.

* Cheesecloth. Check the cooking/baking section of your grocery store. 

* Liquid Starch. Sta-Flo is my go to. Mostly because I want that to be my rapper name. Sta-Flo Stephens.

* Acrylic Paint and Paint Brushes. 
Once you learn the magic of liquid starch and cheesecloth, you are gonna be like me and go crazy covering everything in it! You can see that's just what I did here to create ole Frank. 
Be sure and stay tuned right here and my YouTube channel as I share all of these Halloween DIYs with y'all!
 Like these silly chatter mouth teeth...
And more monsters from the mash like The Mummy...who I find to be the most frightening part of my tree. 
 Or maybe it's Dracula trying to bite through the caution tape! By the way, you can find out how to create these eye-popping ornaments here:
Lighting fast video of how to create these fun and funky eyeball ornaments. 
 I have always loved decorating for Halloween but this tree just took it to another spooktackular level. You can find my Top Ten Fall Crafts here for more ideas. 
 But now that I've shown you around my tree and shared a couple DIY's with you, let's talk about that give away, shall we?
Treetopia is allowing me to giveaway a $150 Gift Card to their online store! That's right, I'm super excited about this one...if you've not explored their site, then you must. They have so many trees to offer with my current favorite being the Candy Corn tree, obviously. However, next on my faves: THEIR RAINBOW TREE, what?! How perfect would that be in an art room, right?! 
 Here's how you can enter to win:

1. Comment. Leave a comment below and share your favorite horror movie of all time. More importantly: leave your FULL NAME and EMAIL ADDRESS as well. 

2. Follow. If you are on Instagram, follow me here and Treetopia here! If you are not on IG but on FB, then you can find me here and Treetopia there

That's it! I'll let all y'all know this Friday, October 13th who the lucky winner is!
 If you don't win...or if you just cannot wait to purchase something from Treetopia right now, they are offering a 15% off discount! Just use the coupon code: TTHWDIYQ17C. This offer is only good from today, October 9th through the 27th. 
What an exciting giveaway and discount, right?! I am itching to get myself another Halloween tree. That black and white stripe one is calling my name, y'all!
But I'm pretty sure the neighbors have enough to say about one Halloween tree...best not start adding more. 
 By the way, if you create any of your own skulls and eyeballs, please make sure to share with me be tagging me in your preferred social media outlet. I'd love to see what you create. 
Stay tuned for many more Halloween How-to's...my list of spooky DIY's grows daily. October just isn't long enough for me.
Or my eye-poppingly handsome friends. 
Too much? Eh, never! Let it all hang out, Gus!
I even have plans to make a variation on these guys...but we'll see if I have time this year to tackle that craft. 
Be sure to enter to win that giveaway, y'all, it's a good one! I'll let you know the winner this Friday!
 photo signature_zpsd10b3273.png
Read more »

Sunday, October 1, 2017

DIY: Eyeball Ornaments

They say the eyes have it, y'all. Well, I'm excited to say that not only do they have it but they have bows too. Yay! Balls and bows, my favorite! Wait, uhhhhh. Scratch that. Eyeball ornaments with bows are my favorite. That sounds MUCH better.
I created these Eyeball Ornaments for my Halloween tree (yes, it's a thing) that will be revealed right here on October 9th so mark your calendar in Candy Corn, witches, cuz it's a Candy Corn Tree! I was tasked by Treetopia to not only decorate said tree but come up with a theme. I've been sharing sneak peeks here but you'll have to wait until October 9th for the full reveal. Until then, I'll be sharing the DIY's I created for the tree.  Today, that means there here ornaments. Here's my wee how-to video:
Here's a wee list of the supplies I used:

* Foil. I hit up the Dollar Tree for this one. Did you know they sell a box of 30 sheets of foil for...you guested it...a dollar?! That place is my sanctuary. Don't judge.

* Rigid Wrap. Which is plaster wrap. You can find plaster wrap at craft stores but I really like Activa's Rigid Wrap. The stuff just seems a little thicker and more sturdy. You can find it here.

* Acrylic Paint. I'm a fan of the cheapo craft store stuff. Cuz I'm cheap and crafty. At least that's what the boys say.  
Before these cuties hit my tree, I displayed them for all to see. If you are curious where I scored my Halloween decor, I'll gladly spill the beans: Nancy Drew book collection was from a gullible neighbor kid I knew when growing up; EEK signs scored at 70% off at after-Halloween sales last fall; paintings by yours truly; beakers from the craft store and the rest was thrifted. 
 Oh! I forgot to mention, after the eyeballs were created, I thought they needed a little touch of cute and fun so I added the bows. I used ribbon found at the craft store. After shaping them in to bows, I simply hot glued them to the top.
 By the way, what is it with me and eyeballs? I mean, I have an eyeball dress and eyeball jewelry. Weird, much?
 About that Haunted Mansion painting...I've never blogged about it because I never finished the thing. And I don't know if I will. The spider webs are strategically placed to hide my unfinished'ish'ness. 
 I REALLLLLLY cannot wait to share my Halloween tree with y'all. Any guesses on the theme I went with? The big reveal will be next Monday, October 9th!
  On a different note, is it weird that I'm itching to paint the covers of the Nancy Drew books and hang them in my house? I want a whole wall. I am living for the paintings on the cover. I might have to do some painting over fall break...which is next week...not that I'm counting the MINUTES. 
 Oh! And not only have I been decorating my home but my art room as well. I'm excited to share what's new in that hot mess express, choo-choo!
 Until then, Jeepers, Creepers! Where'd you get them Peepers?! 

  photo signature_zpsd10b3273.png
Read more »