Showing posts with label how to sew. Show all posts

Sunday, August 10, 2014

What the Art Teacher Wore #109 and Welcome Back, Crazy!

Monday, Monday: Since I was painting my windows with a Mexican market theme, I thought I'd wear a colorful outfit for inspiration. Unfortunately that rogue tube of cerulean I mention in my last post managed to douse my legs, necklace and hair. Good think I was wearing my big ole plastic apron or the rest of me woulda been Smurf-a-fied as well. top: Banana Republic, garage sale; skirt: Anthropologie, found at Buffalo Exchange; sandals: Anthropologie, gift from a buddy
Welcome Back, y'all! 

If you're like me, a crazy art teacher, you just might be heading back to school this week or in the very near future. What better way to be welcomed then by my fave after-school rerun show to watch as a kid: Welcome Back, Kotter. Even though my students have been back since Wednesday, they've not come to art yet. Oh no, that starts tomorrow. Which explains why I'm still in my pj's working on lesson plans at 1pm on a Sunday. Ahem.

Oh, before I forget...Arsty Book Club friends! So as not to overload this here blog post, I thought I'd chat about this past week's readings of Teach like a Pirate to my In the Art Room post this week. It totes ties in because it's inspired just what will be going down in there this week. So read up and we'll chat soonish. 

Now, let's chat about the Apron Sew-Along (could we possibly have more going on here? Me thinks not)! I got my fabric orders in this week and I thought I'd share with you what I decided to stitch into an apron. I also couldn't help myself: I bought a buncha other prints to eventually be stitched into dresses or some MC Hammer pants or culottes. So stay tuned! 

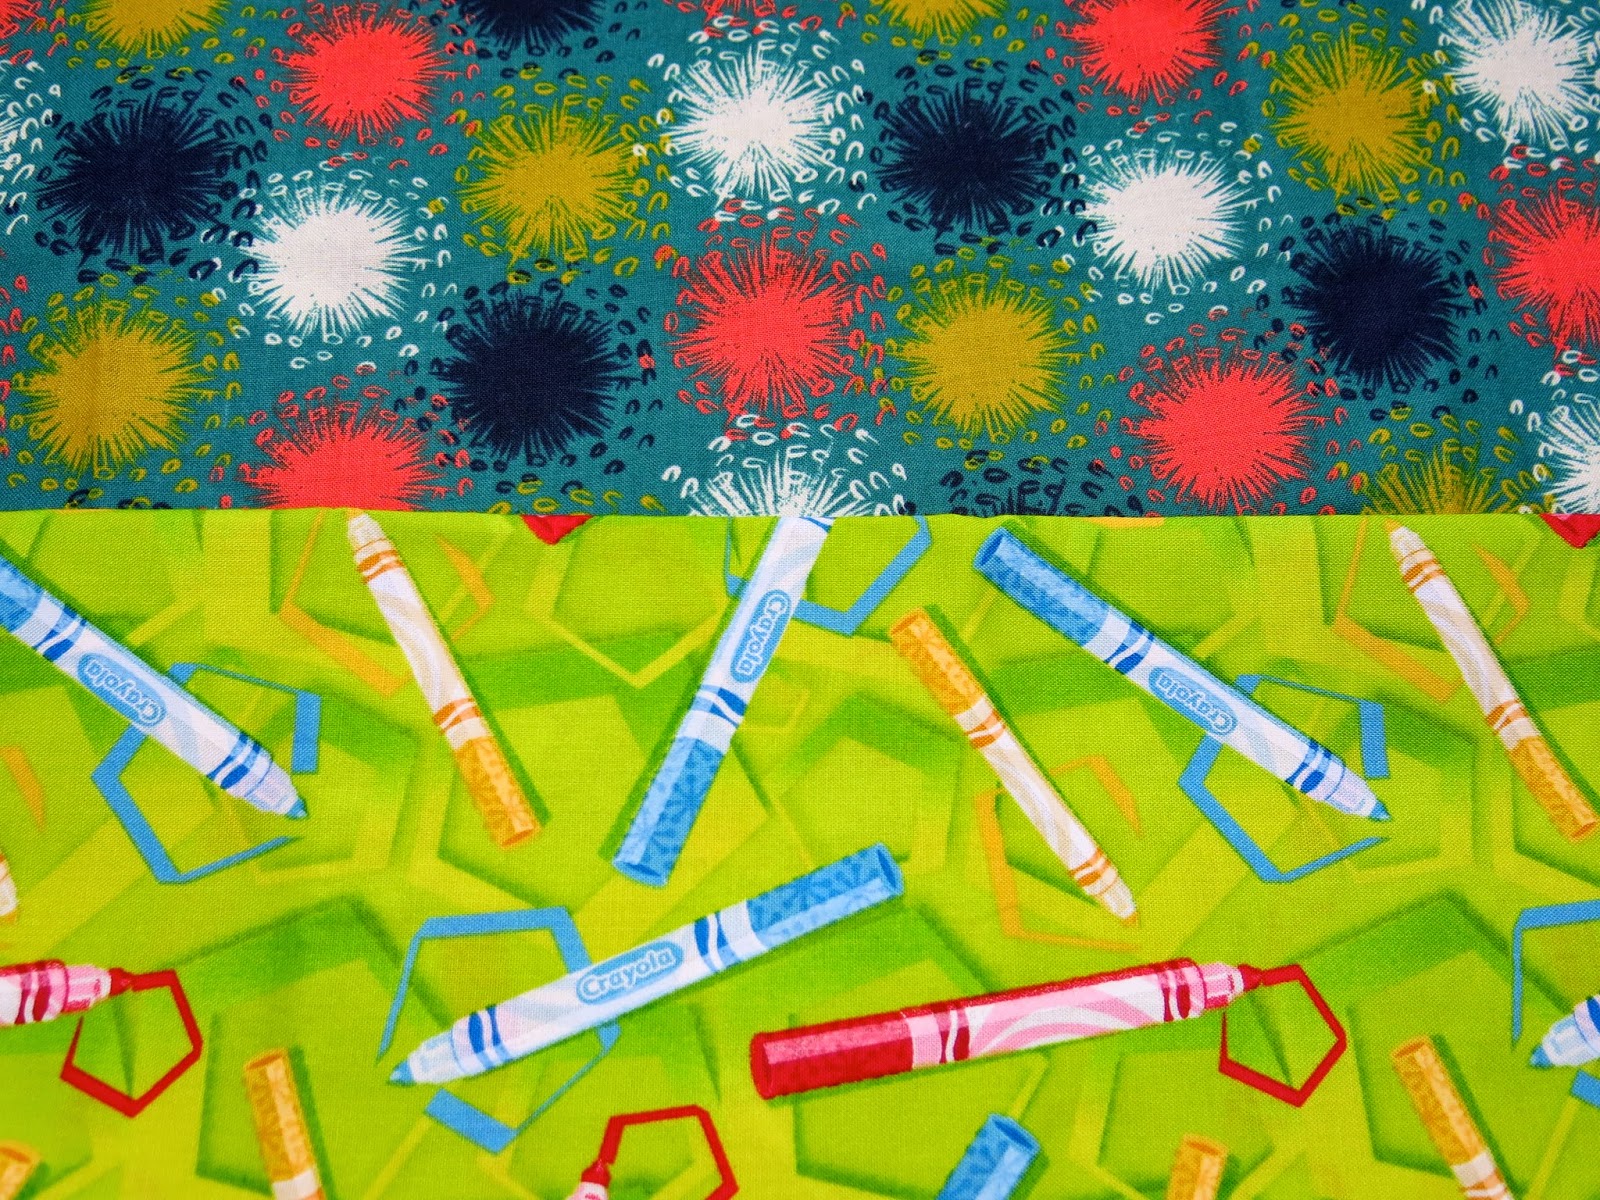
Okay, so here's what I got...
Really? Could one person be more excited about cat fabric? I don't think so.

Now, while we're still on the topic of our Apron Sew Along, please remember to prepare your fabric for stitching by washing your fabric first. The reason being is that this will remove all the sizing from your fabric (have you noticed that it feels a lil stiff? That's the sizing. It needs to be washed out before you sew). I use a delicate and cold setting on my machine. I dry as normal. You should probably wash separately (um, I never do but I'm totes lazy) just so the colors won't bleed onto the other fabrics. 

Okay, so here's a close up of what Ima be stitching with...
I know, riiiiight?! Cray-zay. But they both make me so extremely happy that I just couldn't not get them. I also think that the busy pattern will do a bang up job hiding stains. We'll see about that. Now I've gotta pick out accent fabrics (for the pocket, neck thingie and ties). For that I think I'll dip into my own stash. I'll keep ya posted. 
Totes Tuesday: I finished off my windows on this day. My super sweet custodian popped in to tell me how much he liked them...but then asked, "Don't you usually paint both sets of windows?" I told him I was just too worn out. He took a step back, scratched his chin and said, "Hm...I think I like last year's windows better." Gee, thanks! top: vintage, thrifted; skirt: old, Anthropologie; sandals: old, Target
Oh my gawd, my inner preteen just died of excitement. I cannot wait to stitch something insane with these sweet prints. I love how the framed cat at the top in the middle looks just like our Asha. Fat and furry, just how we like 'em.
Welcome, Wednesday! It was the kids very first day. It was a half day which was weird because 1. I didn't have kids in my room and 2. I was just as tired as if it were a full day and I did have kids in my room. What's up with that?! top: Forever 21; skirt: etsy; shoes with artsy shoe clips: deets here;  necklace: Paper Source
I kinda wanna stitch this into something right freaking now. I have so many sewing projects in the works that it is absolutely nuts. I have no business buying any more fabric...and yet...sigh. 
No Running with Scissors, You'll Lose an Eye! Thursday: At least that's what I told the kids when they asked, "why are you wearing a shirt with eyes and a skirt with scissors?" What I really wanted to tell 'em was "I've got my eye on you and if you misbehave you might get cut" but I just didn't think that was appropriate. Not with other teachers around anyway. eyeball shirt: Urban Outfitters; scissor skirt: Modcloth, super duper sale
Speaking of scissors, I love this sweet print on the left. I don't know if I love it with the pin fabric...but the theme is there, right? I'm still dreaming up what I want my kids to stitch up this year. I'd love any hand sewing/machine sewing project ideas if y'all have got any!
Finally Friday, I mean, Really!: I actually thought it was Friday all week long. That is not a good way to live your life as it only ends in disappointment. dress: DIY by me; belt and necklace: Anthropologie; shoes: Frye, TJMaxx
Speaking of having the kids sew, look at this! I made a lil mention of needing embroidery hoops for my 4th grade artists and a friend shipped a big ole box of these beauties my way! The kids are going to Freak the Funk Out. Yay! So much stitchin' goodness.


I do hope you guys have a super fun week! You especially, teacher friends! Just remember, if all else fails, just act like a crazy person and the kids will love ya. Welcome back!


Read more »

Tuesday, August 5, 2014

DIY: The "Uh, Are You an Art Teacher?" Ensemble

The other night I was meeting up with a group of non-art-teacher buddies (yes, I have those. Two, actually, thank ya vury much) for dinner. I was just coming from my first day back at school so I was in my normal art teacherin' garb. Paint palette in mah hair, pencil-y shoes, some sort of embarrassingly obvious art teacher dress...you know, the norm. When I wear this wacky tackiness, I honestly don't think twice about it. In fact, I often forget that I look rather ridiculous. My non-art-teacher buddies, however, never forget. 

NATB: When we go out, people seriously look at you funny.

Clueless Me: No they don't!  

NATB: Um, yes they do. It's like they are trying to decide, "Is this a crazy person? Does she realize there are crayons in her hair and she's out in public?!" And you don't even notice!
Okay, so I totally thought this was bogus until yesterday. I got it in my big fat art-teacherin head that I needed to create some miniature art supplies. I'd seen some amazing ones here (gah, y'all! This artist must have magical fairy fingers!) and was totes inspired. So I ran to the nearest big box craft shop and loaded up on Sculpey. When I got up to the register, I realized I didn't have my teacher ID for a discount. Then this went down:

Me: I'm sorry, I don't have my school ID. Can I please get a teacher discount?

Not-Looking-Up-From-Scanning-Countless-Sculpey-Blocks Check Out Chick: You have to be a teacher.

Me: I am a teacher, I promise! I just left my ID at school. 

Still-Preoccupied Check Out Chick: I'm sorry but I don't have any way of knowing if you're really a teacher. 

Me (remembering my convo with NATB): Look at me.

Check Out Chick, startled: Huh? Oh. Wow (taking in that number above). So, you're an art teacher, huh? Kay, I believe you!

And I actually think she gave me double the discount, y'all. As she should all crazy art teachers.
Thank goodness for that wee discount otherwise Ida never been able to make these mini-masterpieces. You know, cuz every approaching-middle-age lady needs a set of Art Supply Shoe Clips, amiright? More on those in a minute, for now, let's talk about that discount-gettin dress, shall we?
You might recognize this fab fabric from my Dreaded Art Supply Order post (which I will be posting a revision of. Y'all made SO MANY super duper suggestions that I've already rewritten my order!). I decided to pair it with some orange and red chevron fabric I thrifted years ago that were curtains in it's previous life.

As for a dress pattern, I settled on that 1970's number on the left. I totes loved the bodice (I fer realz have a thing for dresses with a midriff band. In case you've not noticed every-freakin-dress-I-stitch has a midriff band. Band? Belt? Thangie? You know what I mean). However, I wasn't loving the skirt options. Here's the deal, that mini is just a lil too mini. I don't believe in shaving above my knee caps so I pretty much look like an orangutan from there up. Just ask the hubs. Good thing he's into primates. As for the maxi, y'all, I can't do a maxi in the art room. Every time I squat in a maxi (um, that sounded bad. I mean squat down to pick something up off the ground, not like, to pee outside or something. I may look like an orangutan but I'm not an animal, geesh), I inevitably step on my hem, start to stand and fall over. It's quite classy. For that reason, I decided to go with my skirt standby, good ole Project Runway Simplicity 0320.

Now, let's address the big fat hairy elephant in the room...those 1970's bat wings...
Yeah, those. Y'all know I'm not really a lover of stitching sleeves but I was willing to forego my hate for these guys. I mean in the sketch they looked so hippie and cute! In fact when I wore this dress the other day, all my flower-power teacher buddies reminisced about the dress they had as teens with "wings". However, these guys should really come with some sorta warning label. The entire time I wore this dress, I could see those wings outta my peripheral view and kept swatting at 'em. Once I thought there was a bug on me, another time a bird and I swear I even saw a group of dancing bears. But that was after accidentally consuming some of that Sculpey clay (hazards of eating and crafting). So there's that.
I also have decided that absolutely no dress is complete without pockets. However, I really hate where the pocket are placed in this particular dress pattern. It's impossible to have your hands in your pockets and NOT look like you are piddling (scroll upward, y'all and tell me I'm lying). I opted to use some more of that chevron for pocket town.
Oh! Can we talk about that vintage pattern for a pinch? Cuz it was just about the weirdest pattern I've ever used. Tell me if you find this odd: it had me separately create the front and back of the dress...
And then stitch the front and back together at the side seams. Huh? I mean, I've always done it where you make your bodice and your skirt and attach those together. I actually kinda liked it this way as it made gathering the skirt portion a lot less taxing. I just found it kind of odd...have y'all every sewn a dress this way? What are some of the pros and cons cuz I'm thinking of going down this road again when it comes to other dress patterns.
Oh, look, crafting shrapnel. This is what you don't want your dinner table lookin like, FYI. Not unless you want Dancing-Bears-on-Shoulders hallucinations. 
To make these into shoe clips (and sweater, hair, nipple, whatever clips) I simply glued a little alligator clip on the back. I'm kinda addicted to making these right now (well, as of last night) but I'm in need of more mini-suggestions. Whatcha got for me?
And there you have it, kids! An ensemble that will most definitely get you stares and the occasional discount. Off to see if it'll work at the liquor store! 

Read more »

Wednesday, July 30, 2014

DIY: Let's Make Beautiful Aprons Together!

All fabric is from my fave online fabric retailer Fabric.com. They ship fast and have a huge variety. There are plenty of other sellers out there though so shop around, kids! You can find this one here
So last week I got the crazy idea that it might be fun if we, you and me, stitched up beautiful aprons together. Before better judgement set in, I threw this question out to the interwebs:

Have you guys ever heard of a Sew-Along? It's where a blogger presents a sewing project and, over the course of a coupla weeks, walks the reader through the sewing steps of a project. In the end, the sewers show off their creations on the blog. SoooOOOOoooo, I thought I'd see if anyone might be interested in sewing an apron with me. There's tons of fun fabric out there (this example was found after a quick search) and, being that it's an apron, little sewing experience would be required. I only wanna venture down this road if I've got some folks who'd be interested...whatcha think?

I was excited to hear from so many of you that are interested! So in this here post, I've put together some super fab fabric (y'all I spent entirely too much time trolling for fabric. I honestly think I could do it all day. Anyone need a Personal Fabric Shopper cuz I'm totes yer gal!) along with some apron pattern ideas. I hope you'll have as much fun shopping and dreaming up apron designs as I have. 

Now, let's talk details:

* During the week of August 18th, we'll kick off our Sew-Along! In that initial post, I'll post short video clips on preparing and cutting your fabric as well as taking our first couple of sewing steps. I'm going to approach this apron as if you are a beginner sewer so that everyone can feel included. However, you are not limited to what I sew. Advanced kids, take it and run!

* You'll Need Some Fabric! I'm still gazing at apron patterns for us but my personal plan is to use two contrasting fabrics. So, if I were you, I'd purchase about a yard of your main fabric (meaning the fabric that will cover the majority of your body) and about 1/2 yard of a contrasting or complimentary fabric. That 1/2 yardage could be used for a pocket, ties or a ruffly bottom (and who doesn't like a ruffly bottom, hmmmm?). In this post, you'll find a ton of fabric ideas. 

*And, the best part, Let's Share Our Creations! So I actually have big dreams for this idea. First, I'd love for us to share our works-in-progress as well as our finished aprons and what better place than Facebook? So I've created a page just for us! You can join here even if you don't plan to sew, it's fun to be inspired. I also WOULD LOVE for us to gather at the NAEA conference in New Orleans this year wearing our apron-tastic creations! Wouldn't that be fun? Like I said, big dreams. More on that later. For now, let's chat apron patterns!
Okay, lemme tell you my apron criteria as I do plan to wear this in the art room:

1. It must be super cute. Always a priority.
2. It must cover the majority of my bod. Which means ruffly half aprons are out. 
3. There must be big -n- deep pockets. They don't necessarily have to have a wiener dog on 'em or a pig grillin' up his family members (like, weird) but they do have to be functional. That's a must.
4. Speaking of wieners, there won't be a stabbed one in the middle of my apron. Geesh, is someone frustrated or what?!
After much thought, I've decided that we won't be using a purchased pattern. I don't want y'all to break the bank for this AND I want you to have plenty of money to spend on the fun part: The Fabric! So, I'll be working on a pattern template that will be easy for you to replicate at home. However, you are not limited to what I come up with! For some apron-spirtation, you might want to visit these links and come up with your own pattern!

Hostess Apron with Ruffles (this one is more cute than art room functional)
Simple Ruffled Apron (perfect, just needs pockets!)
Another Ruffled Number (again, pockets, people)
Retro Inspired Apron (ahh, so cute! But those ties...are they in a funny spot or is it just me?)

Now, let's chat fabrics!
Artsy! Here's some artsy fabrics to wear in your art room, art studio or just to lounge around and look super cute. Because it's what you do. Retro camera fabric here, pencils here
I MIGHT be madly in love with this fabric. 

That pencil fabric is actually the same design used in a pencil skirt that was sold at Anthropologie last year. I have some sitting in my sewing room waiting to be stitched into a dress. I love that scissor fabric, I think it would be cute as that 1/2 yard contrasting fabric I mentioned earlier. Check those rulers at the bottom so you understand the scale of the fabric.
Art Teacher Geek Chic: Marker fabric and art supplies
What's Cookin', Good Lookin?! I know not all y'all are art teachers out there but I'd still love it if you'd join the fun. So I thought I'd throw some other fabric options out for you. I personally LOVE this fabric as it reminds me of the food in Pee-wee's fridge on Pee-wee's Playhouse!
I actually have that fabric on the right...I had plans to make it into some sort of Labor Day/Grillin Out Dress...we'll see if I can get around to it!
If you type in words like "retro" or "vintage", you'll love what you find on this website! While on this site, check out Cloud9 Fabrics as they are all organically dyed and printed. 
Love these retro prints!
Garden Apron: I mean, I don't garden but I might with this fabric. You might recognize this, I used it to stitch up my Gnome-y Dress!
Something for the Boys: I love this comic book and Pop! fabric
Muscles with Cars, anyone? Okay, you caught me, here's the REAL reason I can't stop looking at fabric. It's just so...hawt. 
Alrightie, kids! If you're in, remember to "like" the Facebook page. Order your fab fabric when you can as we'll be starting the week of August 18th! I'd LOVE to see the fabric you pick so please share it on the Facebook page for apron-spiration. Chat soon!


Read more »

Wednesday, June 25, 2014

DIY: Rambo Meets Frida Kahlo Dress

 Hola, cats and kittens! Whatcha see here is one unibrowed lady that has finished her Rambo dress! What in tarnation is a Rambo dress, you ask? (FYI, no one says "tarnation" anymore, you might wanna update your vocab. You sound like Yosemite Sam and not in a good way.) Well, lemme tell ya. It all started a lil while back when SeamstressErin asked me, ME, if I'd like to participate in a sew-a-long. 

Ya'll. In case you didn't know this, sew-a-longs are for people who can actually sew. But I digress.
 According to Erin, she'd managed to get her kitten mittens on all of the turbans worn in the movie Rambo III. You can see 'em on the dudes below. Look, turban-ie!
 Her idea? To send a buncha bloggers a turban and see just what they would stitch up. It's been super fun (and totes intimidating!) to see what those sewers created. I've added a linky-loo to each at the bottom of this post so you can see for yo'self.
 When my turban arrived in the mail, it was magical. KIDS, this turban has been in the presence of Sylvester Stallone. He probably, like, looked at it! He mighta even, I dunno, stood near the dude wearing it. In fact, I'm willing to say he was all, "Man, that is a super sweet turban. The best outta all of them. Can I just, you know, wipe my brow on it?" 

AH! My turban has sweet Stallone sweat all over it! That would explain the smell. Actually, it smelled like camels when I ironed it. Which could only mean one thing: When Stallone sweats, he sweats camels, ya'll. Like a boss.
Now, as some of ya'll know, I love to create clothing inspired by either works of art or the artist themselves (check out my Campbell's Soup Can Dress, The Great Wave Frock, my light up Starry Night Dress,  The Scream Dress, a Jackson Pollock-y Number and my tribute to the surrealist Rene Magritte). So when I started thinking of ideas for this dress, I happened to be working on that stenciled and embroidered piece below. It totally reminded me of the artist Frida Kahlo (who has been in my mind a lot thanks to Natalie Friedl!). When I happened to lay the embroidery on top of the turban I was all "EUREKA! I love them together!" and my Rambo meets Frida Kahlo dress was born (still workin' name: Fr-rambo Frock? Frida Kahlo-ambo? It's a work in progress). 

By the way, don't you love how it looks like Frida is givin' ole Sly the side-eye. She's all, "Ummm-hmmm. I bet he sweats camels."
Oh, Frida, you so crazy.


Since this turban was based on Rambo the third, I decided to use three patterns. Actually, that's a lie. I decided to use three patterns because I'm an idiot. But I really liked the bodice of Simplicity 0320, the midriff of Simplicity 8087 and the flounce -n- skirt of Butterick 5880. Now, some of you know how deep my hatred of Butterick runs. Deep. It was about this time last summer that we battled it out during the making of this dress. Once again, like last time, I relied heavily on my pretend BFF Professor Pincushion. For any of you sewers out there that don't have a clue (like myself), this lady's youtube tutorials are a sewing-lifesaver. 
Putting this number together was not without it's share of seam ripping and swearing. Can you really do one without the other? First of all, getting that bodice and midriff of two different patterns to play nice wasn't easy. And, let's chat about the elephant in the room, shall we? The stripes on the flounce. ARGH! They no matchy! Some of the stripes lined up but others didn't. That's because they were on opposite ends of the scarf and apparently weren't woven exactly the same. So the flounce has a few flubs. Whatcha gonna do.


 A lil side and back view. For the back midriff band, I used some minty green cotton that was just a touch lighter than the embroidered piece on the front. One of the reasons I always return to that vintage Simplicity pattern is I love that stinkin' band. Not only is it flattering (says me) but it also allows me to play with more fabric patterns an color. 
Outfit details: Well, you know I made the dress...I also created those floral hair clips for the occasion by hot gluing some fake flowers to some hair clips; hand painted necklace: DIY here; bangles: gifts/thrifted; wedge sandals with fabric design: DIY here

Now, let us talk about the wonderment that is the Frida Kahlo, shall we? I've always admired Frida's surrealist artwork for it's honesty. This woman's life was a tough one and each one of her paintings exposes so much raw anguish that it's impossible not to feel her pain. Do ya'll know her story? It goes like this: When Frida was 6 years old, she had polio so her right leg was shorter than the other. For ease of walking, she would wear several pairs of socks at at time. As a child, in order to hid this, she took to wearing long skirts.
 When she was 18, she was riding a bus that was in an accident. One of the metal handrails went completely through her body, leaving her nearly dead. She had over 22 surgeries due to this accident. In the end, those surgeries resulted in the amputation of her leg. For the rest of her life, she wore a series of plaster and leather corsets to help her sustain her body. It was during that first bedridden year after the accident, that Frida took to painting (sometimes on those plaster corsets) and an artist was born. 
 "I am not sick. I am broken.

But I am happy as long as I can paint."

I've always loved Frida's sense of style. But it turns out that there was much more to her look that I ever imagined. You see, in the 1930s- 40s, fashion in Mexico was very European. However, there was a national pride movement that both Frida and her super famous hubs Diego Rivera were apart of. To showcase that pride, Frida started to dress in a style called Tehuana after it's place of origin. In this culture, a women's ensemble had three key parts: a headdress (Frida adopted the flowers), a short square and ornately designed blouse (this easily hid Frida's corset), piles of jewelry and a long flowing skirt (which also hid her prosthetic leg). Her signature look, which hid her imperfections, remains stylish today.


 Oh! I forgot to point out, I used some of my scraps to make a Rambo-esque floral headband. 
 And there you have it! A dress that was once a sweaty turban now lives a new life as a Frida Kahlo-inspired frock!
 A very special thank you to Erin for inviting me to participate in this Rambo Sew-a-long! I had so much fun and was truly challenged by the task (but really, when am I NOT sewing-challenged). Now, follow these links to check out more Turban-tasticness!


Read more »