So, just a side note: I'm SUPER DUPER annoyed today. The last half dozen videos I've shared on my YouTube channel, including the one below, have been flagged as "inappropriate". I'm talking my teaching videos, my art room decor videos, everything. As soon as I post ANYTHING, it's getting flagged and removed from view. I feel MISERABLE about this...and won't be sharing any videos until this gets resolved. It's a waste of my time to post something simply to have it removed. It's obvious it is someone who is a subscriber and just simply removing my videos to be a butthead. Guess what? You've succeeded at being an EPIC butthead. Congratu-butthead-lations. On to my completely inappropriate video! Brace yourselves, it totally deserves to be blocked (ha!):
Having found this little cottage at the thrift, I immediately knew I wanted to haunted house-ify it. The beauty of Celluclay is that you can transform just about anything super easily. I've actually got a slight collection of randoms that I've been gathering from the thrift to transform. For that reason, I'm no longer permitting myself to go into the thrift store for a bit #hoardermuch.
In the video, you'll see that the house began as simple as a wooden box. Not much of a haunt. I decoded to spook-ify it by adding turrets, a porch, columns and windows a plenty.
Having Celluclay'ed the daylights outta the thing, I did have to dry it in front of a fan for a day. Even still, I did notice that the areas which didn't dry completely started to mold. No bueno. But when I painted over the entire surface with black acrylic, that seems to solve the mold problem.
Dry brush is my fave way to paint. I love the antiqued look it adds to my creations.
Just a view from the side...and the back. I really wanted to find one of those flickering light bulbs but, alas, I could not. So a wee bulb with some red paint applied would have to do.
I really wanted to add wee lines for the wooden boards on the house, shingles to the roof and that sort of thing...but since Halloween is TODAY and I was painting this LAST NIGHT, I just ran outta time. Next year! Maybe. Okay, probably not, who am I even kidding.
Y'all don't even know how sad I am that I have to take all of this fun stuff down. My only comfort is that I get to replace it with CHRISTMAS!
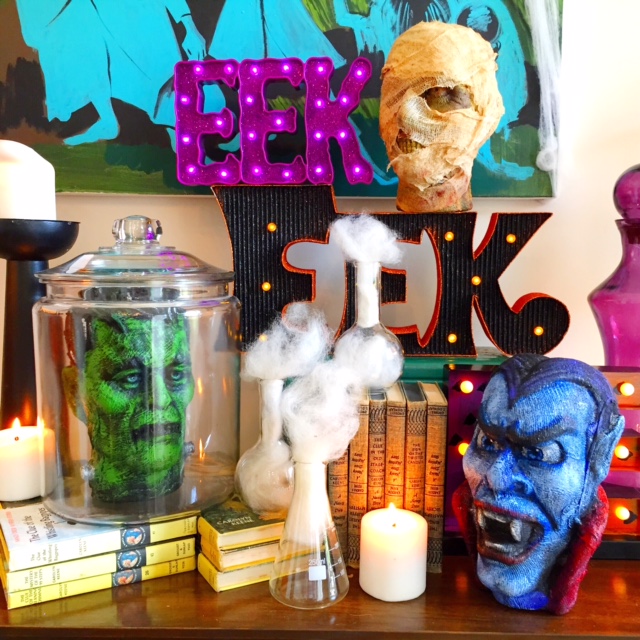
First of all, can I just tell you how SAD I am that next Tuesday is Halloween?! I still have two more Halloween DIY's in the queue to share with y'all! If you are looking for some spooky crafts this weekend, look no further...I've got you covered! I'll be sharing a dozen or more in this here blog post. I kinda went bananas with the Halloween crafts this year...but it truly is my most favorite thing ever. I'm gonna be super sad to pack all of this up next week. Tho, let's be honest, it will probably stay up a pinch beyond Halloween. I mean, there is Day of the Dead to consider, after all!
But, on with the craftin' of these Monster Mash Heads!
Let's talk supplies: * Styro Monster Heads. I picked mine up here last year after Halloween for next to nuthin. They still have them this year too!
* Sta-Flo Liquid Starch. This stuff is my jam, y'all. I have used it for that super fabulous chalk project and for a MILLION Halloweenie crafts. I've been asked where to get it...I found it on the cheap here. * Cheesecloth. You can find this both at the craft stores and at the grocery. It's probably the cheapest online. * Acrylic Paint. Durable and leaves a shine...I love the stuff. Even the cheap stuff!
Now I did mention Halloween crafts...I thought I crafted hard for the spooky holidays last year. Well, this year, really went all out. Lemme share with y'all what I created:
Although these eyeballs were definitely the most easy to crank out.
If you need a fun, fast and easy craft, check this one out!
Okay, the hubs takes total credit for how The Mummy came to be. I think the original intention of that styrofoam head is for it to be a zombie...but zombies weren't in my vintage movie line up. So hubs suggested wrapping him in strips of cheesecloth and YES! Look! He's so stinkin' spooky!
Who's your dentist, bro? You might wanna ask for a refund.
Frank is quite the looker, don't you think? Bride didn't know what she had, silly girl!
Best part about having these in my tree was that I didn't have to hang them or do anything...just place them on the branches!
I love using the cheesecloth because I love the effect I can get with the textured surface. Painting the entire thing black and then going over it with a dry brush is my new favorite thing on the planet. It's so freeing for an uptight and particular artist like me.
Oh, what's that? You need more Halloween crafts? Here you go!
Check out my Top Ten Halloween Crafts from last year, right here!
Oh, wait, that's nothing new. Now, I vant to show you how to do dis super simple craft. But first I must count out the supplies...for that I'll need a little help.
Okay, not gonna lie: when I first started these Dracula's, I totally had The Count in mind...I knew I didn't want to portray them super realistically as the surface of the Celluclay doesn't really lend itself to painting easily. So, I decided to go the silly kind of cartoon route and The Count was what came to mind. BUT I suppose I'm getting head of myself. Let's count out the supplies for making this super easy blood-sucker! 1. Aluminum foil! I like the cheap precut sheets you can find at the Dollar Make You Hollar Tree. 2. Celluclay! Y'all know I love the stuff. You do have to mix it yourself...just don't ask me what the measurements are. I don't measure stuff because math is gross and makes my head hurt. 3. Rigid Wrap! I love this stuff and it adheres to the Celluclay without any glue. 4. Acrylic Paint! 5. Extra: Black Sparkly Glitter! It makes everything better. Now, on with the show:
Seriously, it's that easy! Don't forget to dry in front of a fan and rotate often. Otherwise, mold. And that's just nasty.
Now, when I started to paint the faces, I had no intention of going to mobster-town but, what can I say, they gave me an offer I couldn't refuse. Maybe it's because of my summertime bender of re-watching all the Godfather movies and Goodfellas...who knows? All I know is, when I started to paint, these faces appeared and I just went with it. Cuz, why not?
I started by mixing up a light tint of purple and creating a large T shape for the forehead and the nose. Then I used black for the beady eyes and the eyebrows. From there, I painted a slash for the mouth and some fangs...
Once the paint dried a pinch more, I went back and added more details: darker purple under the eyes and more highlights to the face.
I love it when art takes you to unexpected and unintended places! This is totally not what I had in mind and yet I totally dig it!
A little pinstripe for the paints and white for the socks and I was done. Oh and glitter because, duh, glitter. That fine black sparkle glitter is where it's at, man.
I added the glitter with some glue and some sprinkling. I will officially be finding black glitter in my house for the rest of time.
There's a reason I keep that stuff far, far away in my art room. But at home, I'm all LET THE GLITTER FLY!
I'm sure the Godfather would approve.
So, up next for these guys, I'll be adding a hanger to the back and adding them to my Candy Corn Tree...where I can find the space. By the way, if you are looking for some Halloween Crafts, I'm uploading more all the time on my YouTube channel...I have a serious backlog of stuff for y'all!
Until I get the rest of the goblins and ghouls uploaded on this here blog, I'll leave you with these lovelies.
A couple of weeks ago, I spent a weekend elbows deep in clay and Halloween crafterin' and, I'm not even gonna lie, I.Was.In.Heaven. Seriously. In fact, just tonight, I asked el hubs-tastic if there he thought there was a book publisher out there who might be interested in a new edition of Encyclopedia Britannica of Halloween Crafter'ness cuz I just might be the gal for the gig. Case in point: these Halloween Chatter Teeth!
I created these bad boys after settling on the theme for my Candy Corn Tree: Monster Mash (BTW, have you entered to win a $150 shopping spree yet? If not, what in the world is wrong with you, get yourself here, right meow!) Don't ask me what this has to do with traditional monsters...other than the iconic Rocky Horror Picture Show image. I mean, that qualifies as a classic, right?
In all honesty, the idea came to me from my sketchbook. A year ago, I filled my sketchbook with Halloween-themed ideas and these chatter teeth were one of them. After a pinch of troubleshooting, I discovered that these silly teeth were super easy to make. So much so, I created a video just for you! Here you go:
To create these bad boys, rustle up the following:
* Aluminum Foil I like the stuff in the precut sheets cuz I'm too lazy to cut. Hit up the Dollar Tree for the Aluminum Foil for Lazy People. Yes, that's the actual name.
* Rigid Wrap Plaster Strips I like the stuff from Activa Products which you can find here. By the way, full disclosure and such, I often work with Activa Products. But I do truly love their products. Case in point...
* Celluclay I don't care what you say, Celluclay is my JAM, boy! I love the stuff, it makes my world go 'round.
Now, if you've never worked with plaster strips, lemme just say, it is a gift sent from heaven above. It dries so quickly! It has the strength of ten horses! It's quite possibly the best thing ever!
But I say "quite possibly the best thing ever" with a grain of salt. Because, in all honesty, Celluclay is the best. I'm telling you, get you some, I'll make you a believer. I will say that the stuff does take FOREVER to dry so, for the love, put your creations in front of a fan and rotate, rotate, rotate. As mold loves to grow if you do not. At least in the humid mold-growin' breeding grounds of middle Tennessee.
AND once dry, paint with acrylic.
And display where big mouths and loud mouths hang.
Out of laziness, I did not cover the chatter teeth with a clear varnish. The acrylic had enough shine to give these guys the sheen they needed.
Once complete, these chatter boxes can be displayed just about anywhere! In the living room...
In your Candy Corn Halloween Tree...
Next to a decapitated head of Dracula...I mean, really, the choice is yours.
Wherever you decide to do, just don't for get to enter to win THIS GIVEAWAY, for the love of all things chatter teeth-y and holy. Okay?!
Big GIVEAWAY and discount offered in this here blog post...keep reading for your chance to win! Hello, Goblins and Ghouls...I'm super stoked to share with you my Monster Mash Halloween Tree! I was recently given this amazing Candy Corn Tree from Treetopia and tasked with coming up with a theme to not only decorate it...but create the ornaments for the tree as well. For the creation of the decorations, I reached out to my friends at Activa Products for some of my favorite sculpting supplies. I'll be sharing one of my favorite creations here in this blog post, the Spooky Scary Skeletons! But first...my tree!
I received my tree from Treetopia lightening fast. I was surprised when I unpacked it just how big, full and bright it is. I absolutely love this big ole candy corn tree. I will say, I was a little overwhelmed at first: how was I going to decorate this tree? It already looked fabulous enough as it was. Here's a peek at my unboxing of the beast:
Super easy to assemble and such a full tree! I love that I don't have bald spots in my tree.
Back to decorating...I was like, HOW?! But then I got to thinking: I've always loved the classic Universal Studios horror movies like Frankenstein, Dracula, Bride of Frank, The Mummy...you name it. With that in mind, when Monster Mash came on while I was playing Halloween music in my art room, I knew THAT had to be my theme. So, Monster Mash Halloween Tree it was!
Nothing says a dance party like some disco balls, amirite?!
Over the next couple of days, I'll be sharing with you a TON of Halloweenie How-to's as I show you how I created nearly every bit of spooky decoration on this tree. Today, I thought I'd share how I created these Eye-Popping Spooky Scary Skeletons!
Here's your list of supplies: * A plastic skull. I found mine at a local craft store...but right now, you can find a plastic skull just about everywhere. * Aluminum foil. I like the cheap stuff from the Dollar Tree because it comes in precut sheets that are the perfect size. * Rigid Wrap Plaster Strips. I love plaster strips because they dry so fast! I used them in the making of the eyeballs. * Cheesecloth. Check the cooking/baking section of your grocery store. * Liquid Starch. Sta-Flo is my go to. Mostly because I want that to be my rapper name. Sta-Flo Stephens. * Acrylic Paint and Paint Brushes.
Once you learn the magic of liquid starch and cheesecloth, you are gonna be like me and go crazy covering everything in it! You can see that's just what I did here to create ole Frank.
Be sure and stay tuned right here and my YouTube channel as I share all of these Halloween DIYs with y'all!
Like these silly chatter mouth teeth...
And more monsters from the mash like The Mummy...who I find to be the most frightening part of my tree.
Or maybe it's Dracula trying to bite through the caution tape! By the way, you can find out how to create these eye-popping ornaments here:
I have always loved decorating for Halloween but this tree just took it to another spooktackular level. You can find my Top Ten Fall Crafts here for more ideas.
But now that I've shown you around my tree and shared a couple DIY's with you, let's talk about that give away, shall we?
Treetopia is allowing me to giveaway a $150 Gift Card to their online store! That's right, I'm super excited about this one...if you've not explored their site, then you must. They have so many trees to offer with my current favorite being the Candy Corn tree, obviously. However, next on my faves: THEIR RAINBOW TREE, what?! How perfect would that be in an art room, right?!
Here's how you can enter to win: 1. Comment. Leave a comment below and share your favorite horror movie of all time. More importantly: leave your FULL NAME and EMAIL ADDRESS as well. 2. Follow. If you are on Instagram, follow me here and Treetopia here! If you are not on IG but on FB, then you can find me here and Treetopia there. That's it! I'll let all y'all know this Friday, October 13th who the lucky winner is!
If you don't win...or if you just cannot wait to purchase something from Treetopia right now, they are offering a 15% off discount! Just use the coupon code: TTHWDIYQ17C. This offer is only good from today, October 9th through the 27th.
What an exciting giveaway and discount, right?! I am itching to get myself another Halloween tree. That black and white stripe one is calling my name, y'all!
But I'm pretty sure the neighbors have enough to say about one Halloween tree...best not start adding more.
By the way, if you create any of your own skulls and eyeballs, please make sure to share with me be tagging me in your preferred social media outlet. I'd love to see what you create.
Stay tuned for many more Halloween How-to's...my list of spooky DIY's grows daily. October just isn't long enough for me.
Or my eye-poppingly handsome friends.
Too much? Eh, never! Let it all hang out, Gus!
I even have plans to make a variation on these guys...but we'll see if I have time this year to tackle that craft.
Be sure to enter to win that giveaway, y'all, it's a good one! I'll let you know the winner this Friday!