Showing posts with label art teacher. Show all posts

Wednesday, August 1, 2012

Summer Adventure: NYC in 48 Hours

How does one manage to get their photo taken when traveling solo? Why, you kindly offer to snap photos of families...and immediately afterwords, shove your camera into their hands with an "okay, now you do me!"  Works every time.
 This here extremely photo-heavy post is brought to you by a 48 hour trip to New York City. Hubs often goes there for work and this time, after just a wee bit of nagging (and by "wee bit" I mean only minor kicking and screaming), I was able to tag along. The only catch? As soon as the plane landed on Monday morning at Laguardia, I was on my own. Me. The person so directionally challenged, I still have to hold my hands up to see which makes an L for left. Which got strange looks on the subway. Even from the lady talking to herself. 

Despite all of that, I managed to take to the streets of NYC and pack in as much as possible. I thought I'd share with you some of the must-do high-lights of my super-short trip. And if I managed to miss something, please let me know. I'm sure I can manage to muster up another fall-out-fit the next time hubs needs to take a trip.
I've been to NYC many times and never walked the Brooklyn Bridge. It's amazing! Although getting there proved to be quite the feat. From the airport, I had to take a bus into the city to get onto the subway. Then I took the subway back out of the city to get to the Brooklyn side of the bridge. It was definitely an adventure and I loved every minute.
After arriving in Brooklyn, I made the Must-Do rounds: Jacques Torres Chocolate for the most amazing peanut butter and chocolate cookie, Front Street Pizza for a slice and a cone of the chocolate chunk chocolate ice cream at Brooklyn Ice Cream Factory.
Stuffed to the gills, I walked the bridge. Do you know anything about the tragic history of this bridge? It goes a little something like this: It's creator, John Augustus Roebling, managed to crush his foot before construction of the bridge even started. The amputation of his foot lead to tetanus infection that caused his death. His son, Washington, took charge of the bridge but later suffered from the bends which left him bedridden. Under his guidance, his wife Emily took over the completion of the bridge. Not long after the opening, a rumor was spread that the bridge was going to collapse. This caused a stampede at which 12 people were crushed.
The NYC skyline from the bridge. Lady Liberty was off to the left, just a tiny patina green speck in the water.
Just a peak at the Manhattan Bridge that runs parallel to the Brooklyn.
Once off the bridge, I left the Tribeca area (Museum of Finance? Um, no thank you) and took the subway to one of my favorite areas: Nolita. You've heard of Soho? That means South of Houston Street. And Noho? You guessed it, North. Nolita is in between Little Italy and Noho. It also happened to be where they were filming...wait for it...PROJECT RUNWAY!
Purl Soho, how I love thee. I have been a huge online fan of this shop forever...so to finally venture inside was wonderful. But the best part? Walking out side and seeing TIM GUNN! That's right! All done up in a sharp navy suit with his silver hair gelled back. And just when I was recovering from that, I see ANNIE LEIBOVITZ. Yes, I'm shouting. Because that's what you do when you see genius like that walking the streets. I managed to get THE BEST PHOTO EVER of the back of her head. Yeah, picking my jaw up off of the ground proved to take a mighty long time.
I did my shopping rounds in Soho: Madewell, Topshop, the vintage shop Screaming Mimi's, and my fave shoe store John Fluevog. After all of that shopping, I met up with hubs and some of our favorite New Yorkers (thank you Al, Laureen and Vito!) for an amazing dinner at Becco on Restaurant Row. The food was incredible but I dare say the company was even better.
The next day, I had hubs to accompany me so no more harassing strangers for photos. Our hotel was in Chelsea so we decided to walk something called The High Line.
The High Line was created back in 1999 from an old freight track. Instead of tearing the track down, the city decided to create it into this amazing walkway. It rises above Chelsea and the Meat Packing District. Planted along the line are wild flowers.
A view of a mural from the line.
Near the end of the line is The Chelsea Market. Housed inside of the old Nabisco factory, this place is filled with the yummiest of delights and...an Anthropologie. Which seemed a little out of place...but I was sucked into it's evil vortex and came out with a shopping bag nonetheless.
I took that Big Apple and made it my, ahem, new friend in 48 hours, yo!
Hubs and I on the High Line. Where we managed to find a stranger to take our photo. This time, we didn't have to play any mind games, this kind local offered to snap this herself.
 Thanks for putting up with my endless photos and blabbering commentary. Enjoy your week!


Read more »

Tuesday, June 19, 2012

DIY: A Traveling Companion

Jes getting ready to board the plane to Europe.
 Well, in case you didn't already think that I was the most geeked-out art teacher there ever was, I went and did this. I created a stuffed version of our school mascot to take on our trip to Germany and the Netherlands. Oh yes, I did. And I'm so excited about it.

Each year, I come up with a theme of study in the art room. Last year, we studied all things Egyptian-y. You can see the end result of that here, here and here. Because of this trip to Europe (I have the good fortune of tagging along with hubs who is going for work), I thought I would take the kids on a trip European adventure with our school mascot, Jes the tiger, as their guide.
 Never having created a stuffed animal before, I went at it kind of haphazardly. In case you are dying to create your own stuffed school mascot, you'll need the following:
  • two pieces of felt for the body
  • buttons for the eyes and nose
  • stuffing
  • a sewing machine
  • embroidery floss and needle
  • extra felt for parts of body 
  1. I began by sketching out the tiger. After I was pleased with the shape of the body, I pinned my drawing to my two pieces of felt and cut it out.
  2. The same process was used for creating the face and muzzle. I drew it out, pinned my drawing to the felt and cut. 
  3. From there, I pinned the face to the body and lightly drew in pencil the parts of the face.
 4. All sewing machines have a zigzag stitch. If you set the zigzag so that the stitches are close together, you get this applique stitch. This is what I used to attach the face to the felt as well as stitch the line for the muzzle, the mouth and attach the white fur on the tummy.
5. For the eyes and the mouth, I sewed some buttons on by hand.
6. The eyelashes, the whiskers and my tiger's name, Jes, were all embroidered by hand.
 7. For the last step, I layered stuffing between the two pieces of felt and, using the same applique stitch, stuffed my stuffy tiger.
Yes, I also created a passport. I told you: Geeked-Out Art Teacher.
 So, why in the world did I do this? Well, the plan is to take photos of Jes (that is the name I christened the tiger as it's the initials of my school) in Germany and the Netherlands to share with the kids. By viewing photos of Jes' explorations, I'm hoping the kids will be more intrigued and draw a greater connection to what they learn. Are you familiar with the Flat Stanley Project? It's the same thing but with our school mascot instead of a flattened dude.
When I asked hubs if I could get Jes' passport stamped at customs, he just looked at me. I suppose it's bad enough that his wife is snapping photos with a stuffed animal.
I have a large wall space in my room that I plan to create a map of Europe so we can track Jes' travels. I've got several other ideas of having Jes send postcards and small gifts to the kids. We'll see. Any ideas or suggestions you have would be greatly appreciated.
Because I'm not TOTALLY crazy and don't want to appear as such by dragging a stuffed animal around Europe, I created this bag to stuff Jes in.
 I do have a wee dilemma. My students will be learning about the art and life of the people of England, Italy and France as well. Sadly, I won't be traveling to any of these places in the near future. If you live in one of these lovely countries or know someone who does...someone that wouldn't mind snapping a couple photos with a sweet and adorable stuffed Tiger,  would you please let me know? Postage would be covered via paypal by me...and a gift of appreciation would most definitely be included.
Jes rolled up and ready to be stuffed into my carry on.
Passport in hand and ready to board.
 Because I know you are dying to be kept abreast with Jes' adventures, I'll be sure to share them with you. 

Thank you for reading and tolerating my art teacher geektasticness. 

Have a lovely week!
Read more »

Saturday, May 19, 2012

In the Art Room: The Art Show Part 1

A display of kindergarten abstract masterpieces. These paintings were created at the very beginning of the year during our line and color study. We coated them with glossy Modge Podge to help the colors pop.
Well, my helper moms and I can finally sleep in! The school-wide, hang-up-and-display-everything-we've-made-all-year art show is ooooo-ver. I'd like to thank the kids for their hard work, my amazing mom-helpers who put in countless hours hanging masterpieces, my former student teacher Lauren who worked for hours on the day of the show and my dear mom who drove down from Indiana to help and cheer us on. It was a huge success...one that will be hard to top next year.

I thought I'd share with you the two-dimensional artwork from the art show. This is a photo-heavy post...and just the tip of the masterpiece-iceberg. Stay tuned for the upcoming episodes of In the Art Room: Clay Display and, not to be missed, our Walk Like an Egyptian program performed by our Super Second Grade Stars!

But for now, sit back and enjoy these fabulous works of art. I'll provide a brief description of each. Feel free to leave a comment with any questions or thoughts below. Enjoy!
These sweet kindergarten self-portraits were on display along side photos of the artist. The self-portraits were created on flesh colored construction paper with oil pastels. These were cut out and glued on top of bubble printed paper the kids had made. Hair was then painted. Finally, construction paper that we had cardboard printed was placed on top as a shirt, complete with collar and name tag.

Kindergarten display of collage cats, winter landscapes, and fall printed trees.

For this kindergarten winter landscape, we began by learning about tints and shades and painting the sky and snowy land. From there we collaged trees and houses. Finally we used metallic oil pastels to enhance the sky, the trees and the house.

Because I have my classes for 1/2 hour, I had to think of a quicky project for my wee little ones. They were able to create this butterfly relief sculpture in just the nick of time.

Egyptian collage landscapes by my first grade artists. You can read all about this lesson here.

The idea of using the first grader's weaving for the body of a crocodile originally came from pinterest. But art teacher Lauren came up with the genius idea to create crocodile puppets. Here's the lesson.

Love those teeth.

The first graders also created these abstract collages at the beginning of the year. We did some leaf rubbing and painting. From there, we tore the painting into strips and glued them down to a larger piece of white paper. This was a great lesson on positive and negative space.

In the second grade gallery, we have our circle loom weavings which we attached our Sculpey beads to, our Egyptian profile portraits, leafy prints and our golden tree paintings (not pictured). I also have the students write an Artist Autobiography every year that is placed along side a framed photo of the artist.

Leafy Print Lesson can be found here.

Our third grade gallery includes our sarcophagus, foil leaf reliefs, cardboard weavings and our haunted trees. Not pictured are our photos and bios.

You can read more about our sarcophagus lesson here.

A close up of one of the third grader's cardboard weavings. This year we tried our hand at adding beads to our weavings. We attempted to hide the cardboard with some scratch art paper designs.

I hope this artist is able to find a good place for tacos while she's artin' it up in Paris!

When painting our sarcophagus-es (sarcophagui? We eventually took to calling them our sarcopha-dudes), some of the early-finishers tried their hand at optical illusion drawing. This lesson was pulled from pinterest and was so simple, that I just wrote out the directions on the board and the early-finishers followed the steps.

Fourth grade awesomeness: framed photos and bios, Mona Lisa group project photo (seen on the far left) Egyptian prints, cartouche, moon-light paintings, woven pouches, and Egyptian god portraits,

Egyptian god portrait lesson here.

The kid's all time favorite thing in the whole wide world to do: weave! Once the fourth graders get a taste of weaving, there is no turning back. I have one sweet girl who has woven 12 pouches now for her family members in Mexico.

All the time and hours spent are immediately forgotten when you get a sweet note like this the following day...love it!

Read more »

Tuesday, May 15, 2012

DIY: Anthropologie Style

Dress: thrifted Issac Mizrahi for Target, anthropologie-ized by me; belt and hair clip: by me
Tell me if you do this: you go to Anthropologie determined that you are going to avoid the full retail at all cost and head straight to the sale room. Do not pass go, do not collect $200, you are on one cheap-o mission.

And then, you see It. That dress. The One and Only. The Dress that would complete You.
The Anthro version. On sale this time last year.
And you think to yourself, "you know what, forget the sale room, I've earned this! I've worked hard, I've earned my keep, I watched someone pick his nose AND eat it today. I don't care what the price tag says, that dress will be mine. It belongs in my closet!"

And then you do it.

You look at the price tag.

And the back pedaling begins.

"You know what, I don't really even like that dress.

"I mean, look at it...it's just too perfect. And awesome. Not to mention amazing. Why on earth would I want that? Geez, what was I thinking..." And then you drive off to the nearest Target and try to forget the dress with bottles of nail polish, a tube or two of lipstick, a pair of tights and three Kit Kats...or maybe that's just me.

But this little tale has a happy DIY ending. After seeing that little navy number and being scared off by the price tag, I recalled an Isaac Mizrahi dress that I'd thrifted some time ago. Sadly, it's permanent place had become my closet as I didn't really care for the spaghetti straps. With the out-o-my-price-range dress on my mind, I anthropologie-ized my dress with some sear sucker fabric fashioned into shoulder bows...and viola! $148 still snug in my pocket book.

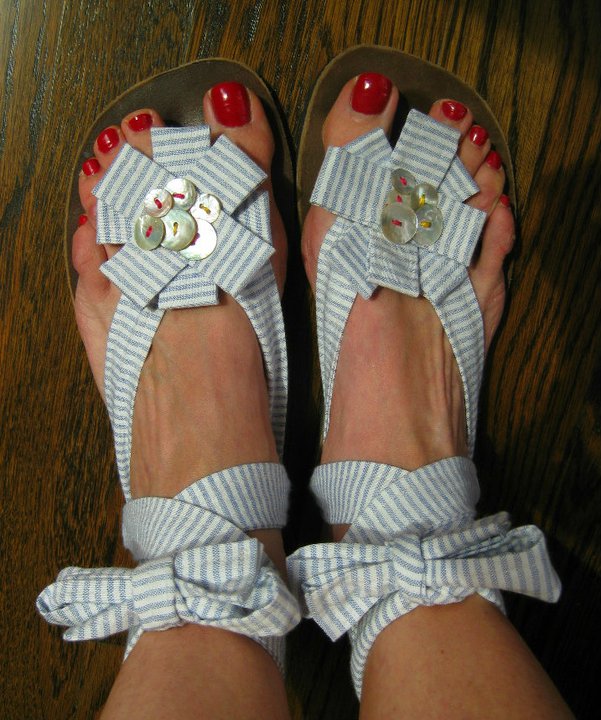
Anthro sandals, also from last spring.
And then I got all crazy-like and decided to try my hand at recreating these bad boys.
Ya'll would you please get yourself some of these Sseko sandals already? It's for such a great cause...and I know you are tired of hearing me yap about them!
With my favorite sandal bases by Sseko. I love that I can create custom shoes in less than a half an hour with these sandals as my base.
Please pardon the toes...they's a little gnarly.
Oh and what do you know? The sandals match the dress. I've become so stinkin' matchy-match in my old age.
There you go, an Anthro-DIY. Just for kicks, let's do a rundown on cost:

dress from Goodwill: $7.99
hair clip and belt: made by me
sandal base: $39

Total: $46.99

Yippie!

Now I know I'm not the only one that's created an Anthro-inspired DIY...what have you created? Dying to know, leave a comment below!
Read more »