Showing posts with label summer art camp. Show all posts

Wednesday, June 3, 2020

Summer Vacation Week: A Wrap Up!

Summer Vacation Week was so fun! And the perfect way to kick start summer. We wrapped it on Friday with this pop-up hot air balloon. Here is the video:
From there we made this Origami Ocean Collage! This one was a huge hit. Kids love origami!
Our last salt dough clay project (for now) was making this garden. It was so fun and the Art Class with Cassie kids got so creative!
We kicked off the week with this Summertime Selfie. I'm actually thinking of starting our school year with this one!
Have fun!
 photo signature_zpsd10b3273.png
Read more »

Sunday, April 28, 2019

In the Art Room: Why Bingo Daubers are an Art Teacher's Best Friend

My name is Cassie Stephens and I'M IN LOVE WITH BINGO DAUBERS.

There. I've said it. It's finally off my chest. And I'm here today to tell you that if you've not discovered the magical wonders of bingo daubers and all that they have to offer your art room, allow me to introduce you to "a whooole neeeeew wooorrllllllddddd..."
If you are unfamiliar, than you might be thinking: 

What ARE bingo daubers? Simply put, they are the little dot-makin' things that folks use when playing bingo. You can purchase them with ink in them...or empty so you can fill with what you like. I prefer diluted India ink but other art teachers have also used liquid watercolor. TEMPERA PAINT, even when diluted, does not work...I know...I tried.

Why are they magic? Because they provide a seamless line, much like that of a marker. In fact, in my art room, we call them "paint markers" and have three rules for using them properly: DO NOT SHAKE THEM, DO NOT PRESS HARD but, most of all, DO NOT SQUEEZE THEM as an endless stream of ink my flow out of the bottle if you do. Sometimes, the ink dries at the tip providing a scratchy line. If I know my kids are going to be using them, I test each one out during my plan time making sure they work and GENTLY squeezing them to get the ink to flow. 

Where can I get them? Here and here is where I get 'em!

How do I fill and refill them? Like I said, I put slightly diluted India ink in mine (I don't have a brand recommendation because it seems all India ink is created equally). When it comes to refilling them, I know you can buy some sort of contraption to remove the top but I just use a pair of pliers to pry them off. Over time, the felt on top of the marker may become worn out. You can buy just the replacement tops!

What can I do with them? I'm so glad you asked! Here are my Top 11 Fave Things to Do with Bingo Daubers (it's a workin' title...don't judge, naughty pants).
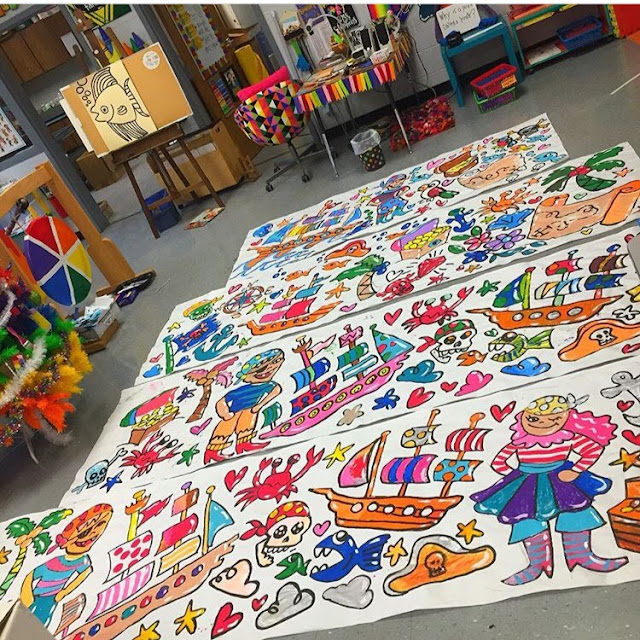
 1. Make Giant Painting Sheets! For our upcoming art show, I wanted to inspire excitement and decorate the walls to announce the event. I sketched out my pirate-y design in charcoal and then laid out paint for the kids to go to town. 
When they were finished, I went back over the black lines on spots where they'd gotten a little excited with the paint (that's putting it mildly) and added white highlights. 
And ta-da! Giant banners to announce our art show! I've seen many art teachers create huge coloring sheets in the same manner for their art shows or art activities. 
 2. Make Welcome Back Banners! If you are like me, you have a CRAZY schedule at the end of the school year. Field day, field trips, assemblies, you name it...it's nuts! And so are the kiddos. Last year, when our field day was rained out and my station was cancelled, I decided to have the kids create Welcome Back banners so that we'd have some color on the walls come fall. They had a blast, we used up excess art supplies and made a rained-out field day super fun. 
Much like the art show banners, here is our paint set up!
3. Heather Galler-Inspired Florals! What I love about the daub is that it forces kids to draw BIG! We never use pencils first, we just dive right in. It's a little scary but it's a great chance to talk about turning a "boo-boo" into something "boo-tiful!" 
More on this lesson (with video!) here...perfect for Mother's Day!
 4. Dean Russo-Inspired Animals! Our mascot is the tiger...and it was so fun creating these massive colorful tigers for our hall. 
We finished them off with our chalk pastel in Sta-Flo trick (see video here!) and oil pastels. 
5. Don't Let the Pigeon Drive the Bus! Kindergarten uses my bingo daubers the most in my art room. Many teachers have told me that they've not had success with kids and daubers...that might be because you gotta remind them of the three rules...with rule numero uno being DON'T SQUEEZE THE PAINT MARKER! This Mo Willems project is always a hit! Lesson with video here. 
6. Jasper Johns-Inspired Kindergarten Alphabet! This is a fave lesson of mine and many others. You can find the lesson details and the lesson video here. 
7. Chicka-Chicka Boom-Boom Kindergarten! We follow our first alphabet work of art with this one, a huge hit with my students. We watch the video version of Chicka-Chicka on YouTube and the kids love to sing along with it. You can find the lesson and video here. 
8. Romero Britto-Inspired Hearts! Easy and super great for learning about line, shape and pattern! All of these dauber works of art are HUGE too which I love. Details here. 
9. Fauve-Inspired Self-Portraits! Self-portraits are not my students fave thing to do...or my fave thing to teach. I think it's because the older my students get, the less confidence they have in making their artwork look "real." With that said, the bingo dauber frees them up, makes them relax and not get hung up in the details. Check out this post to see how we added color to these lovelies! 
10. First Grade Penguins! Oh yeah. These are pretty much the cutest...or, wait...are THESE cuter?!
11. Kindergarten Snowmen! I mean...look at them! Lesson and video here. 
 My third graders created these abstract name designs earlier this year with bingo daubers and I loved how they turned out. I don't have a lesson for this one yet...but will work on soon to have available for you and your kiddos!
 I've been in the middle of Art Show Prepland and the bingo dauber is saving my behind! I was able to crank out this pirate ship (which will be a photo-op prop) with a little help from the dauber. 
And I've even made SEVEN massive backdrops like this for the art show too, all with the dauber. So...if I've not convinced you yet that you need to get some bingo daubers in your life then I've just failed at life. Have a super week, y'all! 

 photo signature_zpsd10b3273.png
Read more »

Sunday, May 19, 2013

In the Art Room: The Art Show Part 1

It seems that when I fell off the DIY wagon it was because it had crashed into the What I Wore wreck. Now that the art show is behind me (huge sigh of relief), I hope to get back to regular blog posts soon. Thanks for hangin' with me! Now here's what I wore at the Art Show: top: Banana Republic, yard sale; skirt: vintage, etsy; wedges: Target, last season; palette hair clip: DIY
Important In-Bold Message: Thank you parent helpers at JES for hanging each and every piece of artwork for the show. The children, their families and the staff have enjoyed seeing their hard work. There wouldn't be an art show without you! My sincerest of thanks.

Last Thursday night, I was able to put another notch on my belt. My Art Show belt that is. If my weak memory serves me correctly, I do believe this is a monumental notch as this was my 10th art show at my current school (I spent previous 5 years teaching at a school in Nashville).  You can see last year's Art Show here and here. Because I took a mountain of photos, I thought I'd share with you the work of my kindergarten through second grade students first. I've written about most of these projects on this here blog, so look out for the link if you are interested in reading more.

Oh! I almost forgot. If you recall from my last post, I mentioned that my students sculpted dogs and cats from clay as apart of their service project. Well, they managed to raise $430 dollars for Happy Tales Humane! Congrats, Awesome Artists!
Our theme this year was Traveling Europe  (we only managed to hit France, Germany and England). At the beginning of the school year, I had each student create a self portrait in either green, blue or yellow and used them to create this map. Full project details here.
Because we were traveling abroad, the students created both suitcases and passports. If you scroll down, you'll see some examples of the suitcases or check out the lesson here. Because we were flying overseas, each class had a plane drawing contest that the kids voted on. The winning drawing was enlarged by the artist on my Elmo while I snapped photos of the kids pretending to be looking out the window of a plane.
This fourth grade plane is a crack up. I do believe it's coming in for a hard landing as many of the passengers appear to be freaking out. Or sleeping. Or getting sick. Gotta love fourth grade.
A wall of kindergarten art. I always snap photos of the artists to go along with their work. Their photos are not shown in this picture. I did not involve my kindergarten artists in our traveling theme. There are so many art basics to cover, that I like to focus on those during their first year of art. You can read more about those lovely abstract paintings here.
These self-portraits as artists were so fun to make. And we got to recycle our "messy mats" into aprons! More here.
Here's a fun weaving lesson that I'll be sharing with you in the next couple of weeks: Woven Fish!
Here's a glance at a first grade class. These guys were included in our travel theme. They also have to write artist autobiographies which are always entertaining to read. You can see more of the German Gnome Project here.
One of my favorite projects this year was the Hot Air Balloons over Paris. Anytime you can include a photo of the child in a work of art, it's a success. Lesson here.
Both my first and second graders created these Royal Self Portraits. Each one is so expressive and a perfect match of the artist himself.
The one on the left looks very much like a doll from It's a Small World. And the one on the right just cracks me up. Lesson details here.
In my art room, I had the clay projects on display. Sadly, the art room became flooded with folks before I got any photos. Here are some of my first grader's clay animal sculptures as chatted about here.

Second grade goodness. This year, I tried out CD weaving with the kids. I loved the lesson and it seemed to take the kids a less amount of time to complete, which was a bonus. My art teacher friend over at the blog Art Matters does an excellent job demonstrating the steps to creating these weavings.
I love the beautifully printed background of this German Cuckoo Clock. Lesson plan here.
These paintings created near the beginning of the school year seem extra exciting to me since my trip to Paris. Geez, I still can't believe I was there! Does that feeling ever go away? Parisian Landscape Lesson here.
My second graders created their animals by putting two pinch pots together and adding legs. Lesson on this in the near future.
Stay tuned for some incredible work by the third and fourth grade students! And, if you have any questions or thought about the projects you see here, I'd love to hear from you. 
Read more »

Wednesday, June 6, 2012

In the Art Room: Walk Like an Egyptian

Our amazing second grade singing and dancing to a rewrite of the Bangles hit "Walk Like an Egyptian."
 Well, here it is, folks, the final installment of The Art Show. It seems like a million years ago that I shared  Part 1 and Part 2 of our school wide art show with you. I decided to save my favorite part of the art show for last: the second grade production "Walk Like an Egyptian."

This year, in the art room, our theme was Ancient Egypt. I chose that theme because of an amazing exhibit at The Frist Center for Visual Arts. Not only did my second through fourth grade students visit this exhibit, but the entire school studied Egypt throughout the year. My first graders created Egyptian Landscapes and Nile Crocodile puppets. The third graders created a life-sized sarcophagus. Egyptian god portraits were created by my fourth grade students. And the second grade created Egyptian collar necklaces and gave this magical performance.
 I wrote this short and silly play set up just like the game show "Jeopardy". The program began with the two hosts (shown on the left) kicking off with the song "Walk like an Egyptian" Our fabulous music teacher rewrote the lyrics to The Bangles song (you know, because that little bit about "smoking on a hookah pipe" just might not go over well) and taught the kids the lyrics. One of our incredible second grade teachers taught the kids some sweet dance moves.

After that intro, King Tut (our friend in the middle) comes out as the Alex Trebek of the show. He lobbed questions, as well as some jokes, at the contestants: Cleopatra, a Mummy and Queen Nefertiti. The kids sang a rewrite of Steve Martin's "King Tut" ("he's my favorite honkey" didn't seem like the best thing for the kids to be singing, 'specially since dude was Egyptian). The show ended with the mummy busting free of her bandage strips (er, toilet paper) and stealing the show as well as winning the prize of 100 shabti (shown on the right).
After the production, the kids were all smiles, even the toothless variety.
 The play was a ton of fun and a huge hit, especially with the performers. They lit up the stage with their excitement and enthusiasm. It was such a delight to work with the incredible music, P.E., second grade and many other teachers in the school to make this play possible.
Egyptian collar necklaces are now the latest in second grade fashion.
 My part in preparing the kids for the program was the costuming. I knew I wanted to keep it simple for the parents, so I asked the kids wear over sized t-shirts, shorts and sandals on the day of the performance. During art class, we studied the history of Egyptian jewelry with a focus on Egyptian collar necklaces and scarab beetle jewelry.
Okay, I'm not a macaroni-art kind of teacher but I will admit, this was kind of fun. If you do this, do not use the textured pasta as it cracks when it dries.
 One group of kids was given a wide variety of colorful pasta that they glued onto their gold-painted cardboard collars. We chatted about patterning and design.
 Once the glue dried, we added designs to our necklaces by printing. The kids used cardboard, q-tips and marker caps dipped in gold paint to create their unique designs.
 Knowing that they were going to be wearing their creations in their performance, the kids really worked hard on crafting beautiful necklaces.
The little actor that played King Tut is the son of one sweet mama. She came up with the pipe cleaner idea as a way to hold the necklaces on. She simply hole punched, fed the pipe cleaner through one side and twisted to keep it in place. The other side she left like a hook. This way the kids could take their necklaces on and off on their own.
 Some of my other classes created these scarab beetle necklaces. For these, the kids used cardboard to cut out the shape of wings. These cardboard shapes were then wrapped in tin foil and then colored with sharpie. Can you guess what the beetle's body is...? One of the many uses for bottle caps in the art room!
Two proud Egyptians showing off their necklaces.
I love the anch design, don't you?
 This program was such fun and a great way to kick off the art show. However, having an art show AND a performance on the same day most certainly gave me some new gray hairs. So, while I'd love to work with these amazing kids and teacher on another production again...let's just say I might pick a less insanely busy day. Thanks for dropping by.


Read more »