Showing posts with label elementary art lesson. Show all posts

Tuesday, April 29, 2014

In the Art Room: Ming Vase Still Life with Third Grade

Well, after taking a two week hiatus to create our Chinese-inspired clay dragons (which I'll share with ya as soon as those bad boys are glazed and refired), my artists in third grade land returned to their Ming vase projects and finished 'er off. They were pretty stinkin' proud of themselves and who can blame 'em? They're just about as colorful and amazing as my third graders themselves.
This project, like so many of the ones we do, was a million step process that schooled us on bunches of stuff. Here's how we began this adventure:

Day #1/2 (two 30 minute class periods): We reviewed properly painting with watercolor paint (for details of that kind of chat, go here) and chatted about warm vs. cool colors. The kids were given the choice of painting with either color family. We also chatted about what constitutes an abstract painting (that'd be line, color and shape) and how we might begin that kind of painting. With that, the kids set to work on their 9" X 12" papers.
Day #3/4: Although the kids were painting a Ming-vase inspired kind of design, I wanted to emphasize to 'em that their vase could simply be decorative or tell a story. So I shared with them the Legend of Blue Willow. I'm kinda dorky (duh, like I have to tell you that) in that I really love story telling. So I got all into it in hopes that it would inspire some super vase illustrations. 

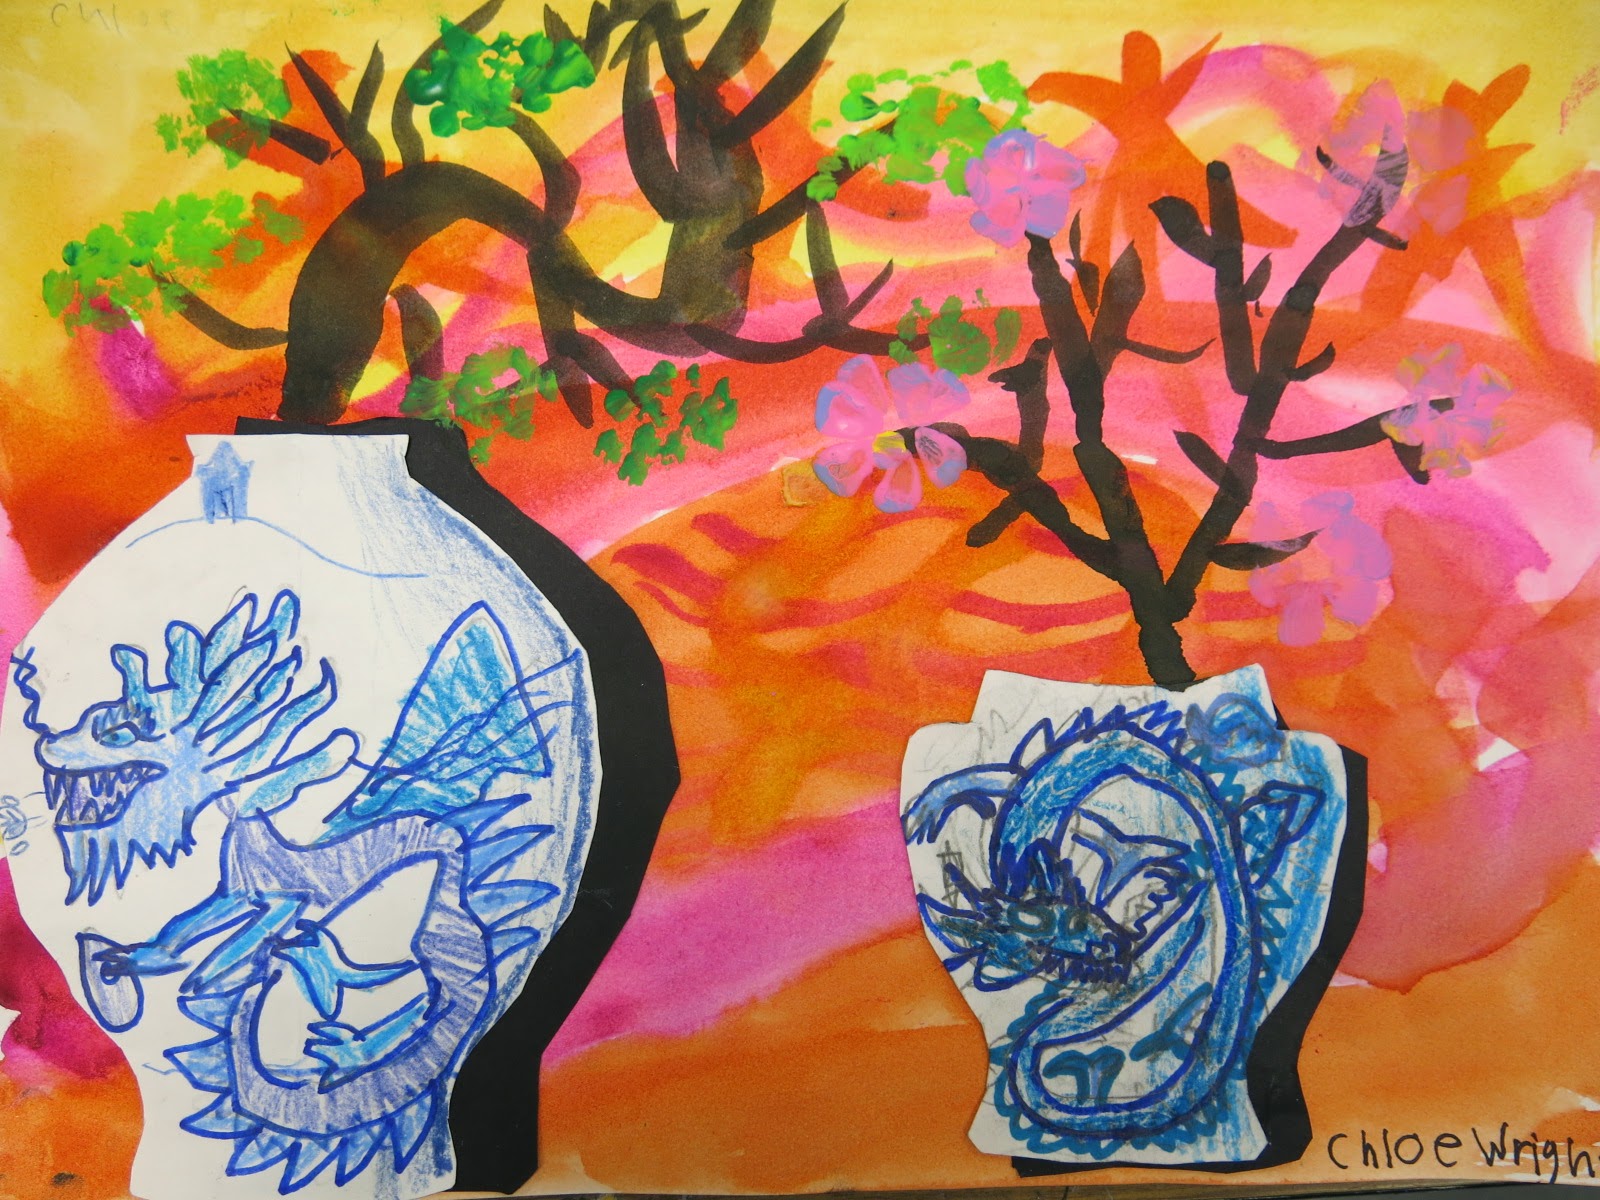
After story time, we chatted about what kind of vase or planter shape they might want. Turns out that there are many different Chinese vase shapes that span the history of pottery in China with each signifying a different period in time. The kids learned to fold their papers in half, draw a shape of their choice and cut. Viola! Instant symmetrical vase!

Once that was complete, the kids created their design on their vase. Pencil lines were traced in blue sharpie and color was added with colored pencils. 
Day #5/6: Well...I noticed that when the kids chose to use the cool colors for their backgrounds, their vases blended in. Oops. So to remedy that, and to create a three-dimensional feel to their work, I had the kids create a shadow behind their vase. This was super simple and the kids thought it was like magic. They simply traced their vase onto black paper, cut it out and glued it to the back of their vase, shifting it slightly to cast a shadow. Once the shadow was glued down, the entire thing was adhered to the background paper.

From there, we had a discussion about bonsai and cherry blossom trees. On newsprint, I showed the kids some ideas on how to paint these kinds of trees. I suggested (em, strongly) that they attempt to paint both kinds of trees on practice paper (that'd be newsprint) before painting on their masterpiece.
I am seriously loving both of the backgrounds in these paintings. By the way, when it comes to watercolor paint in the art room, you must use Crayola's Mixing Colors paint. Not the regular Crayola watercolor. This stuff is way better. Look for the box that says "Mixing Colors." It does come with an odd assortment of colors so you might have to supplement with additional pans. But, look at that magenta and turquoise! So pretty!
I love that this artist remembered from our clay lesson that Chinese dragons are often shown with a pearl that is believed to be the source of their strength and power. 
Look out that painting on the right seems to have an almost patterned shadow behind the vase. These third graders are, like, genius.
Day #7: Once their tree of choice was painted into their vase, I gave the kids several choices for finishing off their still life. One was using a variety of green paint and a stubby brush to create a leaf texture for their tree.
Another was using tissue squares to create three dimensional blossoms. I remember doing this in elementary school and thinking it was the best thing ever. You simply wrap a piece of 1" square tissue around the bottom of your pencil, put a touch of glue on it and press/hold it onto your paper. Give it a second, gently lift off and, viola! Blossom! Sometimes, a couple of pieces of tissue were glued together before attaching to the paper.
The final option I gave to the kids was simply painting their blossoms on. I also told them that they could do a combo of all three processes if they wanted. 

I'm so happy these masterpieces are complete. It's just a coupla weeks until our school wide art show so I was happy to scratch this project off the list. Now! Onto glazing dragons, writing artist autobiographies, painting our clay stars...sigh. Fingers crossed we get it all completed in time.

Until next time, ya'll, have a great week!
Read more »

Tuesday, February 18, 2014

In the Art Room: Cherry Blossom Trees by Second Grade

A couple of weeks ago, I shared with you a work-in-progress painted tree project by my second grade students (ya'll can visit here for the full post as it will cover everything I'm about to skip) and I'm excited to say these masterpieces are now complete!
After learning about Japan's cherry blossom trees and their lovely blooms which are cause for celebration, the kids painted blossoms on both their practice paper and their watercolor painting. Because their practice papers were just as lovely as the finished product, I had the children matte and frame both works of art today.
But before I get to that, let's chat about how we went about painting those blossoms. The children were to paint on their practice paintings first until they were comfortable painting on their watercolor painting. For the blossoms, the kids had a light pink, a dark pink and yellow. I showed the kids how to completely dunk their brush into the dark pink, put just the tip of the brush in the light pink and lay the brush flat on their paper and wiggle it to create each flower petal. Loading the brush with that much paint meant that they could paint one whole flower without reloading their brush. Once that paint had dried a pinch, the kids used q-tips to add the yellow paint to the center.
After they were comfortable painting on their practice paper, the kids added blossoms to their watercolor paintings.
The kids loved those practice paintings so much they were constantly asking if they could take them home (because they know I hoard all their work until the end of the year for the art show, they don't even bother to ask if they can take their watercolors home. Poor kids!). I kept thinking maybe I'd come up with something to do with those practice paintings so I asked them to leave them in the art room. And I'm glad I did. They look just as lovely framed as the watercolor paintings, I think! The above is an example of a practice painting...

And this is the artist's final piece. It's interesting how some children really followed their practice paintings to the point that they match their final product and how other kids completely changed their plans along the way. I made sure to tell them that it was just "practice" and that they could create something totally different on their final piece.
But I'm blabbering. Let's chat about how we framed these, ermkay? The kids used a 12" X 18" sheet of white construction paper as their background frame. I cut a ton of large origami paper (purchased through Sax by the brand Roylco) and cut it down to 2" X 12" strips. The kids glued their chosen origami papers to the top and bottom of the white paper.

And then, because I had visions of them haphazardly mounting their watercolor piece all crooked in the middle, I had them use a ruler to measure one inch in for their watercolor paper. And then I gave myself a big ole pat on the back for including math into the lesson...even if it was just for an inch. Once both practice papers and final paintings were framed and on the drying rack our 30 minutes of art were up. I didn't even get to see these lovelies in all their colorful glory until this afternoon when I was taking them off the drying rack.
Oh! Can I please ask your thoughts on something? So, this painting you see here? The one with the super detailed sky? It took this artist about 3 classes to complete (that's right, an hour and a half). Now. I totally relate to my slower working artists as I'm a very slower artist myself. Which is why I struggle so much in workshops. I need time to: 1. Process the directions; 2. Think of an idea that I love; 3. Put my idea together in some sort of way that I'm happy with. In workshops I rarely make it past #1 when I notice that my peers are already well into #2. And I hate that! I get all uptight and anxious and who can create like that?! For that reason, I always let my slower students work at their own pace...almost to a fault. But I want them to feel comfortable creating and never feel that stress that I often do. So, art teachers: what do you do in these situations? Do you hold your students to a set time frame and move on? If I do that then I have these beautiful half finished pieces. Or do you allow those students to continue working...and if you do, what do your early finishers do? Mine have been content with our current options of origami, free draw on dry erase boards or reading a book with me. Just curious what you do in these situations.
I was told that the little black specks were the pollen coming off the flowers.
And viola! Cherry Blossom Tree Paintings by Second Grade complete!
Read more »

Friday, March 16, 2012

In the Art Room: Leaf Relief

A lovely leaf relief with a dotted background by one of my former students.

Hey guys! This post has been very popular...if you are interested in other leaf related projects, be sure to look at this Leaf Printing post and my Leaf Press Project. Thanks!

While second grade was completing that project, I was working with my third graders on these Leaf Reliefs. It's a very spring/summer kind of project, so I thought I'd share it with you.
A close up of one of the 3" X 4" reliefs. I love that this artist chose a less than perfect leaf.
I like that I can talk about all of the elements of art when looking at something as simple as a leaf: the shape of the leaf; the lines and texture of the veins; the varying colors of each leaf; the cylinder form of the tree that the leaf came from. And when we complete this project, we chat about the values we created and the positive and negative space of the leaf. I do a lot of what's called "call and response" in my classroom which is where I say something and the kids finish my phrase. For example, when I point out an "element of..." they all respond "aaahhrt". Because we are fancy artists that speak with funny accents. Whatever helps them to remember, right?
Completed by an adult during an art afternoon I hosted a while back. I love that she chose to use a dandelion.
For this project, you'll need to gather the following:
  • matte board ... I used 3" X 4"
  • leaves, delicate flowers, lace ... really anything flat with some sort of texture
  • 3M Spray Glue 
  • inexpensive aluminum foil
  • the $1 a can matte black spray paint found at Home Depot ... seriously, you want the cheap stuff
  • 0000 steel wool 
  • canvas, matte board or even cardboard for the background
One adult used impatiens and they turned out beautifully. I like that she even added some color to the foil with watered down acrylic paint.
In the art room, I had the kids gather around a table, pick a piece of matte board and lay it in front of them. Then I would lightly spray the glue on the board. The kids then chose from a pile of leaves laying their leaves on the sticky board veiny side up. I then sprayed the board again, laid a piece of tin foil over the board shiny side up and sent the kids back to their seats. At their seat, they used their finger to rub the surface of the board and reveal the texture underneath.

Once that was complete, we took our boards, a large drop cloth and some cheapo spray paint outside. I attempted to let the kids spray paint but I ended up giving the boards a final coat to insure complete coverage. We let their boards dry until the following art class.
Rubbing the spray paint off of the matte board to reveal the textured leaf underneath.
Using the softest of steel wool, the kids burnished their leaf reliefs. Some kids chose to burnish the boards completely while others liked the variety of values. And even though I emphasized not to rub too hard, we still had several incidences where the kids tore their foil. Usually they noticed right away and the foil could be gently glued back into place. In other cases, we repaired by using a black or silver sharpie to camouflage the tear.
For the background, I have tried a variety of things. In the classroom, we have used canvas boards that we've painted (after a long chat about color theory and mixing, of course) and applied a texture with our texture combs. Not familiar with texture combs? I picked mine up from an art supply catalog however they can easily be made by using either a plastic comb or cutting notches into cardboard.
I picked up a ton of matte board at a local framing shop when it was going out of business. I'm sure any such shop would make a donation. I love the burlap texture on this matte board.
This background here was created by an adult using a leaf stencil. I love the combination of two reliefs.
Once paintings and reliefs were complete, I hot glued the metal work onto the canvas. I gave the kids the opportunity to either have their reliefs flat or popping up by adding a bit of stryofoam to the back of the relief.
Another adult example. I love her use of type and found objects. So many possibilities!
The works of art were a real show stopper once hung in the hall as a group. What I loved so much about this project was that I was able to start the year with a solid introduction to the elements of art. Not only that but all children were successful which is a huge ego bust. In fact, my principal-at-the-time loved them so much, she stayed after school with me for a couple of days so I could teach the lesson to her! Her leaf reliefs are now proudly displayed in her home. Gotta love a project that inspires everyone!
Hopefully this will inspire you as well. Enjoy your weekend!


Read more »