
 |
| Konichiwa'ing and bowing to "Sensei Stephens"...a girl could get used to this. Unfortunately, I can't seem to train the hubs to do the same. |
Konichiwa, ya'll!
I don't know about you, but I am always super curious how teachers begin their school year. Since I just finished seeing all of my first through fourth grade classes for an hour this rotation (I see my students for a 1/2 hour twice every six days. Yeah, I'm just as confused as you are), I thought I'd share with you the first days of art class. Not included in this episode of In the Art Room is kindergarten-town. Because they start a little later than the rest, I only saw one class this week...and I tend to do things a little differently with them (read: whatever I can manage to do with a herd of cats, er kids, in one session).
On the first day of art class, I greeted my students outside my room wearing my kimono. We chatted briefly about how we would be studying the art of Asia this year beginning with Japan. They learned that whenever they are on a red line (one outside my room as you can see below, one in my room where we line up and another set where we sit on the floor) they are to be "samurai silent". I then told them how to say hello in Japanese and how to bow to show respect. Which is what's goin' down in that top photo.
 |
| My Samurai Silent line. |

Once we entered the art room, following another red line, I asked the kids if they could tell me anything that was different about my room. Keep in mind, the last time they saw my room, it looked like this...and now it looks like this. From there, we gathered on the floor in "Japan". I used the yellow map to remind them the name of our continent, the continent we studied last year and the continent of Asia.
I chatted with the kids about my trip to Japan several years ago (I did the Japan Fulbright Memorial Fund program which I cannot recommend enough. It was such a wonderful experience. You really outta do it). They learned that children in Japan are very much like them, including their style of dress. However, on special occasions, folks do wear a kimono. I chatted about my kimono, the obi (that giant belt) and my geta (the wooden shoes I'm wearing).

I know what you're thinking: You didn't talk about RULES on the very first day?! I'm getting to it! But c'mon. On the first days of school, it's nothing but rules and procedures and blahblahblah. Not only that, but I've been these kids' art teacher forever. We kinda sorta got this. That being said, after 10 minutes of chatting about Japan, I did have the kids move to this part of my room, take a seat on the floor so we could discuss...Art Class Rules.
Now, before they ventured to that part of the room, I asked them to go shopping at The Store for a piece of newspaper. The Store is simply the supply-gathering table I have set up in my room. You can read more about that here.
 |
| Okay, so you mighta noticed I'm wearing a different kimono. I'd accidentally left my other one at home that day and was left using my thrift store kimono. |
Once seated on the floor with our newspapers, I went through the roll and greeted each student with a "konichiwa!". This gave them the opportunity to not only practice their konichiwas but to also learn my name if they were a newbie.


Five minutes later we got around to the rules. Now just to spice things up a bit, I like to use my sound machine when chatting about something that might otherwise be monotonous. This little gadget has 16 different awesome sound effects from a scream (to demonstrate what I might sound like if a rule is broken) to a round of applause for awesomeness. Consequences to not following rules are also discussed. Behind my rows of seated kids, I've got two red X's that are my designated time out spots. Students are to stand and face me when in time out so they can still hear instructions but no longer (er, hopefully) disrupt the group. Now, I'm not gonna lie, I've had my share of office referrals. But it's rare so I don't chat about it much.
 | |
| When all that's covered, we get to our Very First Art Project! After teaching for a million (okay, 15) years, it's one thing that I've found drives the kids nuts on the first day: not getting to "do art". So I always try to include a little something. On the first day, we spent the last 5-7ish minutes making origami hats. I used this as a chance to really emphasize the rules: If you "listen carefully" then you'll be able to "follow directions. Origami can be confusing, so "try your best". "Be kind" to your friends, lend a hand if they need help. And that wrapped up our very first 1/2 hour session. |
 |
| For our second 1/2 hour session, we practiced our samurai silent business and got our seats in art class. I have six tables with four chairs at each. Every table has a color and every seat has a number. Each student was instructed where their spot was (I'm a believer in assigned seats with an even ratio of boys/girls and positive peer grouping). I told them that we were going to play the Painting Game. Once they were given their seats, they were told to put on the apron that was on the back of their chair, don't touch the paint and wait for everyone to get their seat. |

So the Painting Game was just a fun way for us to review proper painting procedures, review the elements of art and have fun. I would draw a number and then either a line or a shape and the kids were to paint it. I reminded them that our paint brushes are like ballerinas: they ALWAYS dance on their tippy-toes. They never EVER scoot around on their bottom. Because that's bad for the bristles and just plain weird. I mean, who ever heard of a butt-scootin-around ballerina?!

After a couple rounds, the kids swapped paint cups and brushes with their neighbors. We talked about the principals of art by chatting about variety, emphasis and all that other groovy goodness.
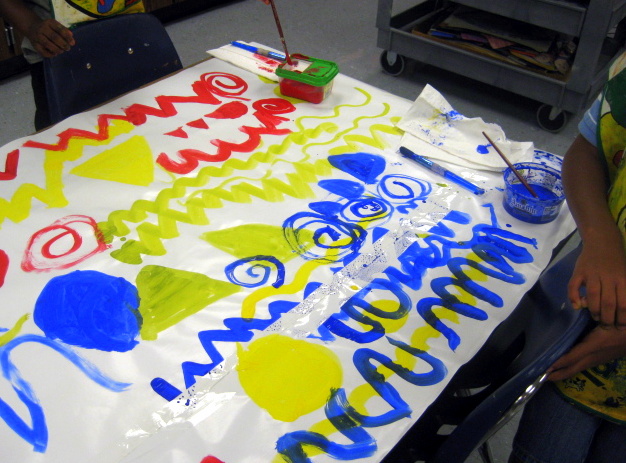
I changed out the table coverings at the end of each day which means these papers got pretty well covered. The kids were responsible for enhancing the painting that was already before them...which was a struggle for some. However, they all seemed to enjoy their painting time and were eager to do it again. Which we won't be anytime soon because we have a million other projects to get to...but I didn't tell them that. By the way, these paintings will be used as a backdrop for another project I'll share with you soon.
 |
| To wrap up the Painting Game and chat about what we learned, we lined up and played The Smartest Artist. More on that game here. |
 |
| This is actually a photo from last year...I just didn't manage to snap one while we were playing this week. I quizzed them on the elements of art, the primary colors and the names of lines. After that, we bowed and said sayonara before exiting. |
And there you have it! One hour in the art room, broken down into two classes. Every time I see these guys, I'll be covering a new routine and procedure (next up, safety drills) but I gotta break it up a bit with some fun. For my sanity and theirs. Teacher friends, how do you approach your first days of school. There's just so much to cover, the fun never ends. Thank goodness Friday comes once a week and saves the day, right?!
 |
| And now it's time to announce the Winner Winner Chicken Dinner! Debi! Congrats, girl! I can't wait to send this crayon-goodness your way and see what amazingness you create. |


