Showing posts with label in the art room. Show all posts

Thursday, December 28, 2017

In the Art Room: How to Make Seat Sacks!

 I hope all y'all had a wonderful holiday! Ours was super low-key and relaxing. I've been taking time to catch up on projects for the art room...just this week alone, I've managed to start three new projects (and finish zero...no surprise there). While working on my latest project, I decided to film the process and share it with you cuz I'm super stoked: Seat Sacks!
 Heaven on Earth, aka the Dollar Tree, had seat sacks or over the chair storage in their education isle recently and I was so stoked. Currently, when my kiddos finish early and only have a few minutes to spare, they LOVE to go and get a dry erase board. However, I don't love the extra milling around the room when it's so close to clean up. However-however, I never wanna see a kid just SITTING in their seat, even if for a few moments, not creating something, anything. So when I saw these seat sacks, I thought they'd be the perfect solution: I could store dry erase boards in there (or, dry erase board SLEEVES with drawing sheets, YES!! More on those in a moment) and that would prevent extra movin' and confusion during cleanup. 
 Now, as you might know, I'm currently on an art room redo bender and I'm color coordinating EVERYTHING. So, while I was excited about these seat sacks, I was disappointed that the above were my only color options. By the way, you can purchase these in bulk here, if they are not available at your local Dollar Tree. 

So I went on a quest to find another source for the sacks. Y'all. These guys are COSTLY! Then I got the bright idea to SPRAY PAINT the sacks...so I bought one as a test and, um, no. That did not work. Not. At. All. 
The one that was sadly spray painted then became my pattern. I looked at the seat sack closely and realized it's a super simple pattern that requires very few supplies. Here's what I used:

* 2 yards of ripstop fabric. Really, 1.5 yards would have been plenty. I chose that kind of nylon fabric because I thought it would be easier to wipe down.

* 4 packages of bias tape. I am doing 4 sacks per table and this proved to be the right amount of tape. 

* Elastic. I used the wider kind.

Here are the directions:
Like I said in the video, I did this in assembly line fashion so as to get it done faster. I started by cutting everything out and then set to stitching all the red ones first, then the orange...this way I didn't have to keep changing out my thread and bobbin.
 I noticed online that there are a lot of other seat sack tutorials...so be sure to check out your options if you do this. I just went the route I thought was easiest. I don't plan to put anything heavy in these so I'm hoping that they'll be solid enough.
 In case you need those measurements again...
 I don't know if you noticed in the first photo but you'll see the kind of chairs that I have. These seat sacks fit them perfectly. If you decide to make these, you'll def wanna be certain it will work for your chairs!
 Of course I had to add a label! I got these labels made a while back from Dutch Label Shop. It says Art Will Rock You. This is the back
 And this is the front! I'll keep you posted on how these work out in my art room. They'll either be a hit or a miss...there never seems to be gray area in my art room!
 Do y'all use seat sacks? How so? Love to hear more!
My little assembly line of pocket making. Wish me luck!
 photo signature_zpsd10b3273.png
Read more »

Monday, June 27, 2016

What the Art Teacher Wore #166: A Feature in Threads Magazine

A while back, I was contacted by Threads magazine about a feature in their magazine. I was beyond flattered and thrilled that this publication, which is for some super serious sewers, thought of crazy ole self-taught-stitcherin' me. Now that this issue of the magazine is no longer available on newsstands (this article is from their April/May issue), I am free to share it here with y'all. 

Now if some of these photos look familiar that's because they were the ones snapped by Nashville Arts magazine for this article! The other dresses were more current creations. For that reason, I boxed 'em up and shipped 'em to Threads magazine so they could take pictures of them. Because the copy is super small, I thought I'd share with you what Stephani L. Miller and I chatted about here. Enjoy!
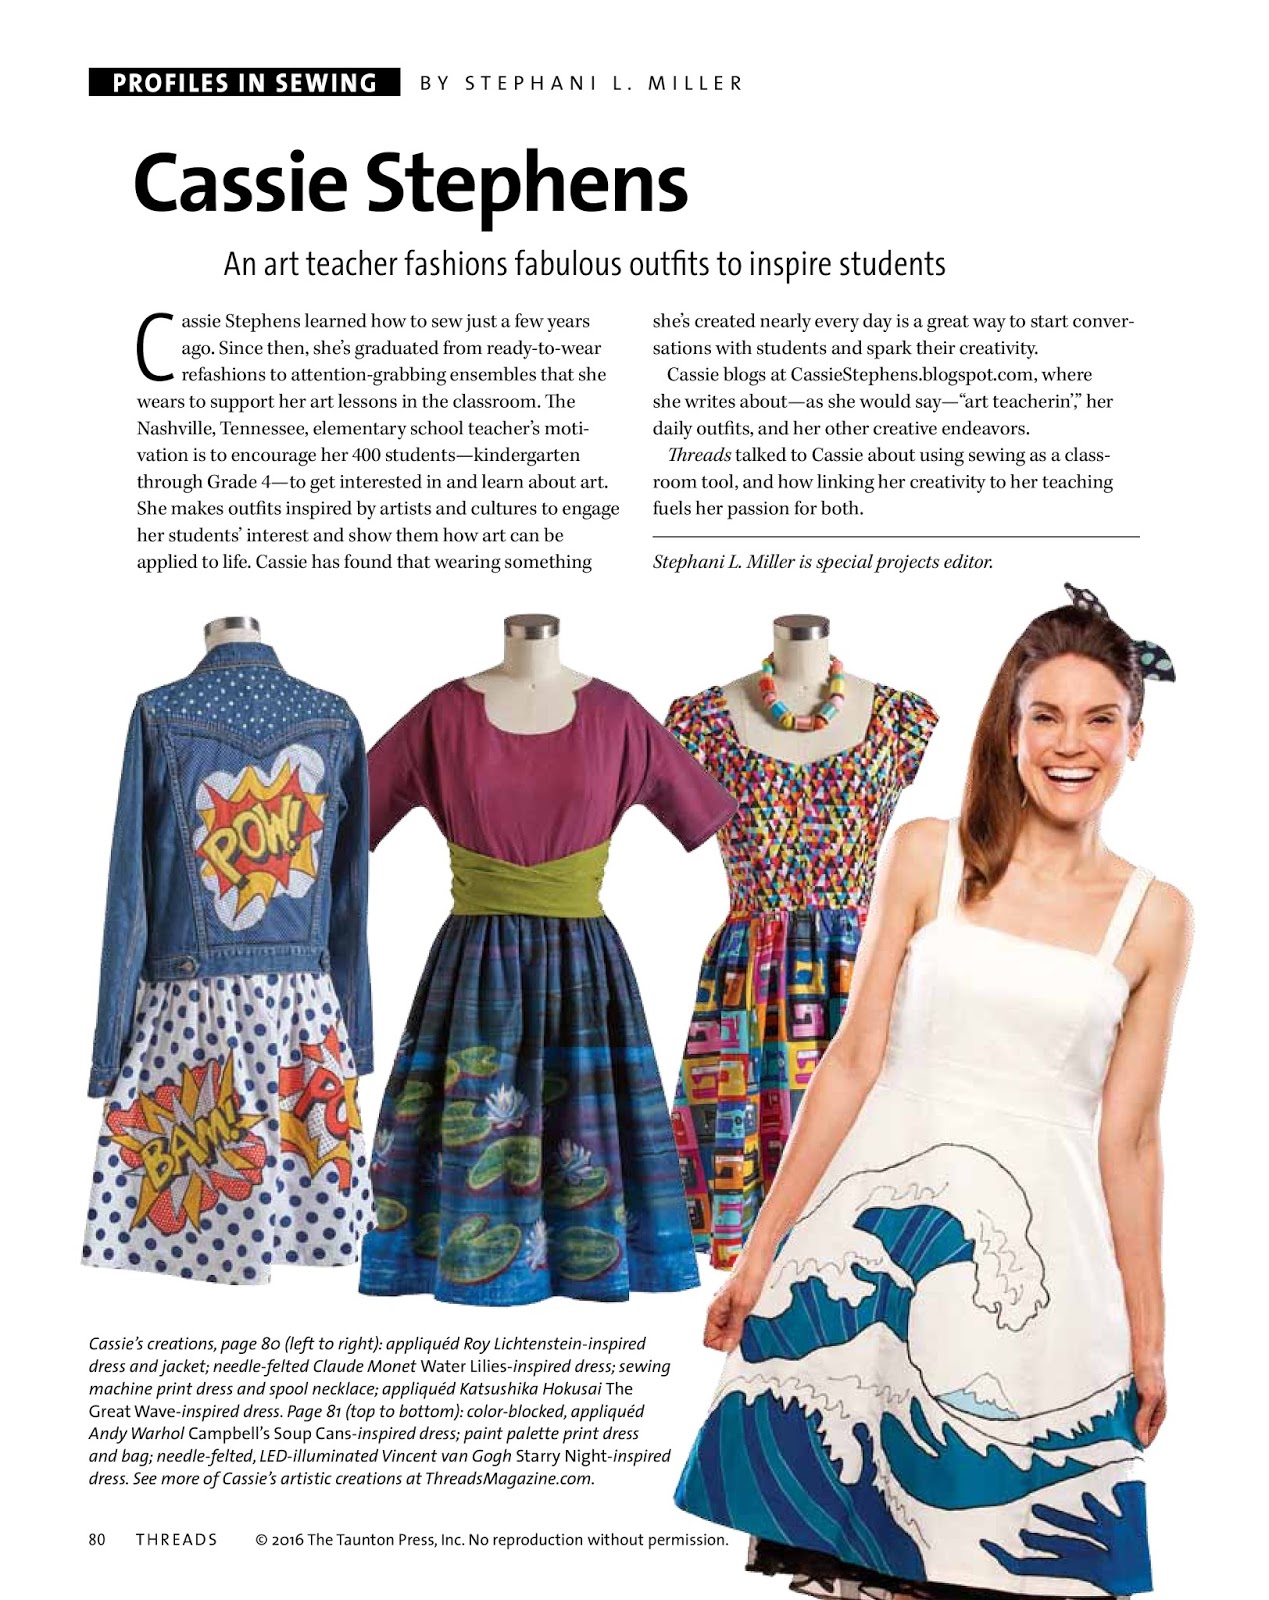
Cassie Stephens: An Art Teacher Fashions Fabulous Outfits to Inspire Students

Cassie Stephens learned how to sew just a few years ago. Since then, she's graduated from ready-to-wear refashions to attention-grabbing ensembles that she wears to support her art lessons in the classroom. The Nashville, Tennessee, elementary school teacher's motivations is to encourage her 400 students to get interested and learn about art. She makes outfits inspired by artists and cultures to engage her students' interest and show them how art can be applied to life. Cassie has found that wearing something she's created nearly every day is a great way to start conversations with students and spark their creativity. 

Threads talked to Cassie about using sewing as a classroom tool, and how linking her creativity to her teaching fuels her passion for both.


Threads: What first inspired you to sew something for teaching?

Me: I needed an apron to wear while teaching, but all I could find were aprons for chefs. So I stocked up on fabrics from a thrift store and an old pair of jeans. I sewed an apron that looked like I was wearing a shirt and jeans, and I appliquéd a guitar - complete with faux tuning pegs and strings - across the front. I embroidered a patch onto the jeans that read "Art Rocks". I had so much fun creating it that I started sketching more ideas and attempted to bring them to life. Rock Star Apron, here

Threads: What was the first thing you sewed specifically to support a lesson plan?

Me: In the beginning, I was unsure of my sewing skills, so I eased into it by repurposing thrift store clothing. My first masterpiece-inspired dress was based on Katsushika Hokusai's woodcut print, The Great Wave at Kanagawa. I appliquéd the entire scene onto the front of a thrifted white dress. I likened appliqué to collage, and I feel very comfortable with that medium. My students and colleagues responded so well to that dress that I decided to create more. The Great Wave Dress, here

Threads: How do you plan your lessons and outfits?

Me: Here's how my ADHD-fueled mind works: Planning lessons leads to sketch outfits to accompany the lessons. From there, I start scouring the Web for the perfect fabric or media to make my lesson-inspired outfit. Then, I finish lesson planning. It has become an integral part of my teaching method. When I first began teaching, I focused solely on educating my students. I read every book written. I worked tirelessly on my lessons and in my art room, but I stopped creating. And I became very unhappy and even bitter toward teaching. But when I decided to marry my passion for creating with teaching, I became excited about teaching again. I realized the using my ability to create and educate was what art is all about. I became a whole lot happier when I started to connect as many dots as possible in my teaching and creative lives. I need to create to teach and teach to create.

Threads: How do the students respond to your outfits?

Me: My students are very curious about my clothing. Many of them have never seen a sewing machine and are unaware of the concept of making their own clothing. In their world, clothes come from a store, and how they are created never enters their minds. We have many conversations about how my clothing is made. And they'll often come in with an outfit they've altered based on something wacky I have worn.

Threads: How do you translate an art inspiration into a garment?

Me: When an artist has inspired me to design, I think of what medium would best translate their style. For example, when I sewed my Andy Warhol inspired Cambell's Soup Cans dress (here), I knew appliqué would be the best medium. When I wanted to create a dress featuring Claude Monet's Water Lilies (seen here), I thought needle-felting would best showcase his Impressionist style. Sometimes, I get lucky and find fabric featuring an artist work, like a Piet Mondrian print (here). When that happens, I use that fabric to sew a dress.

Threads: How do you hope your students remember you?

Me: I hope they remember how much I love teaching them. I have a sign in my art room that reads, "My job is to love you." I hope I convey that love by my actions, my lessons and my wacky clothes!

Thanks for reading, y'all! 
 photo signature_zpsd10b3273.png
Read more »

Tuesday, April 5, 2016

In the Art Room: Exciting News!


Tennessee Art Scouts is SOLD OUT!
Ohio Art Scouts still available, go here to register!

Exciting news, all y'all art teacherin' types! Me and fellow art teacherin' troop leaders Laura Lohmann, Ginger Pacer and Jennifer Alvarado are calling YOU to join Art Scouts! Listen here and learn more...
Are you as excited as we are?! Just imagine: two days packed with enough clay projects, painting lessons, printmaking activities and sewing -n- weaving fun to set your art curriculum for the entire school year. All projects will be geared toward those who teach kindergarten through eighth grade art. Our theme for this two day adventure will be nature which will tie perfectly in with science, social studies and math (that's right, y'all. We're gonna get all kinds of STEAM-y!).
So, how do you sign up? Simply contact me and let me know you are interested (and if you have any questions) at cassieart75@gmail.com. Unfortunately, we can only host 50 of y'all  scouts, so lemme know as soon as you can. Now let's chat about those art teacherin' badges you'll earn...
When I was a kid, summers were my time to explore all things fiber-artsy. At church camps, I learned to weave; at my grandma's house, I learned to embroider and at vacation bible school, I stitched the ugliest pillow that I was so stinkin' proud of. Kids simply love fiber arts but it's often a lost art in the art room. Let's bring it back by introducing our young artists to the math, science and social studies behind weaving, stitching, embroidery and more! If you're new to sharing this art with your students, have no fear. With this intense two day camp, you'll definitely earn your fiber artsyin' badge as well as the confidence to share with your students. 
Truth or Dare Time...TRUTH: I once completely melted down a kiln. I remember it like it was yesterday: having never taken a ceramics class in college, it was just expected that I'd know how to operate this super expensive piece of machinery. After a coworker quickly showed me how to turn it on, I left for the day...only to return to find that all the pieces in the kiln had melted. It looked like a kiln full of melted marshmallows! I had never had a panic attack until that day (I immediately lost sight in one eye...and then my lunch). My incident cost the school a pretty penny and made me realize how little we actually know about what it is we are supposed to be experts on.

All THAT to say, twenty art teacherin' years later, me and my troop leaders know plenty-a-thang about teaching all things clay! We'll walk you thru some awesome clay projects that scaffold on student learning. No kiln? No problem! These projects will be centered around both kiln-fired and air-dry clays. Not to mention some unique alternatives to glazing. And, I promise, the only marshmallows you'll see will be the kind you can eat!
Okay, not sure if you know this or not, but Laura Lohmann is thee painting guru in our troop. I have been a huge fan and follower of her blog for years. It wasn't until meeting and getting to know her last summer at a week long arts camp that I discovered what an amazing art educator she is! You'll learn all of her incredible painted paper tips and tricks that can be applied to your art teacherin' lesson plans.
Don't let the image fool you: we're gonna take printmaking beyond the brayer, y'all. Get ready to discover unique and unusual methods of printmaking (marker prints! gelatin printing! collagraphs! foam carving!) and learn how to manage the mess without losing your mind. Printmaking is a magical experience that all of your students will love. 

Now, let's meet those troop leaders!
Laura Lohmann of Painted Paper in the Art Room is an awesome art teacherin' super star. I was a huge fan of hers before even meeting her because her projects always left me shaking my head and waving clenched fists at the sky thinking, "How are her kids creating such magnificent masterpieces?!" Well, y'all are gonna get a front row, badge-earning seat to find out just how she does it. You'll be amazed at how ingenious and easy her teaching technique is!
If you just pop on over to Ginger Pacer's blog Paintbrush Rocket and watch some of the bird's-eye view videos of her kids creating, you'll be sold on what an art teacherin' super star she is. I am always amazed at the creative projects Ginger dreams up from huge murals painted to sweet woven pouches, she covers it all! Not to mention, her mama was an art teacher so she comes from good art teacherin' stock, y'all!
Art teacher and instagram'er Jennifer Alvarado is one of the most warm and happy people I know and it shows in everything she teaches. I am always in awe of the bright and colorful pieces her students create that cover the walls of her school. Jennifer is one of those people who has a genuine love for both her "kiddos" and their art education. You'll be inspired by her energy and enthusiasm...I know I always am!
So! Do you have what it takes to be an Art Scout? Are you ready to earn your art teacherin' badges? Trust me, it's going to be a wild, crazy and amazing two days of creating of mess and memory making. If you're up for the challenge, just shoot me an email to reserve your spot! 

See you real soon, Scouts!

Read more »

Monday, March 21, 2016

In the Art Room: My Fave Fiber Arts Lessons!

Hello there, long lost friends! Sorry I vanished for a pinch, I was living it up at NAEA Chicago. I promise I'll share with y'all that fun and fab experience (although if you are an art teacher and have been on any sort of social media for a hot minute then you've prolly seen it all!). Today I thought I'd give y'all a smorgasbord of some super sewing, weaving and fiber arts projects!
Every year, when we return from winter break, we start our big fat -n- fuzzy fiberin' units. I think we all have those areas of art teaherin' that we absolutely love and for me, this is it. From embroidery to needle-felting and weaving, all of my students seam seem to eat it up (sorry, that was my sad attempt at sewing humor). Last year, my third graders got a taste of embroidery with the Our School Has Heart mural. My current thirdies are working on a different kind of embroidery project which I'll be certain to share with you soon. Here's an Intro to Embroidery video I made just for them (and y'all, of course!).
Burlap is my fabric of choice when it comes to kids and embroidery because it's inexpensive and the blunt needles work perfectly with this hole-y fabric. However, because burlap is woven, it does like to unravel easily. For that reason, when prepping burlap for stitching, either draw a line of glue around the outer edges the day before sewing (which locks the fibers in place) or simply tape the bottom and top of the fabric with masking tape. Embroidery hoops aren't necessary...but I do love to give the kids the complete experience. For me, that means embroidery hoops! You can find 'em super cheap at the thrift stores or craft shops. Shoot, send out a school email and I'm guessing you'll end up with a stock pile!
Last year I also gave needle felting a go with my fourth graders! Because the kids work with very sharp needles, be certain you work with kids who are responsible. This would also be fun with small groups or with parent volunteers in the room. More here
I remember the summer my grandma taught me to embroider and cross stitch. I was instantly hooked and I do believe that's what's made me such a lover of all things fiber arts since. I have taught several after school sewing classes over the years and this embroidered and stitched pillow was one of 'em
This time gingham fabric, embroidery floss and sharp needles were used. 
And sewing machines! I have been fortunate enough to have about a half dozen machines for my art room. The kids LOVE using them!
Another project I did as a kid that I recently introduced my students to is string art. I remember making one of these in fifth grade and it being just about the best thing ever. My fourth grade students loved making these last year! 
We created these in celebration of Dot Day but I'm pretty sure you could make 'em whenever. I can't wait to do this project again!
What's that? You've never taught fiber arts before? Friend, don't you sweat it. Here's a great project to ease your students (and yourself) into the concept of fiber arts: paper weaving! Not only is this project great at introducing your students to the look and process of weaving but you can also throw in so much math and literacy (there are so many fab books on weaving, y'all!).
Use this loom-making lesson to focus on math skills...and make sure it's a day you are being evaluated. It's all sorts of STEAM-y. You'll look good, trust me!
Word to the wise: some students will understand the concept of weaving immediately while others will struggle. 
For that reason, I often introduce weaving on an oversized loom made from laminated paper. More info here
And I do a whole lotta peer tutoring. The kids are much better at explaining things to each other than I often am!
The following year, I introduce my second graders to circle loom weaving. This project is one that is a HIT with those kids who usually don't dig painting or drawing but do love working with their hands (boys are the BIGGEST fans of weaving, ya'll!). There will be frustration in the beginning but I make sure to warn the kids: This is something new. You've never done this before. Be patient with yourself, me and your friends. We'll ALL get there, I promise!
I have my second grade kids for 30 minutes, twice a week. After spending two art classes painting their plates, we notch our loom as seen in the video above...
And warp our loom. That usually takes us one 30 minute class. 
And then we spend the next couple of classes weaving. Hint: if you use the thicker yarn, weaving goes a whole lot faster! 
 Tree weaving is a slightly different spin on circle loom weaving. I have done this project with my third graders and I love it because I can also teach the concepts of landscape painting. These are always so pretty when complete!

If the kids have completed the circle loom weaving the year before, they'll understand the concept of tree weaving. 
Straw weaving is easily the class hit! I mean, who doesn't love to drink yarn, y'all!?


What to do with finished straw weavings? The kids have made them into bracelets, belts and even little people. Really, the fun is in this making.
Dunno if you have a stock pile of old CDs like me, but I've been hoarding them for this reason: CD weaving!

I was kinda leery of CD weaving for the longest time thinking that the slickness of the CD would cause the warp strings to move. Not so! It's so easy and fun to do. AND it's a quick alternative to circle loom weaving if you are sort on time (and patience as the warping process is MUCH easier).
Ojos de Dios weaving is just as popular as straw weaving in my art room. The kids could crank these out all day long! Once they've gotten the concept down, you might wanna consider expanding on their expertise. Just google Ojos de Dios and you'll see the wonderful ideas out there. 

Right?! Cake! Watch out, you'll end up with mountains of these in your art room.
 Pouch weaving is a project I reserve for my fourth graders. It is def a project you wanna build on from previous years as it's a lil advanced. AND time consuming. I usually allow my students to take this project home to get further ahead on. No videos on this project however, if you follow that link above, I'll hold your hand and walk you thru the process. Weaving the cord is my favorite part...
And it's a nice break from regular weaving. I love having the kids add the cord as it really finishes the piece.
Now if you are feeling inspired (or have older/advanced students), you might wanna try tapestry weaving! It's so fun but does require some focus. However, you won't regret the end results.

And that's all folks! I'd LOVE to hear your fave fiber arts lessons as I'm always on the lookout for more. Please lemme know what you and your students love to create in your art room or at home. 
 photo signature_zpsd10b3273.png
Read more »

Tuesday, February 23, 2016

In the Art Room: Printed and Collaged Winter Self Portraits by Second Grade

So I kinda sorta told the kids that if they painted and printed their winter selfies really well, we just might get the magic of snow. Snow seems to elude us in these parts...but not this year. Turns out these cute things really DID bring on the snow which was totes fab...except for the fact that it meant we've been working on these bad boys for a coupla days weeks. But that's all right. I mean, just take a lil look-see at how stinkin' awesome these printed and collaged winter self-portraits are!
I knew I wanted to introduce my second graders to printmaking but how? I remembered that my buddy Laura over at this fab-o blog taught her students how to create adorable winter selfies last year. I thought it'd be fun to add the printmaking element to this lesson and viola! Here you have it!
This lesson was chuck full o' art teacherin' moments: we learned how to use the elements of art to create pattern, we learned how to make both marker and ink prints, we learned how to create a tint of blue and print snowflakes in the background, how to draw selfies and design a pleasing composition. In short, we was busy. 

Lemme break it down for you:

Day #1: Intro to carving a print. We used Scratch-Art Foam Board but styrofoam plates would work in a pinch. I had created hat and mitten templates so that we could move on to the pattern designing and printmaking faster. I have 30 minutes art classes so I have to take the guess work outta some things. After the first class, most of us had this:

Day #2: On the second day, we continued our pattern design with ink pen. I encouraged the kids to go over their lines more than once just to make sure they'd have a successful print. Early finishers colored with marker and we started to pull marker prints. You can see that in the video...if you've never done it, it's magical!
Day #3: We are ready to use brayers and ink to pull prints! I like to use water soluble Speedball ink because it's the jam. I usually lay out a couple of colors and the kids rotated creating two different color prints on colorful copy paper. (This video was created for my third graders but it's the same idea so I thought I'd share!)

Day #4: We learned how to create a tint of blue and painted a piece of construction paper. We also used cut pieces of mat board to dip into white paint and print snowflakes. It was fun to introduce the kids to a coupla printing processes.
 Day #5: Selfie time! The kids had mirrors, this idea sheet and sketch paper. They had to create three thumbnail selfie sketches before moving on to drawing on their final paper. Pink chalk was used to show just how cold it was outside!
 Day #6: Time to start assembling our collage. We had a long chat about composition and balance before going on this adventure. The kids could use their favorite prints, whether that was their marker or ink prints (we'll use the extra prints for another project, stay tuned!). I happened to have a ton of scrap paper from another project so many of the kids used oil pastels to create scarves!
Some of the girls used chalk for their long hair. 
So in love with this self-portrait! I love how vibrant the marker prints are, it made my happy when the kids chose them. 
Several students decided to arrange their composition on a horizontal format. 
 Last thing added was the pompom! For that, have the kids wrap an 18" long piece of yarn many times around a 2" piece of cardboard. Carefully slide it off and double knot tie another string around the middle. Trim the loops of yarn and you have a pompom!

Now...maybe sharing these snowy selfies here will get me one more snow day, eep!

 photo signature_zpsd10b3273.png
Read more »