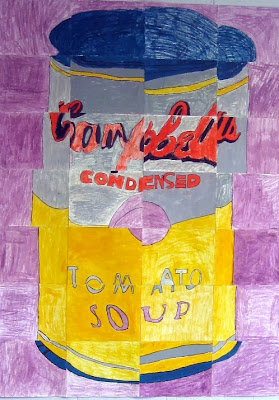
So you've seen it as a backdrop to some crazy DIY Campbell's dress, now it's time to shine some light on this 4th grade mural. In case you don't know the back story, I'll give it to you in 20 words or less: parent wanted posters for upcoming canned food drive; I wanted a mural for the cafeteria; student teacher Rebecca suggested this. Because she's a genius.
Because the kids were in the middle of creating their dots for this project, I decided to ease them into all things Warhol with a coupla of my fave books: Getting to Know the World's Greatest Artists by Mike Venezia and Dropping in on Andy Warhol by Pamela Geiger Stephens and Jim McNeill. As the kids finished off their dots, they trickled to the floor as I read. By the way, one little trick I use to reinforce the names of artists is this: as I read, I'll only read the artist's first name and the kids are to say the last name. I've found this really helps them retain the names of artists...although I have had this happen on more than one occasion:
Me: Vincent...
Kids: DA VINCI!
So, it's not a perfect formula.
Speaking of Vincent da Vinci, er, van Gogh, here's a Starry Night mural created by this same group of kids way back when they were in second grade town. So they are experts at this grid-thang.
Because this project was all Rebecca's idea, she did the planning. She found this image online and created a grid that would provide at least one image per student. We have between 24 - 25 students per 4th grade class so some early finishers were given another piece of the pie, er, can to draw. Rebecca made several copies of this can and colored each of those copies in a different Warhol-inspired color scheme.
This is actually one of the color schemes that didn't make the cut but I thought I'd share it with you to give you an idea. After each of the 4 copies were colored, Rebecca then cut them along the gridded lines.
And here's how they looked chopped to bits. Each 1" X 1 1/2" (and that's a rough measurement) was given a code on the back to help keep when gluing down the pieces. Each student was given a piece of paper that measured about (and I'll have to get back to you after a visit to school tomorrow for a more accurate measurement) 10" X 12".
 |
| Each of the 4 class' different cans cut, organized and clipped. Which would be all Rebecca's doing as I'm not nearly as organized as that gal. |
Directions went a lil something like this:
- Name and code (as seen on the back of the small paper) on the back of drawing paper
- As you start your drawing, look at the 4 edges of the little square. Where you see the beginnings of a line, like the curve of a can or the start of a letter, put a little tick mark on your drawing paper. Think about the scale of the drawing and how you will have to enlarge your drawing to make it to scale.
- Use a pencil, trace with sharpie, color with corresponding colors in oil pastel.
I'm not gonna lie, the lettering, especially the cursive font of the "Campbell's" wasn't a walk in the park. For those kids, another demo was given, this time more of a one-on-one or with some peer-tutoring thrown in the mix, and it worked. The kids really seemed to enjoy the process and they loved the result. As they finished their pieces, Rebecca spray glued them to a large sheet of bulletin board paper which you can see the pink coloring of in the photo below.
Okay, despite the fact that there's a glue bottle on the ladder, I promise you no Elmer's was used in the hanging of this piece. We had a couple of drawings where the edges were coming off the bulletin board paper and that glue was our solution. We had a wee bit of tack strip at the top to hang the piece from...but that didn't solve the dilemma of the fly-away-bottom (which sounds like a personal problem, if you ask me...symptoms of fly-away-bottom include a bottom that just won't stay attached, use Elmer's Glue only as directed). So, we resorted to the Hotter than Hades glue gun (seriously, I watched it burn a hole clear through my fingernail and It. Was. Awesome) which, at my school, is a Big Fat Hairy No-No. But my principal's away on maternity leave, and, as the saying goes, when the principal's away, the art teachers are gonna hot glue the crap outta the school. Or something like that.
I can't believe that in just two weeks, this girl is gonna leave me! I mean, how could she?! What am I supposed to do, teach or something? That's just crazy.
A coupla more close-ups. In retrospect, a chat about David Hockney's photo collages would have been a great tie-in with these cans.
Since Rebecca had to go and teach, she left hanging the last coupla cans in my hands. No problem, says me, I got this!
And with one tug on the extension cord, I managed to make this magic happen. Sigh. Seriously?! I really don't think this girl outta leave me, do you?
In all seriousness, I hope you'll give a big ole mural a-go at your school. The impact is amazing and the kids love it. If I've failed to answer any of your questions, please feel free to either email me or leave a comment...and I'll try my best to answer your questions. And thanks for dropping by!


