There's something you should know about me: I'm a fads-hater. I ain't proud. But there are current trends that make me wanna punch a pillow (kinda wimpy, I know, but I've got soft delicate hands and punching hurts!). Case in point:
- Skinny Jeans on Dudes. Seriously? I don't know what it's like to be a dude but I can only guess that those are...uncomfortable. They make me uncomfortable. Shoot, I actually can't even wear those because the moment I get my leg half way in, I start to experience calf-claustrophobia. Every time I've tried on a pair, I have a near panic attack and can't get outta 'em fast enough.
- Yoga Pants as Pants. Ladies, for reals? Ya'll act like it's so terrible when our Walmart friends show up shopping in their sweats and slippers. To me yoga pants is just the yuppie version of the same thing. You just worked out? Awesome. Now go change your clothes.
- The High/Low Hemline. Didn't we do a varied length hemline like 5 years ago? So this one is now high in the front/short in the back? Yippie, I can flash my spider veins and ghastly white thighs for all the world to see...
World, you're welcome.
So, um, yeah, not only am I a fads hater but I'm also a big fat hypocrite. But I promise I didn't recreate this hemline simply because it's "in". I kinda had to alter it somehow or this dip-dyed DIY would have me lookin' like a wannabe hippie. And I gave up that look in high school.
But I'm getting ahead of myself. Let's do the back-track boogie and start at the beginning...
So a couple of weekends ago, when I was on my dip-dying bender, I
decided to dye this 1990's Express rayon number that's been hiding in my closet since high school. Because I'm an idiot, I forgot to snap a photo of the dress before...but
the one on the left is very similar in pattern, color and style. And, of course, a DIY of mine wouldn't be complete without a little Antho-spiration.
I began by actually reading the directions a little bit more carefully. Turns out you are to completely dissolve the dye in a small amount of hot water before adding it to the warm water dye bath (I used warm water because I was afraid hot would shrink the rayon). Not dissolving the dye completely and simply adding the powder to the dye bath is the reason I had a couple of dark dye dots on my shirt. Live and learn.
Or not. This is my version of a measured portion of non-iodonized salt. For more dying directions, you can see my first attempts here.
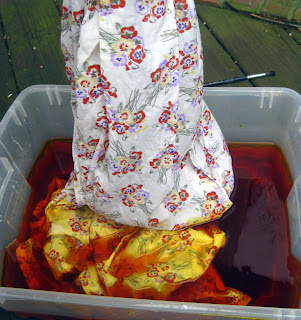
Originally, I had wanted only the bottom of the dress to be dyed. So, like last week, I double bagged the top of the dress and proceeded to slowly sink the dress into the yellow dye bath on on the left. I let it soak up to the waistline for about 5 minutes. Then I pulled the dress out about 5" and left the rest of it to soak in the yellow dye for 20 minutes. This helped achieve the gradation to yellow I was going for.
After pulling that out of the dye bath and doing the running-under-water-until-clear thing, I prepped a fuschia dye bath. I eased the now-yellow dress into that bath (see right photo) following the same routine: about 5 minutes of a soak to create a gradation and the bottom for 20 minutes.
And then I pulled a typical Cassie: I touched the top of the clean white dress with drippy fuschia dye fingers. So much for that double bagging. Knowing I'd never be able to wash out those drips, I proceeded to dye the top of the dress in the fuschia dye bath.
And, viola! One hippy-dippy-dyed dress. Now all I need are some Birkenstocks, some dreads and a couple showerless days and I'll be all set!
And that's when I decided that an altered hemline would update this dress a pinch. I figured I'd already taken this dress beyond the point of no return, why not hack into it and see what more damage I can do? Creating this high/low hemline is quite possibly the easiest thing in the world. Decide just how high you'd like the dress to go and mark the dress. Using a curved line reminiscent of an elementary school slide, stop just beyond the midpoint of the hem. Iron a 1/4" hem and stitch.
And done. One style I exclaimed not three days ago that I'd never EVER wear now happily resides in my closet between my skinny jeans and yoga pants.
Warning: High/Low hemlines are not for windy days and grannie panties. Just sayin'.
 |
| Outfit details: dress: Express; shoes: Lucky Brand; bow belt: made by me, DIY here |
As I was dying this dress and the one from last week, I realized one was made up of the cold colors while this was warm. I thought for sure they'd make great teaching outfits when teaching color theory...but I've since changed my mind on this little number. It's going to have to be a fun summer frock or beach coverup. I'm stamping this one "Not Approved for the Artroom". See, I kinda know what professional attire looks like. Fishnets, yes; high/low, no.
Until next time!


