Hello, friends! I've been packing and preparing for my upcoming trip to Chicago for NAEA and I'm so excited. While I do love me some art teacherin' conferencing, I don't love the multi-day sub plan preppin' it entails. The subs I've lined up are super-fab and I know they will have fun creating with the kids. However, they aren't art teachers by trade so I do like to have sub plans that are not only easy for them to follow but ones they can do with all my classes. This means less confusion for them and less supply prep for me! I think I've come up with a plan and I thought I'd share it with y'all in case you wanna use it too.
It's an autobiographical three-dimensional star! Our school-wide art show is coming up and I love to have the kids do a little writing about themselves. What better way to let their star's shine than with this fun project?
I mean, check out that three-dimensional star, y'all! I created both a sub video AND a photographed step-by-step. This way, if technology-town decides to be uncooperative, my sub-o can use the visuals. I'm printing each of the following photos with directions and plan to have them posted for both the students and the sub to refer to. But, before I get to all that...LET'S TALK ABOUT NAEA 2016!
I'll be presenting a handful of times and meeting y'all at the AOE "Meet the Bloggers" event! Here are the deets... * "Come Blog with Us - Three Art Ed Bloggers Share Tips" Thursday, March 17th // 12 - 12:50pm McCormick Place, North Building, N426c, Level 4 A presentation I'll be doing with some of my fave bloggy friends, Laura Lohmann and Phyllis Brown! Thursday, March 17th // 12 - 12:50 // McCormick Place, North Building, N426c, Level 4 * "Dress Like a Masterpiece: Needle Felting Wearable Art!" Thursday, March 17th // 1:30 - 3:20pm McCormick Place, Lakeside Center, E272b, Leve 2 PLEASE NOTE: This is a ticketed event. It is currently sold out. Sorry, buddies! * "Leaving a Legacy Without Losing Your Mind" Friday, March 18th // 8- 8:50am McCormick Place, North Building, N227a, Level 2 I'm so excited to present with Janine about something we are both passionate about: school-wide collaboratives! For some reason, NAEA has me listed as Cassandra Stephens (which, technically, is my name but I ain't fancy so I never use it!). * "Meet Your Fave Art Teacherin' Bloggers!" I'm super excited to meet y'all and my fave art bloggers! Here are the deets in a super cute graphic that I didn't create (thanks, Alecia and AOE!)...
I'm seriously cannot wait to see/meet/chat/high five all y'all! But until then, let's sort out these subbie plans, shall we? Below is the video I am leaving with the sub. I don't anticipate that she'll get thru the entire lesson while I'm away. However, this will be a super great way for me to ease back into things, what with the kids all working on the same project. I like a mellow-comeback after being gone for a spell, don't you? Here's a wee list of supplies used in this here art makerin':
* Copy paper cut to a square 8.5" X 8.5" * Sharpies * Markers * 12" X 12" black construction paper * Metallic markers * Glue * Chalk
This project was inspired by my current obsession with Sly and the Family Stone and the song Everybody is a Star. Take a look-see!
And here's my sub plan video! (By the way, in case this sub plan doesn't suit your fancy, check this one. Also, I'm always sharing video'ed plans here so you might wanna subscribe). Sidenote: I am going to have my sub create a stockpile of these stars for my kindergarten friends and for any kids who have a hard time following the directions. We don't wanna leave any artist behind!
(Please ignore the crazy image...and the fact that I have blue chalk smeared on my cheek for about 1/8th of the video). In case the video isn't the best format for y'all, I also snapped step-by-step photos because I'm such a giver. Here you go!
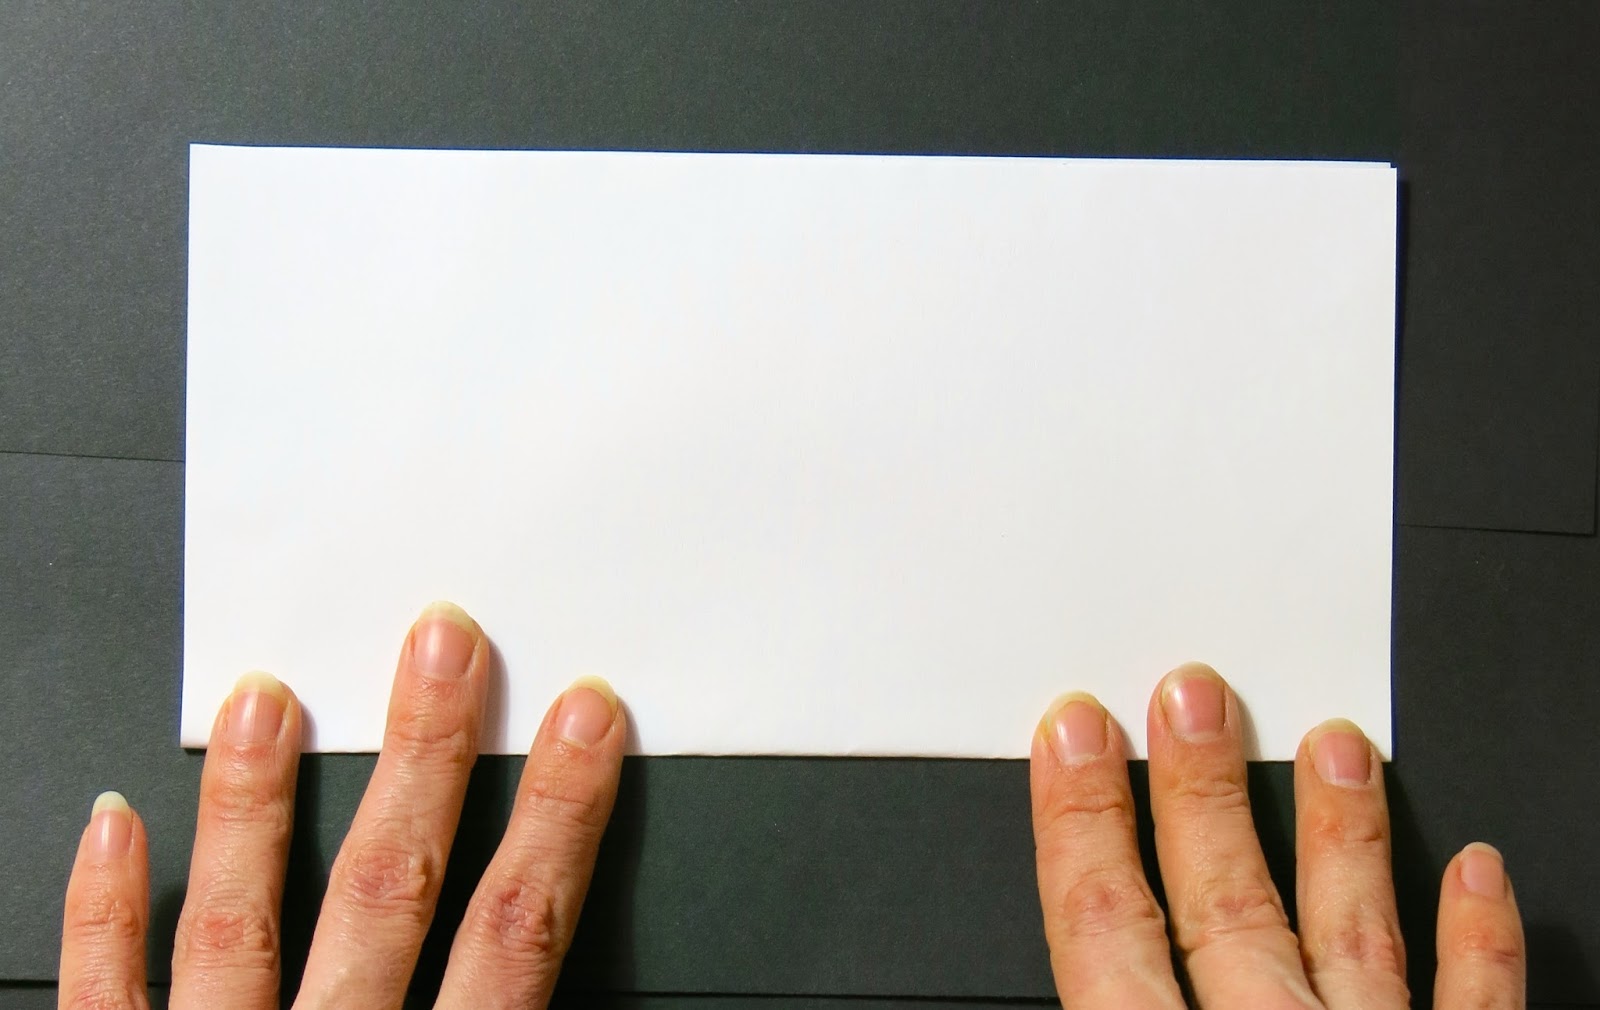
1. Fold copy paper square in half.
2. Be sure to press the fold down firmly.
3. Each corner has been labeled (my apologies for the blurry photo).
4. Take corner C and bring it to the middle of the line segment between corners A and D.
It should look like this. Press the fold firmly.
5. Then bring D up and fold a small triangle.
Press firmly.
It should look like this!
6. Now bring the left hand side over to the right.
It might be difficult to fold all of those papers. Be patient with yourself and your paper!
It should look like this.
7. Now, using a pencil, put a dot in the corner of the two angle lines on the left side...
and another dot on the other side just a little below the middle of that line segment.
Like this!
8. Connect the dots with a cut line and...
Snip!
9. Open it up and you are now the proud owner of a three dimensional star! Congratulations!
10. Now, using a Sharpie, start in the middle of your star and trace each creased line that you made with all of that folding.
You'll end up with ten sections to your star. Each section you can decorate with a different pattern and design.
Here are some ideas for you!
11. Draw your designs in each section.
12. Use markers to add color.
13. Once you are finished, place your star in the middle of a piece of black paper and trace it.
Your pencil lines will be barely visible and that's perfect!
14. Let's write about what makes us a star! As you write, be sure to hop over the outline of the star. You might want to begin each sentence with "I am a star because..."
Fill up that whole page!
15. To get your star to pop out, all you have to do is fold along the long lines of the star.
The long lines of the star should be folded up (that's called a mountain fold) and the short lines of the star should be folded down (that's called a valley fold!).
16. Add a tiny dot of glue to each tip of the star.
17. Press each tip of the star and hold for about 10 seconds to get it to stick.
18. Use chalk to color on your pencil line of the star.
Which should look a little like this when you are done.
19. Use your finger to push the chalk away from the star.
20. Let's do the same thing to the outside edge of the square! Color...
Then smear and viola! You are finished and YOU are a STAR!
Art teacherin' friends, I do hope to see y'all real soon! PLEASE feel free to use this lesson. I'd love to see what your kids create. You can always snap a pic and share it on instagram (you can find me here) with the hashtag #everybodyisastar.
First Day o' Feb Monday: Are you kidding me? I've been counting the days until I could bust out my heart-tastic, LOVE-ly wares, y'all. heart print top: Buffalo Exchange; belt and palette print skirt: Pin Up Girl Clothing; hat: New Orleans; tights: Target; shoes: Fluevog
What's happening, my friends? I feel like it's been ages since we last chatted even tho it was only Tuesday. I do try my hardest to see you here three times a week but sometimes the week gets ahead of me and the next thing I know, it's Sunday. How does that even happen? Time flies when you are a procrastinator, y'all.
In other news, Monday was the first day o' Feb and I was beyond ready to bust out some heart-y/love-y outfits. I also am leaving you with my latest filmed sub plan! I had to pop outta town for a coupla days and I was thrilled to have my same sub from jury duty land. She was very excited when I told her I had another filmed lesson ready for her. Hopefully, her day went well. I thought I'd share it with y'all in case you need a quick fun project for Valentine's Day!
Until next time, love y'all!
This lesson is based around the book Love Monster by Rachel Bright. I don't own the book so I had my sub read aloud the youtube video below and then dive into my sub video you see above! For this lesson, the kids needed Lost Love Monster sheets, glue, scissors, Sharpies, googley eyes and paper to create hearts.
The story is super sweet and one that my sub could play for all of my kindergarten through fourth grade kids. For kindergarten, there was a modified worksheet that didn't entail as much writing.
Sadly, I forgot to save the word doc of the sheet or I'd share it with y'all here! But I did make a couple of examples that I had on my white board which shows what the copy at the bottom of the sheet said. You can also sneak a peek in the video. If you wanna keep up with my video'd lessons, you can subscribe here, kids!
Love and Kittens: I made this dress (and matching sweater!) a coupla years ago and it's still my fave V-day, kittentastic look. I can't believe I didn't stitch up a single Valentine's dress this year! My lil sewing machine is gather dust at the moment, boo. dress: by me, here; belt: amazon; boots: Hunter
Jim Dine Heart Dress: Okay, let's be honest: Valentine's Day in art teacherin'land is also known as Jim Dine Projects Day, amiright? Love this artist so much I needle felted this dress dedicated to him!
Color Wheel Skirtness: I realized the other day that I'd never worn this bad boy to school! The kids loved it but mostly the big bow. The lady at the bank was not as impressed by my big bow, I'll have you know. Color Wheel Skirt and Top: DIY here
If you follow me on Instagram, then you've seen this photo already! We did some color mixing experiments in first grade this week and they loved it! I thought I'd share with y'all how. I used three clear cups for the mixture of each secondary color. In front of the kids, I put an inch of water in all three cups. Then I put drops of food coloring in the outer cups. In this case, yellow and red. I folded a paper towel up (I used Viva paper towels, if that matters), placing one paper towel from yellow to the clear cup and another paper towel from the red to the clear. Immediately, the colored water began to creep up the paper towel. To help the process, I raised the height of the outer cups with stacked CD's. By the end of art class, the kids saw some progress but the following day yielded the best results. They loved it and it was so easy!
100 Day of School!: I forgot to share with y'all my outfit for the 100th day of school...or, as I should call it, Any Excuse to Wear My Rainbow Wig to School. The kids were curious about the rotary phone pattern so we busted out my old phone and played on it! wig: Gothic Lolita; dress: ModCloth; hat and cherry pin: vintage; faux fox sweater: DIY made by me here