Hey, guys! Can I just say how happy y'all have been making me? I've heard from so many of you that are weaving in your art room and beyond (I'm actually working on a weaving outside of the art room too, I can't wait to share that with you!). Thank you so much for your emails with helpful tips, tricks and projects as well as all the weaving love! Y'all are seriously the best. Today I thought I'd share with you a weaving project that is great for a coupla reasons which I shall share with you in glorious bullet points as I'm feeling very bullet-pointy:
* First, it can be as easy or as difficult as you decide to make it. Weaving a basic God's Eye is simple but Ima gonna show you some that'll blow your mind. * Second, it's a great project for those early finishers that still have the weaving itch. I use much of the same weaving terminology when explaining it to the kids which not only reinforces vocab but also helps the process click even more. * You can throw in some culture and contemporary art while you're at it! The Ojo de Dios was originated by the Huichol people of western Mexico. Originally, they were created when a child was born. Each year, a new layer of yarn was added to the weaving. Once the child turned 5, the weaving was complete and hung in the child's home. It's believed to be the eye of God watching over and protecting the child. Cool, right?!
My kids have thought so. This weaving was completed by a third grader just this afternoon! I shared with the kids a wonderful God's eye I'd found at the thrift store and they were interested in embellishing theirs further. This worked out perfectly during art class as I had several kids finishing off other projects.
So a traditional Ojo de Dios looks like this. I scored this beauty for a coupla bucks at the thrift store. The kids were so inspired by it today!
However, weaving Ojo de Dios isn't limited to the Huichol people. There are many contemporary weavers creating stunning versions. I'm so inspired by these beauties by Jay Mohler that I'm thinking of creating my own! Has anyone every tried their hand at this kind of weaving? I'd love to learn more. So, just how does one go about creating a simple Ojo de Dios? I created a coupla clips for you! So, get your kitten mittens on some sticks (or straws as I'll show you in the clip) and let's get started!
In my room, we didn't use straws but various sticks glued together. Like popsicle sticks, chop sticks and toothpicks!
The weaving comes together very quickly. You'll be surprised how fast and fun these weavings are!
I mean, the majority of these were completed in one art class! These were created by my third grade kids.
And these are by my second graders! We added brass bells to the ends of our weavings with Twisteez wire. A paper clips was hot glued to the top so that they could be easily hung for display. Popsicle sticks are the perfect thing for first time weavers. The flat surface of the stick gives the kids plenty of room to number each stick (see video clip for complete details). And, for some reason, I found that the kids grasped the process of weaving much better on these sticks as opposed to other sticks. I've no clue why. Whatcha y'all think about that? A kid-mystery, says me.
I just wanted to give you a sneak peak at the backside. The front and the back of the weavings look very different. I stress that to the kids over and again. This is the key to knowing whether or not you are doing it correctly. Again, if you watch the clip (they're short, I promise), you'll get what I'm saying.
I'd love to hear about how your weaving adventures are going! Have you had your kids create Ojo de Dios before? What tips and tricks do y'all have? For more weaving goodness, feel free to check these posts out, y'all! The Weaving Series: Paper Loom Weaving (perfect for first grade) The Weaving Series: Straw Weaving (second grade and up) The Weaving Series: Circle Loom Weaving (second grade and up) The Weaving Series: CD Loom Weaving (second grade and up)
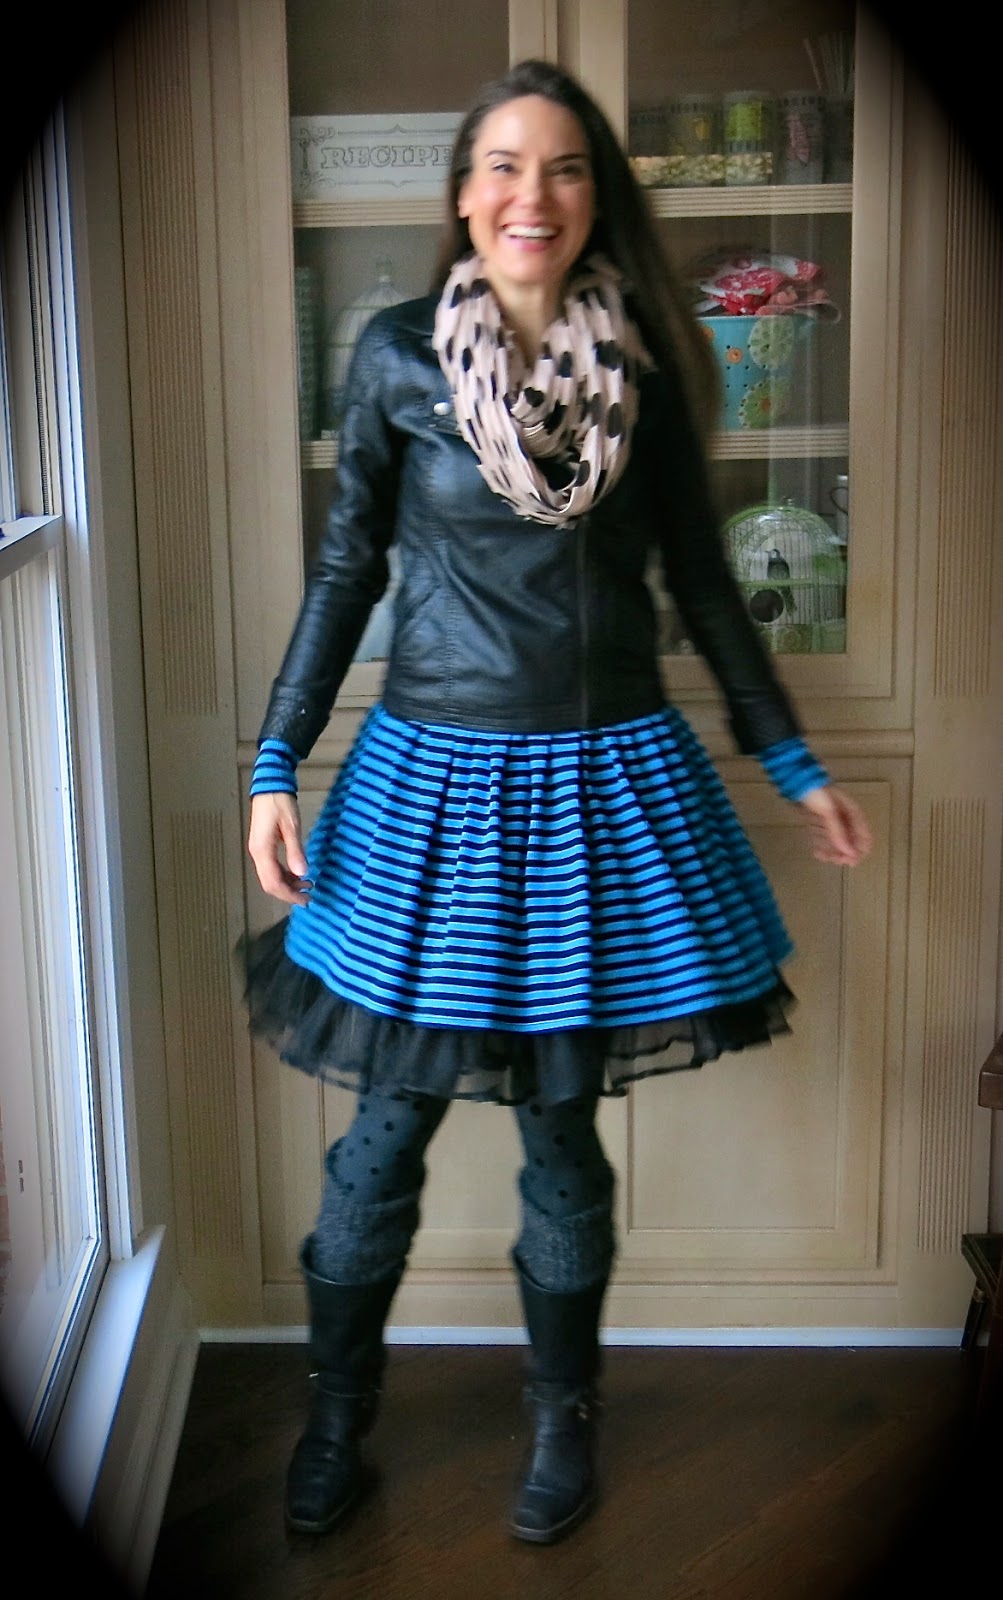
Welcome Back, Monday: Oh, don't let the smile fool you. It was so hard returning to school this week! Two weeks of staying up late, catching up on shows, hiking, eating a nightly popcorn snack and sleeping in 'til 10am was just so hard to give up. Thankfully, Monday we didn't have kids which was a nice ease back into art teacherin' land. Keith Haring jacket: DIY here; dotted scarf: Old Navy, maybe?; Betsy Johnson Dress: found at Buffalo Exchange; dotted tights: dunno, Target?; leg warmers and crinoline: Amazon; Frye boots: lucky $39 score at Journey's years ago. I know, sometimes, I hit the lotto.
Well, howdy, kids! I hope everyone's return to the real world has been a good one. Mine had it's ups and downs to be honest. I'd have this great burst of energy in the morning but by midday, I was just spent. This coming week, my plan is to go to bed a lil earlier and start poppin the vitamin B like it's popcorn. What do y'all do when you hit that sluggish slump?
In other news, have I completely wore you out with all of my weaving posts? I sure do hope not as I've got more coming your way! Stay tuned this week for a simple weaving project for those early finishers and a project for your middle and high school kids. In the meantime, I thought I'd share my weaving prezi with y'all! I created one that showcases weaving from around the world. My students have really enjoyed it, I hope you and yours do as well.
Just click on this link and it'll take you right to the presentation! I'm working on another presentation of contemporary weavers to share with my students next week. I'll be certain to post it here so you can borrow it as well.
Now, let's talk Artsy Book Club! In case you didn't know, we'll be reading The Art Spirit by Robert Henri and I'd love for you to join the fun. Here's all I ask:
* Get your kitten mittens on this book! I found mine used very cheap on Amazon.
* Read the first 51 pages! This book doesn't have chapters like your average book. Instead, it's full of commentary from Henri given during talks, articles and fragments of letters. I noticed that page 51 seemed like a good place to press the pause button.
* Let's chat! I'll be sharing my thoughts (my apologies in advance) as well as posing questions here. Please do chime in, I'd love to hear from you!
So, are you in? I'd love to hear who is reading this classic with us. It seems like the perfect art teacher read, dontcha think?
A better glance at that Keith Haring jacket. You know, no one ever touts the benefits of pleather but I'm hear to tell you, a pleather jacket will keep you pretty warm, kids. It ain't gonna breathe at all so you will sweat your socks off but, by golly, you'll be warm!
Orange You Glad It's Tuesday?: Whilst teaching kindergarten on this particular day, I felt a little tickle on my leg. I looked down to see a sweet girl just barely touching my leg. "It's so orange!", she said when I looked at her. "Too much carrot juice," says me. "OH! I hate carrot juice!" was her reply. "Good thing." I'm so gonna get fired one o' these days. sweater: Urban Outfitters, old; skirt: vintage, thrifted; tights: Target; shoes: Dolls by Nina
Not Appropriate, Mrs. Stephens! Wednesday: I was informed by a fourth grader on this day that my attire was, "not appropriate, Mrs. Stephens! It's too cold out for tights!" I believe she was right, I nearly froze walking out to my car! blouse and sweater: vintage, thrifted; skirt: super old, JCrew
Two Hour Delay Thursday: Temps dipped so I enjoyed myself a couple extra hours of sleep. Which was great because I'd enjoyed myself a couple extra hours of stay-up time the night before. I watched the movie Gone Girl while attempting to knit. Have y'all seen that movie? I'd not even read the book so I walked in cold. It was so good! I think I only got about five rows knitted and dropped about 10 stitches in the process! dress: ModCloth, last year; brown fishnets: TJMaxx; yellow tights: Target
Welcome, Visitors! Friday: So I vaguely recall my principal mentioning that the superintendent, a handful of board members, my administrators and a state representative where gonna be in the school on Friday and would pop in the art room. And by "vaguely recall" I mean I totally forgot! I had my lovely first grade friends in the room who had just finished learning about Picasso's Blue and Rose periods and there thusly painting with cool and warm colors. The kids did great but I gotta tell you, I was a nervous wreck teaching in front of all those folk! Whilst wearing this craziness, of course. blouse and shoes: thrifted; sweater: old, For-never21; skirt: DIY, details here; tights: Target; belt: Amazon
Wuz happening, my wild and wacky weavers?! I hope the return to art teacherin' (if that's your bag) has been a smooth one. Personally, I find it a cruel joke to return to school the week of a full moon but, once again, the powers that be neglected to ask my opinion. When will they ever learn? So, show of hands, how many of y'all decided to go down Weaving Street this month? If you need a refresher, you can start with this paper weaving lesson then transition to this super fun straw weaving project. I just had my fourth graders start their pouch weaving and they were beside themselves with excitement. Like, they were all, "enough with the History of Weaving prezi, lady, let's weeaaavvveee." I'll be sharing that prezi with y'all later this week (still tweaking it) but you can find the complete steps for pouch weaving starting here.
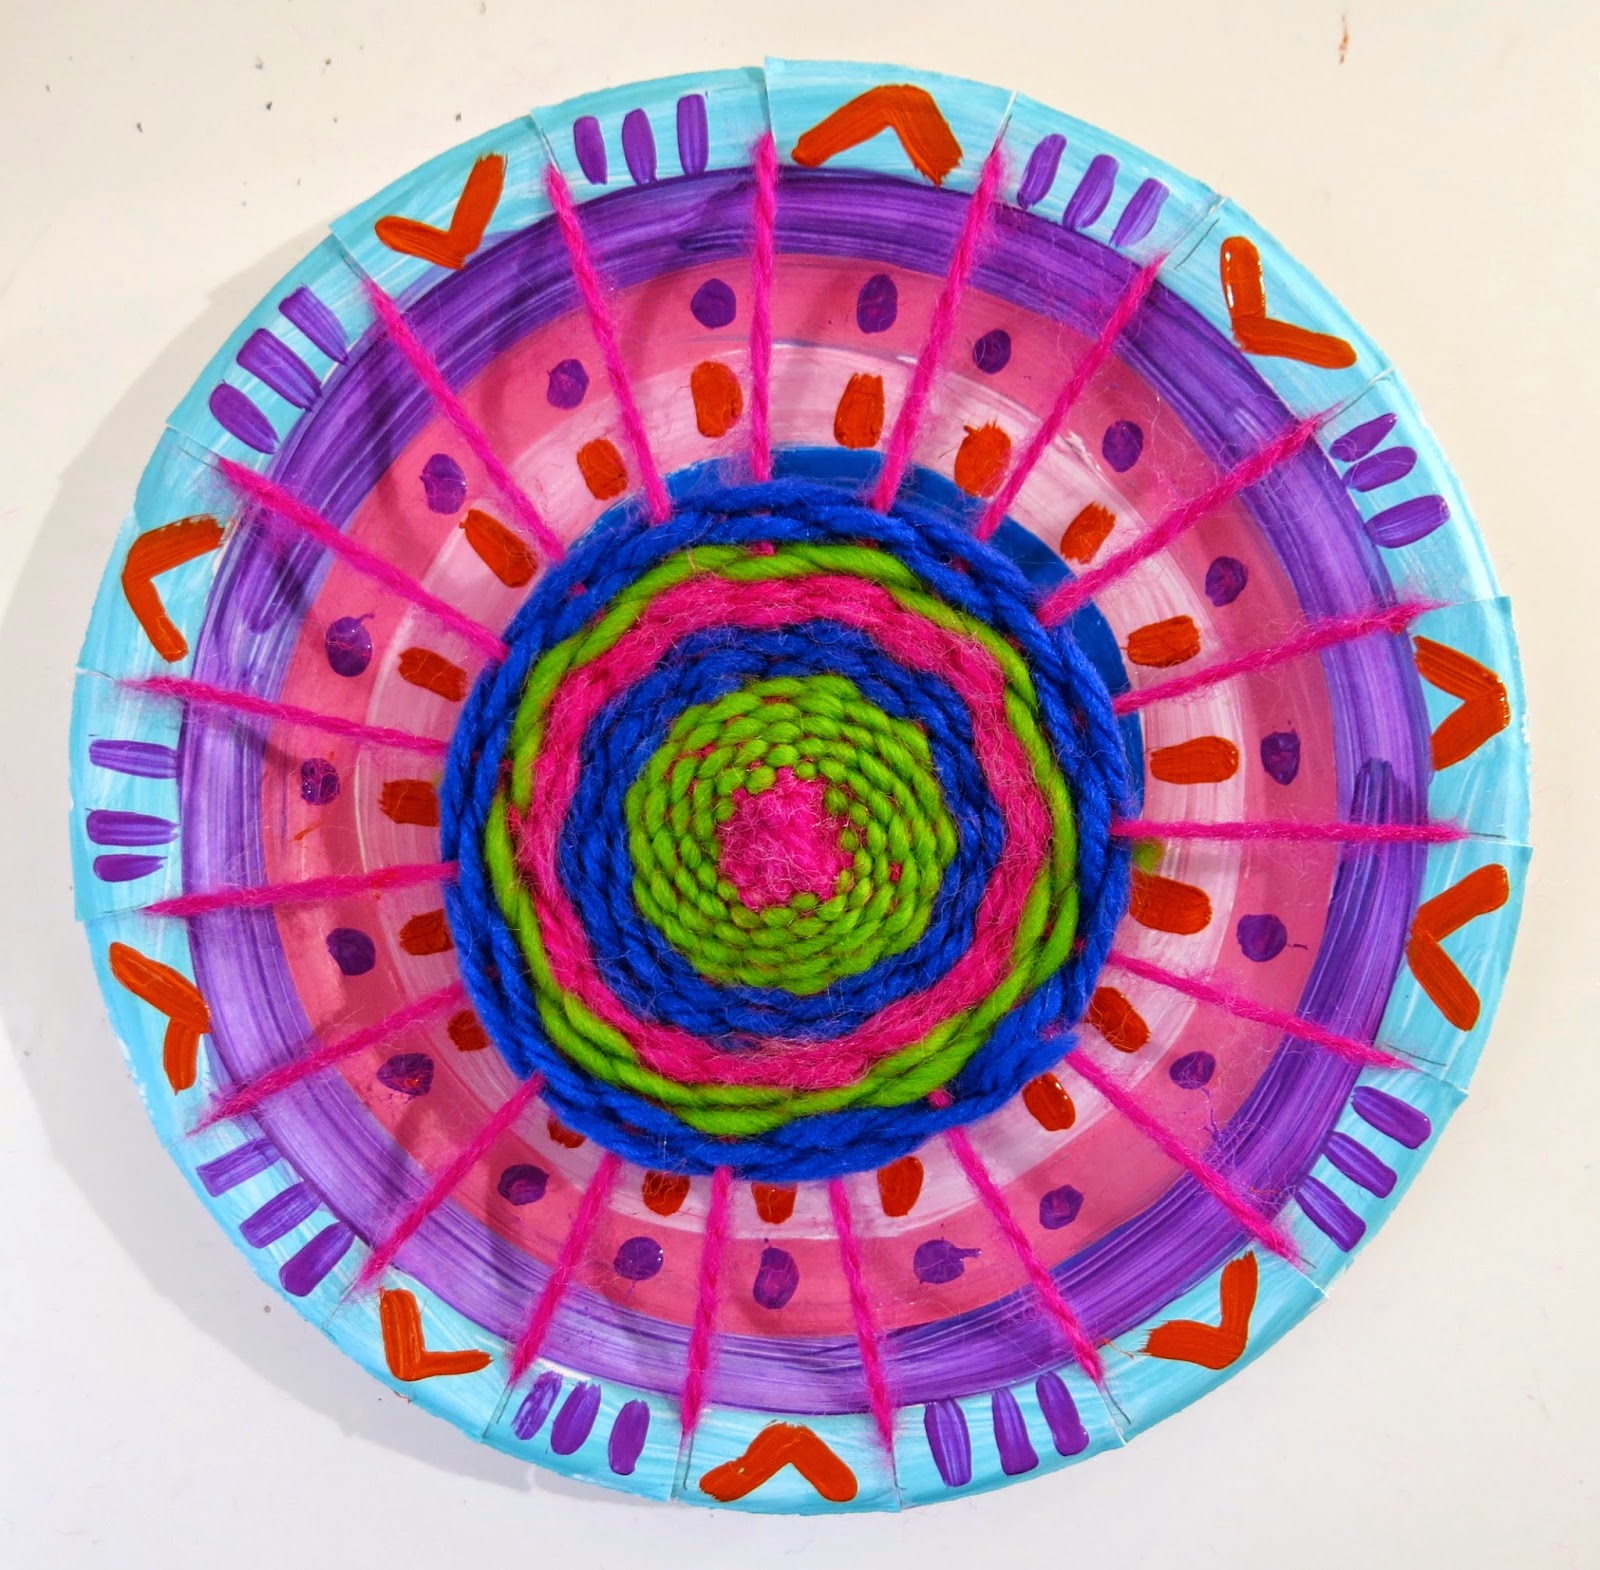
But let's talk Circle Loom Weaving, shall we? This lesson I do with my second grade kids but if you've never taught weaving to your students before, I recommend teaching this to third grade. Again, always start with that basic paper loom weaving as it teaches all the vocabulary and techniques making all weaving projects that follow much easier.
Supplies:
Chinet Plates: When plate weaving, I always use these. They are the thickest and most durable plates. I like to use the smaller size.
Yarn: Any kind will do. Funky yarn is fun but only use that for the actual weaving portion. For warping, use regular yarn.
A Loom Template: I have two for each of my five tables so the kids can share. Each template has 19 notches on it.
Masking Tape: You'll need this to tape down the initial warp strand. And for closing the mouths of those "I Can't Do It" kids. Oh, I kid! Kinda.
Last year I typed out all the steps which you can find here. I'm hoping that you'll find the video even more helpful. If you still have any questions, please ask in the comments and I'll get back to you.
For those of you that don't like video, here's some pitchers and werds. Place the loom template on the painted plate. Trace and cut the 19 notches. I always encourage the kids to count and be certain they have 19 lines drawn before cutting (as some will end up with 190 which is not what you're going for).
NOT GONNA LIE: Warping is the least fun part. Especially when some of the kids stop listening and get stuck on repeat: I Don't Get It. When that happens, I have everyone put everything down, we stand up, we stretch, we shake it off. Then, I tell 'em that they are going to sit back down, not touch a thing, and listen to me. Again.
I have also found that peer tutoring is priceless. These kids speak the same language. Have them help each other, they communicate much better with each other I have found!
Once you are beyond the warping hump (um, the whuh?), the weaving portion is much easier. That is WHEN you get beyond that initial confusion I mention in the second clip. However, if you do that little trick that I share with you, I think you'll find that the kids get it and will really take off with weaving. They love to sit on the floor and weave and chat. I let them sit with buddies, sometimes we go outside if the weather permits. It's just such a fun, relaxing project...once you are beyond the warping and initial day of learning to weave. Stick with it, you'll find that you and the kids will love the process!
Granted, this weaving project does take time. However on Thursday I'm going to share with you a similar weaving project that takes have the amount of time for those of you that are limited. Until then, I do hope you found this helpful and will consider giving weaving a go! And I'd love to know, what weaving projects do you just love to do?
Hello, weaving friends! Welcome to the second installment of The Weaving Series during this Wonderful World of Weaving month formerly known as "January". In case you didn't know, I'll be sharing with y'all some of my favorite weaving projects all this month each complete with step-by-step photos and short video clips. So, what's in store today? Drinking Straw Loom Weaving! Straw Loom Weaving is a great follow up project to Paper Loom Weaving as it builds on all of the previously learned skills. The youngest grade level I've done this sort of weaving with is second grade. However, I believe upper grades would enjoy this fun, easy and totes educational weaving project as well. Let's get started, y'all!
Supplies: Large Drinking Straws: I like the big ones without the bend in them. I've scored them at fast food joints and the grocery. I cut the straws in half. Each kid will need four straws. Scotch Tape: You'll need this to adhere the yarn to the straw. I like this kind of tape better than masking because it can lie flat against the straw and not impede on the weaving process. And don't nobody like their weaving process to be impeded upon. Yarn: Four strands cut to the desired length of the finished weaving. In this demo, mine was cut to about 9". Even More Yarn: For weaving. Let's get started!
You'll begin by warping your loom. This is the fun part, at least according to the kids, a you'll be "drinking" the yarn. If you watch my clip, you'll bet an even better idea on the process. Start by holding the end of the yarn at the bottom the straw. Place your mouth on the opposite end and inhale. The yarn will pop out the other side! Warning: do NOT inhale too much as you'll end up with a yucky mouthful of yarn.
Yee-ouch, nice nails. Tape down that little yarn tale with some Scotch tape.
And do that four more times.
Tie all the ends together with an overhand knot.
Once you're warped (and, admit it, you've always been warped), you're ready to weave! If you watch this short clip, you'll get the process.
Hold the straws together in your non-dominate hand with a tiny bit of space between 'em. Use your thumb to hold the end of the warp string while your other hand begins the process of over and under.
When you reach the end of the row of straws, go around the end straw and begin the process again.
In this final clip, I'll show you how to finish off the weaving and remove it from the straw loom. Take heed: the kids will often want to slide their weavings completely off their straw loom as they weave. It's important that they do not! Their weaving should slide off the ends of the straws naturally as they are weaving along. Also, they will freak out when their weaving begins to slide off because it will look a little loose. Set their minds as ease and tell 'em that it's perfectly normal. No need to freak out.
So what do you do with a straw loom weaving once it's complete? Well, my kids love to make them into bracelets by simply tying the ends of the warp strings together. They've also made belts, bookmarks and wallhangings. I'm personally dying to get some yellow and blue yarn and create woven Minons. What about you? Have you done this kind of weaving with your kids before? If so, what have y'all created! Please keep the convo going in the comments, kids. ALSO! ARTSY BOOK CLUBBIN' KIDS (that's you, you can join the fun here!) don't forget that we'll be reading The Art Spirit by Robert Henri beginning Monday, January 12th! The winner of the Artsy Book Club Giveaway is...Leah! Congrats, buddy!
Well, kids, whatcha see here is prolly the most tackiest of my DIY's to date. And that's really saying sumpin, having created such tacky-tastic gems as this and that and, oh, a lil bit of WTFunk-is-that?! But, when I got it in my head that I needed to create some woven mobiles for my art room (I have no earthly idea where these ideas come from but I seriously blame the high voltage of sugary cereals that I consumed as a child. Some folks have LSD flashbacks, I have Cap'n Crunch Cranium, y'all), for some reason, weaving on an embroidery hoop came to mind. Which is kinda odd seeing as how 1. Weaving is not my most favorite thing as it's repetitiveness bores the crap outta me (even though it's my fave thing to teach!) and 2. This DIY looks so 1970's and, well, I just don't dig the '70's, y'all.
But let us first talk about where this idea came from, shall we? Y'all might recall that my seriously awesome second graders created these circle loom weavings this year. Whilst decluttering this summer (which only lasted a day before I put everything back and decided I needed to keep it alllllll as we hoarders are prone to do), I stumbled upon my cache of embroidery hoops. I set aside a class set and just kinda had a staring contest with the rest.
"What am I gonna do with you, hoops?"
"DUH, make us into something totally tacky. It's what you do."
Embroidery hoops, these days, I tell ya. No respect for their hoarders.
Speaking of starring contest, if you look deep into those kitten eyes and say "Asha!" three times you'll soon find yourself under her magical cat spell and feeding her way more than her daily allowance of cat food, cheese and whipped cream. True Story: I left a container of pesto unattended for a full 30 seconds on the kitchen table and this fat cat was face deep in the stuff. Word of Advice: Don't eat the pesto at mi casa, ermkay?
If you decide that you need some totes tacky weaving wonders in your life, you'll need to scrounge up the following:
* Embroidery hoopage
* Yarn. I liked using the thicker stuff because it made the weaving process go by a lot faster.
* Um, that's it! Let's do this people!
Since warping el loom-o can be a touch confusing (and if you don't know what "warping" means, no worries! Ima getting there), I thought I'd lay this whole process out for you in a coupla formats. Just below you'll find I made a short clip of me warping the loom and starting the weaving process. However, if you're like me, you also like step-by-step visuals which I've also provided. Because I'm a giver, y'all.
Video footage-ness. I do hope I made something close to sense although my money is on nonsense.
If you didn't understand the video or just can't stand the sound of my voice (you and my husband both), then lemme lay it out for you step-by-step style, kay? Here we go:
1. Begin by tucking the end of the yarn under the hoop's screw (heehee), wrapping the yarn around the back to the bottom, wrapping it around the front again and tying the long end to the short end in a double knot. See photo, please, as that sentence made no sense.
2. Yay, double knot! Adjust the knot so that it is centered. What we're gonna do now is warp the loom. That's fancy talk for wrapping a buncha strings around the embroidery hoop for us to weave over and under. So, to get started, flip the hoop over so that the knot is on the back.
3. Like so.
4. Now, let's begin rapping, ermay, Eminem? To do this, you'll be wrapping the yarn around the hoop. I have not cut the yarn from the skein as I don't know how much I'll need. You can cut it when you are finished.
5. As I'm wrapping, I'm bringing the yarn around the loom. As I go, I'm pulling it just tight enough to hold the yarn in place. Since the wooden hoop has a little tooth to it, it holds the yarn in place as I go. However, I can adjust it and evenly space the yarn by simply scooting it around the hoop.
6. The goal is to end up with an odd number of strings wrapped around the loom. It doesn't matter what that odd number is so you can experiment to see which look you prefer. For the first timer, I'd go with a lower odd number so that there aren't so many warp stings to weave over and under. I decided to do 13 so Ima gonna keep going till I get there.
7. Still going...
8. And, viola!, I've got 13 wraps around my loom! Now take a moment to cut your warping yarn (I cut mine the length of my loom and about 3") and evenly space out your warp stings.
9. Now that our loom is warped and ready to go, let's weave, kay? That rogue piece that you cut free from the yarn is now your weaving yarn or weft yarn if we're gonna use our vocab correctly. When you begin to weave, it does not matter if you go clockwise or counter. However, whichever direction you decide to go, be sure to stick with it! In this photo, I'm weaving counter clockwise and staring by going over the first set of warp strings (both top and bottom of the warp strings) and then under.
10. Keep going over and under...
11. And then pull that weft yarn tightly so that what you've woven gathers in the middle and looks like a mess. And then resume weaving.
12. When you run outta yarn, simply tie your new piece of yarn to the last. And keep going until you have a big fat furry weaving like this one...
13. BOOM! Super Tacky Woven Delight. Your inner hippie love child will thank you. By the way, to end this, simply tie the last piece of yarn you are weaving with to one of those weft strings and you're finished! I plan to loop a piece of yarn though the top of the hoop and hang these fun furry guys in my art room. We'll see how the Fire Marshall feels about that, ahem.
OH! I just wanna mention that those step-by-step photos wouldn't have been possible without the hubs. He's on vacation this week which means a coupla things:
1. He's on blog photography duty.
2. He's honing his DIYing skills. Which, you gotta admit, could use some work. When I told him I'd broken my glasses he informed me, "I'll fix them!"...and this is how they were returned to me. When I gave him a questioning "Are you for realz?!" look, it was met with a "BOOM! Nailed it."
Yeah, much like I did these Totes Tacky Wild -n- Wacky Woven Wallhangings...BOOM! Nailed it!
For more weaving fun, you can check out these blog posts: