Monday, December 24, 2012

In the Art Room: Kindergarten Reindeer

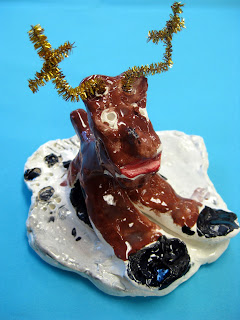
Have you ever seen a reindeer that A.) Resembles Jay Leno and B.) Looks this cute resembling Jay Leno? I didn't think so.
Happy Christmas Eve to you! So the story goes that if you've been well-behaved, you'll be getting a visit from some chubby dude and his entourage of reindeer this evening. Lead by the one and only Rudolph, of course.

My kindergarten artists spent several art classes sculpting these reindeer masterpieces that, despite leaving me feeling as though it was not Grandma that got run over by reindeer but the Art Teacher, made me seriously proud. And, after one told me, "My mom is going to be so happy about my reindeer that she is going to say, 'Oh! Goodness that is the best little reindeer ever!'", I knew they were proud too.
How on earth did these five and six year olds create such amazement? With a half an hour, it really was nothing short of a Christmas Miracle. This lesson had some serious "Okay! Plan B!" moments so I thought I'd share with you how they were created. 
Our inspiration, of course. I've had this book since childhood. In fact, it even has my name written on the inside in my five year old handwriting.

For this lesson, we used the following:
  • Low fire clay
  • A stencil for the base
  • Brown, clear, white, black and red Stroke and Coat Glaze
  • Clay mats
  • Skewer sticks
  • Toothbrushes and cups of water
  • Ziplock bags and damp paper towels
  • A mountain of baby wipes
Several of my students put their reindeer together just as they would draw them: with their legs all in a row. 

I broke this lesson down in many days after trying to cram too much in during one class. When that lesson ended in tears (I managed to dry up before the fourth graders walked in), I decided to drag the lesson out even further. I'd rather give the kids too much time then to rush them. Being a super slow processor myself, I understand the need for lots of time. And tissues. Here's how I broke it down, yo:

On the First Day of Reindeer Clay, I gave to them one grapefruit sized piece of clay. I told them something crazy like, "hold your clay in front of your chest above your clay mat, drop it and pound it flat as a pancake." For a full minute the art room sounded like an elephant stampede with kid giggles throughout. Once flattened, the kids flipped their clay over to the smooth, not-pounded-on side and used their skewer sticks to trace the base shape. And that took us the entire art class, believe it or not. Each child was given a damp paper towel and a ziplock bag with their name on it. They were to "wrap their clay up in its blanket, put it in it's sleeping bag and say 'nightie-night'" until next time.
On the Second Day of Reindeer Figurines, I gave to them one piece of clay the size of a tangerine. We chatted about how many legs a deer has and I showed the children how to divide their clay into fourths. Twist sphere of clay in half and Viola! two pieces of clay. Twist other two pieces and Double Viola! now you have four. From there, they learned how to roll their clay into coils the length of their finger.
On the Second Day of Reindeer Clay, that really wasn't all, for the head I gave them one small ball. Once their coil legs were complete, they created a head. For one class, I tried to have them create all the coils, the head and assemble. That proved to be a reindeer train wreck. We just didn't have the time. Plan B for the following classes was to create all of the parts, wrap them up in a paper towel, gently place them on the base and place the base back into the bag until next time.

On the Third day of Reindeer Crazy, we had zero time for being lazy. The kids assembled their reindeer by "gluing" with the toothbrush and some slip to legs together for the front and two legs together for the back. These two sets were then glued together. Hooves were bent outward and assembled to the base. Lastly the head was added and our reindeer were kiln ready. Once dry, of course.

While the reindeer were drying, my other classes would come in and notice the reindeer. Except they didn't take them for reindeer. They'd say, "Oh! What cute dogs! Who made them?!" It reminded me of the story I read to the kindergarteners while we waited for some of our friends to finish sculpting, Olive the Other Reindeer. Like Olive, our little reindeer just needed some antlers to complete their look.
On the Fourth Day of Reindeer Craze, my little artists were ready to glaze! And I was so proud of their careful attention to detail.
"My Rudolph is a girl and she likes to wear a lot of red lipstick."
On the Last Day of our Reindeer Critter, our reindeer received his antlers made of pipe cleaner glitter! Now I was down to the wire on this, time wise. Normally, I'd expect the kids to create their own antlers, but between programs, field trips and assemblies, we just ran out of time. Thankfully, a very kind aide (thank you, Heidi!) and I managed to get them hot glued in just in time to send them home with the artists.
 I love the unintentional resemblance to Beaker on the left. Notice the sweet little black foot prints in the snow on the one on the right.

And there you have it! Just in time to guide someone's sleigh tonight. I hope you have a wonderful Christmas Eve and Day tomorrow. Enjoy!


Saturday, December 22, 2012

What the Art Teacher Wore #47

Green and White Monday: Just a matter of days before break. And so much to do! dress: thrifted, Target; sweater: thrifted, Ann Taylor; tights: Target; shoes: Dolls by Nina; feather belt; Pinkyotto

For the next 16 days, I am a free woman. No more washing paint brushes over a sink that never drains; no more scrambling to prepare the paint, paper, brushes, glue, and the baby wipes to clean it all up with for the nine classes that rotate in and outta my room daily; and no more saying, "Puh-LEASE get a tissue and DO NOT put that in your mouth!" At least for the next coupla weeks. By then, I'm sure to be missing it all. Except for maybe that last part.

And since I'm completely and utterly in vacay mode, I've got no fine art or art history to share with you this week. What I do have are all of these super sweet Christmas images I've been pinning away on pinterest. Which have somehow subconsciously influenced my wardrobe choices for this week. I thought the resemblances were rather uncanny and just had to share them. I hope you enjoy!

I hope to be back before Christmas with a post of what my crafty kindergarteners created for their families for the holidays. Until then, get that last minute shopping done, spend time with those you love and eat too much sweet stuff. Happy Holidays!
Cuckoo Tuesday: My second graders are working so hard on their cuckoo clocks...but not nearly as hard as I had to when I put the sleeves in this dress. Look, I'm just sayin'. Time does not heal all sleeve-putting-in wounds. dress: made by moi; fishnets and tights: Target; shoes: Softt


Mrs. Claus Wednesday: The above side-to-side image shows what I looked like on the left and what I WISH I looked like on the right. Especially those Mrs. Claus boots. I think I need them in my life. dress: vintage; belt: borrowed from circle skirt by Pinup Girl
Oh Gnome You Didn't! Thursday: Oh, yes, I did. I finished my Gnome for the Holidays dress! I cannot wait to share it (and my countless struggles) in an upcoming post. And don't you just love this quirky image on the right? Alien Santa has four arms! gnome dress: me; tights: Target; shoes: Fluevog

Reindeer Bun Head/Light Up Dress Friday: A sweet coworker showed me this image of a sock bun Rudolph Thursday afternoon and I just knew I had to attempt it on Friday. Mine is an absolute disaster but the kids loved it. dress and belt: light up Christmas dress, made by me; tights: Target; sweater: thrifted

I know, it looks so much like Rudolph it's just bizarre, isn't it?! My apologies, Rudolph. I hope you'll still guide that sleigh to my pad on Christmas eve!

Tuesday, December 18, 2012

DIY: The Tacky Christmas Sweater

One out of the four Christmas trees in my living room is currently a little less decorated. For a good cause. We were having our First Annual Tacky Christmas Sweater Day at school. And I was not to be out-tackified.

 I think hubs thought I'd gone mad, as it was approaching bedtime (which is an embarrassing 9 pm) when I started de-garlanding our tree. 

"Why are you taking down the tree?" he asked.  

I responded with a frantic, "I'm not taking down the tree, I'm making a Tacky Christmas Sweater with the tree because tomorrow is Tacky Christmas Sweater Day and I don't have one to wear!"

Nodding his head as if that explained everything (which it would if you knew me), "Oh, okay. I'm going to bed."
My DIY Supplies: sweater: thrifted leopard-print sweater; other stuff: Target: garland, fishnets, tights and random $1 ornaments that didn't make the cut
I don't know what "I'm going to bed" stands for in your house, but in my house it's kind of like a duck-and-cover technique. As in, "I just don't think I'm up for this kind of crazy, I'm callin' it a night."
When you make your own Tacky Sweater, don't let the garland just run freely under the needle as shown above. Show that garland who's boss by holding it in place as the photo below.
Because I had mucho cleaning to do in preparation for hub's big Second Annual Gingerbread House Competition and Work Christmas Party (aka SAGHCWCP), I didn't have much time to spare working on this sweater. Thankfully it was a 15 minute DIY which is nothing short of a Christmas Miracle for this Pokey Little Puppy.
Care to make one of these Tacky Lil Numbers? Easy. Just do the following:
  1. Set your machine to the zigzag stitch. I began with the bottom edge of the cardigan.
  2. It really helps to use your fingers to separate the garland at the middle as you sew. I felt certain that I'd never find a silver pin again in all that silvery garland, so I did not pin that mess down. I just went at it.
  3. Be prepared to vacuum up a lot of garland shreds as the needle tends to chew threw the garland.
  4. Make sure to really back stitch at the beginning and end several times. This will prevent the garland from falling out all day long. I did this and I still lost garland. I felt I was leaving a trail of Christmas where ever I went.
This sweater seemed to be a big hit with the kids and my coworkers. Folks kept dropping by my room all day long saying, "I was told I had to come see The Sweater."
Because my school is full of wonderfully fun folk, I wanted to create some awards for their taking part in our First Annual Tacky Christmas Sweater Day. We met for a hot minute after school to snap a year-book-worthy group photo and pass out these cheesey awards I created on the fly. Because of their NC-17 nature, we waited until the little ones were out of the building.
I paired my tacky sweater with my double pairing of Target tights (guess who has a serious fishnets-over-tights addiction?), my black Anthro belt, a vintage dress, a wee little red bow and a giant hair bow.
It was funny how this total tack-tastic package was like a Double Punch: first the Pow! from the Glittery-Garland-Gawdiness and then the Bam! of the Bizarro Bow Bun. I actually had to demo this hair how-to to about a dozen of my little girls. They were fascinated. Special thanks to Twila Jean for the super simple youtube tutorial!

And there you have it, kids. May the tackiness be with you this holiday season.


Monday, December 17, 2012

What the Art Teacher Wore #46

Another Messy Monday: Dunno if you can tell, but I tried my best to crop out all of the messy in the background. But it truly is the story of my life. Everywhere I go. Instead of the Midas Touch, I've got the Messy Touch. It's a gift, really. dress and top: thrifted; tights: Marshall's and/or Target; shoes: John Fluevog; apron: vintage, etsy
I've hesitated posting in light of the tragedy at Sandy Hook Elementary in Connecticut. Just like you, it has been on my mind and the sadness is heard to escape. We don't have a television so I've thankfully been spared the graphic images. However, I can't seem to stop myself from reading about the events online. I think it's because I just keep searching for the answer to the question "why?" Why would anyone do something like this? I'm trying to mentally prepare myself if my students ask me that same question. There is no answer.

There is no answer but there are things that can be said. Lessons that might be taught. I thought of some works of art and books that might help teach what life is all about: loving one another. Taking care of one another. Trying our best to be our best. These are the first books and artworks that came to mind. I would greatly appreciate more ideas from you if you wouldn't mind leaving a comment. Thank you.
Pastel by Mary Cassatt, 1990. This is what I wanted to do all day. Our children need to know they are loved. I have had a large letter written to my students hanging in my room for ages. It reads: "Dear Boys and Girls, You are Loved, You are Cared For, You are Important. Sincerely, Mrs. Stephens." I'm always happily surprised when I see a student stop and read that sign. I think I need to remind them of my love for them more often. Maybe a large display of Mary Cassatt reproductions would help convey that message.
Going for the Vintage Christmas Look: I've been getting a pinch tired of wearing just green and red. I thought I'd attempt to match my pink Christmas tree with my favorite color combo: pink and turquoise. sweater and tights: Target; dress: thrifted; belt: from the Cuckoo Clock Dress; shoes: thrifted and DIY'ed by me

We talk about it at the beginning of the year when we cover the rules. The Golden Rule, that is. I'm always surprised how many students are unfamiliar with it. I love this sweet book and it's illustrations. It's one I need to share with the children more often.
Wednesday: I don't even remember a thing about this day. I may have actually been able to go straight home from work, kick off my shoes and relax and that day. It's a rare thing, these days, and I cherish it! blouse: gift from a friend; dress: BCBG; red fishnets: old, dunno; shoes: Dolls by Nina
The Banjo Lesson, 1893, Henry Ossawa Tanner. I could go on forever about how much I love this painting. The way that Tanner created so much air and space in the room. That beautiful glowing light on the back wall. The dark foreground against the light background. And the tender moment of a young boy learning. There's no television blaring, no electronics, no one texting. Just an adult teaching a child banjo.
Tacky Christmas Sweater Thursday: Oh yeah. I was so excited about this day. I actually don't own a tacky sweater (which is shocking!) so I had to rob my tree of some garland to create this one. It was a snap -- I'll show you in an upcoming DIY. I even got to wear it out later that night to a buddy's Christmas craft night -- so fun. sweater: thrifted, DIY'ed by me; dress: vintage; red tights and sparkle fishnets: Target; shoes: Softt; belt: Anthro
The year before last, I received a grant to do an Empty Bowls project with the children. If you are not familiar, the concept is to have children create a ceramic bowl. Once finished, a large soup dinner is held, the bowls are purchased and soup is eaten from the bowl. The money collected is donated to a homeless shelter or food kitchen to help fill empty bowls that exist. We did ours a little differently because I didn't want the children not to be able to take home their own artworks. So we simply collected money from the sale of the bowl to the child's parents and donated that. To explain the act of giving, I read this book to the children. I have the hardest time getting through this book without tearing up. It gets me every single time.
Are you familiar with this book? I absolutely love it. I'm not going to spoil it for you because it's a must read. I've not read it to the children because it's too long for my half an hour. However, each year, when my fourth grade students are in their weaving zone, I read a chapter book to them. I think this will be my book of choice this year.
Frantic Friday: After work, I had to buzz home and get the house ready for hub's work party. We had about 25 dudes and their significant others over for dinner, drinking and gingerbread house making. I had to get outta this teachery garb and throw on my Light Up Dress for the occasion. dress: vintage, thrifted; sweater: H&M, old; green tights: also muy old; belt: Anthro
What else can be said? So much depends on them and how we teach and raise them. We must do this right.
Snap the Whip, Winslow Homer, 1872. I'm leaving you with a sweet image of children playing. I love the girls in the far left background with their hoop and stick.


Wednesday, December 12, 2012

DIY: Have Yourself a DIY Christmas

Oh, look, it's just how I paint: sitting at my easel lookin' all 1950's glam with my puppy assistant. Except instead of a gown, I'm usually painting in my sweatpants (yes, I own one pair) and in place of a cute pup, I have an obese kitty who walks through my paint. But one can dream.
 As Christmas approaches, I'm coming to terms with a few issues I have. Well, okay, I have many an issue but for now, let's just chat about the ones concerning the holidays. So far, I've come up with these:
  1. I have a penchant for phoney-baloney pre-lit dwarf-sized Christmas trees. And if they are tinsel tress in some tacky color like pink, green or gold, I love them all the more.
  2. I have to make the majority of my Christmas decor. I can't buy it because that somehow feels like cheating . So at Christmas my house looks like some 4-H fair craft display. And I kinda like it.
  3. Once I start decorating for Christmas, I Just. Can't. Stop.
I created these paintings last year. The larger green painting I based off of a vintage Christmas card. I had picked up this little wooden house shape years ago at the thrift store. After painting the green canvas, I painted this little house to go with it. This sits in the front room of our house on my decked out easel.

For that over-decorating reason, I don't have any brand spanking new DIY's this week. So I thought I'd share with you a peak around my pad at DIY's of Christmas past. I'll just be giving a brief description of each as I still have more decorating and cleaning to do before the hub's work party goes down here on Friday night. On top of that, I've got a Tacky Christmas Sweater to whip up and the awards for the Tacky Christmas Sweater Contest we're having at school tomorrow. Whew! It really is the most insanely busy (and wonderful!) time of the year.

Enjoy! And if you have any questions about these DIY's, please feel free to ask.
I scored my first pre-lit tree of the year on Black Friday. I planted it inside of a paper suitcase that my mother-in-law gave me for my birthday last year. I created the paper chains years ago and they make an appearance every year, much to hubs dismay. He's not a fan of el paper chain-o.
 I created these hot air balloons ornaments with light bulbs, vintage fabric, Modge Podge and a bottle cap.
Despite the fact that this pre-lit tree is only partially lit (which is exactly how I like to spend my holidays), I still adore it. It sits in my living room surrounded by a couple of Rudolph paintings I created two winters back.
My favorite Christmas special has always been Rudolph. I used my Golden Book from childhood as the inspiration for these canvas board paintings.
 Favorite scene from Rudolph where Rudolph befriends fellow-misfit wanna-be dentist elf Hermey:

Hermey: Hey, what do you say we both be independent together, huh?
Rudolph
: You wouldn't mind my - red nose?
Hermey
: Not if you don't mind me being a dentist.
Rudolph
: [shaking hands with Hermey] It's a deal.
I scored this pre-lit tree for cheap at Goodwill just this week. I added my paper doll collection as well as some vintage sewing notions.
This tree has everything I want for Christmas on it: gorgeous vintage dresses!
Last Christmas, I discovered pinterest and my life was never the same. I created that wreath with my collection of vintage glass ornaments. I began by yarn wrapping the wreath and then hot gluing the ornaments onto it. I then picked up tulle in the same colors and cut that into strips. I tied the strips of tulle onto a string of white Christmas lights.
Ya'll might remember my pink cuckoo clock tree from this post. My dream tree is a real vintage pink aluminum one. But for now, this one next to my mantle in the living room will have to do.
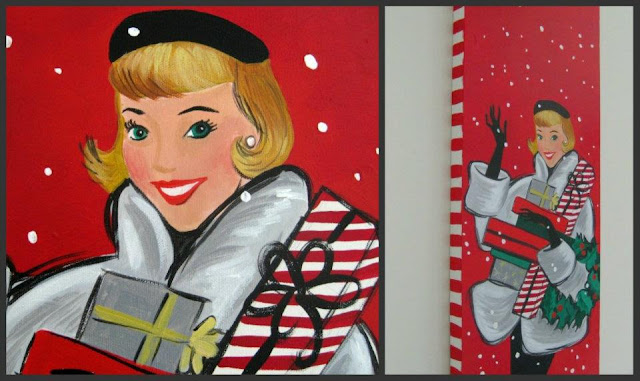
If only my Christmas shopping were so glamorous. I'm usually just clicking away on amazon in the wee hours of the morn. I painted this long painting right before painting the green one at the beginning of this post. These paintings remind me that I've not picked up a paint brush in some time. I need to do that. If I could step away from the sewing machine long enough.
Just a little close up.I have found that adding candy cane stripes to the edge does a great job of hiding smudges of paint and mistakes.
 Thanks for dropping by. I do hope your holidays are shaping up to be just plain fabulous!