Thursday, December 31, 2015

DIY: A Color Wheel Circle Skirt, Blouse of Many Colors and the Crayola Experience!


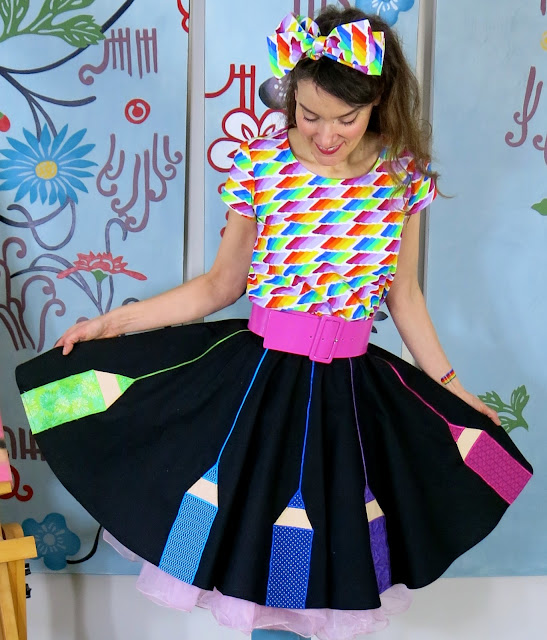
Well, Happy New Year, all y'all! I hope this here blog post finds you bright-eyed, bushy-tailed and tackling that short list of resolutions...and not nursing a hang-over pondering the poor life choices you made last night (Not judgin'. Just sayin'.) Myself, I finally managed to finish off this here ROY G. BIV(and M...for Magenta) skirt complete with a blouse o' many colors and ginormous headband. It's only been on my sewing table for something like a month so hurray for finally finishing something! 
 
I got the idea for this circle skirt way back in November when I took my second sewing class at Craft South. Y'all might remember the music-themed skirt I made with fab-o instructor Devon Iott, aka Miss Make. The skirt was created from an Anna Maria Horner pattern and it comes with a coupla of different stitching options. One of them being a circle skirt that is made up of eight sections. I thought it would be fun to connect each section with a colorful satin stitch and have a corresponding quilted colored pencil at the base of the stitch. 
And while I was mid-stitch on el skirt-o (like, seriously, mid-stitch. I have this habit of getting an idea, dropping WHATEVES it is I'm doing and starting on Thing 2. It's really the worst habit ever and I don't recommend it), I got the notion of making a top AND headband to match. I decided to use the Scout Tee pattern from Grainline Studios because, y'all. That is one easy pattern to follow and one simple top to slap together in, like, 60 minutes or more. 
Hey! Speaking of stopping whatever you are doing mid-stream and totes doing something dif, I hereby interrupt this sewing talk with a chat about my trip to Orlando's Crayola Experience! (That was a segue, kids. A really crappy segue).
So way the funk back in September, the hubs and I made a trip down to Orlando for Universal Studio's Halloween Horror Nights. While we were there, we drove past the Florida Mall and I spotted that hallmark yellow and green. I was all, "Hey! That's a Crayola WONDERLAND! Like Chuck E. Cheese for art teachers. Can we go? Please?!" It was then that Mitch reminded me he'd told me all about this place before we left and I'd been all "meh, whateves". Silly me. I was so happy to find that teacher's get in free! Sadly, el hubbo did have to shell out something like $35 for his ticket. I told him he could stay in the car but that only got me the side-eye. 
 
If you cats and kittens ever get the chance to go to this place, y'all best do it. It's simply fascinating -- like a history lesson on Crayola and a science lesson on the making of crayons. Not to mention a look at their vintage ads which were just so fun to see. 

And tons o' other fun stuff. One of my faves was this station where you could name your own crayons and have them made. We made a handful of our own personalized crayons called such things as "Mrs. Stephens' Lipstick" for a red crayon and "Martian Blood" for a green one. 
Another fave of mine was this encaustic station where you could paint with melted crayon juice. Is there anything better smelling than a melted crayon? By the way, I've installed Scratch -n- Sniff technology in this blog post so feel free to scratch that photo above, stick your nose to the screen and breathe deep. Don't mind the stares, other folks just be jealous. Oh, it didn't work? Keep trying. You can stop when the men in the white coats come to get you. 
My ultimate fave was this melted crayon spin art machine. You get to pick your color combos and while the melted crayon is dripping down onto your paper circle, you can control the speed of the spinning. This results in some seriously cool and trippy masterpieces. 
 Like, far out, dude. 
But, if I'm gonna be all fur realz-ies with y'all, I've gotta admit that the real Experience was to be had in the gift shop. I mean, just take a look-see at that sock assortment. Need I say more? 
Even the check out counter was neat mosquito -- it's made up entirely of upright crayons! 
And now, I interrupt that interruption to bring you back to what I was originally chatting about. Before I interrupted my own dang self. Ahem. The skirt! Which was heavily influenced by all things Crayola Experience-y. And BOOM. I just segue'd my segue. 
 So the first thing I had to do was figure out the colored pencil (do y'all say "color pencil" or "colored pencil"? Because I've always said the latter but now I'm not so sure). Anyway, I sketched it out on paper first and used that as my template once I was happy with el sketch-o.
After cutting the pieces, I started stitching with right sides togetherness.
 Like-a dis. 
 And like-a dat.
 Press with an iron and...
 Viola! Eight colored pencils, one for each section of the skirt. 
Once I had cut out the eight panels of the skirt in black and stitched them together, I started the process of appliquéing the pencils to the skirt. I measured 12" down from the bottom of the waistband and held the pencils in place with some Stitch Witchery. Then I set my machine to a wide satin stitch (it's the one that looks like a zigzag) and sewed the pencils in place. 
Once all the pencils were in place, I simply followed the pattern to complete the skirt. That pattern is cake, by the way. The only thing that is a total drag is hemming that beast. I mean, the circumference is about three miles long so it takes forever to get through. 
Miraculously, I persevered (but not without mucho whining...to myself. The cat and the hubs don't seem to heed my complainingness). 
And I'm super happy I did because I do kinda dig this thing. 
It's great for sitting on the floor and doing a Wicked Witch of the West "I'm melting!" impersonation...
And for twirling away. I do hope you kids have a wonderful New Years and we'll chatty chat soon enough!
 photo signature_zpsd10b3273.png

Sunday, December 27, 2015

In the Art Room: Art Teacherin' Resolutions for the New Year, Part 1

Kids. It's almost the New Year. And, if you're a list-loving-maker like me, that can only mean one thing: it's time to bust out that colorful variety pack of felt-tipped pens and start goal setting! I always make Sewing Goals, Health Goals, House-Cleaning/Decorating Goals and neglect Art Teacherin' Goals. Mostly because I seem to be stuck in the mindset that anything new to do with teaching must ONLY happen at the start of a school year.  Well, not this year, y'all. I'm banishing that notion and going full steam ahead with a litany of New -n- Improved Art Teacherin' Resolutions for the New Year! Who's with me?! 
One of my biggest goals as an art teacher is to jam pack as much info into the limited amount of time I have with my students. And for that reason, I'll be presenting Maximize Your Minutes in the Art Room at this winter's AOE conference! There's still time for you to register to attend this online conference and hear me chat about maximizing AND see a tour of my (new and improved for the new year) art room! 
So, without further ado, let's chat about my...
Art Teacherin' Resolutions for 2016, Part 1
("Part 1" because, let's face it, there's a whole lot I need to work on!)

My class schedule is not like most of y'all, I imagine. I see my kindergarteners for 45 minutes, weekly; my first and second for 30 minutes, bi-weekly and my third and fourth for an hour, weekly. Even with that limited amount of time, I don't want my students to have a watered-down art class. Instead I want to provide a super-concentrated, high fructose, protein-packed experience. One that is both fun and easy for me to build into a routine. So here are some new plans I am looking forward to putting into action once the kids return (by the way, several of these ideas came from the Queen of Pinterest, Donna Staten!):
An Art Class Greeting: When I open my art room door to greet the kids waiting outside, I usually have a coupla hand-raisers (what are we doing today?), a coupla complimenters (I like your hair! [really? because it's not changed since high school, y'all]) and a coupla lost-in-space-rs (Billy. The line is moving. Joining us?). For a while I snubbed this out with my Vocab-at-the-Door routine which I love but it just didn't pack the "Art class is the JAM! Let's get in here and make stuff" punch that I had in mind. Then I saw this video and got an idea to create an Art Class Greeting...
Isn't that awesome?! Of course, I plan to change it up a pinch by saying, "Hello, my most amazing artists!" but the rest is perfection. Then I can drop into my usual vocabulary routine...or, what I'm leaning more toward for a lil change-up, teaching the kids a Walking-into-the-Art-Room song. Check out how these students gather on the floor with a song in this incredible teacher's room (watch the whole video, her methods are fantastic!)...
An Art Class Song: Did you hear the little ditty the students sang as they came to the floor? I loved it! So I wrote one of my own. I wanna keep it short, sweet and simple so that the kids can quickly memorize it and put it to use as they walk in the door. Here's what I got so far: 
Walking into the art room
1-2-3
All my friends 
Are here with me
Let's learn about Picasso and
Vincent van Gogh
With the best kid artists
That I know
(and repeat till all are seated)

3. Word of the Week: Keeping What Works! Of course, I'm not throwing out everything in my attempt to maximize my minutes. I do still love the Word of the Week...
and plan to continue introducing new terminology this way. However, just one word of the week doesn't begin to cover all of the art vocabulary that needs to be taught. 
To remedy that situation, I plan to put my buddy Laura Lohman's Art Word Wall Cards to good use. I printed all of these words off and had them laminated at the start of the year...and just now got around to cutting them out and arranging them on my word wall cabinets.

I've got the words temporarily stuck onto my cabinets with sticky tack so that I can easily pluck them off and put them into my vocabulary pocket chart thingie.
You can score one of these bad boys from Amazon for a lil under $20. Or just shoot out a school-wide email and see if anyone has one they wouldn't mind parting with. When introducing new vocabulary with this chart, I like to do a couple of fun vocab games to get the kids comfortable with saying the words. 
These games are fun and quick. I use them when introducing new words, not each art class. We are trying to keep it short and quick so the kids can get to makerin', right? Oh, here's another:
Accelerated Art History for the Littles: I once went to the doc complaining of stress and panic attacks. She asked, "What do you do?" When I responded that I'm an art teacher, she nearly fell over laughing. "It's only art! How hard can it be?!" Well, I don't have to tell YOU, my art teacherin' friends, do I? Just how do we squeeze in art history, contemporary art, techniques, proper use of materials, skillz, not to mention creativity and the cultivation of some imagination in one class period? With some Accelerated Art History, I've decided. 
At the start of each art class, after our new lil greeting, entrance song and Word of the Week intro, I've started zooming this kids through art history in 120 seconds or less. My first attempts, I brought the kids over to my big art history wall and did the lil routine you see here. Which was super fun but ate into more art time than I desired. So now I show them my lil art history PowerPoint (to be shared here soon!) with a sneak peak into a new period in art each week. I've been using these books as my resource as they keep things short and sweet:

I found both used on Amazon and they have been great at highlighting the key points to share with my students. So far, we've covered cave art up through the Egyptians and the kids have loved these lil short snippets of art history. However, I recently discovered Marcia Beckett of Art is Basic's awesome TPT Art History Sketchbook prompts! Like, what?! So, now, when I am introducing this short voyage through art history, I can tie in the (older) kid's sketchbook prompts. I'm so thrilled with this idea, thank you, Marcia! (Below is a lil blurb about how I've had the kids create and use sketchbooks in my art room this year). 
Sitting Still Like a Frog: One of my goals this school year was to introduce mindfulness and breath to my students. I'll be the first to admit, I've totes dropped the ball on this one! I've been reading Sitting Still Like a Frog and I think I might have made the whole thing a lot more difficult than it needed to be. When my music teacher buddy Kiera told me that she uses the concept when she plays music and has the children listen silently while focusing on their breath, I was all, EUREKA! That's what I'll do! 
My thought is for my younger students who do not have sketchbooks to simply breathe and look at the art work I will have projected onto my television at the start of art class. You know, once, we've finished singing our entrance song and settled in on the floor. The plan is for that image presented to be from our lil Accelerated Art History lesson so I can segue right into that portion of art class. Of course, for the olders, it will give them a moment to reflect on their sketchbook prompt. 

How do you introduce the concept of breath and mindfulness in a fun way? I plan to show this video!

For more on mindfulness, check out this clippity clip!

A Flipped Classroom Attempt: I was really inspired at the AOE conference last winter by the concept of a flipped classroom. If you aren't familiar, the concept is that early finishers can educate themselves by viewing instructional videos created by the teacher. Nic Hahn of Mini Matisse has made a whole lotta strides with this in her art room and I love seeing what she's done (for example, this video above is one she shares with her students to introduce new stations in her art room!). Now, I don't have a class set of iPads for the kids to use but I do have the ability to record lessons and project them on my big screen television. I never really thought of doing this until Nic mentioned that it allowed her to, in one viewing, say everything she needed to say (cuz you know you ALWAYS forget something!) and, for some crazy reason, the kids focus much more on the telly than they do on us! It also will provide me a hot minute or two to tend to supplies and important tasks (like drinking my now-cold coffee). I'm really loving this idea and hope to start popping more videos up on my YouTube channel which you can find here
Alrightie. So, there you have it, just a sprinkling of my Art Teacherin' Resolutions for the New Year! I have many more new ideas in store for my young artists like a new twist on supply distribution, new messy mats that also double as educational tools and a squeaky clean clean-up routine! Stay tuned, y'all. Until then, you'll find me adding these fun and inspirational songs to my list o' tunes to play both for their lovely lyrics...
and their delish singers. HAAAAYYYYY, Bruno Marzzz. I see you! 

What are some of y'all's Art Teacherin' Resolutions for the New Year? I'd love to hear them! Let's inspire each other! photo signature_zpsd10b3273.png

Friday, December 25, 2015

DIY: (One Last) Tree Skirt to Lady Skirt, Y'all!

 Merry Christmas, all y'all! This Christmas, I'm thankful for Sudafed, tissues with lotion added to them (can we please give the inventor of that monumental awesomeness a metal or something? Those Puffs with Vick's are my JAM) and your kind words and well wishes after my sickly last post. I'm feeling so much better! The hubs and I just returned from a pre-Christmas trip to the Smoky Mountains (I've shared oodles of photos here) where we hiked with buddies, dined on gloriously delicious carbs that only the folks in the South know how to prepare and shopped. I'll be sure to share all that with y'all in an upcoming post. But, until then, Merry Christmas and One Last Tree-Skirt-to-Lady-Skirt Hurrah!
This would be my second tree-skirt transformation for this year (I've lost count of how many of these bad boys I've made over the years but you can see 'em here) and I gotta tell ya, this one almost didn't happen. I seemed to run outta gas that last week of school so this sat on my cutting table for a while. Which was just plain silly as making one of these takes no more that 45 minutes. Seriously.
All ya gotta do is start with a tree skirt. I found this one (it was actually a table covering) at an estate sale this year for a whopping $2. The ones my teacher buddies and I made for tacky sweater day were scored from Big Lots for a mere $7. Wait for those after-Christmas sales and start stockin' up, kids. 
Of course, my personal rule of thumb is the kitsch-y-er, the better. Make sure the length is decent. This is the shortest one I've made and it is 19" in length.
 I like to work from a pattern so I used a circle skirt pattern from Anna Maria Horner because I feel comfortable with it. 


I will say I did cut some corners out of sheer laziness. It saved on time and anguish. Rule #1 of Tree-Skirt-to-Lady-Skirt Club: There Shall Be NO Anguish. 
 Following the pattern, I simply folded my skirt twice, pinned the pattern and place and commenced cutting. 
By the way, always check your sizing. I'm not an XS in the shops at the mall (especially For-never21) but according to this pattern, I am. Which is why Anna Maria Horner is my personal hero and I've built an XS shrine to her. Bless you, Anna Maria!
 From there, I cut an opening along the edge of the fabric. 
Using the pattern, I cut out a waistband, added some interfacing and stitched it with a 5/8" seam with right sides together. The pattern actually calls for you to install the zipper first then do the waistband. If you go this route, the zip stops at the waistband and a hook and eye is stitched in to keep the waistband closed. I decided to have my zipper go all the way to the very top of my skirt. For that reason, I put the waist band in and then added the zipper.
 Stitch the skirt back together with a regular stitch from the bottom all the way to where the zipper install will begin (I used a 9" zipper so I measured 9" down from the waistband). Then switch your stitch setting to a basting stitch as those stitches will be ripped out once the zipper is in place. You can see my terribly easy and horribly tacky way of installing a zipper with Scotch Tape here
 Here's a peek at the final zipper-y product. 
Let's just hope I don't eat too much more pie so that I don't have a zipper that decides to slide itself down. 
Obligatory skirt twirl. One must do this in a circle skirt. It's, like, the law, y'all. 
Meanwhile, it's Christmas day...and there seems to be plenty of this happening at Casa de Cassie. 
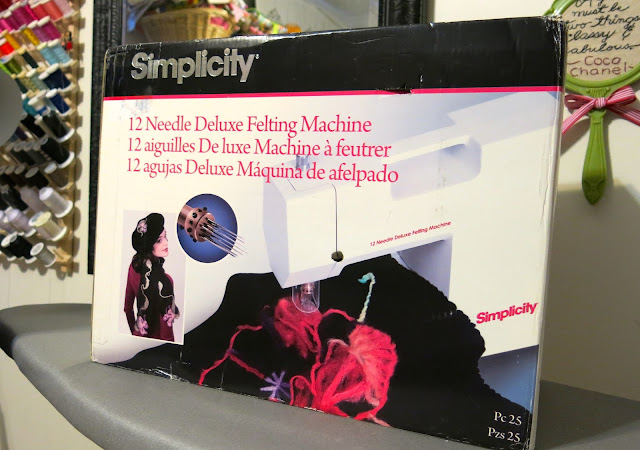
The hubs did good this year with this present. I can't wait to try it out. Although that 12 needles thing sounds like it could end in a bloody mess, I ain't gonna lie. 
I hope Santa treated you right, this year! Happy Holidays, y'all!
 photo signature_zpsd10b3273.png