Wuz happening, my wild and wacky weavers?! I hope the return to art teacherin' (if that's your bag) has been a smooth one. Personally, I find it a cruel joke to return to school the week of a full moon but, once again, the powers that be neglected to ask my opinion. When will they ever learn? So, show of hands, how many of y'all decided to go down Weaving Street this month? If you need a refresher, you can start with this paper weaving lesson then transition to this super fun straw weaving project. I just had my fourth graders start their pouch weaving and they were beside themselves with excitement. Like, they were all, "enough with the History of Weaving prezi, lady, let's weeaaavvveee." I'll be sharing that prezi with y'all later this week (still tweaking it) but you can find the complete steps for pouch weaving starting here.
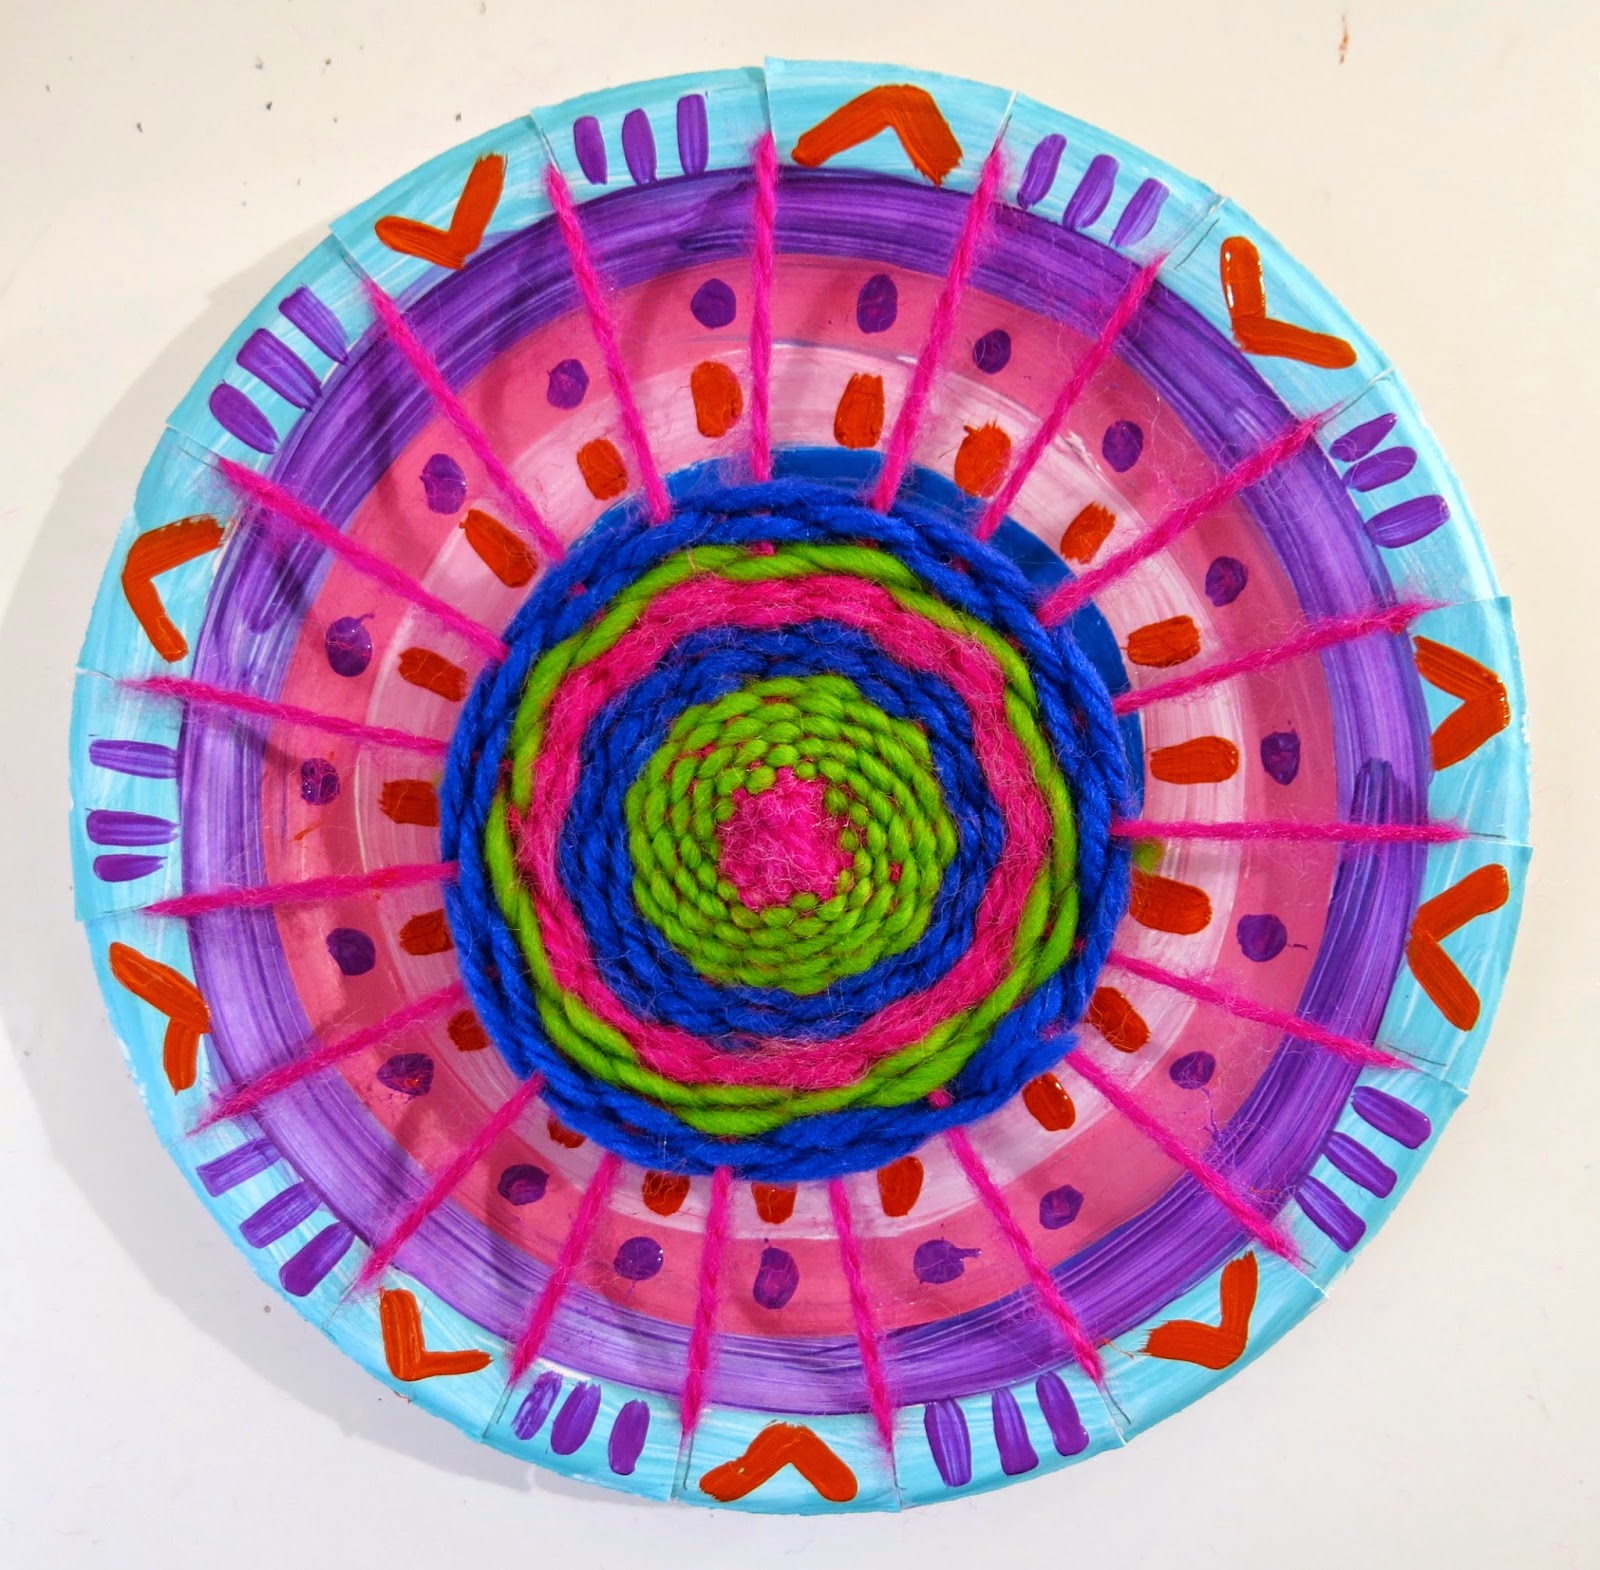
But let's talk Circle Loom Weaving, shall we? This lesson I do with my second grade kids but if you've never taught weaving to your students before, I recommend teaching this to third grade. Again, always start with that basic paper loom weaving as it teaches all the vocabulary and techniques making all weaving projects that follow much easier.
Supplies:
Chinet Plates: When plate weaving, I always use these. They are the thickest and most durable plates. I like to use the smaller size.
Yarn: Any kind will do. Funky yarn is fun but only use that for the actual weaving portion. For warping, use regular yarn.
A Loom Template: I have two for each of my five tables so the kids can share. Each template has 19 notches on it.
Masking Tape: You'll need this to tape down the initial warp strand. And for closing the mouths of those "I Can't Do It" kids. Oh, I kid! Kinda.
Last year I typed out all the steps which you can find here. I'm hoping that you'll find the video even more helpful. If you still have any questions, please ask in the comments and I'll get back to you.
For those of you that don't like video, here's some pitchers and werds. Place the loom template on the painted plate. Trace and cut the 19 notches. I always encourage the kids to count and be certain they have 19 lines drawn before cutting (as some will end up with 190 which is not what you're going for).
NOT GONNA LIE: Warping is the least fun part. Especially when some of the kids stop listening and get stuck on repeat: I Don't Get It. When that happens, I have everyone put everything down, we stand up, we stretch, we shake it off. Then, I tell 'em that they are going to sit back down, not touch a thing, and listen to me. Again.
I have also found that peer tutoring is priceless. These kids speak the same language. Have them help each other, they communicate much better with each other I have found!
Once you are beyond the warping hump (um, the whuh?), the weaving portion is much easier. That is WHEN you get beyond that initial confusion I mention in the second clip. However, if you do that little trick that I share with you, I think you'll find that the kids get it and will really take off with weaving. They love to sit on the floor and weave and chat. I let them sit with buddies, sometimes we go outside if the weather permits. It's just such a fun, relaxing project...once you are beyond the warping and initial day of learning to weave. Stick with it, you'll find that you and the kids will love the process!
Granted, this weaving project does take time. However on Thursday I'm going to share with you a similar weaving project that takes have the amount of time for those of you that are limited. Until then, I do hope you found this helpful and will consider giving weaving a go! And I'd love to know, what weaving projects do you just love to do?
Hello, weaving friends! Welcome to the second installment of The Weaving Series during this Wonderful World of Weaving month formerly known as "January". In case you didn't know, I'll be sharing with y'all some of my favorite weaving projects all this month each complete with step-by-step photos and short video clips. So, what's in store today? Drinking Straw Loom Weaving! Straw Loom Weaving is a great follow up project to Paper Loom Weaving as it builds on all of the previously learned skills. The youngest grade level I've done this sort of weaving with is second grade. However, I believe upper grades would enjoy this fun, easy and totes educational weaving project as well. Let's get started, y'all!
Supplies: Large Drinking Straws: I like the big ones without the bend in them. I've scored them at fast food joints and the grocery. I cut the straws in half. Each kid will need four straws. Scotch Tape: You'll need this to adhere the yarn to the straw. I like this kind of tape better than masking because it can lie flat against the straw and not impede on the weaving process. And don't nobody like their weaving process to be impeded upon. Yarn: Four strands cut to the desired length of the finished weaving. In this demo, mine was cut to about 9". Even More Yarn: For weaving. Let's get started!
You'll begin by warping your loom. This is the fun part, at least according to the kids, a you'll be "drinking" the yarn. If you watch my clip, you'll bet an even better idea on the process. Start by holding the end of the yarn at the bottom the straw. Place your mouth on the opposite end and inhale. The yarn will pop out the other side! Warning: do NOT inhale too much as you'll end up with a yucky mouthful of yarn.
Yee-ouch, nice nails. Tape down that little yarn tale with some Scotch tape.
And do that four more times.
Tie all the ends together with an overhand knot.
Once you're warped (and, admit it, you've always been warped), you're ready to weave! If you watch this short clip, you'll get the process.
Hold the straws together in your non-dominate hand with a tiny bit of space between 'em. Use your thumb to hold the end of the warp string while your other hand begins the process of over and under.
When you reach the end of the row of straws, go around the end straw and begin the process again.
In this final clip, I'll show you how to finish off the weaving and remove it from the straw loom. Take heed: the kids will often want to slide their weavings completely off their straw loom as they weave. It's important that they do not! Their weaving should slide off the ends of the straws naturally as they are weaving along. Also, they will freak out when their weaving begins to slide off because it will look a little loose. Set their minds as ease and tell 'em that it's perfectly normal. No need to freak out.
So what do you do with a straw loom weaving once it's complete? Well, my kids love to make them into bracelets by simply tying the ends of the warp strings together. They've also made belts, bookmarks and wallhangings. I'm personally dying to get some yellow and blue yarn and create woven Minons. What about you? Have you done this kind of weaving with your kids before? If so, what have y'all created! Please keep the convo going in the comments, kids. ALSO! ARTSY BOOK CLUBBIN' KIDS (that's you, you can join the fun here!) don't forget that we'll be reading The Art Spirit by Robert Henri beginning Monday, January 12th! The winner of the Artsy Book Club Giveaway is...Leah! Congrats, buddy!
Well, hello there, buddies! I'm here today to share with y'all that I hereby declare January the WONDERFUL WORLD O' WEAVING MONTH! That's right "WWW". Which is way better than WWF because it doesn't involve sweaty old dudes in spandex. Unless you're into that sort of thing. In which case, you might have found yourself on the wrong blog. Smell ya later.
Whew, now that my mom is gone, lemme splain to ya what the Wonderful World of Weaving Month is gonna look like on this here blog. Each week, I'm going to share with you my fave tried and true weaving lessons complete with video (including this post! Brace yourselves, people. My voice has been likened to nails on a chalkboard.) At the end of this month, I'll be sharing even more weaving goodness at The Art of Education conference on January 31st! Are y'all going?
If you've not attended, you really outta. In my last post, I mentioned my fave things of 2014 and completely left out one of the very best things: attending and presenting at AOE twice! I do hope to see you there so you can hear me wax poetic about WWW. Unless you wanna hear someone wax poetic about WWF in which case you should call my mom. Right now she's only going by her "Wrestling Name" which is Star Blaster. Don't ask.
Now, if you've never ever taught or attempted weaving before, have no fear. This here paper loom weaving project will lay the ground work for all other weaving projects. I do a paper loom weaving project with my first grade friends every year. However, if you are introducing weaving to kids that have never given it a go, I strongly recommend you have them do this simple project. They'll learn the vocabulary, the technique and the ability to apply what they've learned to more advanced weaving projects. So, lez get started!
To jazz up my paper weavings a bit, I'll often have the kids create some textured and painted papers. It's a fun and quick way to introduce such painting techniques as stamping (I used the back of a round clothes pin), credit card scraping (just paint a couple drops of paint at the top of the paper and pull the credit card downward), scratching into paint with a texture comb or back of a paint brush and splatter painting (everyone's favorite...except for the art teacher's.)
Once the papers are painting, some are cut by me into weaving strips (called wefts) and one is left untouched to be used for the loom. In the clip below, I'll introduce you to some of my favorite ways to share weaving with students as well as show you how I go about having the kids create a paper loom.
With the introduction to weaving and loom creating, this generally takes about 30 minutes. That's one art class for me. Oh! In this clip, I mention what my art room set up is like. You can read all about that here.
If you are a step-by-step photo person, like me, here you go. I have the kids gather with their paper and a pair of scissors. We begin by folding our papers in half from the bottom to the top.
With the folded edge at the bottom and the open at the top, peel back the first layer of paper at the top. Fold it down just a pinch, about the length of your finger tip. No need to fold down both pieces of paper. It should look like the lip of an envelope.
Next up, unfold that part and run your finger back and forth over the crease. At this point, I have the kids do the same and repeat after me: "This is the STOP! line. When my scissors are a-cutting they will STOP! at this line".
At this point, I tell the kids that I want to cut my paper almost in half. How will I know when to stop cutting so that I don't cut it completely in half? That's right, the STOP! line. Start by cutting at the bottom in the middle and, well, you know where to stop. I then hold this up and tell the kids, "hey, look, we made Sponge Bob's pants!"
Next up, cut the paper into fourths. If you are curious how I go about having 20 plus kids all cut these looms together, watch that clip. It's tres simple, y'all.
Boom! Now I've made pants for my cat.
Each one of those four sections is then cut in half creating eight equal sections. Lika dis. It should closely resemble a hola skirt.
Carefully unfold your paper and, viola! You've got yourself a loom. Let's weave something, shall we?
In this much shorter clip, I'll show you how I go about teachin' that.
Using a giant paper loom really helps. Unless you have a document cam then I suppose that'd work great too. Once I feel the kids have it, we weave together whilst sitting on the floor.
My first grade kids all know what an A-B pattern is and looks like. So explaining it to them in their terms really helps.
When I'm teaching weaving, I do whole lotta non-exampling. I'll weaving incorrectly, for example, by having the second weft do the same as the first, and show them why this is incorrect (the wefts will simply slide down behind the others). By showing the kids a non-example and explaining to them why it's incorrect, they'll more than likely understand the process even better.
And end up with a super lovely weaving! Now, I'm not gonna like about a half the kids are gonna knock this outta the park and be finished in a blink. Meanwhile, the other kids are gonna get stuck. So we do a lotta peer tutoring in weaving which looks a lil like this...
So, what can you do with paper weaving when they are finished? Well...
As well as these fish collages! My first graders used a small paper weaving as the basis for their self-portraits as royalty.
And there you have it! I hope you are excited about the Wonderful World of Weaving as much as I am. And keep on coming back to here, y'all, as I've got plenty more weaving projects and videos to share with you in the weeks to come. Until then, I'd super duper love to hear what your fave PAPER weaving projects are! Let's inspire each other in the comments below. And if you've got a blog post on weaving that you'd like sot share, pretty please do. Thanks, guys!
Well, Happy New Year's Eve-eve to all y'all! One of my fave things to do during this time o' year is to look back on the past and reflect on some of my happiest memories. I've been doing this the past coupla years and I really enjoy it (you can visit 2012 and 2013 here if you so desire). I hope you don't find it nearly as torturous as those Facebook "This is my life in a coupla rando posts and pics that some pimply teen working at FB picked for me. Thanks for being apart of it." thingies that keep clogging up your newsfeed. If so, my sincerest-ish apologies. For humoring my self-indulgent reflectin', I've got a giveaway for y'all! One of my fave things about 2014 was that I started the Artsy Book Club. We started out with a BANG! reading One Drawing a Day and really having fun with it. The prob? Drawing each and every day is taxing, y'all. However, I did love the bond we created. My next book club read was a double header (Teach Like a Pirate and Printmaking Unleashed) which I think was a big ole mistake. I was overwhelmed trying to read them both. So this time around, I'm throwing a book out there that I've been meaning to read for ages and I think we'll all benefit from and Ima gonna give one of you a copy! So, what's the book, you ask?
A true classic, amirite? AND one that I've never read. Here's how you can enter to win: 1. Leave me a message in the comments about what was your fave memory from 2014. 2. Don't forget to include your email address! I'll let you know by Sunday, January 4th. We'll begin officially book clubbing on Monday, January 12th. There are a million inexpensive copies of the book in the used section on Amazon (that'd be where this giveaway copy came from!). I do hope you'll join the Artsy Book Readin fun! And now, on to 14 Faves of 2014 (in no particular order)...
1. My Artist-Inspired Dresses. The craziness continues. I started this artist/artwork-themed dress thing last year after creating The Great Wave dress. My most recent one was this Lichtenstein number (I've got a couple on my sewing room table right now just waiting to be created).
This Starry Night Dress was actually started at this time last year over winter break. The light up part is my ab fave.
Woof, this entirely needle felted The Scream dress had me seriously questioning my life's choices. It took me foreverness. I don't wanna even know how many hours were poured into that dress (although I do know that about 3 seasons of Project Runway were watched whilst needling away). I took a lil hiatus from needle felting after that number.
But once I learned that there was a Kandinsky exhibit coming to The Frist Center for Visual Arts, I was back at the felting biz-natch. You can see the dress on the left and the one on the right by clickin' the linky-loo, Cindy-Lou Who
2. Feature in Nashville Arts Magazine. From the interview to the photo session to seeing it all in print, that was easily one of the coolest things of 2014 for me. You can view the entire interview here incase your eyes cannot read flea-sized font.
3. The Artsy Sew Along. Originally just called the Apron Sew Along until we finished the aprons and people kept joining the fun (I love Denise's Frida/El Dia de los Muertos apron, don't you?)! I've got a new sew along project in store for us so if you join here, you'll be able to stay informed. If you are still wanting to get your apron stitching on, go here. There's all the links to the videos and tutorials you'd ever want (well, not really. But it's a start).
3. Going to NAEA in San Diego. Twas an absolute blast! It was basically Art Teachers Gone Wild which is always the best kind of party. I'm most def going this March (and leading two sessions, whuuuh?! Y'all best come and hold my hand, ermkay?). I loved meeting some of my fave bloggers and awesome art teachers. From left to right, that's Phyl, Patty, Rina and the lovely Donna. If you click on their names, you will be blown away by their awesomeness.
And of course, Nic Hahn of Mini-Matisse! Like, seriously the nicest gal everrr.
4. Leading my first professional development at Cheekwood Botanical Gardens. Y'all. I was so super nervous to be leading that workshop! I mean, I'll teach kiddos all day long but other art teachers?! Who am I to tell 'em what to do? My nerves were set at ease by that awesome group of art educators and it was such a fun experience that I can't wait to do it again.
5. Speaking at Bowling Green State University. That was another spooky/thrilling experience that I absolutely loved! Although, I gotta tell ya, my fave part was meeting Laura Dean of Painted Paper. Her blog is insanely creative and always an inspiration.
6. Gallery of Gratitude. As art teachers, we hang artwork in the hall all the time to boost the kid's self esteem and to show off their hard work. However, it's not often that we create art work to booster the esteem of others and congratulate them on their hard work. But that's just what our Gallery of Gratitude did. And the impact it had on my coworkers was very touching. This was easily one of my fave art projects of 2014.
7. 4th Grade Legacy Mural. This project was one that came to me two weeks before winter break. The idea: have my 4th grade kids create a legacy for the school and present it as a Christmas gift before winter break. Getting this completed caused multiple panic attacks but with the help of my buddies the custodians, the bookkeeper, my librarian buds and all my fab fourth graders, it was finished and revealed to our principals.
8. String Art Project. This project was both a student and blog reader favorite. If you've not given this a go, I really recommend you do. Each and every kid loved it and was successful. And now my 3rd graders are begging to create one as well. I've got an alternative in mind for them that I can't wait to start after break.
9. Circle Loom Weaving with 2nd Grade. This one was another blog reader/kid fave. Do y'all weave in your art rooms? It's one of my favorite things. In fact, I'm declaring January Weaving Month by hosting a weaving lesson each week on this here blog. I'm also presenting all-things-weave-y at the AOE conference at the end of January! I'm so looking forward to that. Are y'all going?
10. 2nd Place Art Education Blog of the Year. Speaking of the Art of Education, this was a super nice surprise this year (I know it says 2013 but it actually went down in 2014)! I was thrilled just to be nominated. Shoot, I'm just glad that there's five of you out there that read my ridiculousness!
11. Tennessee Elementary Art Educator of the Year. Well, that was a super nice surprise! Especially the part where I'm surrounded by some outstanding art educating action like these lovely ladies. Guess who didn't get the "Professional Attire Required" memo (as if I have any clothing that falls into that category!).
12. Hiking Mount Baldy. Like, wow, y'all. That was a tough hike the hubs and I did this summer. But outta all the hiking we've done, this one was one of my faves. The views were amazing.
Like, right? Once we caught our breath the view was even more breath taking.
13. Halloween Horror Nights at Hollywood's Universal Studios. The hubs and I have been going to HHN for years. It's like our fave thing in the world. Seriously, the hubs loves it so much, he starts planning our trip in May. I was able to get this frightening clip filmed while standing at the front of the entrance to the park. Just watching it still makes my hands sweat. And to think we pay money to get chased my these maniacs!
14. A Ladies Trip to Charleston. Me, my moms and my moms-in-law traveled to Charleston this summer and completely did the town. I'd never been before and the whole place was such a fun and unique experience. Fave part: the dolphin sightings right after these photos were taken. So fun!