Howdy, friends! I've been busily plugging away, getting my art room ready. My students will be here in just three short weeks...which I know sounds like plenty of time. However, I go back in two weeks (and two days, but who's counting? ME, THAT'S WHO) and have decided not to come in at all next week. That leaves just this week to get my room ready...and I decided to only allow myself two days. If you follow me on Instagram, you were able to see my progress. I drank two pots of coffee AND GOT SO MUCH DONE! Proper room tour to come...once I clear the hot mess off my counters (like, did an art supply store bomb go off over there or what?!)
In case you didn't know, I've got a book club happenin' over on my IG and my FB pages. Every Wednesday evening, I've been going LIVE around 9:15pm CST to chat with y'all about The Wild Card, our current teacherin' read by Hope and Wade King. Recently, in the book, they mentioned finding your WHY...why do you teach? During our chat, we had the idea to each come up with our own WHY (if you don't know it already), put it in kid-friendly terms and make a work of art out of it! Here, lemme 'splain:
Clear as mud?
Easy enough, right?
Sound good? Great! Even if you can't join the fun, be sure and tag me, I'd love to know your WHY! It will surely inspire others.
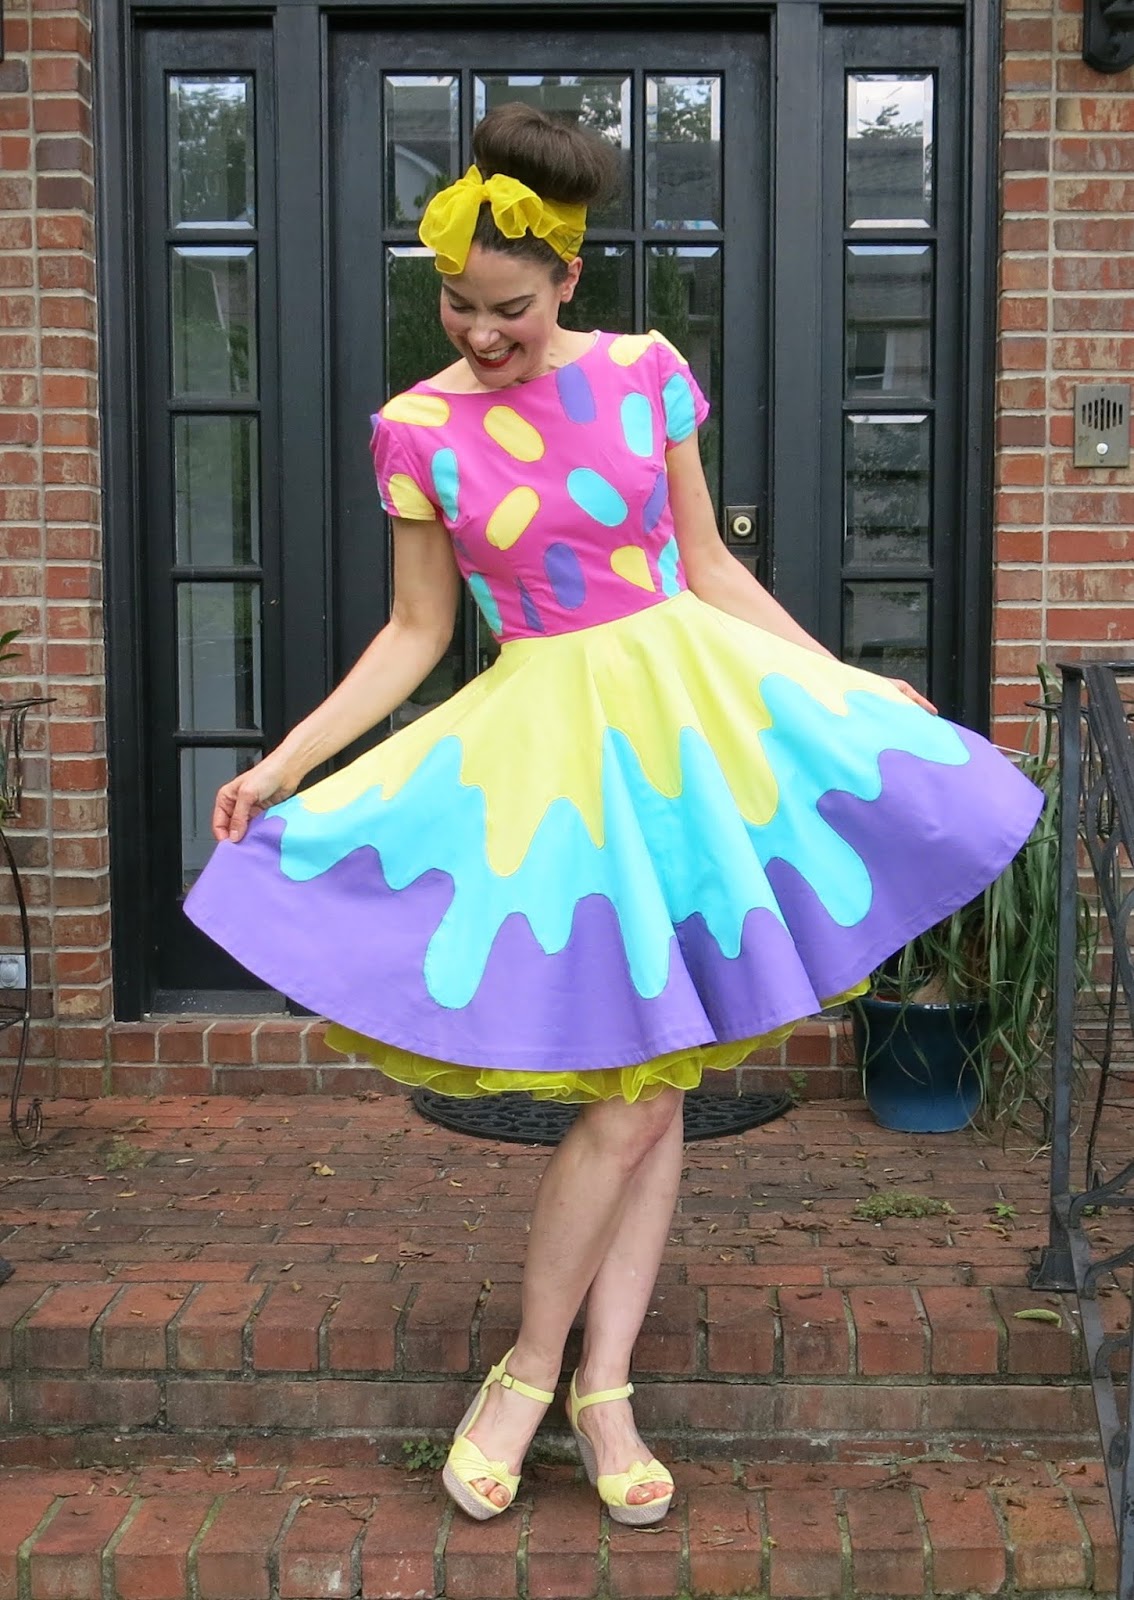
My goal this summer was to stitch up one dress a week. After sewing this beast a couple of weeks ago...I've since changed my lifetime achievement goals. BECAUSE THIS DRESS WAS A MOTHER-LOVIN' BEAST.
Here, lemme show you why:
Now look, don't get me wrong. I LOVE this dress and wanna wear it every day and make about a million more in a variety of colors. But.You.All. I cherish the sliver of sanity I like to think I have left. And therefore I will not be making another dress like this for a while. It's gonna be like the Halley's Comet of Dresses that only makes an appearance every 75 years.
I started with a sketch...where all bad things take form:
And, like, I'm kinda thrilled that my dress actually kinda-sorta looks like my drawing. That NEVER happens! Mostly because my drawing looks bananas but also because I can't sew and 99.9% of the time, I'm just winging it.
I decided to go with a 1950's pattern bodice and my trusty Anna Maria Horner circle skirt pattern. Now the 50's pattern did lead me astray as it had me install these horrible, puffy-topped, too-long sleeves that had me lookin' VERY 1980's Working Girl. I mean, I had shoulders for DAYS. I promptly ripped them out and went with a cap sleeve.
But the sleeves were the least of my worries. It was THE APPLIQUE. What in the world was I thinking?! I cut out and appliqued no fewer than 29 sprinkles. I think that was how many there were. I dunno. TOO DANG MANY, THAT'S HOW MANY. I'm sorry for shouting but if you had to live thru this, YOU'D.SHOUT.TOO.
Okay, I thought. Bodice done. Surely the skirt will be easier as it's only too colors. Well, first of all: Don't call me Surely. AND no. A circle skirt is massive...and appliquing around that alone takes a bit. Add the squiggly line of melting ice cream and you have a project that takes FOR.EVE.RRR.
Insert all the annoyed face emoji's here.
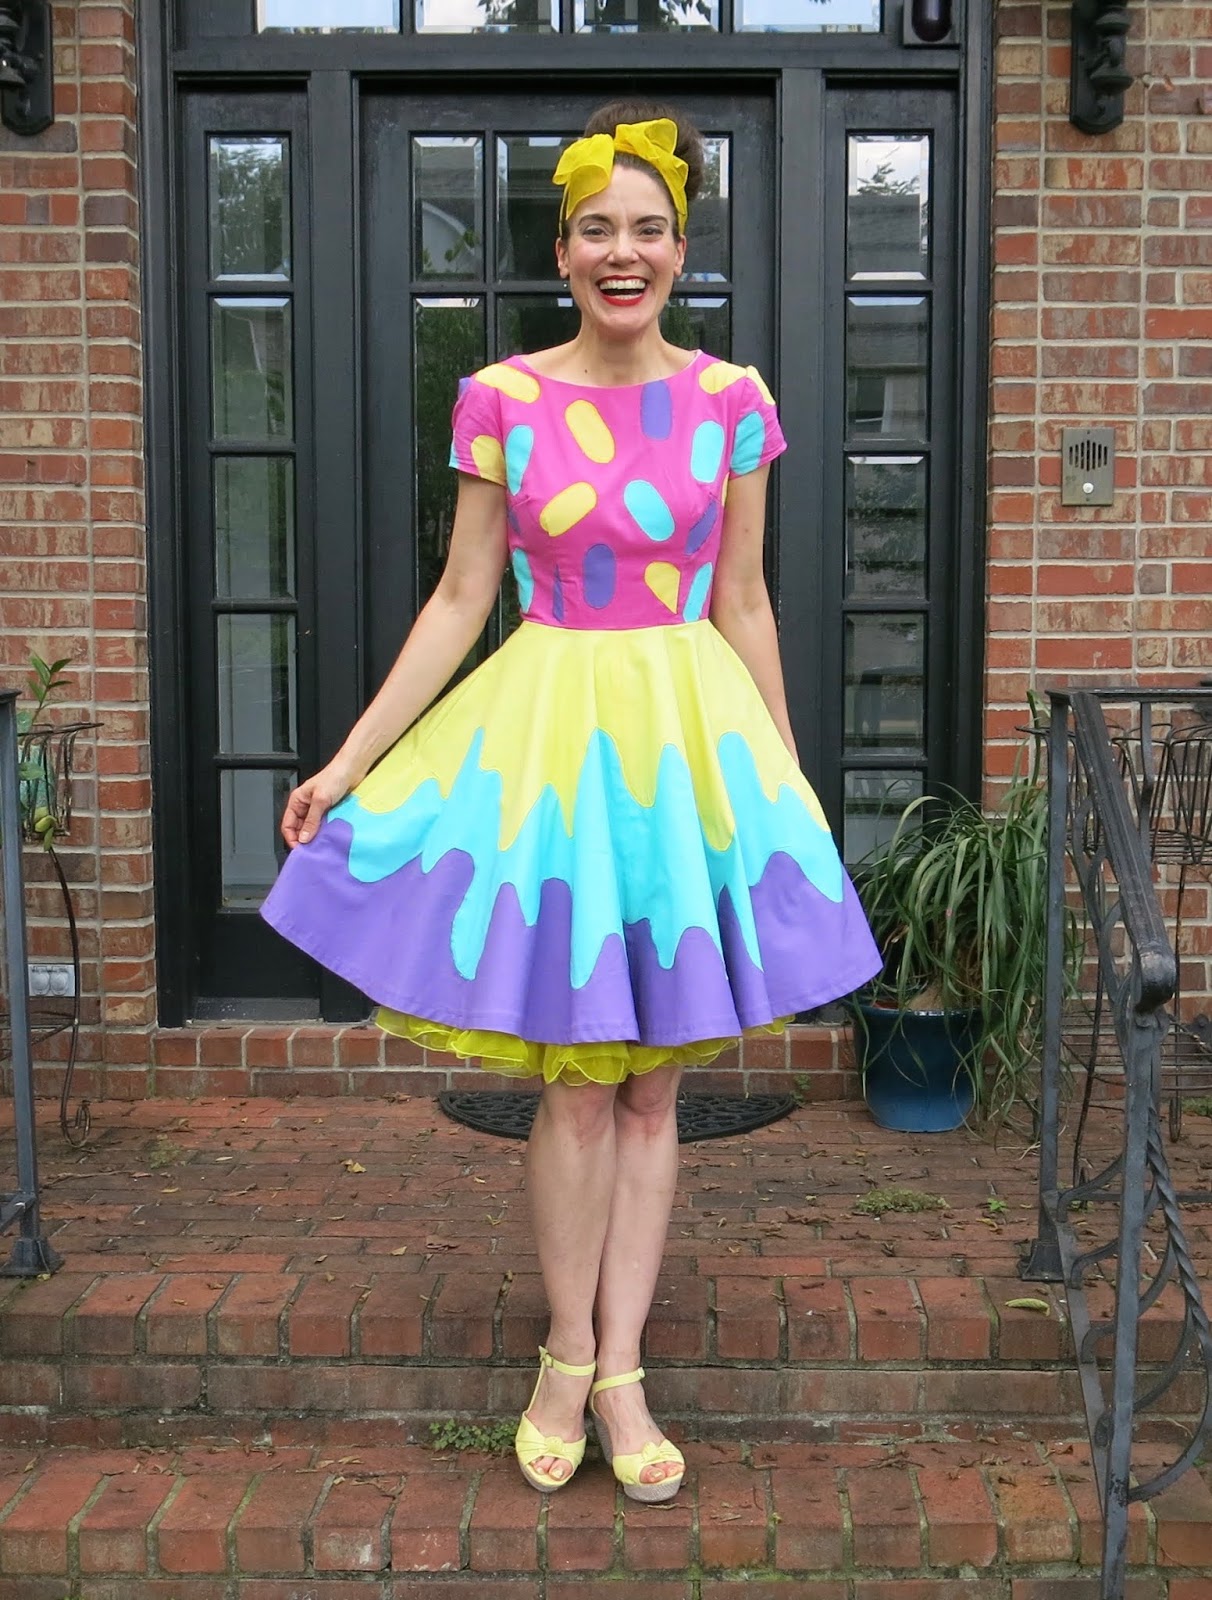
But once the skirt was complete, I was in the homestretch. Just had to attach the top and bottom, throw in a zipper, toss in a hem and BOOM! Done! 3 hours later...
Hurray!
Lady at the grocery: What are you supposed to be? Me (going all existential on her): I don't even know anymore. Lady at the grocery, shaking her head: No, I mean, are you in a costume? Me: No. Literally, that's all I had. I was so tired from sewing, I couldn't even give her more than a NAW, LADY. THIS HERE IS MY ENSEMBLE. Now, move, I gotta go figure out what I'm supposed to be!
Now, I say all this because y'all know good and well I'm gonna have to applique me some more dresses...I have them all sketched out and ready to go. Wish me luck!
Well, I accidentally took a wee blogging break and I'm super sorry! I had a really exciting opportunity pop up and I seriously had to just stop, drop and get the heck outta Dodge. I can't fill you in on any more details other than that...but I will be able to spill the beans soon. And when I can, trust me, y'all will be the very first to know. While I was on my adventure, I threw the idea of a book club out to my friends on Instagram. I picked up The Wild Card at the bookstore to read on my travels and I was really excited about it right from the start. I thought y'all might like to join me on Wednesdays during our Facebook and Instagram LIVE chats at 8pm CST. This Book Club isn't exclusive to art teachers tho, I've opened the floor to all educators. The more, the merrier! I firmly believe we can all share, learn and grow so much with each other. We'll start this coming Wednesday with a soft intro and a chat about the first chapter. Even if you don't get a chance to get the book or do the reading, I do hope you'll join the fun!
Hi, y'all! I'm so excited to share that I recently decluttered and organized my sewing room! It's been a LONG process and I'm so thrilled with the result. I can walk in, move around, LOOK around and see all of my supplies. It's amazing how much clearer the mind and work when there aren't piles of stuff to sift through.
When we first moved in to our house some 10 years ago, I already knew I wanted one room dedicated to sewing. I'd just started teaching myself to sew and was excited by all the possibilities of what I could create. Having a room dedicated to this was so exciting to me. Because I'm a collector (read: hoarder), I'd accumulated a ton of fabric and fun vintage finds like sewing notions. I thought it would be fun to dedicate one wall of my sewing room to display my inspirational finds.
Over time, I realized that this was a waste of precious space. I recently removed all of the frames and vintage notions within.
And decided to make this wall a workspace. So all of the above came down.
I LOVE my studio space and decided to create a similar space in my sewing room. I went to Hobby Lobby and picked up their biggest frames in the clearance section. Then I headed over to Home Depot and had them cut pegboard to fit my new frames. I also picked up a pegboard kit which includes the tools for hanging the frames.
And now I'm so excited! I have all of my embroidery floss, currently used patterns, knitting needles, embroidery hoops and more stored on this pegboard.
I'm super visual, I love to have all of my supplies on hand and on display. This kind of set up works so well for me. The same goes for my thread. These are actually table top thread displays that I found at Joann's. I simply drilled holes in them and hung them on the wall.
Keeping this off my sewing table allows me to have so much more space to work.
Here's a look at my other pegboard. This one is a lot bigger than the picture shows and it holds so much stuff! I purchased the wire bins as a set from Home Depot along with all of the pegboard hooks. The yellow and metal cans are from Hobby Lobby. Currently, all of their metal containers that are colorful are on super duper sale, check their spring isle.
The little round containers along the bottom are magnetic spice holders. My mom gave them to me but I feel like you could find those at IKEA or Bed, Bath and Beyond.
Pegboard Porn, y'all.
BEFORE! I had fabric everywhere! So much so that the room was very crowded feeling...and not fun to work in.
AFTER! I ditched the wire rack and a lot of the fabric that was on it. I kept what I liked and have decided to part with the rest. The giant mirror is from my bedroom which we never used. It allows me to see dresses as I sew them and really opens the room up.
BEFORE! This is from a "clean out" a couple years ago...here is the AFTER result of that.
That time, I didn't really "declutter" as much as I just rearranged. I'm a constant sh**-shoveler, as I like to call myself. All I seem to do is just shovel sh** from one place to another. NO MAS!
AFTER! This time, I really did declutter! My mom helped me out a lot. What I learned is that having a person help you is key...and it has to be a person who has no ties to the items you are looking to declutter. My mom does not sew or craft so she was all for trashing everything. Don't worry, nothing was trashed...just going in the donation/sale pile.
Love using shoe and sweater holders for scrap fabric, yarn and roving!
Y'all recall that fabric stash of mine from the photo above? Well, the closet was also filled! My goal was to condense all of my fabric supply to fit in this closet. And I did it!
I love having my fabric hung as it allows me not to have to root through piles of fabric. It also keeps it less wrinkled.
There are still some things I'd like to do: make sure curtains, take down the old art you see above me and paint a happy picture...and organize the wire racks and make them more useful. But the bulk of the work is done and I'm so excited!
This past Friday was National Donut Day! Because I'm pretty much a crazy person, I decided to create not one but TWO dresses for the occasion (the extremes I will go to to avoid cleaning my house HAS NO BOUNDS, PEOPLE). The first dress I made was an ode to Krispie Kreme. This here dress was dedicated to all the other fabulous donut joints out there!
I decided to pair my dress with the Donut Hat (er, fascinator?) that I created a couple of years ago at a workshop. I started the dress at about 11:30pm on Thursday night. I'm a total night owl and it gets really out of hand during my summer vacation time!
I used my easiest dress pattern that I've repeated both here and here. I love this dress pattern because it really just involves to pattern pieces (not including the two straps): the bodice and the skirt! It's a vintage Vogue pattern, number 8571. When looking for vintage patterns, your best bet is eBay or etsy. Using the sewing pattern number makes the search a lot easier.
I decided to opt out of the waist tie (I did that here) and just wear my big ole pink belt. I did go with a circle skirt (like I did here) which took me a bit longer. I didn't have enough fabric so I had to do some "tasteful additions" to one of the back panels. I'm not telling you which one, I'll let you see if you can figure it out!
With the pattern pieces cut the night before, I got up at 7am and started sewing. This dress took me until 11am to complete...not bad, I don't think! Adding pockets and hemming that beast of a circle skirt did slow me down some but I was happy with my time. Then I had to bust it to wear both dresses to all my donut stops!
After hitting Krispie Kreme in my KK dress, where I picked up donuts for our school's custodial staff (and any other takers in the building!), I did a quick change into this number. These photos were shot by me with my self-timer right outside my art room door. Then I was off to Dunkin'!
So it turns out that Dunkin wasn't giving away free donuts...you had to buy a drink before you got a freebie. I bought a dozen donuts from there to take to my school's central office where the big wigs work. I work in a very small school district of just 8 schools and we're like family. It just so happens that they are less than a half mile down the road from Dunkin so it totally worked out. Everyone was so excited to get a donut and see my wild ensemble that it totally made my day. But they didn't eat all the donuts, I still had half a dozen left!
I remembered I had some banking to do which is also just down the road. I popped in there and delivered donuts to those hard workin' folks at the bank. Our bank is next door to our post office, right in downtown Franklin, so I popped in there too and delivered the rest of the donuts. Y'all. Folks were so stinkin' happy and excited...this was such a fun day! Who knew dressing crazy and giving away free sweets was so much fun? I really need to do it more often!
Disclaimer: Since discovering Instagram and my love for it, I've gotten super bad about snapping photos with my camera and simply using my phone. So what you have in this blog post are phone photos and for that, I apologize. If you'd like to see me overshare my art room happenings (as well as just my hot mess of a life), you can find me here. In my last post, I shared what we did for the art station portion of Field Day...when I thought it was going to be rained out. The night before Field Day, while I was head scratching what we could do, I thought creating a collaborative canvas painting would be fun (this is what happens when your brain is fried, y'all). So I pulled this giant canvas out of my closet and went to town.
I've had this canvas for years. I had started a painting on it years ago and never did anything with it. So I simply painted over it with a cream color paint (cuz that's all I had on hand) and used watered down black acrylic paint to create this. Why watered down acrylic? Because it has better viscosity that way. I began by sketching out four wavy lines across the canvas. Then I wrote out the letters of our school. Once I was happy with the placement, I painted it with a flat brush and called it a night.
Along with our other painting station, I let the kids go to town on this. My only "rule" was that one color go in one space...and TRY to stay within the lines. As you can see above, that was a struggle. But it was field day, we were wound up and I knew I could lean up the lines by simply going back over them. So no worries.
This was after the first day. I was tempted to leave it this way...and then I added the little pattern on the top and thought it would be fun for the kids to add patterns the following day.
Again, so sorry for the grainy photo. My only rule for the patterns was that the kids had to pick one pattern and color and stick with it. For the dots, they used wine corks dipped in paint (fave part of the day? A kid saying, "oh my mom has TONS of these!" Ha!) and thin brushes for the designs. Again, other than that, little direction was given. This was on the last day of school where I had free choice centers set up around the room. This just happened to be one of them.
Once dry, I went back over the black to once again clean up the edges. Then I thought it might be fun to add some white highlights to make the letters pop. Look, even the edge got painted!
The admin had no idea we were creating this painting. When I was sharing it with them, our school librarian saw it and LOVED IT. It was decided that this painting would go in the library for everyone to see. AND I'm really excited to share that now the librarian and I are collaborating to create an entire ALPHABET WALL in this style! The kids will kick off the new school year painting a canvas for each letter in the alphabet to showcase in the library. Y'all I'm so stoked! This project was so easy, colorful, happy and fun. I'm looking forward to making more. LOVE to hear if you give this a go!