Showing posts with label back to school. Show all posts

Monday, July 21, 2025

Best Back-to-School Art Lessons!

Okay, y'all. It's happening! The emails from admin are rolling in, the BTS stuff is out at stores...it's already (ALREADY!) time to start thinking about heading back to school...and the lessons you plan to kick off your school year with.

When I'm thinking of my very first lessons, here's what I consider:

    * The lesson should involve not-so-messy supplies. I do this because during those first days in the art room, the focus is on the expectations, the routines of the art room and the rules. To also throw into the mix the rules, routines and expectations of said messy supply is overwhelming. So I tend to do lessons that involve supplies my students are very familiar with.

    * The lesson should be one where all are successful. I want that first lesson to really set the tone for the art room. I want all students, even those who say, "I'm not an artist" to feel as though they are. So the lessons you'll find here today are ones that are tried and true...and where all students have found success.

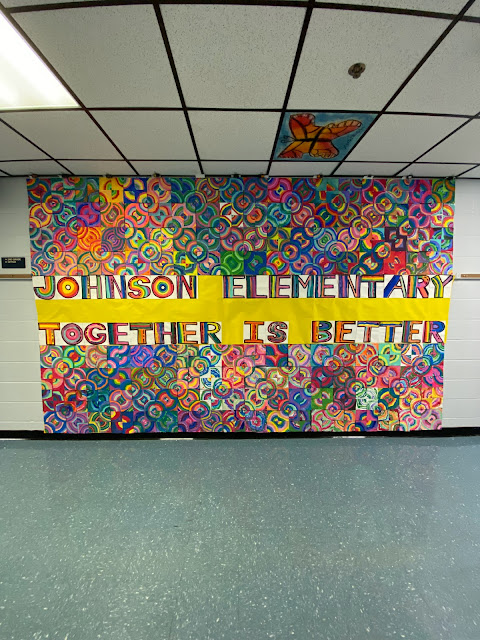
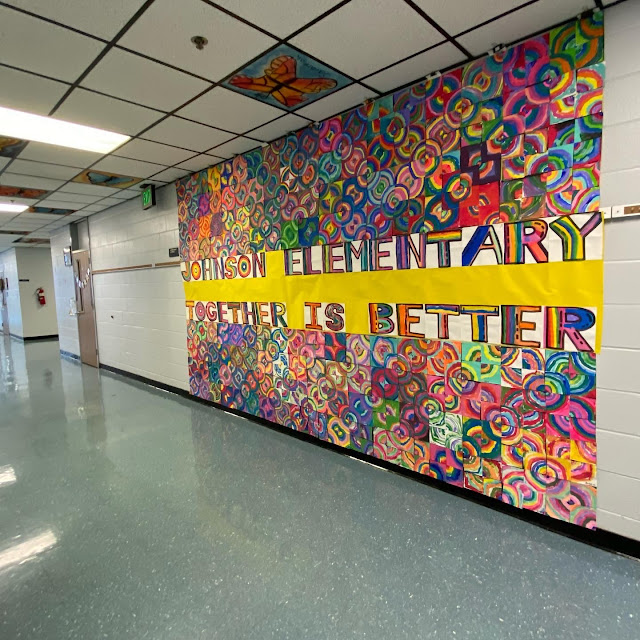
    * The lesson should be something that could be used for a display. Often we have an open house not long after the school year begins. To highlight the art program, it helps to have something to deck the halls. I'm often looking for a BTS lesson that does just that.

    * The lesson should be the same for everyone OR make use of the same art supplies. This one is a hot take...I've gotten some flack for this one. But at the start of the year, I usually do the same lesson with all students, 1st - 4th (kindergarten is a different story and you can find out what I do with them here). But I find that this helps me not to stress and run around prepping 5 different lessons, art supplies and the rest. I do the same thing with everyone...and in the end it makes for a cohesive display and a more relaxed start to the beginning of the school year. You have the whole year to stress! So...let's not kick things off that way!

With those things in mind, I'm going to share with you lessons that I've used over the years for BTS. Feel free to use them in your art teacherin' world! Just tap the link to visit the blog post. There you'll often find free downloads and videos. Let's go!
Back to School Banners

One way to start the school year is by creating banners for your students. I create my banners with my trusty ink-filled bingo dauber (which you can find here, if interested) and I often create them for my students to color at the END of the school year during field day. Then, when we return to school, I have them up as a way to decorate the halls and welcome students back.

However, you can make them now! They would be the perfect activity during those first days as they would get your students creating, getting to know their classmates and becoming familiar with your art room. 
When it comes to creating the banners, your only limit is your imagination. I've created frames for students to draw selfies and slogans for students to color.
I used to have a set up like this and allow my students to paint. While this was fun...it was a lot of work and a lot of cleanup after tons of kids painting all day. In the end, I switched to having my students use paint sticks...and that seemed to work so much better! The colors are just as bright...and much less messy. But, you do you!
For all the details on how I created these banners for my students, visit here!

And if you aren't comfortable creating these rolls, don't worry...I made some for you! You can find all four of them here
Getting to Know You Sculptures

Oh man, do I love teaching paper sculptures! In fact, this IS the lesson I do with my kindergarteners on their very first day...I just elevated it to include this Getting to Know You sheet and added some more paper folding and sculpting techniques.
This lesson makes for such a fun display and a great conversation starter as the kids share with their adults what each part of their sculpture represents. For the TWO TOTALLY FREE downloads, just visit this blog post!
Sketchbooks

I've done sketchbooks every manner of ways but the one I ultimately did with my first through fourth grade was this one! We created these sketchbook covers on the first days of school and they were always so much fun to put together and have ready for the school year. 
Inspired by the Getting to Know You sculptures, I created these decoder sheets for the covers. You can find them as a free download here. 
If you are interested in how I use, organize, store, operate, all the things sketchbooks in my art room, you can read all about it here. 
And if you'd like to check out the sketchbooks I created for your students with my friends at Prang, you can get them here!
Self-Portraits

I find that selfies are such a great way to return to school. Of course, for some students, they can seem daunting...so I like to keep them on a small scale. These wee selfies are just 3-4" squares! We went with a monochromatic color scheme but you could do these any way you like! You can find this lesson as well as a video for you and your students here. 
Of course, self-portraits can take on any manner of style. This was such a fun collaborative piece to make that we kept it hanging for years outside the art room! For more collaborative projects like this one, visit here. 

Dot Day

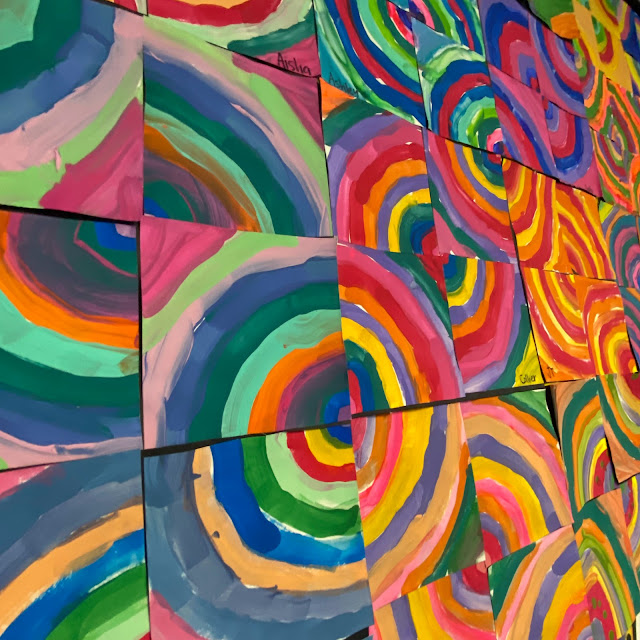
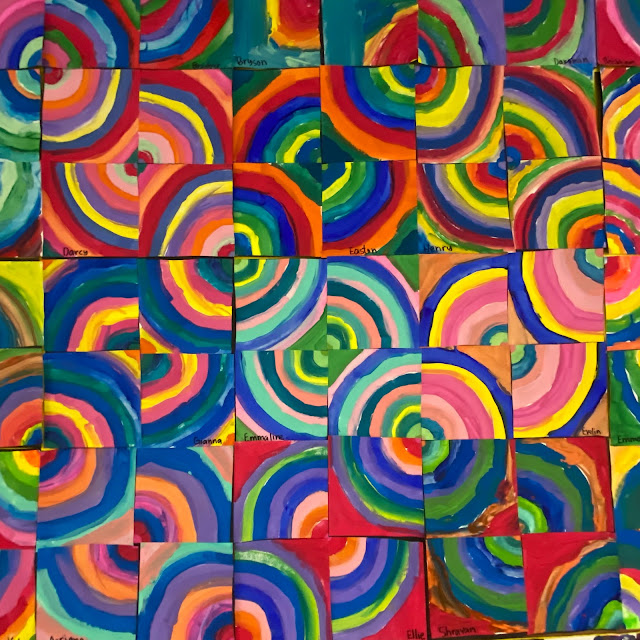
Dot Day is a great way to kick off the school year! Based on the book The Dot by Peter H. Reynolds, it is one that I read to all of my students on their first days of art. So what better way than to dive in with lots of dot-themed art projects?! To find out about this one seen above, tap here!
For a shorter Dot Day experience, my students LOVED this one! I picked up a bunch of metal pizza pans from Dollar Tree and my students explored monoprinting! You can check out this lesson here.
If you are feeling a little anxious about the idea of using tempera paint on those first days of school...I got you! Check out my blog post featuring my Top 10 Tempera Painting Tips!
If you are looking for even more inspiration for back to school lessons, I have MORE in this blog post! BUT...I'm ready for my second copy of coffee so I'll leave it here for the day.

Stay tuned...I'm working on a new video for a lesson that your students will love! It will have a couple of free downloads just for you. I hope to have it for ya next week so...until then!


photo signature_zpsd10b3273.png
Read more »

Tuesday, July 30, 2024

Back to School Banners for your First Days of Art!


Well, my friends. The time has come...it's back to school we go! 

For many of us, anyway. I know some of y'all kept on teachin' until, like, the end of June which is absolutely WILD to me. First of all, the temperature here in Tennessee during that time of year is literally the surface of the sun. I cannot imagine trying to teach, let alone put kids on a bus, in that type of heat. And, second, let's be real: I'm tapped out come May. Okay...I'll be for-real for-real...I'm tapped out the week after spring break. So those of you that teach into June, y'all deserve a break.

BUT for those of y'all that are heading back, I thought I'd put together a blog post of a simple, fun and IMPACTFUL project for your Back to Schoolin' days. 

Let's talk Back to School Banners!
One of the biggest back-to-school stressers for me was "what am I gonna teach on the first couple days?!" Because, honestly, that's not of great importance. What's VITAL is establishing Rules, Routines, Do's and Please-for-the-love-of-God Don't's. For that, you may want to check out my book, my videos or my podcast. BUT be sure and pop back here later this week as I've got more coming your way. 

BUT...I always want a project that gets the kids excited! AND that gives me something fun, vibrant and happy to hang up as soon as possible. So, for that reason, I'll be sharing my fave tried and true 
If you tap the link, I've got a video with more detail on these from how they are made to how I use them in my art room. Full disclosure: I usually create these at the END of the school year for my students to paint/color on field day. Then I hang them up in August to have some bright and happy color in the halls when students return. However, they could easily be created and utilized during Back to School!
Here's how I created these:

* Using large bulletin board paper and an ink filled bingo dauber, I draw the designs in yellow or peach chalk. 

(SIDE NOTE: If you'd like to see/read more about bingo daubers and the lessons I have done with them, check out this blog post!)

* The chalk makes it easy to adjust and erase my drawings before tracing them with the "paint marker" or ink-filled dauber.

* No time to create these? That's okay, I made some for you! You can purchase the banners I created right here. 


Ideas on how these banners can be used in your art room:

* So...you could go the route that you see above if you are feeling brave enough to bust out paint...on the first days of school. I would HIGHLY not recommend that. Trust me...I speak from experience.

* The above photo was taken before I discovered tempera sticks! These work far better than paint as they are less messy and the kids love them. That is what I'd recommend.
Now don't feel limited to creating giant coloring sheets as I have done. In fact, why not take it a step further and have students create a huge self-portrait banner?! 

How to make this happen with a room full of kids:

* Create stations! Have students rotate from table to table. One table could have a banner with frames like this where students can draw their self portrait. I provided construction paper crayons and Sharpies for this. A short selfie demo was given first by instructing students to use ONE frame only (ahem) and draw with their marker before adding color with Sharpies. We made the frames extra fancy by coloring those with metallic tempera sticks.

* The other table stations could include your banners! So students are always active, creative, coloring and moving around the room. This would also be a great way to get students acquainted with your art room.

* Why not include a Gratitude Banner where students draw portraits of their teachers and the faculty and staff in the frames? That's similar to a lesson that I did here and here
Now, let's take the Back to School Banner in a totally different direction and make Back to School table covers! In my book Art Teacherin' 101, I talk about how I have my tables color coded as I'm sure many of you do too. Each table is referred to as a 'team' and expected to work together. As they do, I give them points for their table in Class Dojo.

Here's where it gets interesting. On Class Dojo, where you would normally put in a student's name, I put in the table color. EVERY class has the opportunity to earn points for their table team. So...if the Red Team earns 5 points in Ms. Smith's first grade class, those points are earned across ALL of the Red Teams in ALL of my classes. This creates a School-Wide incentive to do well of the team. 

Does that make sense? Let me tell you...it works great!
During those first days of school as we get used to our table and the idea of table teams, I roll out (literally) these color coded mats. After hearing rules and routines, we often don't have much time left in class. So we spend that time adding color and kind words to our table covering. 
Students use construction paper crayons to add bright colors to these banners. 

In the past, I ALWAYS used paper to color code the tables on those first weeks of school. After a month, the banners were a mess so they were tossed. Usually,  I only had them to signify the table colors those first few days and after that, my students knew their table. 

However, when they made these, I really wanted to save them. So...here's what I did:

* Fold the table covering in half LENGTHWISE.

* Slowly put the table covering through the school laminator. Ours was the width of the paper folded lengthwise. 

* Once through the laminator, cut along the unfolded edges of the folded banner.

* And Ta-Da! You now have a banner that is laminated on one side!

Because of the crease, you do have to flatten a bit. I simply taped mine to the underside of each table. 

Added bonus: now you can draw on them with dry erase markers!


And there ya have it! Some ideas for creating fun and impactful Back to School art!

Stay tuned...I've got more projects coming your way!

AND if you are feeling like you need some classroom management tips...I would really recommend you check this out


photo signature_zpsd10b3273.png
Read more »

Thursday, August 3, 2023

Videos for those First Days of Art

During those first days of art class, there is a whole lot we gotta cover: Rules, Routines, More Routines, Consequences and, again, Routines. It can be taxing on our voice (not to mention energy level) and, inevitably, we forget SOMETHING to SOME CLASS and can never remember just what it was we forgot or to whom. It's all very exhausting...and that's just how WE feel. The poor kids literally spend their first week hearing all the Do's and Don't's until it all just becomes a blur. Usually, by the time they reach our door, they are just dying to do something, ANYTHING, other than hear Rules and Routines. 

So, like, what to do?

I can tell you something that has worked well for me: videos!


Creating videos is something I've done for a very long time (subscribe to my YouTube channel and check out all of my teaching videos!). I started with creating lesson videos and noticed just how closely the kids pay attention. I always say they listen to TV Stephens far better than Real Life Stephens (and I don't know how I feel about that but whatever!). So several years ago, I decided to create some Welcome to the Art Room videos, as well as What is Art and Routine videos and I thought I would share them all here today. 

In this post, I'll share with you some tips on creating your own videos or...feel free to simply use mine! You can always pause the video and interject. Let's start with the most recent video I created for the first day of art. Here's the graphic I created for the video (on Canva, a free website for easily creating graphics just like this!)

This video is short and sweet where I quickly cover some things on the very first day. I do go back and cover the rules the following art classes but this is just a way to catch a glimpse on that first day. If you'd like to see what a first day looks like for me, check out these videos. This is how I run my art room for first through fourth grade:
Not shown: when I stop to play the video. I usually do this after we go through our introductions. 

For more behind the scenes of my art room routines, you can check out these videos. It may explain the method behind my madness:

These are routines I establish that first day and how I start each art class. 

Throwing this video in here since I reference the behavior system that I use. It's a hit with my students!

I thought I'd also share some older Welcome to the Art Room videos that I created in years past. This might give you some more ideas of what a video you create may need. 
This one was created during Covid...so you'll notice how different the routines were.
And this is my original video.
I promised some tips on creating your own video so...here we go:

* Keep It Short! Don't overwhelm the kids. Think of this video as the fun "Cliff's Notes" version of all that you plan to cover. A brief tour, a quick introduction and a general view of how you operate your art room is perfect. 

* Involve the Staff! Kids love to see their teachers ham it up! This video I created on Art Class Etiquette was always a hit:
I also created several "routines" videos and this one they loved because their favorite teachers were featured in it:

* Use Your Phone! I'm always asked "how do you make your videos? What software? Lighting? Microphone?" Guys. GUYS. Your phone is fine! Just prop it up someplace and hit record. And be YOURSELF. Now that is easier said than done. What works for me is to hit record and then make faces at yourself for a minute. Loosen up. Don't worry about messing up. Don't hit the stop button and record again and again. It will just make you frazzled! Just record and know you can edit later. Or not! A bloopers reel may be fun for the kids to see!

If you have an iPhone, iMovie is the easiest editing tool! Watch a 5 minute How-To video on YouTube and you'll have all the basics down. The kids aren't lookin' for perfection. They will love it regardless! Unless they are in 5th grade. Then they pretty much don't like anything ;)

No iPhone? There are PLENTY of free apps out there for editing. Or create the video in TikTok or Reels! That will REALLY get their attention. "YOU HAVE A TIKTOK?!" Yes. And please don't follow me.


So, there you have it! I added this last video in case you are interested in sharing it in your art room. All of the drawings were made on my iPad and I simply recorded myself while drawing! 

Need more art teacherin' tips and tricks? Did you know I wrote a whole book on it? And I can tell it's Back to School season as I'm backing up tons of orders each day. You can find it here. 
Have a great start to your school year, friends! And be sure to check out my last blog post for a ton of back to school art lesson ideas!


photo signature_zpsd10b3273.png

Read more »

Thursday, July 13, 2023

First Day in Art with First through Fourth Grade


I know, I know, I can hear you now:

STOP! NO! I DON'T WANNA THINK ABOUT THE FIRST DAY OF SCHOOL DURING MY SUMMER VACATION!

Juuuuuuuust hear me out: isn't it far less stressful to think of it now, with your feet in the kiddie pool and your bowl of ice cream-for-lunch slowly melting in the summer sun? Instead of, let's say, stressing during those dreadful back-to-school faculty meetings as you count the long list of endless things you need to do before the kids arrive? When you are so busy setting up your room that you lose track of all that you want to cover that very first day? 
See? It's not that bad!

My first day with my first through fourth graders is an easy-peasy one. You'll see it in this video, complete with a breakdown of why I introduce what and when. Please pardon the location placed on the video...it's clear that me and iMovie are still getting to know each other after all these years. Anyway! I know it looks like a bunch fun and games BUT there is a method behind my madness...and that's teaching kids my routines: 

* Our Art Class Greeting
* Our Art Class Catchphrase
* Our Open/Closed sign 
* Our Behavior Management System (not that we call it that!)
* Call and Response and how it works
* Learning my name...and me learning theirs
* Becoming comfortable with making our voice heard
* Learning how to become an active and considerate listener

What's not shown is how we get our seats, practice emergency drills and lining up properly. 

I have art class with my students for 30 minutes twice a week. We manage to knock out ALL of that in the first 30 minutes. And, you may notice in the video, the kids already seem to know a lot of the routines. That's because I taught them in kindergarten. And even though my first day with kindergarten looks a lot different...we do eventually cover all of these things. 

AND if you just want more...I wrote a whole book on this topic! I lay it all out for you in my book Art Teacherin' 101. It has ALL that you need for a successful year no matter your teaching situation. You can find it right here. 

I also have a TON of videos on this topic on my YouTube channel. If you subscribe, you can stay posted because with it being 'the season', I'll be adding a lot more video content on back to school soon. 


photo signature_zpsd10b3273.png


Read more »

Saturday, October 29, 2022

The Dot School-Wide Collaborative

Hello, friends! I'm excited to share that the school-wide collaborative my first through fourth grade students created at THE BEGINNING of the school year (yikes!) is finally installed. Like, finally.

Y'all, while I do love having all students creating a collab at the start of the school year, why do I do it to myself? It's so much work on my end! All the attaching to bulletin board paper and hanging...it's so much! AND I always procrastinate! And yet I do it year after year. Such a glutton for punishment, I guess.

Here's a look inside the process of hanging this beast with some of my tips:


When hanging something this heavy, it takes everything in your tool belt (as well as a helpful music teacherin' friend). Check out my tip on binder clips and long tabs of paper. It helps!


I've not done an official post on how we created these dot paintings but I'll tell you: it was super easy! In fact, it's one of my fave kindergarten lessons which you can find the details on here

All students began with a dot in the middle of their paper. The paper was prefolded so that each dot was exactly in the middle. Meaning I quarter folded the paper, once in half one way and then in half the other. Dot was placed at the intersection of those two folded lines. 

Like the kidnergarten lesson, each student was then instructed to paint concentric circles around their dot using any colors of tempera paint they liked!
Once dry, the paintings were cut along those folded lines. They were then rearranged and glued to a black piece of construction paper. This part was tricky so students helped one another. 

Early finishers painted the wording of the sign!
And then the beast was hung...where it shall stay for a LONG, LONG time. Or the end of the school year where I'll have the students cut it apart to take home their circles (maybe. Or I may leave it up until next year!). 


photo signature_zpsd10b3273.png
Read more »

Friday, August 14, 2020

Top Tips for Surviving Back to School!

Today I was asked if I was ready to return to school next week and I just nearly spit out my coffee. 

Like, wait. What? 

OMG. I do start back to school next week! It's not even next week, y'all. It's down to just mere days and hours. Minutes even. How in the world did I slip into such daze of delightful denial that I had forgotten? 

Okay. I'll be honest. I have not forgotten. It's been on my mind since July. 

As a teacher, I think of July as a month-long version of Sunday night. You teachers know what I'm talking about: Sunday night is the one time of the week that you dread because you literally spend the evening running through all the work that lies ahead. What's first-grade learning? Is second grade finished painting or will I need to prep paint trays in the morning? Fourth grade was on a field trip so half of them are behind while the other half is ahead...so who's doing what tomorrow? Third grade, did I plan a lesson for third grade? And, kindergarten. Lord have mercy on my soul, what will I do with kindergarten tomorrow?! 

If that's our average Sunday night then y'all know what our month of July feels like. Especially in the midst of this wild world we are living in. 

Needless to say...I have been having just a tiny bit of trouble relaxing (ahem). But I have found some ways that have been working for me and I thought I'd share them here. Let's start with something I've recently mentioned on Season 2, Episodes 1 and 2 of my podcast: BLISS.
This morning, I was going over all the things I needed to do today and I started to have trouble calming myself down. I've only had a couple of panic attacks before (once during my third year of teaching when I MELTED DOWN A KILN and immediately lost sight in my left eye and was sent home. Good times) but this morning, I noticed that the feeling over being overwhelmed was effecting my breath. Meaning...I couldn't catch it. Not a good feeling at all. Then I remembered my acronym BLISS. 

The B is for Breathe. It helps when breathing to have a gatha or a phrase that you say mentally as you inhale and exhale. What this will do is help you to focus on your breathe. Just taking a deep breathe and exhaling is great but, if you are like me, your mind will rapidly move to what it is you are currently fixated on. So if I have myself mentally say, 'Breathing in, I am calm; Breathing out, I can relax,' it really helps. Try looking up gathas or writing some for yourself. If, after a couple of breaths you aren't feeling better, keep trying. Breathe deeper. Relax your shoulders. Focus on the present. You'll get there. 

The L is for List Your Gratitudes. By that I just mean, while you are breathing, stop and take a look around the space you are in. Mentally list off what you are thankful for. Currently, I'm thankful for a comfy chair, a cup of coffee and the sewing room I am sitting in. You don't have to write it down. Just take in the present, 

The I is for Indulge in Your Feelings. Look, things are not easy right now. It's okay to have all the feelings. I've mostly felt confused (by the tons of emails) and overwhelmed (by knowing that the load on my teacherin' plate is about to get bigger) and upset (because I know I won't be able to do it all). And I think it's okay to get all up in your feelings now and then. As long as we don't live in that space, I think it's fine. 

The S is for Stop Reading Social Media. When have you EVER hopped off social media and felt like that was time well spent? I mean...I am an epic social media time waster! I spent a couple of days this summer completely off social and not only did I not miss it but I felt so much lighter. I recommend a little social media vacay if you can. 

And the last S is for Surround Yourself with Joy...whatever that may mean for you. For me...it's creating, sewing and painting. If I don't take my creative vitamins, I swear I go through a withdrawal.
Wanna know what is keeping me up at night and my mind on a constant hamster wheel of thoughts? LESSON PLANNING. I keep thinking "how can I possibly provide my students with the best art education they deserve if I'm on a cart or on a screen or they are spaced so far apart?!" This little phrase right here has been helping me keep a positive mindset. 

Your only limitation is your imagination.. 

I was chatting with an art teacher the other day who has been teaching for 31 years. I've been at it for 22. Neither of us have EVER seen anything like this current teaching state. Which means...we are all in this together! It doesn't matter how long you've been teaching, this is a challenge for us all. Her mindset was, "a challenge can be fun." And she's right! Not the kind of 'fun' any of us signed up for...but if we think of it as a challenge and accept it as such, maybe it will push some of us out of our teaching comfort zone. This challenge has the potential of making better teachers of us all. 

All that to say...I'm still not ready! I'm still not sleeping well! I've been having my BTSN (Back to School Nightmares) like crazy and they seem to be even worse this time around. Y'all, I had a dream that there were WOLVES in the school the other night. My mind is on overdrive! I shared this with my friend Virginia who recommended I start at the beginning of the alphabet and think of all the foods I could. I got to the letter H before I had to get out of bed and hit the kitchen for a snack. All that did was make me hungry! 

A couple times this month, when sleep has completely illuded me, I've tried Melatonin by Natrol. I had no clue what Melatonin was until recently. It's a natural hormone that your body creates to let you know when to hit the hay and get outta bed. Twice this month, when my mind wouldn't allow me to rest at all, I found this to help. I even woke up without my standard morning headache (do y'all get those?!) which was a nice surprise. 
Just know...that if you are feeling a little panicky and overwhelmed, it's okay. Also, just know that yours truly will be teaching children in THIS ROOM next week and what you see right here is the clean and tidy side. 
Also know that my face has permanently frozen this way (just as mama said it would) as I've made it so many times when asked "Are you ready for school to start?!" Hahah, yep! Sure am! Doesn't it look like it?!

In all seriousness, y'all, we got this. We handled it like champs in March when it came out of nowhere and we suddenly found ourselves as YouTubers, videographers, Zoom-Call champs and more. We can do this new thing and we'll be doin' it together. Love y'all! Mean it! 
photo signature_zpsd10b3273.png
Read more »