In case latch hooking a mini rug and sewing it to the back of a jean jacket wasn't the first clue...I have cabin fever! I'm currently on my SEVENTH day off in a row after we got some snowy weather here in the South. Y'all know, we Southern Lilies cannot handle that white powdery stuff and it just shuts our town down. I've been knitting, needle felting, and latch hooking since. It's been GLORIOUS...but with this DIY, I'm starting to question my sanity.
When bad weather is predicted in these here parts, everyone makes a mad dash to the grocery store. I happened to pop in to get my staples (cat food and a bottle of wine. Pretty sure nothing says pathetic more than that!) when I was practically run down by carts filled with Wonder Bread and gallons of milk. What EXACTLY does one do with that much bread and milk? Are milk sammies a thing?
Me, when bad weather hits, I skip the grocery and head to the craft store. My provisions are CRAFTS!! I know I'm gonna need something to occupy my hands. So I hit the craft store with the idea of knitting a rainbow scarf rolling around in my head. After piling my cart full of Roy G. Biv yarn-i-ness, I turned a corner and spotted a whole aisle of these: LATCH HOOK KITS!
I grew up in the best era: the 80's. Crafting was all the rage and I was a huge fan. One of my faves? Latch hooking. I can still remember sitting on my babysitter's couch, latch hooking a mushroom in all those horrible 80's browns and greens while watching MTV. I remember they played that video for Madness' Our House about 20 times a day. I can still see it in my head!
Even my parents caught the latch hook rug and made a huge red rug with a bright orange running tiger across it. It sat in between their dresser and their waterbed (omg! Why was that a thing?!) for years.
I never did finish my mushroom rug but I managed to complete this guy in just a couple nights. I had EVERY intention of taking this to school, showing the kids how to do it and adding it to my early finishers fibers area...but when I got the call for another snow day, I couldn't stop myself! When I bought it, I thought it would be fun to hang in the art room as a reference for TEXTURE (and I still plan to do that!)...but, in all my cabin fever wisdom, I decided to add it to the back of a jacket instead.
The final design, only being 8" square, was not as big as I would have liked to fill the back panel of the coat. So I added 8 additional rows: two turquoise and two indigo, both at the top and the bottom. This filled the space completely. I did have to cut the yarn to that certain size to hook which was a slight drag...but not that bad.
From there, I just used a super sharp needle and some super strong thread and stitched it to the back of the jacket. Easy! Right after this photo, Asha the cat came over and planted herself right here. IT'S A COAT, KITTY! NOT A RUG! NOW MOVE, I GOTTA VACCUM IT!
Alright, be honest: is this crazy or what?!
Not gonna lie, it's warm and certainly easy on the back when I sit down. Kinda like giving a panda a piggy back ride.
Pretty sure I'm gonna be getting a lot of back rubs from the kids for this one!
Now, don't judge...I already have designs on hooking a Mona Lisa coat! Okay...time for me to leave the house. Fresh air and human contact might do me some good.
So...at the BEGINNING of the school year, I got the idea for this collaborative project...and, here we are MIDWAY through the school year and I'm finally assembling and sharing it with you. Story of my life, y'all.
At the start of the school year, I dyed a bunch of clothes pins by placing them in a bin of watered down paint. I later learned that food coloring works well also. I dyed them red, orange, yellow, green, blue and purple.
When the students came in, we read The Dot (yes, this was our Dot Day attempt!) and we spoke about all of the things that we are. "I am creative. I am amazing. I am silly. I am funny." You get the idea.
I had the kids get two colorful clothes pins (any color the wanted) and one plain one. On the colorful clothes pin, they were to write their name on one and a word that described them on another.
On the plain ones, I had them with monochromatic Sharpies and create a design. I did this project with my first and second grade students who have 30 minute art classes. My third and fourth graders, who have an hour, did a different collaborative project:
You can find out details on this project here. I at least managed to get this project finished and hung at the start of the year!
After the kids were done with the clothes pins, I had them sort them by color. Then I clipped them around 9" cardboard pizza rounds. I then painted the center black and used the kids' painted papers to create the I am... in the middle. Initially I was going to hang these in the hallway but I was afraid they would get damaged without a watchful eye on them.
AND because they are so stinkin' pretty I wanted to be able to see them all the time! I used command hooks and yarn to hang them above my window. They did keep rotating which would have been fine if I'd had the kids draw on BOTH sides of the clothes pin (which you might wanna do if you do this project). To keep them forward facing, I simply hot glued them together where you see them touching/overlapping a bit.
Another happy rainbow addition to the art room that I'm happy to finally have on display!
It's officially Sweater Weather in my neck of the woods and I'm all about it. So much so that this weekend, while I was procrastinating lesson planning, I decided to do a little wardrobe planning instead because #priorities. After rooting thru Mount Sweater (seriously, if you follow me here, you've seen my stories...I have a sweater-hoarding problem, y'all!) I decided I had so many sweaters, I thought I'd go with a theme...and settled on animals. Here's this week's line up:
Boom! Side note: I have enough animals sweaters to last me two weeks, maybe even three. Did I mention Mount Sweater? Whilst rooting thru my jumpers, I noticed that a fair amount of them had been created by yours truly. And that's when I thought a blog post of my Top Ten Fave Needle Felted Sweaters was in order (conveniently, I've needle felted EXACTLY 10 sweaters...countless dresses...but 10 sweaters. Exactly.) So here you go. If you are looking for a super fun craft that allows you to take out your frustrations while stabbing something repeatedly AND NOT GET ARRESTED, have I got a craft for you!
My Very First Needle Felted Sweater! If we are gonna talk needle felting, let's start at the beginning, shall we? I started needle felting in January of 2013 (seems like yesterday!) after a visit to Anthropologie. I'd spotted a BEAUTIFUL sweater that I was determined to buy until I spotted the $98 price tag. Say whut now?! I remember examining the sweater carefully and thinking, "I think this is felt...I think this is needle felted!" That evening, I went home and watched several YouTube videos on needle felting. After stumbling upon a video where a sweet British woman exclaimed, "You can needle felt on ANYTHING!" I decided to get the supplies and give it a go on this thrifted and moth-ridden purple sweater. here's the my preferred needle felting supplies:
This Clover brand needle felting tool can be found on many websites. I like it because it holds three needles, making the job a little easier and it fits comfortably in your hand. Just a side note: when buying replacement needles, purchase the Clover brand ones. They are designed specifically for this tool.
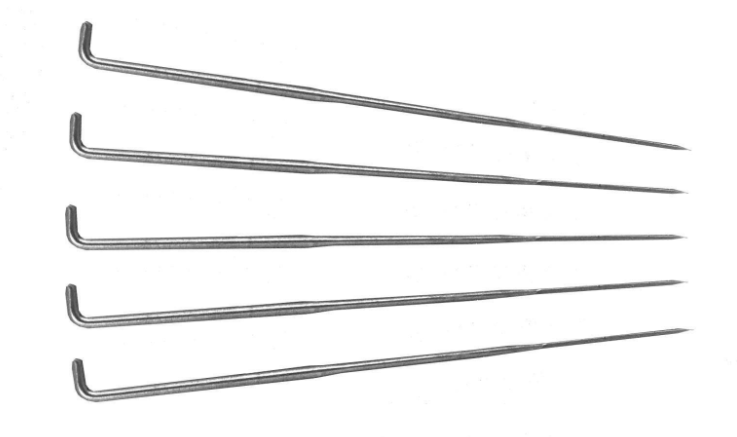
The needle felting tools usually run about $12. If you aren't sure if this is the craft for you but still wanna give it a shot, you might consider inventing in a pack of needle felting needles. They are barbed and razor sharp so if you poke yourself, there will be blood. No sharing needles, okay? Not a craft for the little kiddos, okay? You can purchase a pack of these for half the cost of the needle tool. Why do I need so many, you ask? Well, as a newbie, breaking needles is not uncommon.
When needle felting, you gotta have a cushion underneath otherwise your needles will break. My cushion of choice is this one, also created by Clover. However, a foam cushion, like that used to reupholster furniture would work as well. Now, let's talk roving. I'd like to recommend purchasing from a local provider. How do you find that? See if your community has a Fibers Guild. Mine doesn't have much of one...but where my mom in law lives, Birmingham, they do. Reaching out to them will put you in contact with someone who just might produce their own wool. Or you could contact my two favorite ladies: Sue Bunch at Back to Back Fiber and Natasha at Ester's Place. They are GREAT! Now, back to the sweaters!
Crazy Cat Lady Sweater!After seeing a cat sweater on ModCloth, I decided to make a portrait of my cat on my sweater. So here is Asha! This method of needle felting, I call Paint By Numbers. If you follow the link, you'll see just how easy it was to needle felt. Now, easy does not equal FAST...needle felting is time consuming, FYI.
Crayola Crayon Sweater!I'm still waiting for my endorsement from these guys. I mean, how much more love do I have to show, I stabbed your logo on my sweater?! If you want an easy sweater, try this one on for size! Flat shapes of color and LOTS of stabbing.
Pencil and Line Sweater! Want a fast project? Here you go! By the way, the best place to find sweaters to stab is the thrift store! The sweaters DO NOT have to be wool...remember, you can needle felt ANYTHING. Here's a closer look.
When it comes to yarn, you can needle felt any kind of yarn, it does not have to be wool! I used yarn on both the zig-zags and the looped lines. Word to the wise: when needle felting yarn, DO NOT CUT IT! It "shrinks" as you felt, meaning it will "felt" and get smaller in size. So only cut it when your project is complete to ensure you've used enough yarn.
Put a Bird On It Sweater!Remember back in 2013 when we put birds on EVERYTHING? So much so Portlandia did a hilarious skit about it. Well, I'm guilty! I love stabbing birds (ahem) onto stuff...including this sweater. Sadly, I rarely wear this sweater! Whenever I put designs on the back, I always remember that I can only wear them when my long hair is up...otherwise, they go unseen!
Foxy Stoll Sweater!Here's another short-ish project stabbed upon a thrift store sweater. I'm telling you, once you get in to this craft, you'll either be raiding your own closet or that of the thrift store. The best part is, if you mess up, who cares?! You're only out a coupla bucks!
Owl-y Sweater!Not even gonna lie, so much of my sweater-inspiration comes from Anthro! I see that cute sweater, get all excited and then I see that price tag...but DIY motivator there ever was. This owl was a direct Anthro-inspo.
Floral Felted Sweater! As was this one! I love this sweater and practically live in it during the winter months at home. That being said, it took FOREVER to make because of all the small flowers and fruit. But I think it's one of my faves.
Van Gogh Sunflowers Sweater!Did you know that you can needle felt fabric?! That's right...if you find yourself without wool roving then hit the thrift store and purchase some 100% wool sweaters. Wash them, dry them and you'll have felted fabric. With that you can cut out shapes and the felted fabric will not unravel. Felted wool is what I used for the flowers and leaves of this sweater and the one below. Just place the felted wool on the sweater and stab as you would wool roving.
Calligraphy and Flower Sweater!This sweater involved needle felting wool roving, needle felting felted sweaters and WET felting! I don't talk too much about wet felting on this blog as it's not my most favorite thing ever but...I did it for the yellow centers of the flowers. This whimsical sweater was a blast to make.
I have shared A LOT of felting and fibers videos on my YouTube channel, so if you are interested in learning more, you might wanna subscribe here. Thanks, y'all!
If you follow me on Instagram, then you know that last Wednesday, I had the chance to attend an amazingly fun PD lead by an art teacherin' buddy in my district. Her name is Madison and she shared with us all about yarn bombing! We watched this TED talk about Magda Sayeg who is attributed to "inventing" yarn bombing. It was fun to learn a little about the history of this street art movement.
Yarn bombed things are usually knitted items...at least that's how Magda began the movement. What I loved about Magda's talk is how she never thought of herself as an "artist" per se...but found herself in the middle of an artist movement. Yarn bombed items since have been knitted, crocheted and wrapped...which is what we did. Madison asked that we bring something to wrap. It just so happened that I'd picked up this heart the day before at the Dollar Tree. I didn't even know that I needed it...but when she mentioned bringing something I realized the benefits of being a shopaholic. Here's a video of how I created this heart:
Of course I had to get a little bit tricky with the needle and all...but this heart would have looked just as cute without going that extra step.
The best part about this project is using up random yarn. I always get a TON of yarn donated to the art room. Oftentimes, it's not enough for a project...so it just sits unused. Now I can add it to an Early Finishers center of objects to be yarn bombed! But more on that in a moment.
Lemme just say that yarn bombing, while easy, is a pinch time consuming. Especially if you go the fancy route with sewing in the yarn like I did. The crazy thing is, I bought SEVEN more of these hearts on my last run to the Dollar Tree...I wanna create a whole wall of these lovely hearts!
Cuz I have just a pinch more wall space left in the art room for that sort of thing. Ahem
So, let's talk Early Finishers. Ya'll know that's been my thing this school year...trying to conquer the Early Finisher Beast. I'm trying to add more and more to my early finishers rooster...to allow more open-ended choice in my art room. I'm currently trying to wrap my head around my fibers area...I think yarn bombing would be just thing thing. Add a basket of yarn, some mundane objects that need a little yarn-love and viola! Yarn Bombing!
I know it worked beautifully for me when I was avoiding lesson planning on a recent PD day. A few minutes between lessons and my class broom went from Blah to OHHH-LAAA-LAAA.
I had so much fun yarn bombing my broom that I realized the kids would surely enjoy it just as much. And I could use up those small amounts of yarn that seem to be multiplying in my storage closet (is that why I keep hearing Marvin Gaye's Let's Get It On coming from my closet?!).
Have you kids yarn bombed before? So, what gives? Do you love it as much as me?!