Showing posts with label collaborative. Show all posts

Monday, May 28, 2018

In the Art Room: A Collaborative Painting for Field Day!

Disclaimer: Since discovering Instagram and my love for it, I've gotten super bad about snapping photos with my camera and simply using my phone. So what you have in this blog post are phone photos and for that, I apologize. If you'd like to see me overshare my art room happenings (as well as just my hot mess of a life), you can find me here

In my last post, I shared what we did for the art station portion of Field Day...when I thought it was going to be rained out. The night before Field Day, while I was head scratching what we could do, I thought creating a collaborative canvas painting would be fun (this is what happens when your brain is fried, y'all). So I pulled this giant canvas out of my closet and went to town. 
 I've had this canvas for years. I had started a painting on it years ago and never did anything with it. So I simply painted over it with a cream color paint (cuz that's all I had on hand) and used watered down black acrylic paint to create this. Why watered down acrylic? Because it has better viscosity that way. I began by sketching out four wavy lines across the canvas. Then I wrote out the letters of our school. Once I was happy with the placement, I painted it with a flat brush and called it a night. 
 Along with our other painting station, I let the kids go to town on this. My only "rule" was that one color go in one space...and TRY to stay within the lines. As you can see above, that was a struggle. But it was field day, we were wound up and I knew I could lean up the lines by simply going back over them. So no worries. 
 This was after the first day. I was tempted to leave it this way...and then I added the little pattern on the top and thought it would be fun for the kids to add patterns the following day. 
 Again, so sorry for the grainy photo. My only rule for the patterns was that the kids had to pick one pattern and color and stick with it. For the dots, they used wine corks dipped in paint (fave part of the day? A kid saying, "oh my mom has TONS of these!" Ha!) and thin brushes for the designs. Again, other than that, little direction was given. This was on the last day of school where I had free choice centers set up around the room. This just happened to be one of them. 
 Once dry, I went back over the black to once again clean up the edges. Then I thought it might be fun to add some white highlights to make the letters pop. Look, even the edge got painted!
The admin had no idea we were creating this painting. When I was sharing it with them, our school librarian saw it and LOVED IT. It was decided that this painting would go in the library for everyone to see. AND I'm really excited to share that now the librarian and I are collaborating to create an entire ALPHABET WALL in this style! The kids will kick off the new school year painting a canvas for each letter in the alphabet to showcase in the library. Y'all I'm so stoked! This project was so easy, colorful, happy and fun. I'm looking forward to making more. LOVE to hear if you give this a go! 
 photo signature_zpsd10b3273.png
Read more »

Sunday, May 27, 2018

In the Art Room: A Giant Painting Banner for Field Day!

This past Monday was our school's field day. There was a 90% chance of rain and thunderstorms for the occasion (of course!). I was in charge of the Art Station which was a new thing last year. In the past, I'd always been in charge of the Face Painting Station with parent and student volunteers. Last year, some changes were made and I was given a box of sidewalk chalk and told that was my station. Y'all...I don't know if you've ever sat outside all day in the blazing sun while kids rotate every 15 minutes only to write words like "fart" on the sidewalk and then ask when they can go to the next station but I can easily testify that it is NO BUENO. I decided to do something different this year...
And this was NOT it. My grand idea would have involved being outside (I'm keeping it a secret in hopes that I can make it happen next year!) and Mutha Nature was given me a big fat "no" with those impending storms. So I arrived at school at 6:30 am to start plotting what my Art Station might look like. I created a video to kinda walk you through what we did:
 I already have several "stations" or centers in my art room that the kids are familiar with as they are my Early Finisher Centers. In addition to those centers, I also created two painting stations for the kids to explore. This HUGE banner was one of them and what we created on canvas I will share in an upcoming blog post. 
 These banners are about 18' long. I simply rolled out huge pieces of bulletin board paper, laid it across three tables and went to town with my good ole bingo dauber. I'm about read to retire this set as we've used them a lot this year and the tops have lost their fuzzy marker-ish-ness. But they work so well for big posters!
 As soon as the kids walked in my room from their outside activities (I have an exterior door making it easy for them to come in), I invited them to take a seat on the floor. I was concerned the kids would be bummed that they were inside (cuz, y'all, IT NEVER DID RAIN!) but they actually loved it. 15 minutes in air conditioning with a chance to go to the restroom if needed ended up being a good thing. I told their teachers, who were rotating with them, to take a little break and come back in 15. It was a good moment to relax for everyone. 
Once everyone was seated, I reminded them of their centers choices and talked to them briefly about the banner. Then I released them. 
 I told the kids that they could rotate to a new center if they wanted but first had to leave the old one as they found it...or even better. 
 Painting friends were reminded to slap on an apron as leaning over the giant banner could get paint on clothes.
 I gave no instructions when it came to painting other than be sure and clean your brush between colors. To clean it up a bit, I painted over the whole thing with my black outline and added pops of white once it was dry.
 And now we have two huge banners to decorate the halls when we come back to school in August! I'm so excited as our hallways are usually so sad when we return. 
Have you ever done anything like this? Love to know what you did in your art teacherin' world!
 photo signature_zpsd10b3273.png
Read more »

Sunday, April 22, 2018

In the Art Room: Fourth Annual Chalked Ceiling Tile Event!

Well, here we are...it's that time of the year, y'all. Time for ALL THE THINGS TO HAPPEN ALL AT ONCE: Clay Week, Art Show Prep and our fourth annual Chalked Ceiling Tile Event!
 That's right...it's been four years now that my second grade kiddos have created legacy ceiling tiles to be permanently displaced in the ceiling of our school. What started out as an "alternative project" has quickly become a school-favorite and an annual event. You see, four years ago, I had a visiting sidewalk chalk artist come to our school with the idea that my students would also chalk outside right along with her. But on the big day, rain was in the forecast so we had to improvise. My admin had been requesting painted ceiling tiles...knowing that, I had my custodian buddy Mr. Scruggs (see here!) get me a tile and I played around with drawing on it. After fiddling with the front of the tile, I realized that the back actually worked better as it wasn't as porous. And that's how our Chalked Ceiling Tile Event was born. You can read all about our first event here and here
So what do you need for an event like this? The following supplies:

* Faber-Castell Chalk I used to swear by a brand called KOSS but I can no longer find it. So we started using Faber-Castell and it turns out I like it better! The colors are so vibrant and the shorter size is perfect for my student's hands.

* Ceiling Tiles We always have a ton on hand as we do this every year. We ALWAYS use the backside of the tile. One tile per kiddo.

* Foam Brushes These ceiling tiles are huge and would be much too difficult for the kids to blend colors with their bare hands. We use foam brushes for blending. I've had the same set of brushes for years now.

* Baby Wipes This is a messy task, not gonna lie. But with me being in charge of four classes of second graders, I'm not about to let them all loose on the bathrooms. So baby wipes it is!

* Bulletin Board Paper Again, this is messy...like having rainbow dust everywhere. So we try our hardest to control that by putting paper down on the floor of the multi-purpose room.

* Hairspray I always fix the tiles when we are finished by dousing them in hairspray. It will dull the colors slightly. However, the spray doesn't matter too much...the tiles are in the ceiling and therefore no one will be able to touch them and cause them to smear. 
So, how does it work? Well, I usually create a video to walk the kiddos through the process. This saves my voice in a loud space like this big room. I block out about an hour and a half to two hours of time for the kids to spend on their piece. I pool all of my second grade classes together and, well, we just go for it! It's loud, messy but beautiful and so much fun!
 Usually the classroom teachers will take 30 minute shifts during this time or my specials team will help out. Really tho, it's an easy event. Once all the kids are rolling and understand what to do, it's just fun to watch them roll up their sleeves and create. 
 Every year, we do something a little different. Our first year, we did the butterflies. The following year, we created flowers and last year, we made fish! You can watch the action here:
Here's the video I used to teach last year's tile: 
This year, Ms. Rebecca, our cafeteria manager, has requested healthy foods for the ceiling tiles. We're going to be creating fruits for our tiles...you'll have to stay tuned to see how they look!
  These tiles will remain on permanent display. I've been asked before how the kids react to this, knowing that they won't get their artwork back. We spend a lot of time chatting about what a legacy is and how important it is to "leave your mark". I've not had a student yet get upset about having their work up in the ceiling.
The only wear I've noticed from the tiles is some slight fading on the first year's butterflies...but I think that is hardly noticeable. Thankfully, Mr. Scruggs loves to hang these tiles. I hung the ones that are up in my art room and I ended up with a ton of chalk in my eyes! 
 He does a beautiful job of spacing these out and getting them up!
 On top of this big event, I also have first graders painting their clay projects and third graders FINALLY finishing their plaster crayons...the art show is quickly approaching so we are in "wrap it up" mode. 
 photo signature_zpsd10b3273.png
Read more »

Thursday, January 11, 2018

In the Art Room: "I Am..." Mobiles

So...at the BEGINNING of the school year, I got the idea for this collaborative project...and, here we are MIDWAY through the school year and I'm finally assembling and sharing it with you. Story of my life, y'all.
At the start of the school year, I dyed a bunch of clothes pins by placing them in a bin of watered down paint. I later learned that food coloring works well also. I dyed them red, orange, yellow, green, blue and purple.
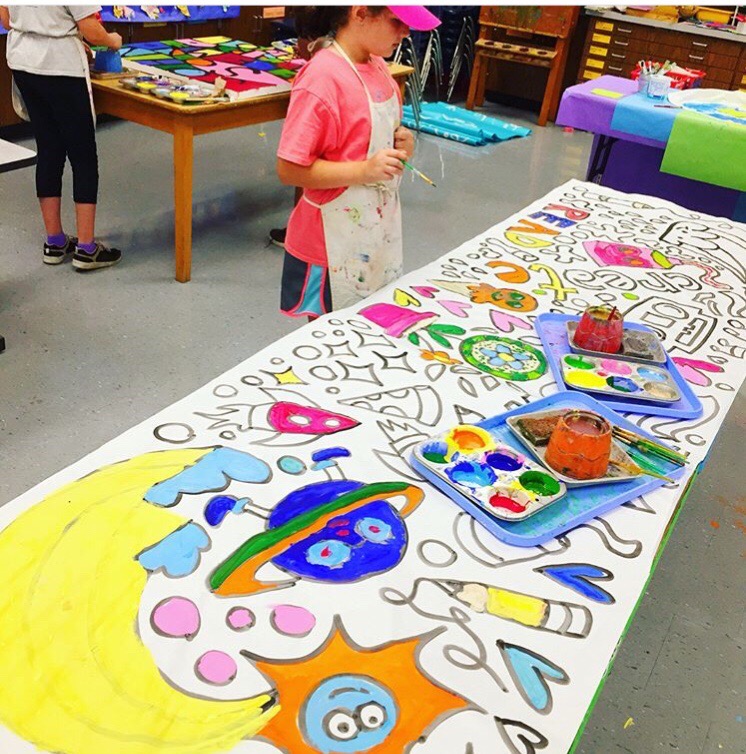
 When the students came in, we read The Dot (yes, this was our Dot Day attempt!) and we spoke about all of the things that we are. "I am creative. I am amazing. I am silly. I am funny." You get the idea.
I had the kids get two colorful clothes pins (any color the wanted) and one plain one. On the colorful clothes pin, they were to write their name on one and a word that described them on another. 
On the plain ones, I had them with  monochromatic Sharpies and create a design. I did this project with my first and second grade students who have 30 minute art classes. My third and fourth graders, who have an hour, did a different collaborative project:
You can find out details on this project here. I at least managed to get this project finished and hung at the start of the year! 
 After the kids were done with the clothes pins, I had them sort them by color. Then I clipped them around 9" cardboard pizza rounds. I then painted the center black and used the kids' painted papers to create the I am... in the middle. Initially I was going to hang these in the hallway but I was afraid they would get damaged without a watchful eye on them.
 AND because they are so stinkin' pretty I wanted to be able to see them all the time! I used command hooks and yarn to hang them above my window. They did keep rotating which would have been fine if I'd had the kids draw on BOTH sides of the clothes pin (which you might wanna do if you do this project). To keep them forward facing, I simply hot glued them together where you see them touching/overlapping a bit. 
Another happy rainbow addition to the art room that I'm happy to finally have on display!

 photo signature_zpsd10b3273.png
Read more »

Monday, September 18, 2017

In the Art Room: Learning For All Collaborative

Those who are unfortunate enough to have to work with me know that I'm a bite-off-more-than-I-can-chew/start-now-figure-it-out-later/wild-and-crazy kind of gal. Thankfully, I work with The Best folks who not only tolerate my silliness but, I daresay, encourage and facilitate my weird ways. All that jib-jab to say this: look what the kiddos created for our 2017 collaborative! Learning for All with a contribution from each of my first through fourth grade artists and a whole lotta blood, sweat and (after misfires of the staple and hot glue gun) tears on behalf of me and my P.E. teacherin' buddy Ali Starkweather!
Ah! This 5' 6" mama weighs in at just over 15 lbs and is every bit of awesome, if I do say so. I've had the itch to create something in our foyer every since the kiddos created our Johnson Elementary sign a couple of years ago. And, with the successful creation of this massively heavy mosaic beast, I KNEW the custodians and maintenance dudes could make hang the monster...but how to create it? 
I originally got the idea this summer while I was at the hardware store and spotted paint stirring sticks. Before I knew what was happening, I was taking the folks at Home Depot into donating a ton of sticks to me for the cause. I was inspired by the Color Wheel Clock I created some years ago and just kind of went from there. 
With this inspo in mind, the first days of school, I had my first through third grade kiddos paint a stick with a color and white. This was easy: after going over the rules, routines and whut-nots of the first day, I was like, here, let's paint a stick, doesn't that sound fun?! After a resounding NO!, I chatted about creating a collaborative and a legacy piece to leave behind. That was a little more inspiring. With our leftover paint, we created painted papers for future projects.  
 My fourth grade kiddos were given the large paint stirring sticks. Those I did have to pay for as Home Depot decided they had to draw the line somewhere. I didn't mind. The kids were given baskets of analogous colors and requested to "leave their mark". They happily did so. After a wee sword fight with the sticks. 
Once all the sticks were complete, the MASSIVE assembling began. I'm not even gonna lie: I hardly snapped any photos as I wasn't sure if this was even going to be possible. In fact, it wouldn't have been possible had my buddy Ali not stepped in. She was determined this was gonna work. I'm so thankful she helped me...otherwise it would still be in bits in the art room!
 I just so happened to have the large round canvas at my house, sitting around, collecting dust. Ali and I began by laying out the colors of the shorter sticks and deciding how they would go together. When someone asked how it was assembled, I believe Ali put it best, "Lots of hot glue, gorilla glue, and a staple gun....and then LOTS of hot glue, gorilla glue and a staple gun!!! lol..." She says LOL but what that really means is for real tho. There's a reason we didn't snap any photos of the assembly.
Y'all better believe I wanted this bad boy up in time for Open House. And all y'all better also believe it was only finished the day of. In fact, these sweet fellas had to wait a pinch as the wording I had JUST painted needed to dry. 
And then, of course, the domino effect of disasters transpired: the lift stopped working; I didn't paint the wording to align with the hanger on the back (no surprise there)...but there was no need to worry. By some miracle of miracles, the lift was fixed the so was my hanger malfunction. And, viola! Masterpiece hung in time for Open House!
 High five to these handsome devils!
Every morning, when I do morning duty, I've been pleased as punch to see this happiness greeting our kiddos as they enter our school. This mantra is a portion of our school motto...and I believe everyone who loves to teach at Johnson Elementary agrees. 
 Even if some of 'em are a wee bit crazy. But I'm in such good company! 
Thanks for letting me share! This was a fun collaborative...and one that my wee artists and I (as well as all who were involved!) are mighty proud of!
 photo signature_zpsd10b3273.png
Read more »