Hey, y'all! I just had to share with you a project that we are about half way through: A big ole self-portrait mural inspired by the artist and author Todd Parr! It's a school-wide effort but currently only my kindergarten through 2nd grade students are finished. Once my 3rd and 4th grade kiddos complete their self-portraits, I'll add them to the mural and be sure to share the finished product with y'all.
This unit of study has not only involved creating a colorful self-portrait but also color theory and collage. But I'm getting ahead of myself! Let's talk about the inspo: It's Okay to be Different. Do y'all have this book? It's a super short and colorful read that's perfect for the art room. What better place to emphasize our differences and celebrate them than art class, right?! It's a happy read with a great underlining meaning that the kids really love.
And I really love the crazy and colorful result! To walk you through the entire process, lemme tell you how we started. With kindergarten and first grade, that meant this color-mixing lesson and a reading of the book Mouse Paint.
Kindergarten created these in one class: read the book, did some drawing together and boom! Mixed up some secondaries. I created a more thorough blog post here. A video of the steps is below.
My first and second graders earned a party for their awesomeness and we used our color mixing skills to ice our cookies!
If you'd like to know more about this, you can watch this short clippie:
Once we'd become paint mixing masters, we created these painted papers! The papers had been pre-folded by yours truly, first in half and then a 4" fold across the bottom. This created two squares and two rectangles on the paper. The kids were instructed to use their knowledge to paint three shapes in the secondary colors and in the last shape, they could paint any color they liked.
I loved the colorful result! I need this as some wallpaper, stat!
Now, in this NEW video, I'll walk you through our collage portrait making process. I throw a TON of ideas at the kids and let them pick and choose and, of course, come up with their own! I feel like the more ideas you give them, the more confident they will feel that they can make any of their wild and crazy ideas come true.
Because I see my younger students for 30 minutes, they spent two days collaging and on their final day they outlined in black paint. In the video, I am using brush painting supplies to help the students keep their "paintbrush ballerina" on her tippy toes.
Each portrait was different and, of course, that was okay!
Y'all better believe I love that crayon hair clip. I wonder where she got that idea...?!
What's cuter than a side pony? Nothing, y'all. Absolutely nothing.
For my kindergarten and first grade kiddos, I took a different route. After cluing down the head and ears, these kids created their facial features in black paint.
I love the variety that they add to the self portrait mural. Cool glasses, bruh.
Love how this kindergartener created his spiked hair and glasses, so cute!
And there you have it! I can't wait to see what my third and fourth graders come up with to add to the mural. After this mural, we are on to creating realistic selfies as well. What are some of your fave self portrait lessons? If you need some ideas, I shared some here...but I'd love to hear some more! Lemme know below, y'all!
Hello there, friends! Allow me to introduce to you the cutest art teacherin' fabric ever created in the universe: Carrie Bloomston's Paint line for Windham Fabrics (No, I'm not an endorser. Yes, I'm a total fan girl. Fabric-gasm much?).
When I spotted this fabric on that one website which I just sign all my paychecks over to, I literally let out a gasp and hollered "Take All My Moneys!" I mean, just look at it, y'all. Gaze at the wonderment of the best dern artsy fabric there ever was...
Is Carrie a fabric-designing genius or what, y'all? You can still find some of the stencil and paint brush fabric here but for the other'n (as my grandma usta say), you'll have to hit up those sweet etsy sellers. Try here. I knew I had to use both fabrics together (with a pop of polka dotted purple at the waist). So I used my trusty Simplicity 2444. Y'all might remember when we had that lovely ice storm last winter and I successfully turned my school Snow Days into Sew Days, stitching up not one but THREE versions of this pattern. There was that Mondrian number, that marker-tastic dress and the pencil dress complete with bolero. So, me and this here pattern, we go way back.
I did do something a lil dif this time around. I sized down the bodice. I noticed that the bodice of each of those dresses was a pinch large and I do like my bodice to hug me just right, nice and tight. So even tho I'm usually a 36" bust (sorry if this is too much info for y'all. Just deal with it.) I went down to a 34" and I love the fit! I do recall reading somewhere that one should size down in bust when stitching (was it Gertie's book?) and I'm much more pleased with the fit. I will say that it did shrink the armholes a bit which I didn't love. I have this weird thing that if something is touching my armpits, Ima gonna sweat on it (again, TMI? It's a sharing-is-caring kind of post this evening. I repeat: Deal.Wit.It.) So there's that. I smell but I got a good fit. Not a bad trade off says moi.
What I dig about this design is that I can tie a big fat bow in the front, in the back, wrap it around the back and add a simple knot in the front, you name it. Of course, I do also love me some fit and flair.
Of course I just HAD to wear this dress with my Paint Brush Tiara!
No, I did not create this masterpiece. I scored it at the NAEA convention in NOLA. They have this great vendor's market and there were so many amazing art teachers selling their creations. I do wish I could recall who created this headpiece as I scored the last one! If any of y'all attended NAEA and know of the artist, would you mind dropping a line in the comments? I'd really love to give this awesome lady some credit!
I decided to debut this ensemble on the day we were using recycled paint! I have this small group of 4th graders that come to my room for about 10 minutes each morning. They take down my chairs and attempt to help me organize my art room. Last week, their mission was to test ALL of my markers and find the "deceased" ones. We placed those in cups filled with just a pinch of water to drain out the remaining ink from the marker.
With that "marker juice", my second graders created splatter paintings! We'll be using these in an upcoming self-portrait project. They thought this was just about the best thing ever.
"Mrs. Stephens, I have purple freckles now!" "That means you are hitting your paint brush too hard. No more splatter freckles!"
Meh, we all ended up with a rainbow of freckles. All part of the fun!
And there you have it! A Brushstroke-tastic dress, purrrrfect for the art room, says Asha the Cat. Actually, I believe she said, "Stop taking pictures and fed me, fool!" (she likes to channel Mr. T when she'shangry). Adios!
Hey, y'all! I'm so excited to share something that I'm sure many of you already do but I feel like I just discovered: sketchbooks! In the elementary art room! I've never successfully attempted sketchbooks with my students before as I just couldn't figure out how to afford 'em if we bought them and how to make 'em if we didn't buy them. Recently, however, art teacherin' buddy Jane Shores recommended using old manilla folders with paper stapled inside and I was like, ahhhhh, I think we can do that! I'm thrilled to say that my students love the result and have enjoyed working in them. I made a wee video to walk you through the sketchbook-making/how we're gonna use 'em steps.
I hope you can focus on my video and not so much on the fact that I missed a button on my sweater! Geesh.
To make our sketchbooks, we used the following: * Recycled manilla folders. The central office in my district was kind enough to send me a mountain of the ones they were going to otherwise recycle! * 20 sheets of copy paper per folder. * Dollar Store faux-duct tape. Works just as great for half the cost. * Baseball card sleeves. For holding our Artist Trading Cards, thank you SO MUCH for the idea, Nic Hahn! * Electric stapler. I picked one up off Amazon. Works like a dream going through the folder, papers and sleeve.
On the first day of sketchbook making, I gave the kids the folders and told them they could paint their folder either all warm or all cool colors. They could paint fast and furious or delicate and detailed but they had to have it done in 30 minutes. The following art class, when they came to art, I had already stapled the 20 sheets of paper and the baseball card sleeve into the folders. We were ready to start sketching! For that we met in the "Jungle Lounge" in the art room (more details on this and my painted window to come). Once the sketchbooks and pencils were passed out, I did a palming activity with the children (video clip below). While their eyes were closed I played my rainstick and told them to imagine a rainstorm in a jungle. What are the animals doing? Is the wind blowing? Is the weather getting worse? When they opened their eyes, they were allowed to sketch at their seats or on the floor but they were not allowed to talk.
Palming is a great way to chill those kiddos out and help them refocus! Worked like a dream for this sketching activity!
While they sketched, I called them up to add the duct tape of their choosing to the spine of the book and to create a label. This really was a special moment for them as it really made their sketchbook their own. I was able to catch a glimpse of their sketches as they came to see me. I was floored by their great drawings.
Most of these third grade students sketched without stopping for a good 45 minutes. I did ask them to take a break with me on the floor when I was finished with the taping. We chatted about our experience sketching so far (consensus: they LOVED it!) and how it would look during a normal art class. I plan to use this as an art class starter for the first 5-10 minutes of most art classes...I'll keep you posted.
At this point, I told the kids about Artist Trading Cards. These are baseball-sized works of art created by artists of all ages. I told the kids that their ATC cards were going to be kept in those baseball sleeves. I have a sign in my room that lists the Topic and the Media for the ATC cards. This week, it was "Tigers" and "Colored Pencils and Sharpies" (yes, we're on a tiger-kick. Lesson details to come!)
So, those finished with their sketches, were allowed to start their ATC's.
The great thing about those sleeves is it's the perfect spot to keep unfinished ATC's!
"In my jungle, a mysterious animals is afraid of the rain and is hiding". ARE YOU KIDDING ME?! Love!
The kids absolutely loved their sketchbooks and I'm thrilled! I'll definitely keep y'all updated on their progress...but I gotta know: Do you use sketchbooks in your art room? How? Any tips or tricks? Please share in the comments, friends!
Hellllo, friendly faces! For my Back to Art Teacherin' feature today, I thought I'd share with you my very fave self-portrait projects! Last week you saw my fave landscape projects so I thought these fresh faces would be a nice follow up! So, without further ado-ness, let's get the self-portrait party started!
These first grade royal self-portraits are so stinking cute and were super fun! Not to mention, my wee ones learned so stinkin' much! Pattern-making, portrait drawing, relief-style crown design, whew! These artists are now in fourth grade and seeing these self-portraits just makes me so proud. They are still as awesomely artistic as ever!
Last year, my third grade artists had the opportunity to sing and record a song to go along with the book A Beautiful Oops! In preparation, we sang and painted oops-es. We also learned how to draw a proportional self-portrait to be placed over our paintings. I loved how colorful and happy these turned out! More details about our recording session and the process of these pieces here.
Love the splatter paint!
Teaching kindergarten can be a wild and crazy ride. The key is to harness the crazy. This project was completed near the end of the year after we'd covered line painting (in the background), collage (for the clothing), rainbow order (see that palette?) and the proportions of the face. It was great to see all of their knowledge come together in one good looking project! All the details you could ever need on teaching portrait drawings to the littles, here.
Y'all remember about 5-ish years ago when there was no Pinterest and we all had to use that gray squishy thing between our ears? WASN'T THAT A TERRIBLE TIME?! And y'all remember when that one genius art teacher did that one genius rainbow self-portrait project that I think just about every art teacher in the universe did (I know I did it!!). Well, this "We are the World" self-portrait number was a take on that. It was a big beautiful undertaking that you can read about here.
Putting this together was a bit of a beast. Thankfully, I had some super amazing practicum kids from a local university put the thing together. Otherwise, it'd prolly still be sitting on my floor!
Another big portrait-making undertakin' was this dealio:
The Gallery of Gratitude was one of those projects that just made everyone smile. Who doesn't love to see a child's drawing of them along with their words of appreciation? This was a great project do to before Thanksgiving.
Not to mention we learned about portrait drawing, capturing someone's likeness and colored pencil usage.
When this display came down, I made sure everyone got their portrait and I've seen many teachers, faculty and staff have them hanging in their rooms and offices. How fun!
My units are usually based on a culture. So many of our self-portraits give a lil nod do the culture we are studying. These second grade self-portraits were all about the kimono and the konichiwa!
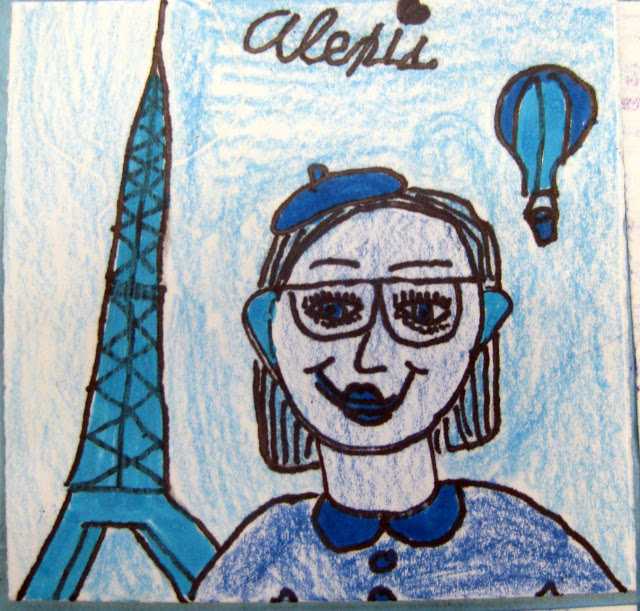
And these were all about Paris! First grade had a fun time flying high with this project!
I love teaching about Ancient Egypt as much as the kids love learning about it. This is one of those self-portrait projects I repeat each time we venture to Egypt because it covers so much!
We really got into the correct proportions of the face and shading.
Last year, we were pinched for time in self-portrait-land for both kindergarten and first grade. Having eight snow days will do that to an art teacher! So we went the quick and easy route: we used multicultural colored contraction paper for the face which we drew in oil pastel. Then we cut that out and glued it to another sheet of paper that we painted hair and a background on. That took us two thirty minute art classes! Like I said, quick and easy.
And happy as can be! Y'all have been so great about sharing your ideas...I'd love to know what your fave self-portrait projects are! Thank you in advance, kids.