Showing posts with label elementary art class. Show all posts

Wednesday, November 4, 2015

In the Art Room: I Ain't Gonna Paint No More Portraits

Hey, y'all! Just popping in to share with you some selfies that my firsties and second graders have been working on. All of my classes are in the middle of Self-Portrait Land with our collaborative project being our It's Okay to be Different mural (which I'm hoping to have up and share with y'all by next week). That project really introduced the kids to color mixing and basics of self portrait making with painting and collage. So they were ready to handle these colorful and crazy self portraits.  
In this project, we covered more color theory, color mixing, the proportions of the face and collage. It was a fun endeavor and one that I'm sure I'll be doing again in years to come. My art classes are 30 minutes in length with my younger students so each portion of the lesson I had to break down in small bites. 
The project began with a group of helpful fourth graders that come in each morning and help a poor hot mess of an art teacher out. They sorted through all of my washable markers and found the that were on their last marker-y leg, so to speak. I soaked 'em over night in a cup of water and the next day, placed the warm colors of "marker juice" on one set of tables and the cool on another. 
The kids could decide what color they'd like for their background and commence splatter painting. We had chatted briefly about Jackson Pollock and watched a short clip of him in action. The kids were super excited about this process and very curious about the making of marker juice. Y'all don't even know how many donated markers the kids have brought in for the cause.
We MIGHT have ended up with just a coupla rainbow freckles with all that splattering. 
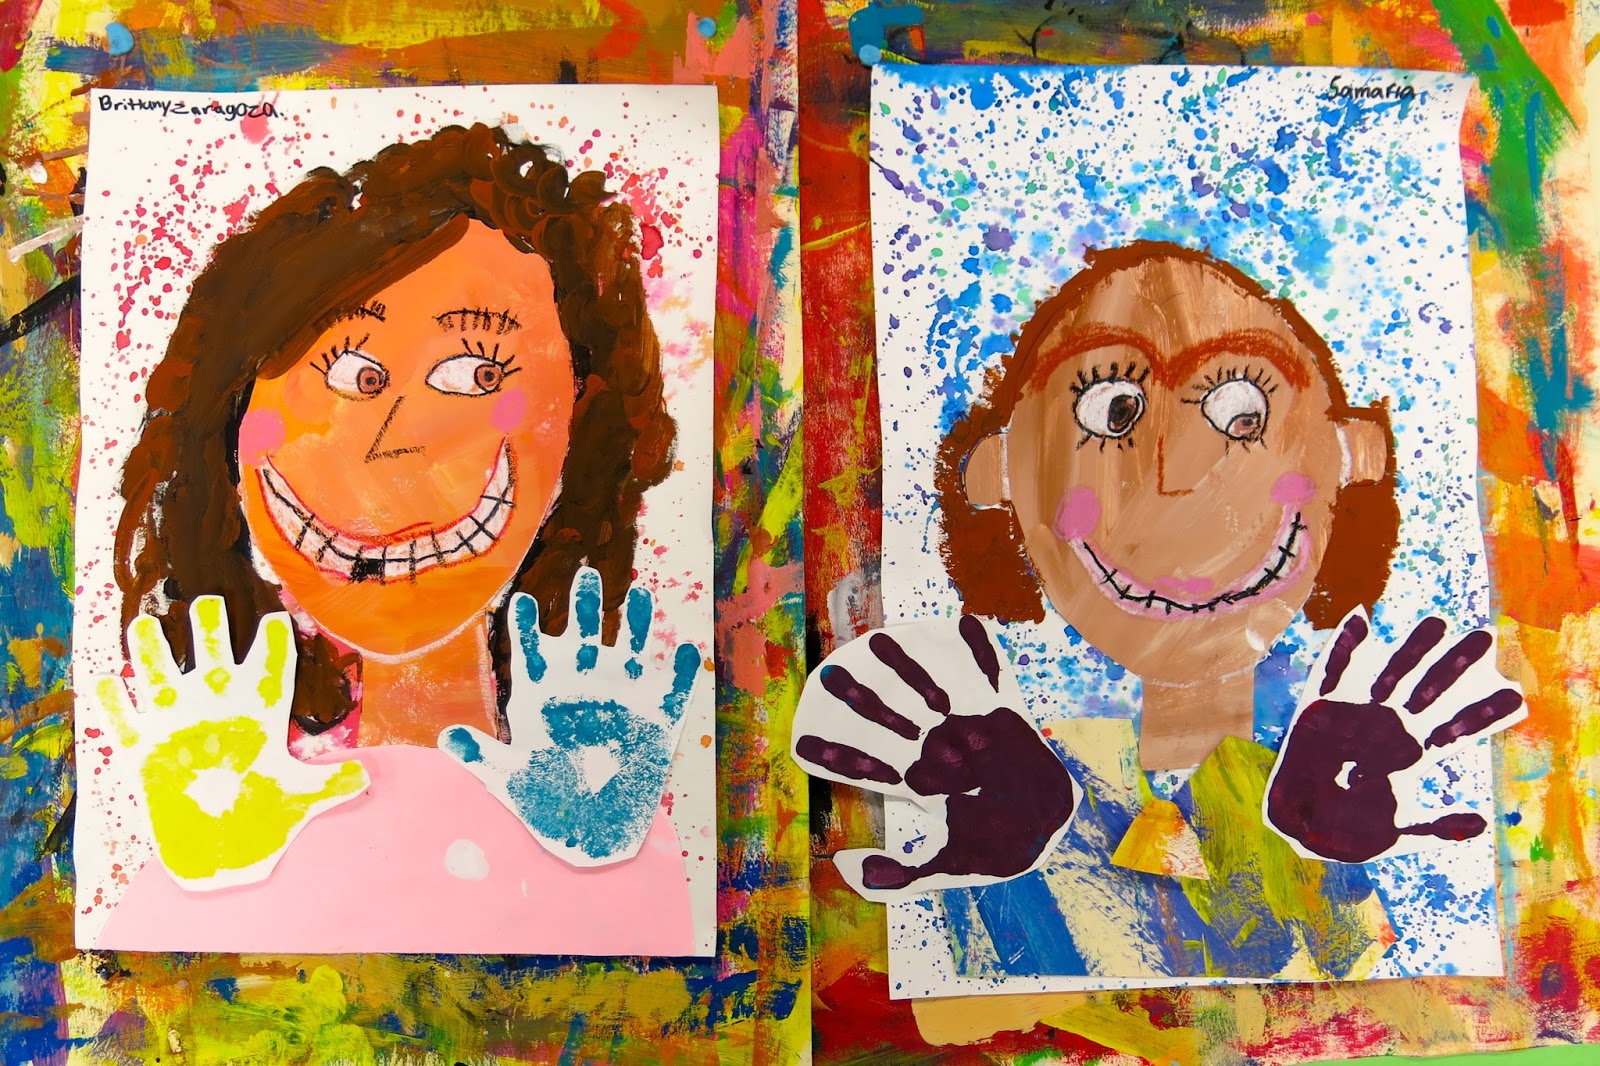
The following art class, I read the book The Colors of Us. Because of our color mixing background, the kids were familiar with the basics of how to create secondary colors with primary. For creating the unique flesh tone of each child, the kids were given red, yellow, brown, white and black. We talked about the various flesh colors in the book and how the young girl in the book created each one. Then the kids put that knowledge to work and painted a piece of 9" X 12" sheet of paper that was their flesh color. 
The following art class, we used that flesh colored piece of paper to draw our self portraits. We talked about how the head is shaped like an upside down egg. The students traced a head-shaped template, drew a neck and did a little guided drawing with me. I had mirrors out so the kids could look at themselves as we drew. 
From there, we cut out our bald self portraits and glued them down to our splatter painted background. Using mirrors and our color-mixing knowledge, we painted our hair. I loved seeing all the different hair styles! 

We have been reading the book I Ain't Gonna Paint No More (which is so much fun to read, the kids adore this book!) and we talked about how sad we'd be if we didn't get to paint anymore! Each of the kids then chose a super messy and painty piece of paper to create their shirt. 
While they worked on that, I called them by table to come and see me to do one last crazy thing: mix paint on our hands!
 I had three trays of the primary colors set up. When the kids came up to me, they had to tell me what secondary color they wished to mix and, as a great post-assessment test, they had to figure out what primary colors to use! One hand went in one primary, the other hand in another, rub those hands together like you are putting on lotion and VIOLA! Secondary color hands! These were then promptly printed on paper. The best part was each kid gave me a great big ole painty high-five when they were finished and heading to the sink. 
Our final step was to cut out our hands (without cutting off digits), glue 'em down and sign our name. I can't wait to hang these happy faces in the halls at school. 

What are some of y'all's fave books to read when teaching self portraits in the art room? 
 photo signature_zpsd10b3273.png
Read more »

Thursday, October 22, 2015

In the Art Room: Self Portrait Mural Inspired by Todd Parr, Part 1

Hey, y'all! I just had to share with you a project that we are about half way through: A big ole self-portrait mural inspired by the artist and author Todd Parr! It's a school-wide effort but currently only my kindergarten through 2nd grade students are finished. Once my 3rd and 4th grade kiddos complete their self-portraits, I'll add them to the mural and be sure to share the finished product with y'all. 
This unit of study has not only involved creating a colorful self-portrait but also color theory and collage. But I'm getting ahead of myself! Let's talk about the inspo: It's Okay to be Different. Do y'all have this book? It's a super short and colorful read that's perfect for the art room. What better place to emphasize our differences and celebrate them than art class, right?! It's a happy read with a  great underlining meaning that the kids really love. 
And I really love the crazy and colorful result! To walk you through the entire process, lemme tell you how we started. With kindergarten and first grade, that meant this color-mixing lesson and a reading of the book Mouse Paint. 
Kindergarten created these in one class: read the book, did some drawing together and boom! Mixed up some secondaries. I created a more thorough blog post here. A video of the steps is below.
My first and second graders earned a party for their awesomeness and we used our color mixing skills to ice our cookies!
If you'd like to know more about this, you can watch this short clippie: 
Once we'd become paint mixing masters, we created these painted papers! The papers had been pre-folded by yours truly, first in half and then a 4" fold across the bottom. This created two squares and two rectangles on the paper. The kids were instructed to use their knowledge to paint three shapes in the secondary colors and in the last shape, they could paint any color they liked. 
 I loved the colorful result! I need this as some wallpaper, stat!
Now, in this NEW video, I'll walk you through our collage portrait making process. I throw a TON of ideas at the kids and let them pick and choose and, of course, come up with their own! I feel like the more ideas you give them, the more confident they will feel that they can make any of their wild and crazy ideas come true. 
Because I see my younger students for 30 minutes, they spent two days collaging and on their final day they outlined in black paint. In the video, I am using brush painting supplies to help the students keep their "paintbrush ballerina" on her tippy toes. 
 Each portrait was different and, of course, that was okay! 

Y'all better believe I love that crayon hair clip. I wonder where she got that idea...?!
What's cuter than a side pony? Nothing, y'all. Absolutely nothing.
 For my kindergarten and first grade kiddos, I took a different route. After cluing down the head and ears, these kids created their facial features in black paint. 
 I love the variety that they add to the self portrait mural. Cool glasses, bruh. 
Love how this kindergartener created his spiked hair and glasses, so cute!
And there you have it! I can't wait to see what my third and fourth graders come up with to add to the mural. After this mural, we are on to creating realistic selfies as well. 

What are some of your fave self portrait lessons? If you need some ideas, I shared some here...but I'd love to hear some more! Lemme know below, y'all! 
 photo signature_zpsd10b3273.png
Read more »

Sunday, September 13, 2015

DIY: A (Brush)Stroke of Genius Dress!

Hello there, friends! Allow me to introduce to you the cutest art teacherin' fabric ever created in the universe: Carrie Bloomston's Paint line for Windham Fabrics (No, I'm not an endorser. Yes, I'm a total fan girl. Fabric-gasm much?). 
When I spotted this fabric on that one website which I just sign all my paychecks over to, I literally let out a gasp and hollered "Take All My Moneys!" I mean, just look at it, y'all. Gaze at the wonderment of the best dern artsy fabric there ever was...
Is Carrie a fabric-designing genius or what, y'all? You can still find some of the stencil and paint brush fabric here but for the other'n (as my grandma usta say), you'll have to hit up those sweet etsy sellers. Try here.  

I knew I had to use both fabrics together (with a pop of polka dotted purple at the waist). So I used my trusty Simplicity 2444. Y'all might remember when we had that lovely ice storm last winter and I successfully turned my school Snow Days into Sew Days, stitching up not one but THREE versions of this pattern. There was that Mondrian number, that marker-tastic dress and the pencil dress complete with bolero. So, me and this here pattern, we go way back. 
I did do something a lil dif this time around. I sized down the bodice. I noticed that the bodice of each of those dresses was a pinch large and I do like my bodice to hug me just right, nice and tight. So even tho I'm usually a 36" bust (sorry if this is too much info for y'all. Just deal with it.) I went down to a 34" and I love the fit! I do recall reading somewhere that one should size down in bust when stitching (was it Gertie's book?) and I'm much more pleased with the fit. I will say that it did shrink the armholes a bit which I didn't love. I have this weird thing that if something is touching my armpits, Ima gonna sweat on it (again, TMI? It's a sharing-is-caring kind of post this evening. I repeat: Deal.Wit.It.) So there's that. I smell but I got a good fit. Not a bad trade off says moi. 

What I dig about this design is that I can tie a big fat bow in the front, in the back, wrap it around the back and add a simple knot in the front, you name it. Of course, I do also love me some fit and flair.  
 Of course I just HAD to wear this dress with my Paint Brush Tiara! 
No, I did not create this masterpiece. I scored it at the NAEA convention in NOLA. They have this great vendor's market and there were so many amazing art teachers selling their creations. I do wish I could recall who created this headpiece as I scored the last one! If any of y'all attended NAEA and know of the artist, would you mind dropping a line in the comments? I'd really love to give this awesome lady some credit!
I decided to debut this ensemble on the day we were using recycled paint! I have this small group of 4th graders that come to my room for about 10 minutes each morning. They take down my chairs and attempt to help me organize my art room. Last week, their mission was to test ALL of my markers and find the "deceased" ones. We placed those in cups filled with just a pinch of water to drain out the remaining ink from the marker. 
With that "marker juice", my second graders created splatter paintings! We'll be using these in an upcoming self-portrait project. They thought this was just about the best thing ever.
 "Mrs. Stephens, I have purple freckles now!"

"That means you are hitting your paint brush too hard. No more splatter freckles!" 
Meh, we all ended up with a rainbow of freckles. All part of the fun!
And there you have it! A Brushstroke-tastic dress, purrrrfect for the art room, says Asha the Cat. Actually, I believe she said, "Stop taking pictures and fed me, fool!" (she likes to channel Mr. T when she's hangry). Adios!
 photo signature_zpsd10b3273.png
Read more »

Thursday, September 10, 2015

In the Art Room: Sketchbooks for Kids!

Hey, y'all! I'm so excited to share something that I'm sure many of you already do but I feel like I just discovered: sketchbooks! In the elementary art room! I've never successfully attempted sketchbooks with my students before as I just couldn't figure out how to afford 'em if we bought them and how to make 'em if we didn't buy them. Recently, however, art teacherin' buddy Jane Shores recommended using old manilla folders with paper stapled inside and I was like, ahhhhh, I think we can do that! I'm thrilled to say that my students love the result and have enjoyed working in them. I made a wee video to walk you through the sketchbook-making/how we're gonna use 'em steps. 
 
I hope you can focus on my video and not so much on the fact that I missed a button on my sweater! Geesh. 
 To make our sketchbooks, we used the following:
* Recycled manilla folders. The central office in my district was kind enough to send me a mountain of the ones they were going to otherwise recycle!
* 20 sheets of copy paper per folder. 
* Dollar Store faux-duct tape. Works just as great for half the cost.
* Baseball card sleeves. For holding our Artist Trading Cards, thank you SO MUCH for the idea, Nic Hahn
* Electric stapler. I picked one up off Amazon. Works like a dream going through the folder, papers and sleeve. 
 On the first day of sketchbook making, I gave the kids the folders and told them they could paint their folder either all warm or all cool colors. They could paint fast and furious or delicate and detailed but they had to have it done in 30 minutes. The following art class, when they came to art, I had already stapled the 20 sheets of paper and the baseball card sleeve into the folders. We were ready to start sketching! 
 
 For that we met in the "Jungle Lounge" in the art room (more details on this and my painted window to come). Once the sketchbooks and pencils were passed out, I did a palming activity with the children (video clip below). While their eyes were closed I played my rainstick and told them to imagine a rainstorm in a jungle. What are the animals doing? Is the wind blowing? Is the weather getting worse? When they opened their eyes, they were allowed to sketch at their seats or on the floor but they were not allowed to talk. 
Palming is a great way to chill those kiddos out and help them refocus! Worked like a dream for this sketching activity! 
While they sketched, I called them up to add the duct tape of their choosing to the spine of the book and to create a label. This really was a special moment for them as it really made their sketchbook their own. I was able to catch a glimpse of their sketches as they came to see me. I was floored by their great drawings.
Most of these third grade students sketched without stopping for a good 45 minutes. I did ask them to take a break with me on the floor when I was finished with the taping. We chatted about our experience sketching so far (consensus: they LOVED it!) and how it would look during a normal art class. I plan to use this as an art class starter for the first 5-10 minutes of most art classes...I'll keep you posted. 
At this point, I told the kids about Artist Trading Cards. These are baseball-sized works of art created by artists of all ages. I told the kids that their ATC cards were going to be kept in those baseball sleeves. I have a sign in my room that lists the Topic and the Media for the ATC cards. This week, it was "Tigers" and "Colored Pencils and Sharpies" (yes, we're on a tiger-kick. Lesson details to come!) 
So, those finished with their sketches, were allowed to start their ATC's. 
The great thing about those sleeves is it's the perfect spot to keep unfinished ATC's! 
"In my jungle, a mysterious animals is afraid of the rain and is hiding". ARE YOU KIDDING ME?! Love! 
The kids absolutely loved their sketchbooks and I'm thrilled! I'll definitely keep y'all updated on their progress...but I gotta know:

Do you use sketchbooks in your art room? How? Any tips or tricks? Please share in the comments, friends!

 photo signature_zpsd10b3273.png
Read more »