Sunday, December 22, 2013

What the Art Teacher Wore #84

Light Up Monday: There were many a chat about my light up dress and Santa shoes. I overheard one new boy ask a veteran kid: "Why is she always looking so crazy?"  As if exasperated, he threw his hands in the air, turned to the new dude and said, "Duh! She's the art teacher!" This inspired a short convo on how different artists enjoy creating in different media (mine being clothing) and how the only person who gets to day Duh! in the art room is me. Duh. light up dress: DIY here; fishnets and red tights combo: Target; Santa shoes: DIY here
What I'm about to present to you are 13 of the very best Artsy Pick-Up Lines in the Universe. Never again will you approach that paint-splattered artist of your dreams unarmed with the right thing to say. Read over these lines carefully, friends, and simply click to vote for your fave in the poll on the right. The winner and their mystery prize will be announced by the end of next week. 

Here you go:

Hey girl, your use of tints and shades color my wheels. (Miss French Fry)

Hey girl, are you related to van Gogh? Because I see stars when I'm near you. (Miss FF)

I'm Degas-ga for you! (Katie)

Hey girl, you must be a ballerina because De-GAS! You look good! (Emily)

Hey there, come to this easel often...? (Julie)

Have I told you lately I Lourve you? (Laureen)

Hey baby, you're a piece of fine a...rt! (Abby)

Baby, you are so fine, you would make an Impression on Monet. (Troutgirl)

At first I thought you were sketchy but now I am drawn to you. (Mary)

Is that a tube of Golden in your pocket or are ya just lad to see me? (Laureen)

I'm an artist but...for you, baby, I'll get a JOB! (Laureen)

You put the art in heart, baby. (Laureen)

Are you a Picasso? Because I'm going to pieces over you! (Faigie)
I've learned my lesson with these shoes: I gotta put them on when I'm outside. Otherwise, the cat confuses the feathery white boa I glued around the shoes for some sorta animal that she must claw, chase after and bite. My bleeding ankles are not a fan of the cat.
Since this week was nutz, what with the full moon and the upcoming break, I've decided to keep this here What I Wore post just as scattered. So pick-up lines and rando photos from my week it 'tis!
Tacky Christmas Day! Tuesday: But, let's be honest, I'd wear this no matter what the day. When the faculty posed for our annual Tacky Christmas Sweater photo this fact was pointed out to me numerous times. Okay, I get it, I'm totes tacky, ya'll! blouse: vintage; headband: clearance somewhere last year; table cloth to skirt: upcoming DIY!; tights: Target; leg warmers folded over as boot socks: Target; gilded gold dot boots: upcoming DIY; giant bow belt: thrifted

Instead of just tacky sweaters, the girls in my sewing group and I decided to wear our latest creations! Not only are these two ladies incredible educators, but look at those fab fashions! Heather (lovely in the middle) created a skirt from a tree skirt while Bethany (beauty on the right) sewed up that super Santa skirt. Not gonna lie, the sewing group at my school is totally rad. P.S. Is that chicken photo-bombing us or what?!
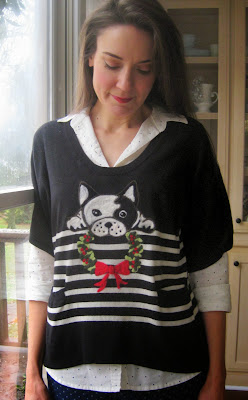
Felted Sweater Wednesday: Have any of you ever attempted felting with children? I've had a lot of kids ask about my felting adventures and express an interest...but it seems more of a small group/art club kind of thing. Any thoughts, ya'll? necklace: vintage, gift from a friend; dotted blouse: Old Navy; felted dog sweater: DIY here; skirt and tights: Target; shoes: Dolls by Nina
I was so excited to come home and find this in my mailbox! It's a lesson I wrote for SchoolArts featuring the work of my (former) fourth grade students. Blog details on that lesson here and digital SchoolArts issue here.

Mrs. Claus Thursday: This has gotta be one of my all-time fave vintage etsy finds. I freakin' love this Christmas dress. It's always a good day when I get to wear it...to bad that day usually only comes once a year! hair clip: DIY here; dress: vintage, etsy; tights: Target; shoes: thrifted, Crocs

Since I can't send all ya'll a Christmas card (although I'd love to!), I thought I'd share them with you here. This year, I uprooted four different photos from Christmas past had them made into our cards. These two were my faves simply because they are horrifying. What you see here is me, full headgear and '80's glasses receiving an OFFICE CHAIR for Christmas while my baby bro Kris looks on. I kinda look like I'm about to back hand him with a "Don't be touchin' my sweet office chair, fool!"
Of course, I can't be the only one in our household I humiliate. Here's a photo of hubs who is not at all enjoying his Santa experience. Although, to be fair, it doesn't look like Santa's having much of a good time either.
Two-Hour Friday!: I love our last day before break. A teacher buddy and I read 'Twas the Night Before Christmas on our school's televised announcements, our music teacher leads a sing-a-long of Christmas tunes during a school-wide assembly, parties are held in the classrooms (were I like to drop by and sample the goods) and then we all go home! And when I got home, I promptly took my long winter's nap. It was divine. tacky Christmas sweater: DIY here; tulle skirt: DIY here; gold leafed shoes: DIY here
Now before heading off to school Friday morning, I decided to treat myself to some Starbucks. While I was waiting in line, I noticed a guy who I thought was taking a picture of me. I brushed it off, thinking I was being paranoid until he did it again. Now. When you dress like I do, you get kinda used to odd stares and comments. And I've even had people ask if they could take my picture before for which I'm always flattered and gladly oblige. After a little bit of sleuthing, I found that not only was my picture snapped but it was also shared on Facebook. Thankfully the comments were harmless and funny but I honestly would have liked it better if the photographer had asked. Because, let's be honest, this is not my best side.
Everyday is Saturday for the Next Two Weeks! Enjoy your holiday time with all of the F's: Food, Fam and Fruitcake (the last two being interchangeable if you are in my family). sweater: vintage, thrifted; dotted top: thrifted; skirt:  Gap Kids, found at Buffalo Exchange; boots: Hunter

Don't forget to vote for the best pick-up line, ya'll! I'll be back soon with a coupla DIY's. Until then, have a great week's end!


Wednesday, December 18, 2013

DIY: Gold Leaf Fringe Shoes

I promise, if you bear with all my random ramblings, I WILL actually get to the DIY portion of this blog. But...it might be a while. So sit back, put your gold-leafed feet up and read on, yo.
First of all, lemme just start by congratulating you on your Amazing Art-sy Pick-Up Lines. If you have no idea earthly idea what I'm talking about, don't you fret. I'll set the scene for you:

Imagine you are in your very first painting class full of the usual suspects: The Patchouli-Smellin' Hippie who will paint a sad parade of Grateful Dead dancing bears on each and every canvas *; The Deep Thinker that will spend days painting his canvas a dark depressing dirt color and title it something like Reflections of My Soul #51 **; The Guy Whose Brain Never Developed Beyond Age 15 whose canvas portrays candy colored sports cars *** and demands to know, "When are we gonna paint from live models so I can see some naked chicks?!" ****
When suddenly, in walks The One...
Who DOESN'T AT ALL look like the lady in the above photo. Naw, man. That's the rando crazy chic who spends more time worrying about her outfit than what she's painting on her canvas. I'm talking about the other one. That one perfect, artsy smartsy being that you just know is the one for you. But! What do you say? 

AND this is where my Artist Pick-Up Line contest left off. Ya'll have been coming up with the best lines. I'm still taking submissions (so hop to it!) and I'll be putting them together in a post at the end of next week. Thus far, here's some gems: 

I'm an artist, but... for you, Baby... I'LL GET A JOB!

At first I thought you were a little sketchy but now I'm really drawn to you.

Hey there, come to this EASEL often?

Are you Picasso? You're looking like you're going to pieces or falling apart over me!

I know, right?! Where were the lines when I was in art school? Don't forget to leave your best submissions in the comments, ya'll. You just might be a wiener. I mean a winner. Whatever, on with the DIY!
Okay, is it just me or are these not the ugliest-cute shoes you've ever seen in your life? I kinda feel about them like I did The Deep Thinker: I love/hate them. But at $198.00 (oh, my bad, now the low low price of 69.95, gee, thanks, Anthro!) I just hate/hate them. So  I decided to invest in a gold leafing kit (in craft stores for under $10) and make my own.
Over the Top Tacky Details: tacky Christmas sweater DIY: DIY from last year, featured here; Anthro-copy tulle skirt DIY: full story here
So I decided to gold leaf these fringe shoes that had been sitting unworn in my closet since I found them in a resale shop. They were just a little too Pocahontas for my taste and I never could seem to find the right outfit to pair them with. Being fringe like the Anthro shoes, I thought I could easily transform them into an Anthro copy.
The gold leafing kit I picked up came with a liquid adhesive, a sealer and some antiquing stuff. The directions said to paint on the adhesive, allow to dry and become tacky and then apply gold leaf. Since I was working with absorbent suede, I gave the fringe a couple of coats of adhesive before attempting the gold leaf.

Now, just a word to yo mother, gold leaf is one finicky b*tch. I thought for sure I'd be able to get my gold leaf on there perfectly as you see in the Anthro shoes...um, no. It's like working with paper that's thinner than tissue and with a mind of it's own. With that in mind, I just pressed the gold leafing to the fringe, gently lifted it and if it stuck, fantastic! If not, well, that part would be without. And, after wrestling with that leafy stuff, I was cool with that. 

Because there was a lot of fringe, this was actually a DIY that took much longer than expected. So I took frequent breaks (not "smoke" breaks, mind you. Chocolate breaks work for me) and ended up working on this over the course of several days. Once each fringe was complete, I sealed it with that sealer stuff. Which smelled like Mod-Podge but tasted like glue, baking soda and a dash of paprika. Just kidding. It didn't taste like glue.
I spy with my little eye a big toe that's busted out of hose. Nice.
And there you have it! Sparkly shoes that I actually think are cuter than those Anthro ones. But that may be all the sealer I consumed talking. 

Don't forget to submit you very best Artsy Pick-Up Lines! We'll vote on the best later next week. 

AND I've not forgotten that this is supposed to also be an art teacher blog...more news on art room happenings soon, I pinky-swear, spit-shake promise!

* Yes, all of these characters are based on Real Life Art Students. That hippie? She once invited me outside for a "smoke" during a break in class. I shoulda known we she dove behind a bush at the back of the art building just what kind of "smoke" she meant. I totally froze, made some excuse about not wanting the oil on my canvas to dry and ran back to class. Needless to say, I was forever more labeled the Class Square.

** Ugh, that guy. He was one of those dudes who spent more stirring his coffee, quoting Russian authors and perfecting his Jackson Pollock-esque appearance than actually hitting brush to canvas. I always considered that guy my nemesis. Mostly cuz he was way smarter than me.

*** Oh boy. And to think I dated that dude. Yeah, seriously. To my credit, I did dump him when I found out his favorite thing to paint was NASCAR. I was not about to compete with Earnhardt, ya'll.

**** My first college roommate just so happened to be a nude model for art classes. Her name was Star (surprised?) and she was just the sweetest naked chick you'd ever wanna meet. She did have this habit where she would "forget" my at-the-time boyfriend was in the room and suddenly drop clothes. Yeah. College. I do not miss thee.

Monday, December 16, 2013

DIY: A Felted Christmas Sweater and a Contest!

You know, sometimes (ahem, most the time) I take photos that look so hokey, I just gotta make fun of myself. Case in point: in the above picture, I kinda look like I just delivered a super cheesy pick up line that I'm mighty proud of. So for the occasion, I scoured the interweb (and my imagination) for The Best Art Teacher Pick Up Lines known to man. Singles-Seeking-Artsy-Types, get that pencil and notebook ready because what I'm about to deliver is nothin' short of epic:

Baby, if you were a Sharpie, you'd be Super Fine.

Hotness, are you an alien? Because your art skillz are Outta This World.

You're so fine, I bet you'd make an Impression on Monet.

Are you a Jackson Pollock? Cuz you just splattered my heart all over the floor! (Like, ew).

Wait a minute, are you a Dali? Because anything as beautiful as you is just surreal.
Outfit details: dotted blouse: Old Navy; original sweater (pre-felting): Buffalo Exchange, Old Navy label; jeans: Target; boots: Hunter
Oh, you think you can do better than that (let's be honest, you totally can)? Well, okay then. I've decided to open this up to a little competition. Leave your very best artsy pick up line(s) in the comments. I'll share 'em in an upcoming post and we'll have a little vote for the best. THE WINNER will receive some totally awesome and amazing gift (read: I've not completely thought this through so I have NO idea what the winner will actually receive but if I were to guess I'd say it will be some unwanted Christmas gift like a stinky candle or smelly lotion. Which reminds me of the time during my first year of teaching, one of my students gifted me lotion called "Body Fantasies" that he said his dad picked out. Awk.Ward. All that to say, that's probably what the winner will receive. Which strikes me as totally appropriate).

So! Please leave your best artsy pick up lines below. I'm so excited to see what you come up with!

But, since this is supposed to be a DIY post, I guess I should talk about my latest Anthro-felted copycat sweater. Now this makes my fifth Anthro-inspired felted sweater (my first, with detailed directions here; next up was this number as well as the skirt; the most time-consuming sweater of all was this one here; and this fall's owlish sweater) and my umpteenth sweater DIY. When I saw this super cute sweater (no longer available, originally priced at $118), my first thought was "I can felt that!" So I kept my eyes pealed (does anyone else hate that saying besides me?!) at the resale shops and found this Old Navy number for $8. Take that, Anthropologie. I just saved myself a whopping $110 that I will most assuredly spend at your store sooner or later.
I began by sketching the little guy out. Feel free to steal this image for your own sweater. I did.
Once I got him placed on my sweater, I decided two things: one, my drawing was too small. So I simply laid it on another sheet of paper and drew it larger. And second, just having the dog alone was boring. I wanted something a little Christmas-y so I decided to put a wreath in his mouth and lose the tongue.
I went about felting this pup the same way I did my Crazy Cat Lady Sweater: I cut out my image; created an outline by felting 100% wool yarn around my drawing; filled in my drawing with wool roving. It's really that easy, ya'll.
The good news is, if you screw it up, you are only out what little you paid at the thrift store. And if you really really  don't like it, you can have a pick-up-line competition on your blog and simply give it away! It's truly a win-win (or a win-sorry, suckas!) any way you look at it.
Now for the wreath, I didn't have any "festive" green, just a lime and natural green. So I used a combo of them both and felted some leafy shapes. This went by fairly quickly which made me happy because I tend to be "over it" after just about an hour of any activity. Except Chocolate-Eating-Competitions. For that I'm good for dayssss.
After felting the wreath for a while, I decided I needed to add a bow. Which seems to be a bit of a theme as both the Crazy Cat Lady Sweater and the Owl Sweater feature bows.
...almost finished...
And, viola! A super grainy close up for your viewing pleasure! Once complete, I did flip the sweater inside out and give it a good ironing. And even though I'll only get to wear this Christmas-themed sweater a couple times a year, I'm glad I added the wreath. I like the bit of festive color it adds as opposed to all that black and white.
Just a little behind-the-scenes story for you: my fat furry friend here is in love with my tripod. Which makes taking these pictures a little difficult as she's usually rubbing her face all over the tripod legs causing the camera to shake when I'm attempting these cheese-ball photos of mine. When she's not slobbering all over the tripod, she's kind of dancing in and out of the legs. Hubs has likened it to a kitty cat stripper pole. To get her away from the tripod, I'm usually calling her which means she engages in a little photo-bombing. And, let's be honest, this sweet girl totally steals the show every time.

And, there ya have it, folks! 

Wait, before you go, I just gotta ask: Are you a Seurat because you have so many beautiful points!

Don't forget to leave your best pick-up lines in the comments below for the Best Artsy Pick-Up Line Contest! Feel free to enter as may as you like. Chat with you soon!


Sunday, December 15, 2013

In the Art Room // What the Art Teacher Wore #83

Dress Like a Tacky Christmas Tree Monday: When I was a kid, my parents allowed me to have a mini-Christmas tree in my room to decorate as I saw fit and it was just about the tackiest thing ever. When I ran outta real ornaments, I crafted some with construction paper and copious amounts of glitter. When I tired of that, I took to filling in the gaps with stuffed animals (who never looked to thrilled to have fake pine needles stickin' 'em in the back, go figure). It was bright, shiny and totes tacky. Kinda like Monday's outfit. sweater: ebay; top, tights: Target; necklace, belt, skirt: thrifted; shoes: Anthro
Hey, guys. Thank you so much for your kind and thoughtful words this past week. My sweet and caring father-in-law will be greatly missed by each and every person that had the pleasure to meet him. I have so many happy memories of him. I am keeping those at the forefront of my mind.

This post was actually written the week before last. After some time away from school, I'm excited to go back (even if it is for only 4.25 days), see the kids and attempt to pick up where we left off. I've got a couple of new routines I've been test-running in the art room that I hope to share with you later this week. Oh! And a couple DIY's up my wannabe-Anthropologie sleeve.

Until next time, squeeze your loved ones. I'll chat with you soon.
All my students, pre-K on up to 4th grade-land spent one 1/2 hour art class creating clay star ornaments. Our mission: to gift them to our parents in exchange for the gift of one dollar. The children are bringing that dollar back to the art room. Our service project this year is to help our friends in Asia (as that's the continent we are traveling this year), particularly those in the Philippines who were so badly effected by Typhoon Haiyan. What warms my heart the most about this project so far are the dollars coming in from the children themselves.
This is our third year to do a service oriented project. Our first year, we did a project very similar to Empty Bowls and donated the proceedings to a local homeless shelter. Last year, we created ceramic animals and "sold" them back to our parents with the proceeds going to a local no-kill animal shelter. This year, I wanted something quick and easy we could bust out in one class. So now my room is currently filled with these stars. I'll keep you posted on the progress.
Christmas Tree Skirt Tuesday: 'kay, I might have a slight addiction to making these skirts. I finished my second this weekend and now I find myself hunting them down at the thrift stores. Somebody stop me. It's not like I don't have an Everst-sized mountain of unfinished projects to tackle. blouse: Old Navy; tree skirt to lady skirt: DIY post here; tights: Target?; shoes: thrifted, Crocs
Our awesome PE teachers have the kids skating this week. After a super brief chat about gesture drawing, I took my third and fourth grade students down to the gym armed with clipboards, newsprint, charcoal sticks (which they thought was just about the coolest thing ever after I told them that I didn't use such an art supply until college) and chamois clothes. They were to fill three pages with as many sketches as they could in the 15 minutes that they had.
My Favorite Christmas Colors Wednesday: These colors remind of me of 1950's kind of Christmas decor which would be my fave on the planet. In fact, I'm so excited that this year I have out the aluminum tree (with a rotating color wheel light!) my mom bought for me last Christmas. Which is kinda funny cuz she just called me yesterday to tell me she bought me another of those trees with another rotating light. Looks like my mom is a hoarder enabler. Which is why I love her so. cuckoo clock dress: DIY dress here; sweater and tights: Target
Most of the kids really took to the gesture drawing. However, some of my more detail-oriented drawers (which is me) were stumped. They simply stared at the skaters zipping by in complete confusion as to how they were to make a "good" drawing. I reminded them that we were simply to show movement in our drawings and that was all. And to stop thinking so hard and just draw. Draw, draw and draw. Some had the bright idea to sketch the legs of one skater and after they zipped by, add the torso of another and the arms of yet another. This gave them a little of a montage sketch but at least is solved the problem of just having floating body parts.


Candy Stripes Thursday: Now I admit I have entirely too much clothing (seriously, I get asked a lot about my closet..it's time for a post!). But one way I've found to make my dresses work summer and winter duty is to simply place a sweater over 'em. This is a sleeveless summer dress that I topped with a thrifted sweater. sweater and shoe clips: vintage, thrifted; dress: European vacation score; tights: Target?; boots: Lucky Brand, found at Marshall's; belt: Pin Up Girl Clothing

Once the got the hang of it, they were on a roll...pun intended. And I could tell they enjoyed it. In fact, one of the fourth graders said, "Mrs. Stephens, we never leave the art room!" I could tell just doing something a little different felt like an adventure...which is what art is always supposed to feel like, right?
Feelin' Mad Men-esque Friday: The weather here has been completely bonkers. One day, I swear it was 75 degrees and the next 30! I basically lived in this poncho on Friday which isn't an easy thing to do as I felt like I had bat wings all day. Which I kinda do and totally need to bust out my Jane Fonda tapes. Cuz, yes, I have them and yes, I still have a VCR. I'm retro, ya'll. poncho and dress: vintage, thrifted; tights: Target; shoes: Dolls by Nina

Stay tuned to what becomes of our sketches. I'm pretty excited to share the progress with you!

Tuesday, December 10, 2013

Heading Home

 
“Remember me and smile, for it's better to forget than to remember me and cry.”
Dr. Seuss

We lost someone very dear to us Monday morning. We know he is much happier and more comfortable now...but it's still so hard. 

“Never say goodbye because goodbye means going away and going away means forgetting.”
J.M. Barrie, Peter Pan 

I know there is no way that this man will be forgotten. And saying goodbye is just too painful. So we won't. 
Thank you for your thoughts and kind words. I'll be back with you soon.
Cassie

Wednesday, December 4, 2013

DIY: Tree Skirt to Lady Skirt in 60 Minutes or Less

This year, we started a weekly sewing group at my school which is strictly Adults Only. As soon as the kids are piled onto the bus and sent on their merry way, we clear the tables of art-making shrapnel (because, let's face it, it always looks like a craft store exploded in my art room), bust out the ironing board and sewing machines, mix ourselves a coupla drinks (coffee, that is) and set to work. Most of the lovely ladies that attend have little sewing experience which makes me their (completely inadequate) leader. Frightening thought, no?

Now what I love about this group is that they are fearless. When we first began, we all tackled the same project: A Reversible Waist Apron. Once that (first time for many) project was finished, these sewing rockstars were ready to tackle anything! So far they've created such sewing wonders as more aprons, a stocking, baby clothes, grown people clothes, etc. You name it, they're gonna make it. 

So when one of them shared a pinterest pic of a tree skirt gone lady skirt, there was a collective "Eeeee! Let's make one!"
The vintage pattern I used was Simplicity...and it might have been a little too simplistic for my taste. You see that wee gap at the back of the waistband? Totally not addressed in the pattern. No add a button, stitch in a hook and eye, staple together, none of that! I'm thinking of adding a hook and eye...but for now the prob was solved with a black belt-addage.

Since I'd be helping these ladies along (and because I was SUPER excited about this idea), I decided to get a jump start on my tree skirt makin' and trouble shoot the making of such. First step: Finding the Perfect Tree Skirt. I knew I wanted it cheap and vintage (exactly how I like my wine) and a quick trip down etsy/ebay lane lead to the click-to-buy purchases of this little lovely and that denim number a coupla photos down.

When I blabbed about it on Facebook, several buddies reminded me of this episode of Designing Women where Bernice dons a tree skirt and the following goes down:

Mary Jo: Bernice, why are you wearing your Christmas tree skirt?
Bernice: Well, this is the skirt you gave me for Christmas.
Mary Jo: Yes, I know. It's not to wear. It's a Christmas tree skirt. You're supposed to put it around the base of your Christmas tree.
Bernice: Oh! Well, no wonder. I like to never got this thing on. I finally just let the waist out and tied it with a belt.

And that's TOTALLY what I did! 

(P.S. Should Mary Jo REALLY be throwing stones when she's wearing shoulder pads AS BIG AS HER HEAD?! Me thinks not.)
But before we get into all that, lemme just tell you that this skirt is huge. Add a crinoline underneath and it's huge-er. So much so that one 2nd grader inquired, "What's under that thing that makes it so poofy!?" At one point my wide-poofy-ness totally swallowed one kindergartener and knocked down two others. AND at bus duty, the whole skirt decided to blow STRAIGHT UP in the air. Thankfully, nobody saw that happen...or so I thought until a dad walked up behind me and said, "Be careful of that wind!"

Doggone poofyness.
So, just how does one go about turning a tree skirt into a big a$$ poofy lady skirt in 60 minutes? Well, get yo'self a tree skirt. There are some cute ones at Kohl's, Marshall's, TJMaxx, yo mama's house, you name it. If you shop online, make sure that you check the diameter of the skirt. I chose ones that were between 45-50". 

STILL can't find one? Dang, you are picky. Use a cute round tablecloth! 

Then, if you can get your kitten mittens on a circle skirt pattern, that might make your life easier, but it's not necessary. Measure your waist (always a pleasure) and create a paper circle that has the same diameter. With that, simply open your skirt (or tablecloth), center the circle and cut it out. From the circle, decide where you want the back to be (or side if you want to have a side zip) and cut down 9". Then, try on the skirt and make sure your hips can fit comfortably through the opening. If so, let's move on! If not, cut a little more until they do.

Circle skirt pattern friends, you got it made. Add the pattern to your skirt and cut. Here I am cutting the waist of the skirt to size. You can see the original tree skirt opening above my pattern.
Now my skirt was not open at all, as some tree skirts are, it simply had a hole in the center. So I proceeded to cut all the way from the opening to the bottom of the skirt. Which was super stupid. I shoulda just cut that length of the zipper. Sometimes my brain is off. Since I had cut to the bottom, I followed the directions above. I trust you can read 'em cuz I'm too lazy to type. Been a long bossing-children-around kind of day.
When it comes to adding zippers, I ALWAYS use this Scotch Tape trick. You can read the details here (again, too lame to move fingers around the keyboard for you). Once that little detail was complete, I created and attached the waistband. 

To create the waistband patternless, you'll need to cut a piece of fabric (I used denim because it was thicker and stronger than cotton and could handle the weight of my skirt. Because she's a heavy b%tch). The fabric should be 4" longer than the waist of your skirt and about 4" in height. Attach that to your waistband with right sides together and stitch. Once attached, fold waistband up and iron. Now, fold waistband in half lengthwise, tuck a 1/2" under and sew a topstitch across the waist. Those extra 2" on each side? Tuck them on the inside of the skirt and topstitch the crap outta 'em. 

Wow. Awesome directions. Do you see why I kinda feel sorry for those ladies in the sewing group?
Yayness! One Tacky Tree Skirt complete, one to go! Which is after I said, "no more Christmas clothes!"...meanwhile there's a felted sweater in the works and a dress on my cuttin' table. I've got Christmas-itis in a bad bad way.

Later, kids!