Showing posts sorted by relevance for query Palette. Sort by date Show all posts

Tuesday, December 8, 2015

DIY: Paint Palette and Crayon Hair Clips Giveaway Closed

What do you do when you need a present for an art teacherin' buddy? One who is just as adventurous in her crazy art teacher ensembles as you? Make her a couple wild and crazy hair clippies, of course!
If you've been around this blog for a hot minute then you know I have a thing for wearing a wee palette in my hair. It's kinda become my signature look. So much so that when the kids draw pictures of me I'm usually only recognizable by that lil palette in my 'do. Strangely enough, even tho I made my palette clip, I never did a proper DIY blog post about it. While making this clip for a friend (and one for YOU, dear readerz...deets in a minute), I decided to lay out the steps so you could make one of your own!
Because I was making two, one for my buddy and one for a winner of this here giveaway (okay, if you just can't wait, deets at the bottom of this here post), I simply folded the felt in half, drew a palette shape, pinned and cut them out. 
 Oh, look. A photo of the pinning stage. Fascinating.
I did add a bit of interfacing in-between the two layers of felt to give it a little bit more body. Nobody likes a floppy palette, know what I'm saying? 
 From there, I cut out "paint" shapes and used Witch Stitchery to hold them in place. If you aren't familiar with the magic that is The Witch then, WHERE HAVE YOU BEEN?! Yes, I'm shouting. And you will be to once you discover the amazement of this hold-in-place-without-pinning magicness. 
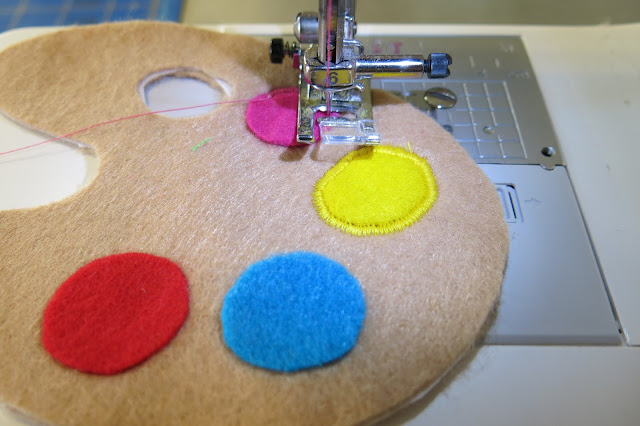
Okay. When it comes to stitching, you don't need a fancy machine to impress your friends with your mad stitchin' skillz. What you do need to do is set your machine to the zigzag stitch, change the width of the stitch so it is medium width for the smaller shapes (for zample, the paint blobbies and the palette hole opening) and the widest stitch for the outer edges of the palette. 
The needle will hop back and fourth on either side of the paint blob. It's hard to turn those round shapes but don't you worry your pretty little head about perfection. It is a paint blob, after all.
For the outer edges, set your machine to it's widest stitch. This time, when you sew, allow the needle to go to the very edge of the shape and back in. This may feel odd but this will seal in the edge. 

AND done! Time to add the brush and clip. I done told you perfection was overrated. The paint brush and your massive 'do will hide any mishaps. 
I used hot glue to adhere the paint brushes to the back of the palette. 
As well as an alligator clip. Now time to stick it in that top knot!
But wait, why stop there? Let's make a Box O' Crayons clip too!
Also, would you please take a moment to appreciate that sweater of mine? Because, let's face it. It looks like crayon worms are crawling all over me. And what could be more creepy/bizarre/fantastical than that?
 Alrightie, so, kinda repeat of the palette. Folded fabric, trace, cut out, cut out a piece of interfacing, you get the idea. 
 So that I'd have my designs placed correctly, I cut out my template and traced the places I knew I'd want to stitch certain lines. 
Does it look like that box of crayons is wearing a diaper or is it just me?
 Oh, my. Somebody is definitely bikini ready. 
 Crayons cut...
 And tacked into place with Witch Stitchery. 
 And the sewing commenced. 
Without the tight curves of the palette, sewing the boxes of crayons was a lot easier. 
I did add a small stitch around the tops of the crayons just to add more of a design and further adhere them. Clips were hot glued to the back at a diagonal. 
And viola! Certifiable Crazy Art Teacher Hair Clippie! Let's talk about how you can get your hands on One Palette Hair Clip:

1. Leave a comment about your fave gift you ever created for a friend or loved one. DON'T FORGET TO INCLUDE YOUR EMAIL ADDRESS so I can let you know if you are the lucky winner!

2. If you are on Instagram and don't currently follow moi, I'd love it if you would!

That's it! Looking forward to hearing from you and sending the lucky winner their new head ornament. 


 photo signature_zpsd10b3273.png

Thursday, July 9, 2015

DIY: A Palette Dress, Purse and GIVEAWAY!

At one point, every summer vacation, I start to fall into a slacker-esque routine. I'll have my To-Do list all written down, my running shoes by the door, a big ole stack of projects to tackle and then I go all meh, not today. The list gets forgotten, the shoes collect dust and  the stacks of projects turn into towers of tasks I ain't never gonna touch. That was today. YESTERDAY, however, I finished off this number and stitched up that thar palette purse! So I can give myself one day o' estate sale shopping and Mad Men Marathon watching, right?!
I'm super stoked about this lil outfit y'all. But, let's be honest, the purse makes the thing. Amiright?
Let's talk about what inspired this outfit: that fab fabric, y'all. I have this habit: late at night, when I should be fast asleep, I scour the interwebs for fabric. I like to google things like "art supply fabric" or "color wheel fabric" OR, you guesser, Chester: palette fabric. The moment I saw this retro-inspired goodness, I tossed three yards in my virtual shopping cart and scooted on over to checkout faster than you can say "fabric hoarder" (although, why would you say such a thing? I like to think of myself as a Fabric Connoisseur, thank you vury much). The pattern I paired with the fabric is a vintage Simplicity 3877. I decided to go with the bodice of view 3 but I didn't love that skirt (flat front, gathered hips? Because I wanna look like a hippo?!) so I opted to use a regular ole gathered skirt from some rando pattern. I ain't trying to be vague. I'm just sayin, it's literally a big a## rectangle that I gathered and attached to the bodice. The.End.
Now, I'll be the first to admit, that this here fabric pattern is a wee bit overwhelming. That's a whole lotta palette action, you know what I mean? So I decided to break it up with that lil dotted cummerbund.  
I do love me a cummerbund. Or any waist-cinching, belt-esque thingie I can get my kitten mittens on. This one was a snap to make. I have a feeling I'll be busting out more o' these in the future. Magic Eight Ball says it's so (actually she said, "Ask Again" which I always take for a YES! WHATEVER YOU SAY! Magic Eight Ball is kinda like the original Siri but without the attitude.)
But can we fur realz just talk about the show stopper here? I mean, that purse, right?! 
RIIIIIIGHHHHHHT?!
It was pretty easy to make (with my sewing machine only having a hissy fit a mere three times during the making) and, if you are interested, ya outta pay close attention so you can make your own! BECAUSE Ima bout to give away the supplies to do it! But first...
I started with two straw placemats I found on Amazon. I then sketched out my plan and placed it on top, pinning it into place.
Then I snipped away. 
The handle proved to be the biggest beast for a multitude of reasons. The first being it was a drag to cut out. BUT I did it. WITH much complaining. TO the cat. BECAUSE no one else will listen. 
Using extra wide double fold bias tape, I pinned that business around the edge of the mat. Sadly, I didn't have enough for the handle so I had to use the smaller double fold tape I had on hand. That proved to be a real joy (insert sarcasm here) to stitch. But I muscled through. 
And then there was The Great Debate. If you follow me on Instagram and Facebook, I threw out a question because I was stumped how to proceed with the paint splotches. So my question was: round or blobby? I had so many sweet friends offer their advice that it was fab! The prob? Everyone was divided! So I took a closer look at the palette on my skirt and noticed that the paint splotches were ovals. That seemed to be a happy medium. Okay, so the Magic Eight Ball is actually the medium, but you know what I mean. 
This part actually went off without a hitch. I just set my machine to the appliqué stitch (all machines have it, it's just a zigzag stitch with the stitches set close together) and went to town.
Originally I was gonna stitch the two mats together on the black bias tape but it was just too thick. I ended up switching to a light brown thread and sewed the front and back of the bag together on the straw mat. Done and Done. 
BUT I'VE GOT THE SUPPLIES FOR YOU TO MAKE ONE TOOOOOOOO. Well, the purse, perhaps. And just a wee bit of palette fabric. And it can be ALLL YOOOOUURRZZZZ if y'all do the following:

* (If you wanna) follow me on Instagram, that'd be swell. 

* Leave me a message in the comments! I want to know...Who is your fave painter (ya know, since we're talking palettes and all) and why? Also! Don't forget to leave me your email addy so I can let you know if you won, you big winner, you!
 
AND, I'll see you soon! Artsy Sew Along friends, I'll be back shortly with more video clipp-ies of our next phase of skirt stitching. Toodles!
 photo signature_zpsd10b3273.png

Saturday, May 6, 2017

DIY: Intro to Fashion Felting!

Last week was our very last felting craft night! All during the month of April, every Wednesday night at 8pm CST, me and a group of many others, learned the fine art of felting. I've had so much fun sharing my fibers hacks and learning from all of those who joined the fun. You can still participate and purchase supplies here as all the LIVE videos are archived both on my YouTube channel and on my Facebook page. For our last night, I shared how to create a palette hair clip. This one was created by Charlene @artteacher. Here's the video of our session together:
This week, we began a new creating adventure: working with clay! We explored Celluclay, one of my favorites. We are working with this kit (but you don't have to purchase to join the fun). We have been spending the first 20-ish minutes of our session just chatting all things art teacherin' and clay. Then we explored the medium together! You can see what folks are creating (and share your creations as well) by using the hashtag #creatingwithcassie

So to wrap up our fibers fun, I thought I'd share what we created. Shout out once again to the amazing Sue Bunch for creating those kits and joining our live sessions. You are a rock star! 
Don't you LOVE Heather's Leia? How perfect for May the Fourth, y'all. 
 Sculptural needle felting was new to me and I loved sharing the process with folks. Desiree's colorful owl is so stinkin' cute! 
 Maddie's fox is so cute. A coworker of mine had a baby fox in her yard this week and it immediately reminded me of Maddie's creation. 
 Ms. Yoon's shirt is just about the cutest thing ever. I bet you she could sell these cuties!
 Deborah's creations have been blowing me away every week. I never thought to felt on a straw hat such as this. She's got me excited to explore new surfaces!
 She also created this needle felted dryer ball. 
 Mariana's sweet daughter needle felted this portrait of Friday. How incredible! 
 I love the incorporation of embroidery with this needle felting. Maddie created this blouse that looks like it is straight out of Anthropologie. 
 Desiree's sparkly woodgrain on her palette was so creative. I loved seeing everyone's spin on their palette hair clip.
 Seeing photos of everyone's creation throughout the month of April really did make me so happy. I loved that folks got to experience something that I truly love. Look at all of this beautiful felted goodness!
 Angela's palette made me so happy but this knocked me off my feet:
Love her tribute to Klimt. 
 Meganne's addition of the two brushes was a super cute idea. 
 Love Rachel's needle felted name on her palette. 
Biggest heartfelt thanks to all of you who have been joining our live chats. We hit our 25th chat recently and it made me so happy...spending time with my favorite folks is something I look forward to all week. Thank you!!
 photo signature_zpsd10b3273.png