Showing posts sorted by relevance for query dorky teacher. Sort by date Show all posts

Tuesday, May 13, 2014

DIY: The 7 Habits of a Crazily Dressed Art Teacher

That's right, ya'll. It's my closet. While I do share it with the hubs (my apologies, dear), he owns just a small piece of real estate [not pictured, those aren't his leopard print pants, I swear]. Lemme tell you what you are lookin' at here from left to right: on the left shelf: summer sweaters, shoes, bags and more sweaters; on the top row of hangers: tights on hangers (so I can easily find ones to match my ensemble), skirts; on the lower level: pants and blouses; middle: (more) sweaters, pants (what?!), under-stuff (I don't have a dresser, so this is where I keep that kinda stuff); right: dresses. Lots of dresses. clear plastic tubs above: winter duds.
The hubs is currently reading that uber-famous Steven Covey book The Seven Habits of Highly Effective People. And I totes wanna know those habits (because I secretly wanna rule the world and dress ya'll in Crayon shoes) but I also totes don't wanna read the book (even though I'm pretty sure one of those aforementioned habits would be "don't be an illiterate lazy a**"). So, every evening at dinner, I casually ask hubs about the book to trick him into thinking I'm making polite conversation when really I just want the Cliff's Notes. But I think the dude is onto me. Because, at the end of every ever-shrinking conversation, he says:

"You should really just read the book."

And, maybe I will. Although I'm more of a trashy/smutty summer novel kind of girl. If only Covey's book was titled something like "Fifty Shades of Highly Effective Bridget Joneses" we might be curled up on a beach towel together. For now, I'll just borrow heavily from his book for the title of this here DIY blog post:

The 7 Habits of a Crazily Dressed Art Teacher *
1. Do What Feels Right. 
Okay, let's be honest. I look ridiculous. Like some sort of Rainbow-Brite/PeeWee Herman love child. And that might not be the look you are going for. Because how many times have you woken up and thought, "You know what? Today, I'm gonna dress like a rainbow shot out of a unicorn's a**." So, you should always, always do what feels right for you. For me, in the beginning, tiptoeing into the pool of Crazy Art Teacher meant stepping up my accessorizin' game. 
2. The Devil is in the Artsy Details.
Have you ever noticed that little people notice the little things? Like the time you only put your eyeliner on one eye ("Mrs. Stephens, what's wrong with your eyes? One is fancy the other is sleepy!") or the day you opted out of wearing a Bumpit ("Where is the prettiful Mrs. Stephens? Your hair is so...sad.") Yeah, you pretty much have to sweat the small stuff with the smalls because...they notice everything. 

So, why not bank on that?
Start by accessorizing. I began with something small, cheap and easy (um, no comment): pins! Pins are great, ya'll, especially for those of us that wear a lanyard or an apron all day. In the beginning of my art teacherin' career, I got big time into making pins outta Sculptey which fed two needs: a creativity itch and that desire to be different. When I found that the kids responded to that little touch of pizazz (anyone else hate that word?), I decided to expand my accessory repertoire to necklaces (DIY directions for that necklace above, go here.)

Most of my necklaces are either thrifted, sale-racked or handmade. Details on that embroidered pin here
Scarves were another one of the first accessories I wore in the art room on those days when the heat just decided to up and die. I remember once when I took a scarf off during a lesson when a student said, "Oh, please keep it on! It's super cute!" And, well, you know I'm all about the Super Cute. Because I'm 12.
Why not put ever accessory together in one ensemble? Headband, check. Scarf, checkity-check. Tacky gold belt, done. Cup of tea, like a boss.
Another fave accessory: Head Gear. Well, wait, not THAT type of head gear, I already did years of that in my adolescence. Head decor, I mean. Anything to jazz up the 'do is a do in my book. Details on the sushi headband here. Pencil clip DIY here.
Because nothing says "Crazy Art Teacher" like this kinda Head Decor.
3. Make a Leggy Statement (Added Bonus: Never Shave Your Legs Again!). 
These days, you can find tights in just about every color of the rainbow (thank you, Target) and for cheap. I'm in the habit of only buying things that are on sale for a coupla reasons: 1. They's cheap like me. 2. You'll notice that only the "weird" (read artsy) stuff makes it to the sale rack. That's because the rest of the world, which is inhabited by Non-Crazily Dressed Art Teachers, steers clear of 'em. Perfect for the likes of us.
Amazon actually carries a huge selection of artsy tights. Don't believe me? Search "Starry Night Tights" and tell me I'm fibbin'. Sweater DIY, here.
While you're thinking of legs, don't forget your feets. I'm kinda prone to heels although I do keep a pair of ballet flats in my art room when the dogs grow tired. The majority of my shoes are thrifted (that might gross you out but my tolerance of disgusting is off-the-charts) and then DIY'ed. The crayon shoes, leopard print, glittery and blue splatter paint shoes are all of my footsy-masterpieces.
Follow this linky-loo for all the gory foot-feitishy deets, yo.
4. Put an Apron on It. 
Let's pretend for a sec that I'm Beyonce (not a stretch, right?) and Ima singing a version of "All the Single Ladies" which I like to call "All the Artsy Ladies". And it goes like this:

'Cause if you liked that dress, then you should have put an apron on it
If you liked that top, then you shoulda put an apron on it
Don't be mad once you see that kid got paint on it
'Cause if you liked that skirt, then you shoulda put an apron on it
Oh, oh, oh, oh, oh, oh


Seriously. Aprons are cute and fun to make. Like that dorky one above. Do yourself a favor, put an apron on it. 
5. Shop that Thrift Store like an Art Teacher/Hoardin' Boss. 
If you aren't thrifting your art teacher duds, you are seriously missing out. My fave thing to do is to go with a group of art teacher buddies. They'll talk you into buying the most craziest of things. I'd say that about 70% of my closet is thrifted and I'm cool with that. 
What do I look for at the thrift store? Anything odd, unique, colorful and pattern-tastic. I usually steer clear of fad fashions as I've found that I usually end up giving those right back to thrift store months later.
A peak at the pattern-y duds in my closet.
6. Create Your Own Clothing. 
Okay, that sounds totes overwhelming, right? So, kids, start small. Like I said, I began by making pins outta clay. When I first decided to tackle clothing, it involved me literally gluing stuff to a dress because I didn't know how to sew. Then my mom bought me a sewing machine, I read the manual and created some super ugly things. That I loved and wore with pride. Then I started felting after watching a coupla youtube videos. These days, I'm usually confident that when I come up with an idea, I can make it happen. I enjoy doing that. You might also...but your creative outlet might take you down a different path. Follow it. You might be surprised what crazily-dressed artsiness awaits. (Campbell's Soup Can Dress, here. Hokusai's The Great Wave Dress, here.)
7. Nay the Naysayers. 
Now, as you embark on your Crazily Dressed Art Adventure, be prepared to be met with some resistance. I know I've had my share. From that stranger who snapped my photo at Starbucks and posted it on Facebook to comments like, "Why are you wearing that?!" by a colleague, just brace yourself. Not everyone can handle the scandal. That's why they're not art teachers, ya'll. Or, at least, the ones with ballz. And you, my friend, I can tell have some Big Bad Artsy Balls. So embrace your crazy! And share it with your students. You won't regret it. Although your significant other might. (Totes Crazy Art Teacher Outfit DIY, here.)

Until next time, let your Crazily Dressed Art Teacher Freak Flag Fly!

* Disclaimer: This here blog post is for the Art Teacher Ladies out there. If there are any art teacherin' dudes that would like to share their Crazily Dressin' Tips, shoot me an email at cassieart75@gmail.com!


Sunday, April 27, 2014

What the Art Teacher Wore #97 and Last Call for the Best Dressed Contest!

Feelin' Frida-ish Monday: I have a coupla after school art clubs, in those small groups, we have the most enlightening convos. One girl asked, "We learn about men artists a lot. Aren't there any girl artists?" I had already been thinking about how I'd like to introduce more contemporary artists next year (this guy does it all the time and has me inspired) but now I know that more female artists need to be thrown into the mix. So! What contemporary/female artists do you introduce in your art room? dress: thrift store; necklaces: Forever39, ahem, 21; belt: Anthropologie; tights: Target; boots: Seychelles 
I don't know what life is like on your end of the world but I'm sure it's crazy-busy. Especially if you are a teacher. End-of-the-school-year projects to wrap up, mountains of artwork to sort for our school-wide art show, let's-get-rid-of-this-stuff spring cleaning, the list grows by the day. So this week, I thought I'd share with you just some of the things we've been working on in the art room. Complete lessons on this here blog to come, but for now, you'll have to savor these sneak-peaks.

AND, just so's ya know, Wednesday, April 30th is the LAST CALL FOR THE BEST DRESSED ART TEACHER CONTEST! Yes, I'm shouting at you, that's how excited I am! So many of you awesome art teachers have sent me snaps that left me rolling in laughter (which is a good thing, I swear! Ya'll are the best!). 

What's the Best Dressed Art Teacher Contest, you ask? 
Well, here's the details:

Nominate yourself or an art teacher buddy!

Simply send an email to me at cassieart75@gmail.com with a photo of your best artsy look. High resolution photos preferred, please.

 Please include a short bio about the art teacher and what inspired the look.

Photos and bio will be shared on this blog on April 30th.

Open voting on this blog will end on May 5th and the winner will be announced May 7th!

The winner will receive a magical prize along with an interview on this blog.

So! what are you waiting for? Shoot me an email, you crazy art teacher, you!
So if I'm not found Buried Alive under the 400+ clay projects that the kids have created over the last coupla weeks, it'll be a miracle. These clay stars were created a couple months back. Our original intent was to glaze them and "sell" them back to our parents with the proceeds going to charity. However, due to some personal stuff, that had to get placed on the back burner. But now we're back! And I just knew I'd never be able to get 400+ stars glazed and fired along with all those projects. So I lurked the interwebs for a possible solution and saw something about coloring clay projects with crayons...(well, construction paper crayons were recommended but, in the state that my room is currently in, there was no finding mine)...

We painted over them with watercolor paint (I asked that the kids pick just one color, por favor) and viola! Colorful and completed in a snap! More details about these stars and how they were created in an upcoming post.
Bump-It Up Tuesday: So I had a hair appointment after school on Tuesday (not that you'd ever be able to tell I got my hair cut. I'm such a chicken, I always just get a couple inches taken off. So boring!). Once seated in the hair-cuttin-hot-seat, I proceeded to unravel the following from my 'do: 11 Bobby Pins, 2 Pink Bows and 1 Extra Large Bumpit. My hair dressers reaction, after regaining her thoughts, "Ohmigawd, IS THAT A BUMPIT?!" I live in the South, ya'll! It's Big Hair or Die! shoes, sweater and top: thrift store; skirt and belt: Pin Up Girl Clothing 
Speaking of clay projects...my 3rd graders created these Chinese-inspired clay dragons. Ya'll, this project was such a hit! I would easily do this again with all grade levels. The creativity was off the chain crazy! I can't wait for them to glaze them so I can share the easy-peasy lesson with you. 

Some of my 4th grade students created Panda's with Personality (oh boy, ya'll. Do they ever have personality!) while another group created Asian elephants inspired by the painted elephants in India. Many added jewelry, fabric and flowers to their elephants. I have a feeling these are going to be the most colorful elephants ever.
So Stinkin' Tired Wednesday: Seriously. The end of the school year is near...and my work load only builds as I'm sure yours does as well. This photo was the only one I managed NOT to be yawning my head off in. dress: vintage, thrifted; tights: Target; shoes: Dolls by Nina
After finishing off our clay projects, We Returned to Our Normally Scheduled Program, Already in Progress (said in that officially dorky voice). Which means my 4th graders added either bamboo, cherry blossom trees or pine trees to their large (12" X 18") watercolor painted backgrounds. Lesson to come, promise!

What is Wrong with You, Thursday?!: Wow, this outfit was a let down to the folks, both big and small, in my school! The 4th grade decided that they had never seen me in "short shoes" (um, I'm guessing that means flats?!) and my librarian buddy dubbed this a "too normal" of an outfit. Humph! Time to get outta these Short Shoes and step up my Non-Normal game, I guess! top: Target; skirt: vintage, etsy; shoes: gift; headband: made by me; necklace: The Paper Source
Meanwhile, in 3rd grade, we excitedly finished these Ming vase inspired still lives. We spent a long time on this project but learned so much...I'll be sharing this lesson later this week. Stay tuned, ya'll!

Hittin' the Town, Friday: Almost everyday after school, there's something going on. Whether it's an art club or meeting up with buddies, I'm always running. I had decided that, with art show approaching, I should spend more after school time in my art room...but I just can't! Not with buddies that I need to chat and shop with. Tamara, thank you for snapping this photo at my happy place -- Anthropologie (where I walked out with a not-at-all-necessary $298 dress for $26, eeee!). dress: made by me (go here for the craziest food-processing-foot-cutting story everrr
My 1st grade friends made clay koi fish...and while those dry, they are creating these koinobori (Japanese for Carp Kite) for May 5th which is Children's Day in Japan.

I actually picked up these die-cut paper fish years ago through Roylco and never got around to having the kids create them. This time it worked to be the perfect tie-in, as well as a super short project while our clay drys out. I'll share with you more about this project soon. Ah! So much to share with ya's!


Monday, August 20, 2012

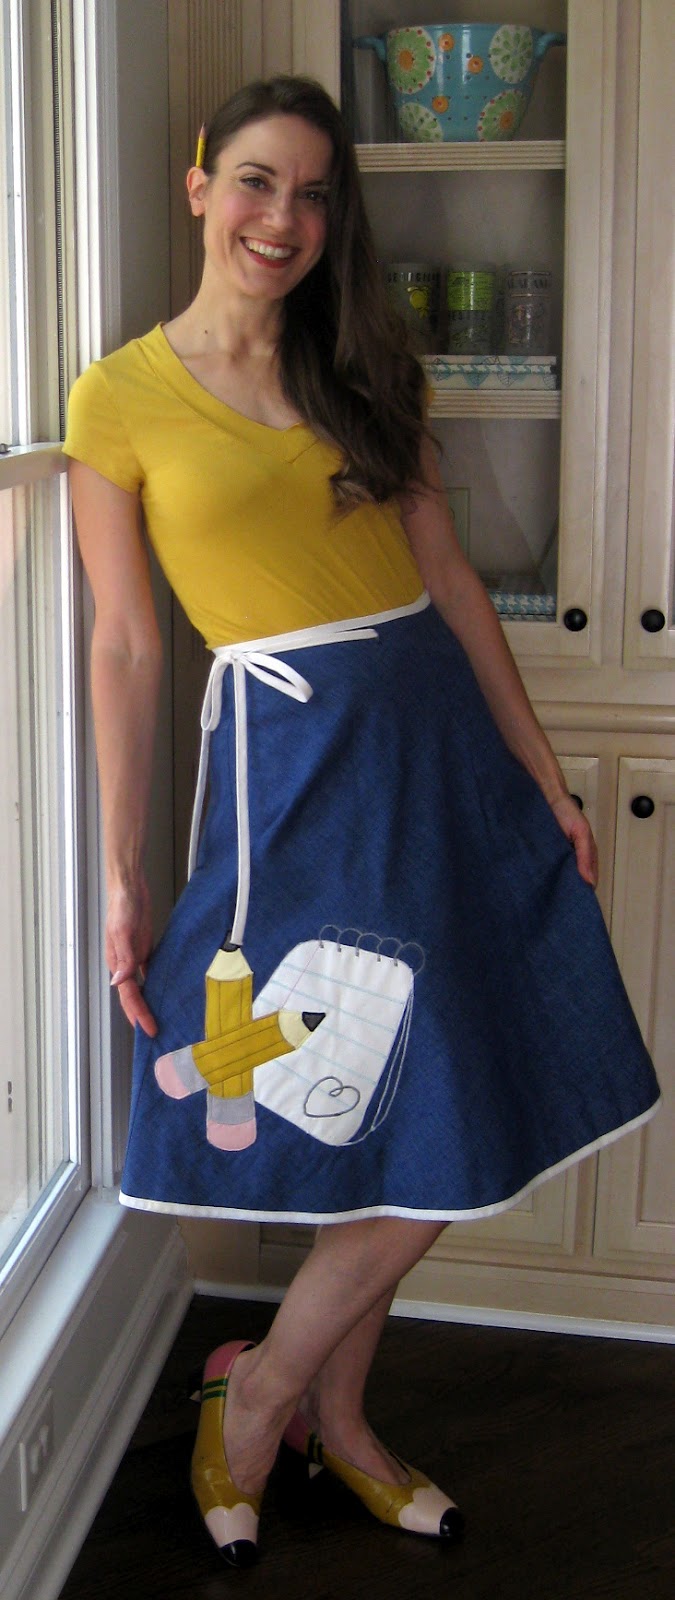
DIY: The 1970's Dorky Teacher Skirt

Dying for a Double DIY? Here's how to paint your own Pencil Shoes!
 This past weekend's to-do list looked like this:

1. Mow the yard...nope, didn't do it.
2. Clean the house...I danced around with the Swiffer, which counts as cleanin' in my book.
3. Go for a run...naw, no one was chasing me so, why bother?

That's all I had to do this weekend. And I didn't even manage to get 50% done. Which kinda makes me sound like a slack-tastic slug. Unless you take into consideration that I did something that wasn't even on my list: I made the World's Dorkiest Teacher Skirt. That's right. I just turned that Slack-tastic into Tacky-tastic. Because it's what I do.
Please try to ignore the dust bunnies that my Swiffer Samba didn't pick up.
It all started with this 1970's wrap skirt I picked up at Goodwill years ago. Yeah, I said years. I don't get rid of anything. In fact, when I start cleaning out, I make huge stacks of things to donate...and then refold them and place them back in my closet. Where they belong. Along with my cassette tapes, my VCR and Richard Simmons workout videos. I'd laugh with you if I wasn't crying.

How I usually go about bringing my goofy ideas to life: I start with a sketch and just dive in. I find that if I spend too much time thinking an idea through, Sane Cassie will usually come to her senses and drop it. However, if I just go at it, Crazy Cassie can sometimes make it happen. Am I really talking about myself in third person? Isn't that what Sybil used to do...?
This skirt was actually inspired by my vintage palette and rainbow wrap skirts that you can see here. I didn't make either of those but I have done my share of applique in the past (check out my Rock Star Apron). You can applique on any ole sewing machine. It's just like collage with the stitching acting as your glue.
For the pencils (because I know you are dying to get your tacky on):

1. Pin your pencil drawing to some yellow fabric (I used a mustard yellow linen) and some facing. Cut it out.
2. Cut out shapes of eraser, the pencil ferrule (what you didn't know that's what the metal thingie was called?), the wooden tip and the lead.
3. Tack shapes down with stitch witchery (non-sewers, that's this magical stuff that will adhere fabric with just the heat of an iron).
4. Set your sewing machine to the zigzag setting. Now each machine is different as far as setting go. So you may have to uproot that manual you never read and give it a peak under "applique stitching". Trust me, your machine can do this. The applique is simply a very tight zigzag stitch.
Oh, look it's The Notebook. By the way, am I the last female on the planet that hasn't seen that movie? Yeah yeah, I get it, they're wearing vintage, it's romantic and (gasp!) Ryan Gosling is in it. But I just can't handle that much sap {shivers}.
The notebook was a snap. I doubled up the white fabric and adding facing to the back. Before adding it to the skirt, I stitched on the lines for the page and the little doodled heart. Once appliqued to the skirt, I added the spiral bound rings and the lines for the sheets of paper.
Before teaching art, I thought all #2 pencils were all alike. Oh contraire mon ami. The Ticonderoga big pencils are my personal fave in the art room.
Once the notebook was attached, I appliqued on the pencils. This part took a pinch longer because I wanted to match the applique thread with the colors of the pencil. Because I'm only detail oriented when it comes to the important things. Like applique. Remembering to drop by the bank, the post office and the grocery? Um, not so much.
I know it looks like a drag, but it really was just a matter of changing the thread out. The key to a clean applique stitch is making sure that your needle zigzags from the edge of your fabric to the inside.
Does it get any dorkier? Me thinks not.
The only thing missing is a pencil hair clip. Or a pencil beret. Perhaps a pencil sombrero? Always an option.
Please tell me this isn't my fate...but if I do get an itch, it's nice to know you can still buy sweaters like this here.

Now when Crazed Cassie was in the midst of whipping up this little number, she (okay, this is weird, I'm switching to first person), ahem, I asked hubs for some advice. He's like the Tasteful to my Tacky. 

So I inquired: On the notebook, do you think I should use black thread or gray thread for the heart doodle?

Hubs: I don't think you should put a doodle on the notebook.

Moi: Well, that wasn't really the question. Black or gray was my question.

Hubs: I have an idea, how about you stitch the alphabet on it? You know, like a capital A and then a lower case a and then a B and a C?

Moi: What?! That would make it look totally tacky!

Hubs: (exasperated "I-think-you've-already-reached-that-level" look).


Really? I don't know, let's do the math:

Two pencils plus one notebook and a heart equals Pretty Stinkin' Dorky.

Add in some pencil shoes and, yep, he's right Totally Tacky.

Well, if anything, at least I'm consistent. Now! Off to make a Pencil Hat!

Monday, August 19, 2013

What the Art Teacher Wore #73

Trip-Takin' Monday: Since we'll be traveling to Asia this year, I decided to break out my Suitcase Skirt for the occasion. Also because, let's fact it, I've got a lot of baggage. skirt: vintage, etsy; blouse: gift from a friend; belt: Pin Up Girl Clothing; shoes: thrifted Crocs (I know, hard to believe)
What's up in your world, ya'll? Dudes, I've got my feets up and an ice cold...water (sadly) so life here is practically perfect. Today marked the first day for my super student teacher to enter the wild world of art teaching and I couldn't be more excited. Stay tuned for next week's outfit posts that will also feature her groovy looks...just don't tell her about it. She doesn't have a clue that I've been snapping her picture whilst pretending to hold the camera in her direction and mutter, "I wonder what this button does." Silly student teacher.

And speaking of teaching, since seeing me in this get-up, my students have now been learning all about the history behind the kimono. It's quite fascinating so I thought I'd share it with ya'll this week. Until next time, have a fantastic-ish week and I'll talk to you sooner than you'd probably like.
So originally "kimono" was the Japanese word for clothing. Of course now we know it to look a little something like this. This style of kimono came about more than a thousand years ago. Their popularity came into play partly because they are so stinkin easy to stitch up. Known as the straight-line-cut method, it involved simply cutting the fabric in straight lines and stitching them together. This method also meant that the kimono is one-size-fits-all and no tailoring is required.
The Great Wave Tuesday: My students are also learning about ole Hokusai who, apparently, changed his name up to 25 times during his life including a Japanese name that translated to "Old Man Crazy about Drawing". Gotta love an artsy fart with the ability to laugh at his craziness. dress: made by this crazy, DIY here; shoes: Payless

Sadly, it seems that kimono making is a dying art. Hundreds of years ago, thousands of Japanese people were in the kimono making business as it was what was worn daily. Currently only a handful of families craft kimonos with many of those craftsman being elderly. It's sad to think that the art of kimono making is literally a dying one.
First Day O' Kindergarten: This year I have my wee friends for 45 minutes at a time and I'm pretty excited. Once we get past that monkeys-on-crack phase I think we'll be good. Ish. I mean, there is something to be said about teaching a roomful of Crack Monkeys...right? skirt: etsy; top: thrifted; crayon shoes: DIY here; primary colored necklaces: thrifted finds

Traditionally crafted kimonos, from the silk cocoon to the final product involve more than 1000 processes carried out by different craftsmen. Each of these artists learned their crafts from the generations before them...which makes it so sad to think of this art as being lost. At one time, kimonos were worn by every class of people from samurai to aristocrats to the working class. When I was in Japan several years ago, it was rare to see anyone wearing a kimono and the thrift shops were filled with these beautiful robes.
Pencil Me in Thursday: I know, dorkiness abounds. But are you really surprised? pencil skirt: DIY here; top and sweater: Target; shoes: Swedish Hasbeens, Anthropologie sale!
Beautiful, right? Many Japanese are very aware of the change of seasons and love to celebrate it. One way of doing so is to have a kimono that showcases each season. I love this idea and have decided to expand my kimono-wardrobe. Cuz that's just what my overcrowded closet needs.
Friday, Where You Been?!: Kay, not gonna lie, the last two weeks have felt pretty stinkin' long. Which is entirely my fault, too many late nights and early risin's. Would love to say Ima gonna work on that but I just can't make any promises. There's just not enough time in a day, ya'll! skirt: etsy (if you type in "Dorky Art Teacher Clothes", you'd be amazed at what you'd find!); blouse: thrifted; shoes: Payless; palette hair clip: made by me
There are many parts to dressing in traditional Japanese attire beyond the kimono. That giant belt is called an obi which, from the front, you would see has a smaller cord belt wrapped around it called an obi-jime. Those wooden-heeled shoes are called geta and are worn with toe-socks called tabi. And if you look closely, you'll see what looks like another kimono under the ones worn by the ladies above. That's actually a collar called a han'eri. Of course the back of the kimonos is worn low across the neckline to showcase the beauty of the neck.