Showing posts with label clay projects. Show all posts

Wednesday, November 20, 2024

DIY: Air Dry Clay Vases!

Hey there, friends! 

I'm excited to share a little something I discovered with one of my favorite art supplies: Celluclay(this link will lead you to my Amazon list of supplies). As you might know...I've created a TON of creations with my students and for myself with Celluclay. It's a paper-based air-dry clay that really lends itself to a whole lot of exploration. HOWEVER...one thing I never loved about working with the stuff is painting my creation after the fact. It's got a rough, scratch surface which is difficult to paint AND you have to wait several days for it to dry completely BEFORE you can paint it. That is...until I discovered...you can TINT the clay! Let me show you how:

In this video, I'll share with you two ways of tinting your Celluclay with acrylic paint (although I've not tried it, I'm sure tempera paint would work just fine). You can prep the clay by tinting it ahead of time, wrapping it in plastic and storing in your fridge. This is what I'm doing for a 2-hour class I'm leading today. I've got all my colorful balls stashed in the fridge (ahem). OR...at another class I lead, I had the participants mix up their own clay! I demonstrate both methods in my video. 

What I love about this method of tinting the clay is that I also don't have to struggle to paint in the small areas. For example, painting around those squiggles would have been a struggle and definitely would have had me questioning my life's choices. Now...I can just create the color of clay that I want!

I did cover each piece with a layer of satin-finish ModPodge to help further anchor the pieces in place, give the vases a finish and waterproof them a bit. ModPodge comes in so many different finishes now that it's awesome! They make a sparkle finish, and indoor/outdoor finish...you name it! In a pinch...diluted Elmer's glue also works in place of ModPodge if you can't get your kitten mittens on any.


I have worked with Celluclay with my students in the past. It's fun stuff, especially if you don't have a kiln or you have sculpture projects in mind. For a smaller scale project, my second graders created these sculpted hearts. If you tap the link, you'll find a video of the lesson for you to share with your students:
This was a lesson we did in just a few 30 minute classes! We used foil that we shaped into a heart as our armature. I pre-prepped the Celluclay which made it so much easier! Once dry, the students used acrylic to add color. We hung these in a little popsicle stick frame.
My older students created these Celluclay taxidermy heads that were a blast! You can see all the details here. 
But back to the vases...I was going to include in this post all of the things I've created with Celluclay BUT...I've made so much that I think it deserves it's own blog post. So...that will be coming soon. I also have a ton of videos on my YouTube channel if you are curious about more Celluclay exploration. Check the playlist Clay Projects for Adults and Children for more. 

I will warn you: making these vases is HIGHLY addictive! I even thought for a split second that I was going to go into the vase-making business and started day dreaming about opening a booth at a local craft fair! And then I looked around at all my other half finished art creations which were giving me the evil eye and thought....well...let's just take it one day at a time ;) 

I don't know if you can see this but...look closely at the top of this vase. When the squiggles dried, they did pull away from the vase a little bit. I assume that is because I didn't have the squiggles secured to the vase well enough and they dried, thus pulling away, before the vase itself did. So really make sure you have your bits and pieces anchored down. That seems like a good rule of thumb for all aspects of life ;)

Please do let me know if you have any questions! You can always drop me a line on my YT channel. Unfortunately, due to spam comments, I did have to turn the comments off here. So sorry! 
BTW...I know I've only shared a little of this big news on my Instagram but...did you know I wrote a Decide Your Direction art adventure book for kids? That's right!! I'm so excited and I'll be talking about this more super soon but until then...yay! I always read to my students while they work but I could never find the perfect "art" novel...so I wrote one! This book introduces 7 different artists and the reader decides which adventures to go on. It has 32 different endings and over 80 illustrations! Like I said, I'll share more here soon but if you just can't wait, you can get yourself a copy here! It's perfect for the holidays...and I'll even sign it for you!

photo signature_zpsd10b3273.png
Read more »

Sunday, April 3, 2022

Clay Mugs for Kids!

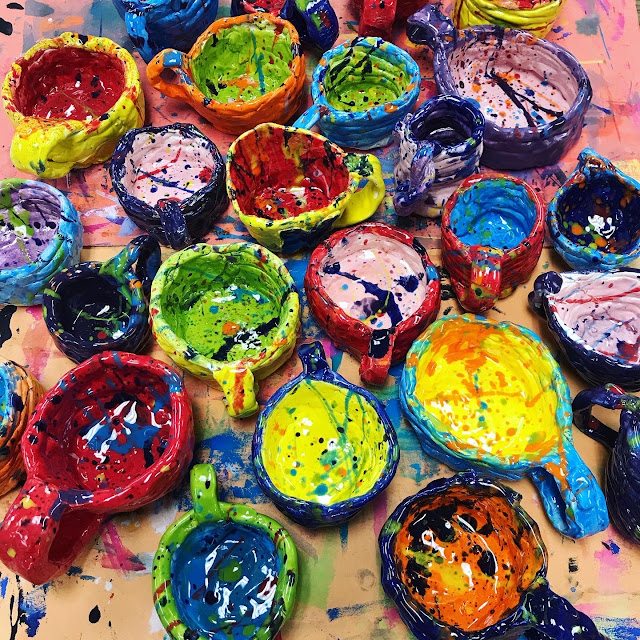
Hi, friends! My students are wrapping up one of the clay projects they created and I thought I'd share. Last year, my first through fourth created clay mugs and it was easily everyone's favorite clay project. When I shared that we were working with clay again, a few weeks ago, their first question was "are we making mugs again?!" I had already planned on it...so they were excited to hear the answer. Once mugs are complete, we celebrate by drinking hot chocolate out of them...so it's a whole lot of fun. 

This year, I created a video to share with them. Because I have 30 minute art classes, I only showed the pinch pot portion and a bit of coil making for the first class. The second class, we did a brief coil making reminder and then watched the portion about creating a handle. The video helped them trouble shoot and get their mugs completed in just two 30 minute classes!
This week, we started glazing! They were told they could use any two colors of glaze, one for the inside and one for the outside. They were to do at least three coats of their chosen colors and not to glaze the bottom. Once complete, they could join me at the splatter glaze station!

When my students were finished glazing, they could help a friend or work on the large banners I created to announce our upcoming art show! 

We used Prang's Creativity Street Tempera Sticks to color these with.
The glaze we used are from two companies and I like them both: Mayco's Stroke and Coat and Amaco's Teacher's Palette. Both are food safe and fire to cone 06.
When introducing clay to your students, you might find this video fun to share:


Read more »

Thursday, May 21, 2020

Let's Make Black Light Clay!

Bet you didn't even know you could make clay that glows under black light! Let me show you how to make Salt Dough Clay with my simple three-ingredient recipe...and then how to make it glow! I'll also share how to create a deep sea scene. You'll need the following:

1/4 cup of water
1/4 cups of salt
1/2 cup of flour
Prang Fluorscent Paint
Cardboard
Crayons

Let's create!

 photo signature_zpsd10b3273.png
Read more »

Sunday, December 1, 2019

In the Art Room: All Things Clay!

When I first started teaching, teaching clay was in my curriculum and I FREAKED.THE.FUNK.OUT. I didn't take a single clay class in college and only made a couple of pieces in high school. I managed to melt down a kiln, explode hundreds of pieces and even drop my share of masterpieces. Despite all of that, after teaching art, clay and kiddos for over 20 years now (and having written a book on the topic!), I feel like I can finally share my (semi-limited) wealth of knowledge on all things clay!
While my book was written for children who don't have access to a kiln, many of the projects can be used with kiln fire clay! 
Over the last three weeks, I have shared everything I know about kiln fire clay on my podcast! It's so much...that I had to break the series into three episodes just to squeeze it all in. So, if you'd like to take a listen here, here you go:


But wait, there's more...


AND just a pinch more...


In case you need a visual, as I often do, here's a video of some of the clay tips I mentioned. For the complete blog post, you can visit here. 
 More details on my favorite tools and how I set up for clay in the video and my podcast!
Part 3 of this series is all about glaze and glaze alternatives. If you'd like a video with more, check this one out:
The blog post with more details on glaze can be found here. 
And if you need a visual of the clay projects I mentioned or just some clay project ideas, then check out this post with my very favorite clay projects! Have fun! 
 photo signature_zpsd10b3273.png
Read more »

Thursday, May 23, 2019

2019 Art Show: The Pirate Gallery!

Now that the art show dust has settled and I'm able to have my life back (like I have much of one in the first place), I thought I'd share our art show with you! I've been giving a ton of sneak peaks over on my Instagram...but have not really given a proper tour. So, let's get started! I created a video tour of the portion of the art show...I hope you enjoy it!
I know the video tends to sweep over the projects and displays so I thought I'd share an overabundance of photos here. Sorry not sorry, y'all. This show was epic!
The theme of our art show was Pirates! That's right, we had a Pirate Art Show and it was easily the biggest and bestest one yet. I cannot wait to share with you all of the details that went into this show...but there is so much that I'm going to spread them over the course of several blog posts. To summarize, our art show was a showcase of three galleries: The Pirate Art Gallery (which I'll be featuring in this blog post), The Glow Gallery (our first black light gallery that was a HUGE hit!) and our Grade Level Galleries which feature every work of art that the kids have created all year long. 
My art room, shown here, was the Pirate Gallery. Each year, I use my art room as a gallery to feature our 3-D projects. You can see what last year's Super Hero themed gallery looked like here, here and here
This display is one that was seen upon entering my art room. Normally, this area is used as our "early finisher" area with a foam rug and lots of building activities such as blocks and sculpture toys. About a month before the art show, I packed up the carpet and started prepping displays in that area. This first display showcases the work by all of my fourth graders and two classes of my first grade. 
My fourth graders created these Coral Reel Relief projects from kiln fire clay. This was a one hour clay project that they totally rocked. I've not had a chance to share the lesson details or a video with you but hope to very soon. Instead of glazing these, I decided to have the kids use metallic craft store paint. I started by dunking the bisque fired pieces in diluted India ink (any brand works great) and having the kids paint them with inexpensive craft store paints. The results were so pretty!
 I cannot wait to share this lesson with you!
Mixed amongst the fourth grade pieces were the first grade fish! You can find the clay lesson for the fish here, complete with video. While our theme was pirates, I also added a lot of ocean life projects too. 
The fish were glazed and had to be fired on metal stilts as they were glazed on both sides. The base was dunked in diluted sand-colored paint and the kids painted the bases with the same metallic paints as the fourth grade pieces. Then I had the pleasure of gluing together with a hot glue gun and a chopstick!
At the bottom of the table are the fourth grader's Pirate Ships in a Bottle...another lesson I'm excited to share with you soon. More closer photos in a moment...but let's move on from here and over to the next couple of displays. 
I created these giant banners a month before the art show. I plan to tell you how but here's a little secret: they were easier than they look. In a future post, I'll also share how I hung these to the wall. This was a great way to add more excitement to the pirate art show AND hide that big mess of an art room behind it. 
Under the treasure chest banner was a display of my second grader's treasure chests! This project was easily everyone's favorite and I'm looking forward to sharing it with you. These second graders were STOKED to take these home.
The treasure chests were created from boxes covered in plaster and decorated with Model Magic details. We even created "gold" coins from scraps of cay and metallic paint. Each student got a "loot bag" that I stamped with a Jolly Rodger. I just happened to have a bunch of draw string bags in my stash so that worked out perfectly.
My third graders created two clay projects, one of them being these pirate ships!
 The ship lesson is actually one adapted from my clay book! You can scoop up my clay book here...it's written for kids who don't have access to a kiln. So if you are a kilnless art teacher, this book is for you! BUT many of the lessons can also be used for kiln fired clay. So it's an equal opportunity book. 
 The ships were also dunked in a terra cotta colored paint and sparkle was added with metallic. 
Sails were created from...can you guess? Toilet paper tubes! The kids had to hole punch through the tube to slide the straw down. I had a stash of paper straws in my closet for us to use. I did have to hot glue the sails in place which didn't take too long. 
Around the corner from the other displays was this one. This display featured the work of my second and third graders. 
My second graders, in addition to creating their treasure box sculptures, they also made these Pirate Parrots! These are pinch pot birds with fun dangly legs. 
Some had made their parrots with eye patches, pirate hats, you name it. Each had a wonderfully fun personality, just like the artist!
 Third grade, in addition to their pirate ships, they also made these coral reef relief. 
 These were created similarly to the fourth graders pieces but on a smaller scale. They were also painted in the same manner. 
When finished painting, the kids used Twisteez wire and beads to create a hanger for their piece.  
Around the corner, we had more second grade treasure chests, more first grade fish and more third grade pirate ships.
 Fourth grade also created these ships in a bottle which were a lot of fun. We used cardboard recycled from the cafeteria, painted papers and Model Magic for the boats. More lesson details to come!
 This project was a big hit with the kids!
 A lesson that I'd definitely do again. 
To display, I simply hot glued them to the bottom of the paper table cloth.
The last displays I'm sharing featured the work of my kindergarten, more treasure chests by second grade, more pirate parrots by second and some fish by first. 
My kindergarten actually created two clay projects...one was displayed in the glow gallery and I'll be sharing that in a future blog post. 
 This is a clay project from my book also! I've been doing it for years with my kindergarten kiddos and it is ALWAYS a success for each child. Gotta love that!
 Thank you for joining me on this tour of the pirate art gallery! Be sure and pop by at the end of this week...more videos and tours to come!

 photo signature_zpsd10b3273.png
Read more »