Showing posts with label vintage dress. Show all posts

Tuesday, August 29, 2023

Sew a Dress from a Vintage Pattern with Me!

To know me is to know that I really love fashion. Particularly, vintage fashion. There's just something about that 1950's fit and flair that gets me. In fact, vintage sewing patterns from the 1950s are what got me into sewing in the first place. I found a stash of patterns on a visit to the thrift store in college. Even though I didn't know how to sew or even own a sewing machine, I bought all the patterns and just stared for hours at the pictures on the front of the pattern envelopes. 
It wasn't until YEARS later that I got a sewing machine and even more years after that when I finally learned how to sew. And I really don't know why I waited so long! Sewing is not rocket science. Especially these days with pattern companies doing a great job of breaking the steps down and folks on YouTube sharing all of their stitching knowledge. 
So when I set about making this dress, I decided to film the process. From my big mistake of not taking the print into account when cutting out the pattern pieces to not following the directions and making the bust too large. I packed as much of it as I could into a video and you can find it right here:

And if you want a tour of my sewing room, you can check that out here:
Gotta love it when it's tidy!

I know what you are thinking: isn't it a little early for a Halloween themed dress? Well...we are going to Halloween Horror Nights in Orlando this weekend so...I don't think so! 
And I gotta say: I've not sewn a dress in A LONG TIME (I think maybe the last was a dress I wore for an art show two years ago!). It felt good to get back into my sewing room again. And I've got a couple more dresses underway so stay tuned! 


photo signature_zpsd10b3273.png
Read more »

Tuesday, June 23, 2015

DIY: A(nother) Monet Dress

If y'all follow me here, then you've seen the snaps of this Monet dress in progress. It's my second tribute to ole Monet (that was more of my spring line and what you see here is from my summer collection [I'm hoping you read that in your most uppity voice as that's how I typed it]) and it seemed just the thing to stitch up on these 90 degree/boiling-inferno/hotter-than-the-underarm-of-a-construction-worker days we've been having here in lovely Tennessee. 
By the way, someone once asked me why I'm so smiley in my DIY photos. It's not so much a smile of happiness as it is surprise. Like, "Holy crap, y'all! Can you believe I made this?! Like, with a sewing machine and not a hot glue gun although, at times, I think that mightah been easier!" Therefore, I smile. 
I used my trusty vintage McCall's 6221 (which is available on etsy, y'all! It's a simple dress and so cute. Git yerself here and scoop it up!). This is my third time sewing with this pattern. You can see my other attempts here (OMG, I totes forgot about those cat shoes!) and here (that time I almost burned the house down with...banana bread. Sigh). I even lined this dress because, hey, I was feeling fancy. And the pattern makes it so simple and-and, I feel like a grown up sewer when the flip side of my dress looks as snazzy as the outside. The fabric, sigh, isn't it presh? I picked it up from Joann's a while back. I was just there the other day and they still had some. It's out on their website but I bet if you called their stores they could help ya out.   
I did a full 30 seconds of googling in an attempt to find what Monet painting the print was inspired by. The palette is closer to that Cliffs at Amont, 1885 painting on the left although the theme looks more like that dealio on the right. Maybe I should find out zactly before I wear this to school and introduce Monet to los kiddos.
 SooooOOOooo, in true Cassie-fashion, I got ALMOST done with this dress and was all, meh. I don't need no stinkin' bows. But I forced myself kicking and screaming to add them. I'm so "almost to the finish line, think I'll break for a Twinkie", it's kinda pathetic. But not this time! And I'm happy I did because, BOWS ARE ADORBS. 

Except these bows have this bad habit of tickling the back of my upper arm. They are in a weird place and I'm constantly swatting at myself. Which doesn't warrant weird looks from strangers AT.ALL.
Yeah, pretty much. 
I shared with Asha today my new dress as she's my only company. This was the reaction I got. And I wasn't even swatting at myself! Such a harsh critic. 

Meanwhile, in Asha-land, here's how she pictures herself in a Monet...
Reality is, that crotch-licker would prolly look more like this in a Monet (by the way, if you've not seen 17 Classic Works Improved by a Fat Ginger Cat THEN YOU'VE NOT LIVED, FRIEND). 
In other news...I starting filming some short clips for our Skirt Sew Along (you can join here for minute-by-minute updates [I kid. Try weekly.])! I'll be back later this week on how to read your pattern package in order to determine you size and what you need to purchase. I'm so excited about sewing with y'all! Until then!


 photo signature_zpsd10b3273.png
Read more »

Sunday, April 27, 2014

What the Art Teacher Wore #97 and Last Call for the Best Dressed Contest!

Feelin' Frida-ish Monday: I have a coupla after school art clubs, in those small groups, we have the most enlightening convos. One girl asked, "We learn about men artists a lot. Aren't there any girl artists?" I had already been thinking about how I'd like to introduce more contemporary artists next year (this guy does it all the time and has me inspired) but now I know that more female artists need to be thrown into the mix. So! What contemporary/female artists do you introduce in your art room? dress: thrift store; necklaces: Forever39, ahem, 21; belt: Anthropologie; tights: Target; boots: Seychelles 
I don't know what life is like on your end of the world but I'm sure it's crazy-busy. Especially if you are a teacher. End-of-the-school-year projects to wrap up, mountains of artwork to sort for our school-wide art show, let's-get-rid-of-this-stuff spring cleaning, the list grows by the day. So this week, I thought I'd share with you just some of the things we've been working on in the art room. Complete lessons on this here blog to come, but for now, you'll have to savor these sneak-peaks.

AND, just so's ya know, Wednesday, April 30th is the LAST CALL FOR THE BEST DRESSED ART TEACHER CONTEST! Yes, I'm shouting at you, that's how excited I am! So many of you awesome art teachers have sent me snaps that left me rolling in laughter (which is a good thing, I swear! Ya'll are the best!). 

What's the Best Dressed Art Teacher Contest, you ask? 
Well, here's the details:

Nominate yourself or an art teacher buddy!

Simply send an email to me at cassieart75@gmail.com with a photo of your best artsy look. High resolution photos preferred, please.

 Please include a short bio about the art teacher and what inspired the look.

Photos and bio will be shared on this blog on April 30th.

Open voting on this blog will end on May 5th and the winner will be announced May 7th!

The winner will receive a magical prize along with an interview on this blog.

So! what are you waiting for? Shoot me an email, you crazy art teacher, you!
So if I'm not found Buried Alive under the 400+ clay projects that the kids have created over the last coupla weeks, it'll be a miracle. These clay stars were created a couple months back. Our original intent was to glaze them and "sell" them back to our parents with the proceeds going to charity. However, due to some personal stuff, that had to get placed on the back burner. But now we're back! And I just knew I'd never be able to get 400+ stars glazed and fired along with all those projects. So I lurked the interwebs for a possible solution and saw something about coloring clay projects with crayons...(well, construction paper crayons were recommended but, in the state that my room is currently in, there was no finding mine)...

We painted over them with watercolor paint (I asked that the kids pick just one color, por favor) and viola! Colorful and completed in a snap! More details about these stars and how they were created in an upcoming post.
Bump-It Up Tuesday: So I had a hair appointment after school on Tuesday (not that you'd ever be able to tell I got my hair cut. I'm such a chicken, I always just get a couple inches taken off. So boring!). Once seated in the hair-cuttin-hot-seat, I proceeded to unravel the following from my 'do: 11 Bobby Pins, 2 Pink Bows and 1 Extra Large Bumpit. My hair dressers reaction, after regaining her thoughts, "Ohmigawd, IS THAT A BUMPIT?!" I live in the South, ya'll! It's Big Hair or Die! shoes, sweater and top: thrift store; skirt and belt: Pin Up Girl Clothing 
Speaking of clay projects...my 3rd graders created these Chinese-inspired clay dragons. Ya'll, this project was such a hit! I would easily do this again with all grade levels. The creativity was off the chain crazy! I can't wait for them to glaze them so I can share the easy-peasy lesson with you. 

Some of my 4th grade students created Panda's with Personality (oh boy, ya'll. Do they ever have personality!) while another group created Asian elephants inspired by the painted elephants in India. Many added jewelry, fabric and flowers to their elephants. I have a feeling these are going to be the most colorful elephants ever.
So Stinkin' Tired Wednesday: Seriously. The end of the school year is near...and my work load only builds as I'm sure yours does as well. This photo was the only one I managed NOT to be yawning my head off in. dress: vintage, thrifted; tights: Target; shoes: Dolls by Nina
After finishing off our clay projects, We Returned to Our Normally Scheduled Program, Already in Progress (said in that officially dorky voice). Which means my 4th graders added either bamboo, cherry blossom trees or pine trees to their large (12" X 18") watercolor painted backgrounds. Lesson to come, promise!

What is Wrong with You, Thursday?!: Wow, this outfit was a let down to the folks, both big and small, in my school! The 4th grade decided that they had never seen me in "short shoes" (um, I'm guessing that means flats?!) and my librarian buddy dubbed this a "too normal" of an outfit. Humph! Time to get outta these Short Shoes and step up my Non-Normal game, I guess! top: Target; skirt: vintage, etsy; shoes: gift; headband: made by me; necklace: The Paper Source
Meanwhile, in 3rd grade, we excitedly finished these Ming vase inspired still lives. We spent a long time on this project but learned so much...I'll be sharing this lesson later this week. Stay tuned, ya'll!

Hittin' the Town, Friday: Almost everyday after school, there's something going on. Whether it's an art club or meeting up with buddies, I'm always running. I had decided that, with art show approaching, I should spend more after school time in my art room...but I just can't! Not with buddies that I need to chat and shop with. Tamara, thank you for snapping this photo at my happy place -- Anthropologie (where I walked out with a not-at-all-necessary $298 dress for $26, eeee!). dress: made by me (go here for the craziest food-processing-foot-cutting story everrr
My 1st grade friends made clay koi fish...and while those dry, they are creating these koinobori (Japanese for Carp Kite) for May 5th which is Children's Day in Japan.

I actually picked up these die-cut paper fish years ago through Roylco and never got around to having the kids create them. This time it worked to be the perfect tie-in, as well as a super short project while our clay drys out. I'll share with you more about this project soon. Ah! So much to share with ya's!


Read more »

Wednesday, July 31, 2013

DIY: Butterick, Who's Yo Mama?

You ever have one of those annoying sensations that just won't go away? You know, like a little tickle in the small of your back that you can't seem to reach or one of those rouge runaway hairs you feel somewhere on your face but you just can't find. OR, this one's the worst, what about a wedgie that manages to get more friendly than a proctologist?

 Oh, oops. Did I just go too far? Or maybe too close to home. I promise I didn't know this post was gonna head south so quickly when I began. My bad.

But I tell you I was going somewhere (other than south) with that there intro. Because this Red Hot Vintage Floral Fabric has been that unreachable itch, that fantom hair, that borderline sexual harassment wedgie all summer long.

Seriously. It started way back in May when I was working on my Star Wars dress. I spied this lovely piece peaking out from my Mount Fujiyama o' Fabric. And it was all, "Hey! Look at me. I'm gorgeous." and I'm like, "Wow, you are pretty sweet. But doncha think calling yourself 'gorgeous' is a little, I don't know, arrogant?" To which the fabric was like, "Look, if you don't think you are up to workin' with somethin' as amazing as me, that's fine. But let's not pretend I wouldn't make a pretty smokin' dress."

And that there sparked the unrelenting urge to find the perfect pattern to marry with this beautiful, albeit a pinch egomaniacal, fabric. 

(BTW, have you noticed just how much time I spend talking to inadament objects? Dunno what I'm talking about? What about here, here and, oh man, here. Geez, I need to get out more. Or start taking my meds. That'd probably help.)
After some serious online pattern digging, I found The Perfect Partner for my Red Hot Vintage Floral. I mean, look at that cut, that detail at the neckline, that big-drapey-hankie-thingie. It was like a match made in sewing heaven.

Then I saw it. The name of the maker at the top of the pattern envelope. And I went all Jerry Seinfeld and spit out the words with such venom and hate that I almost scared myself:

"BUTTERICK!"
That's right. The above is an accurate portrayal of my relationship with Butterick. You might recall my ever-so-slight (ha!) frustration with said pattern-maker here. In fact, I do believe I made that scrunched-up, buck-toothed mouse face complete with Wicked Witch of the West hands more than a dozen times whilst attempting to solve the riddle that is a Butterick pattern. And every time it stared right back at me with those dead-Newman-esque eyes and that smirky smile. Oh, how I loathe thee, Butterick.
(BTW, not that it would ever happen anyway, but I'm almost positive that these blatant Butterick-hatred posts are gonna make it so said pattern-making company never contacts me for an endorsement. Whatcha think?)

My frustration over the vaugeness of the directions became so great that I even started fantasizing about tracking down ole Mrs. B and asking her why, just why were her designs so great and her directions so bad. And then I realized that this pattern is super old and that I'd probably have to find Mrs. Butterick Junior if I wanted any sort of contact with my nemesis. And THEN I realized that she'd probably be just as cryptic with directions to her house (because I wanna see this evil face-to-face...which makes me think I shoulda titled this post "Butterick, WHERE'S Yo Mama?") as her maw was with sewing steps: "Oh, you know. Just drive a while and then turn at that stoplight. The one on that corner. It's a white house. On a street. With a yard. You'll find it if you're not an idiot..."
BUTTERICK!

Or, rather: BUTTERICK, JUNIOR!

One particularly difficult evening whilst attempting that big-drapey-hankie-thingie, I decided to google this pattern and see if anyone out there might have a word of advice (or an address, perhaps). And that's when I found her: Professor Pincushion. In this 80 minute tutorial, she walks you through the entire pattern and explains every single step. It was like the heavens opened up and I could hear the angels sing (which, it turns out, they like to sing G'n'R. I KNOW RIGHT, how rad is that?!) That's not even a joke, she's really that awesome. AND she's got these amazing sparkly gold fingernails that she  uses to accentuate her explanations which I have likened to Glenda the Good Witch. If she were only a set of nails.
Now I gotta admit, I still had to watch her create that big-drapey-hankie-thingie about two or twenty times before I got it. Which made me think that ole Prof Pincush could really make it big if, after a dozen replays, she could just reach her Glenda nails through the screen and do the hard stuff for you. Seriously. Are you listening, Professor? Because if this idea appears in your next tutorial, Ima gonna expect some royalties.
All moaning and groaning aside, I am pretty excited about this dress. Even with help, this pattern definitely was a challenge that put my severe lack of skills to the test. I still can't believe I managed to pull it off. With a whole lotta thanks to Professor Pincushion. And now that that annoying wedgie is finally released (ewww, sorry! But I had to do some sort of tie in with the beginning of this post. It's called Closure, reader. Deal wit it), I've two other dress-itches that I gotta scratch. Both involve amazing art-teachery fabric that I'm super stoked about. AND speaking of Super Stoked...
Me and my nutty outfits have found their place in SchoolArts Magazine! If you are an art teacher, then you know this is one of the best art education mags out there. AND, if you found this blog because of the magazine, welcome! I promise this blog is normally about much more than wedgies (haha, no it's not). For diy-details on the outfits above, just click on the following linky-loos: Applique Pencil Skirt; Gnome Dress; Embroidered Eiffel Tower; Paris Dress; Painterly Dress; and, lastly, Crayon Felted Hat and Skirt (with painted shoes!).

Stay tuned for some upcoming photos of my nearly complete art room!


Read more »

Monday, June 24, 2013

DIY: A Bonfire of Banana Bread and ... a Giveaway (Now Closed)

 So wouldn't you know the moment I start doling out recipes like I'm Martha-Flippin-Stewart, I turn my house into a Bonfire of Banana Bread. Not familiar with such a thing? Well, lemme tell you how the pros do it. First, you start with the batter and the only teeny tiny bread pan you have on hand. Then you fill the bread pan just half full (because the recipe says so) but that looks like an entirely too empty pan so you decide to fill it to the rim. Because you hate to see wasted space. AND because you only have one teeny tiny bread pan (you really should get more pans. Just sayin'). Then you throw it in the oven and almost forget about it...until that distinct burnt hair smell reminds you...

 Oh, crap! The banana bread! 
When I threw open the oven door, it looked like a bomb had gone off. There was smoke, fire and bubbly melty banana bread everywhere (okay, when bombs go off, I'm guessing there's not bubbly melty banana bread unless the bomb goes off at a Banana Bread Factory but that's just ridiculous. What kind of crazy person would blow up a banana bread factory?! Everyone loves banana bread! Well, they did until they saw this photo). I managed to salvage this wee loaf with what looks like fake vomit stuck to the side. It was at that moment, hubs walked in. And this happened: 

Hubs: I'm hungry...wait, what's that smell?

Me: Um. Banana bread...?

Hubs: (noticing said bread on counter) You mean Blackened Banana Bread? 

Me: I got the recipe from Bon Appetit!

Hubs: You know, when I look at Bon Appetit, it's funny, the food looks just like that.

And then he insisted on taking a photo of my gourmet cooking and that I share it with you on this here blog. So that you may never get a Banana Bread Hankerin' again. You're welcome.
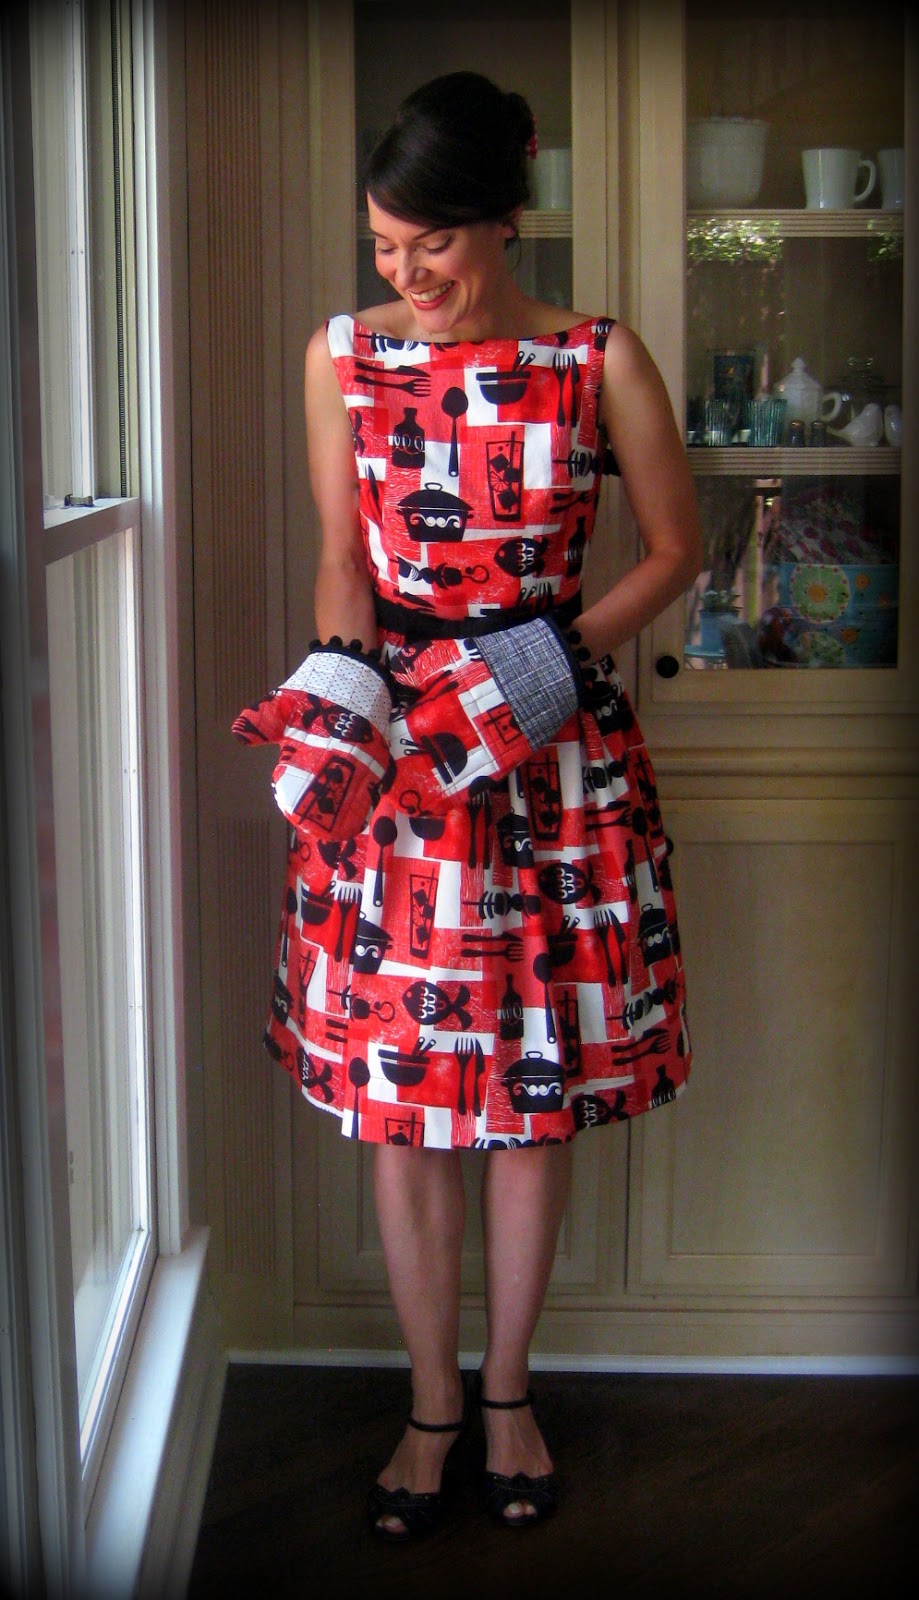
Remember this fabric? Because it has an early 1960's vibe to me, I decided to pair it with this 1962 dress pattern sent to me from a friend (thanks, Kristin!). I love the neckline, the bow belt and the bows at the bottom of the back straps. Check out this amazing dress in the same fabric sewn by The Girl with the Star Spangled Heart.
But, wait, what was that other thing mentioned in the title of this post? Did someone say giveaway (and is this someone currently talking about themselves in third person? Someone is creepin' me out!)? That's right, you read the title of this post correctly, I'm givin' away stuff, Oprah-style! ... except I'm not going to give you a brand new car. Sorry. Not in my budget. But what I got is even better (no it's not, just trying to make you feel better) so don't you dare scroll all the way to the bottom of this post to look for the giveaway details.* Because if you do, you'll miss all of the fascinating tales of this here dress and those thar oven mitts.**
That forced-grin photo on the left kinda reminds me of the day I wore my thong wrong. Which takes skills so don't act like you aren't impressed (and that you haven't had to pause a second before slipping into your thong. I mean, there are just too many entry points and too little fabric). I noticed that day that I kept walking crooked, bumping into anyone that was crazy enough to be near me. A trip to the bathroom lead me to discover my problem (well, one of them): I had one leg in the leg hole, the other in the waist hole and my waist in the other leg hole. Needless to say, it was as pinchy and uncomfortable as I look in that photo on the left. Is this too much information? Am I over sharing? Let's change the subject: Look At Those Adorable Bows! (...did that help...?)

So this pattern was pretty rad...and it introduced me to a series of firsts. Like lining. I've never lined a dress before and look at that photo below. Look at it! This is my first dress that just as pretty on the inside as it is the outside! I'm considering wearing it reversed just so people can admire how stinkin' awesome it is. They'll be all, "Dude, your lining is so rad!" and I'll be all, "I know, right!?" and that's pretty much where the conversation will end because I'm a pretty sucky conversationalist. And, let's face it, if we're not talking about me, I ain't got nothing to say.
Another first? Putting in something called a waist stay. When the pattern called for that, I was all "whah, huh?" Then google informed me that it was pretty much just a ribbon that kept my gathered waist from ungathering while covering up those unsightly gathers.
Just a view of the back. And those bows, gah. I loves 'em. So much so that I even made the bow for my hair using the same pattern. It's super easy. One of these days, I'll show you how. By the way, I got off easy as this dress fits like a glove! And by "glove", I don't mean an ove-glove. Because that would be too big. No, man, this was a no-alterations needed pattern. Which is great because I can't even put on a thong correctly so altering would be outta the question.
 When I went to the grocery today to pick up the ingredients for that bread (ahem), the checkout dude gave me the up/down (you know, when someone looks you over from head to toe with a "what the h***?" look on their face) and said, "Do you dress like that everyday?" And for some reason, my mind immediately thought, Oh no! He knows I'm wearing my thong wrong! and I was tempted to blurt out, "No! I just made a mistake! There are so many holes and so little fabric, it's confusing. You would NEVER understand!" And then I realized he meant my dress and I was all, "Yeah...I guess." I've never left a grocery store so quickly in my life.

 In the middle of dressmaking, I decided this fabric just had to become a set of pot holders. I mean, look at it! It's screaming, "Make me into a pot holder right now! After you make me a sandwich!" (geez, this is exactly what that other fabric said to me. Must be a trend.)


 Wanna make some pot holders? I borrowed heavily from Denise Schmitt's Quilts book. But I did some tweaking and thought I'd share my version with you. You know, because this blog post isn't already long enough. 

To start, I sewed two contrasting fabrics together and pressed the seam open, as seen in the photo on the left. Because I was making two mitts, I created four of these panels. I then pinned the pot holder parts in this order: panel, quilt batting, heat retardant fabric, inside fabric. These were about 9" X 11" in size.
 Then I set my machine on a basting stitch (so that the stitches would be really long) and sewed a series of vertical and horizontal lines. The beauty of her pattern is that you don't have to sew straight lines. They can be as wonky as me walking in a crooked thong.

 Earlier, I had traced my fave oven mitt (which is currently covered in banana bread goo, no lie), added about 1/4" all the way around and cut out the template you see on the left. I drew the horizontal line to match up my two fabrics. The template was placed on the sewn fabric and cut out. To finish the bottom edge, I used quilt binding tape that I held in place with Stitch Witchery until I could stitch.
 I wanted pom-poms on the bottom of my mitts, so it was at this point that I sewed them to the wrong side of the mitt. After that, I pinned the two mitts wrong sides together and sewed around them with a 1/4" hem.
 Right before turning them right side out, I clipped really close to the inside of the thumb. Turning them right side out wasn't easy...so it's important not to make your mitts too small. Then they'll be a royal pain to turn. When turning these, they reminded me of the Hamburger Helper oven mitt. Makes a great meal. Or so I've heard.
And the mitts are finished! But enough about that...let's chat about the GIVEAWAY! 


Here's the deal: I have two yards left of this Michael Miller fabric and I wanna give it to YOU! Along with this little vintage cookbook, because, let's face it, I really shouldn't be cooking. So here's how to enter: 
  • Leave a comment below and tell me what you'd create with this fabric. I'm dying to know! And I'll probably end up stealing your ideas and never sending you fabric...kidding! But only about that last part.
  • For extra bonus points, I'd totally dig it if you'd follow my blog. Because you need more Burnt Banana Bread blog posts in your life. And stories of thongs. Oh, forget about it. I wouldn't follow this thing either! (Seriously, you don't have to become a follower to enter).***
 How does that sound? I'm excited to hear from you! I'll keep this giveaway open until Monday, July 1st. AND it's open to international commenters too. On that date, I'll throw all the names into a jar, pull one, announce the winner and send this good stuff your way. Chat with you soon!

*Ha! You DID skip to the bottom! Well, the details of the giveaway aren't here. So get yourself back up to the top and finish reading! Geesh.

** Ugh, I'm bored by this post already, aren't you? WHAT?! You are?! That was a trick and you, my friend, you failed. No free stuff for you! Now go leave a comment so I can "accidentally" forget to put your name in the jar.

***Yes, you do...****

****Seriously, you don't. Now go away and leave a comment.
Read more »