Tuesday, January 1, 2013

12 Favorites of 2012

Favorite Memories: Star Wars Weekends at Disney. We had so much fun that plans to return are already in the works. This dress I crafted from my childhood bedsheets got some serious attention with complete strangers asking if they could snap photos of it. Sketches of the next SW dress are underway. 
 Happiest of New Years to you! I hope you managed to ring in the new year in style. And, if your style is anything like mine, you were in your pj's fast asleep wondering who was blowing up your cell phone at midnight. I know, I'm such a party animal. 

Since I woke up feeling all reminiscent-y, I thought I'd share with you my 12 faves of 2012. I started this blog back up again a year ago as one of my resolutions of 2012. I wanted a place to share my DIY's, the art projects of my students, what I wore and, just, life stuff. While scrolling through my blog this morning, I picked out some of my favorites and thought I'd share them with you. So, here they are, 12 of my Favorite Memories, What I Wore, DIY's and Art Class Projects of 2012.
Favorite Memories: A Day Trip to Graceland: I have been a big follower of both Quincy and Emma's blogs for a while. So when the stars aligned for us to all take a day trip to Memphis, I was thrilled. One of the funniest things that happened was at the end of the tour, we decided to have our photos taken. Suddenly, a newspaper dude came up and started snapping away. And then some publicity guy for Graceland. And then complete strangers who asked to have their photos taken with us. It was a hilarious moment I won't soon forget.
Favorite Memories: A European Vacation: Well, for me anyway. Hubs spent most of his days working while I tooled around Germany in my VW exploring cities, eating entirely too much gelato and shopping for souvenirs. We did spend several days vacationing in the Netherlands with Amsterdam being my favorite
In the Art Room: Fantastic Frogs: Our clay theme for the end of last year's school year was Monet's Garden and these frogs created by my third grade artists were such a hit. I love the different personalities of each frog and how much it reflected that of the artist.
In the Art Room: Leaf Printing. I learned about this process from a fabulous art instructor at the Tennessee Arts Academy. The results of each print was just breath taking and such a wonderful learning experience for positive and negative space, printing, texture and nature. Complete details of the project here.
In the Art Room: Pouch Weaving. Not to be confused with purse-weaving as the boys would never go in for this project. And it turns out that this one is always a hit, especially with the boys. Each year my fourth grade students complete these pouches as a rite of passage. I wrote out the many steps to completing these pouches in my weaving posts. You can find the first installment here.
DIY: The Blue Christmas Light Up Dress. One of my resolutions for 2012 was to sew my own clothing. Before this year, I'd only sewn one dress completely on my own. This year, I sewed nine! This light up dress was one of my favorites, from it's adorable fabric to the pattern and, most especially, the lights at the bottom (which was my genius hubs idea!).
DIY: Memories of Marilyn. I began creating these ceramic paper doll dresses after finding a bunch of photos of my maternal grandmother Marilyn. I wasn't sure what I was going to do with the dresses but I created about a dozen of them and shared a tutorial here. When a friend mentioned putting them in a shadow box with the photos that inspired them, I knew that was the answer. You can see more of the end result here. I think my grandma Marilyn would have loved this tribute to her.
DIY: Pencil Skirt and Shoes. Okay, I'll just go ahead and admit it: I've got a little bit of an applique addiction. It's kinda my version of be-dazzling something. Got a dull skirt? How about a blank apron? Need to jazz up that boring dress? Just applique the crap outta it! And you'll notice I've got the same issue with painting on shoes. Oh well. My students loved this end result.
What I Wore: Madeline for Halloween. Since the kids were learning all about Paris, France at the beginning of the school year, I decided to go all Madeline on them. This tied in so nicely with the beautiful bulletin board created by one of my practicum students. How I miss those awesome girls!
What We Wore: Dressing like Monet's Garden meets the 1950's. I had the pleasure of having one of the most incredible student teachers this year. We shared the same goofy brain and often dressed alike to teach our lessons. Her middle school students are very lucky to have such a talented and dedicated art teacher.
What I Wore: Read Across America Rainbow. Don't let my expression fool you, you know I'm lovin' this ridiculousness. This photo was taken during Read Across America week and on this day it was silly hat day. The best part about this hat was that I managed to cloud slap anyone that got to close with just the turn of the head.
  Another thing I have loved about this past year is getting to know so many of you! I have been thrilled with your comments, words of encouragement and the discovery of so many other like-minded folk. Thank you for following my blog and my dorkiness. I truly appreciate all of you. 

Happy New Year!


Sunday, December 30, 2012

What the Art Teacher Wore #48

Christmas in the Smokies: I managed to wear this almost everyday while on our vacation in the Smokey Mountains. Not my best look, but fishnets and heels just weren't gonna cut it on these trails. backpack: borrowed from a friend; jacket(s): I'm wearing two with two more shirts underneath. Mountain Hardware; scarf: Urban Outfitters; hat and fleece headband: courtesy of hub's work, Meinl; cargo pants and long johns: army surplus; sneakers: New Balance
Well, happy post-Christmas/pre-New Years Eve to you! I come to you completely overdressed in layers of clothing and under dressed in overall look. When hubs and I decided to spend Christmas in the Smoky Mountains, I did pack up some stylish duds but they never left my suitcase. Because everyday's agenda involved a hike up some mountain or another, I opted to be comfy and warm. So you'll have to forgive my lackluster look and suffer through my vacation photos aplenty. Enjoy!
The Smoky Mountains, Gatlinburg, Tennessee. We left for Gatlinburg last Saturday morning. We took our time and stopped by Knoxville, Tennessee for shopping at two of my favorite vintage shops in the area, Four Sessions Vintage and Nostalgia. Lunch at The Tomato Head was delish. Our hotel in Gatlinburg was pretty high in the Smokies. This was our view of the mountains the following morning.
After leaving Knoxville, we managed to make it to Dollywood in time to meet up with some friends, see a couple shows and ride some rides. Knowing we'd be back for more Dollywood-tasticness, we splurged on some annual passes. Normally the hubs and I take pretty poor photos but these aren't too shabby for us.
Okay, I was trying to snap a shot of this sculpture outside of the Wild Eagle ride because I thought it was pretty cool. What I didn't realize at the time was that it appears this poor unsuspecting dude is about to become an eagle snack. It cracks me up each time I see it! A side note: the moment they pulled the much-too-tight-for-my-taste harness over my head, I asked to be removed from the ride. The young guy strapping everyone in gave me a raised eyebrow and a "Really?" Knowing that I'd have a freak-out-fest if I was not released immediately, I gave him an, "Um, yes. Really. Please! Right now!" Needless to say, that's all it took. So, sorry, can't give you a review of the ride!
The day after our Dollywood adventures and my "get-me-off-this-ride" meltdown, we spent the day hiking. It was a chilly morning and much of the trail was covered in a 2" sheet of ice. But the huge cave at the end of the Alum Cave Trail was worth the slippery slopes.
At least three bridges made from giant logs were apart of the trail. At the end of this bridge, you had to hike inside the cave and climb a large stone staircase. Being in the shade meant that each step was a sheet of ice. I took to crawling up the steps and hoping hubs would break my fall if I fell.
Ya'll see that ice? You had to watch your step and your head. As the day went on and the sun came out, icicles were breaking and crashing to the ground. It was pretty scary as there would be no warning, just a sudden SMASH! on the ground. We managed to scramble up this slick trail pretty quickly.
At Alum Cave. The cave had a very large overhang which kept the ground here dry. It was still very chilly but the workout from the hike had us stripping off our layers. The overhang had huge patches of ice sliding off of it so we didn't stick around too long.


Hubs snapped this photo of me slipping and sliding across some ice. He likened it to the infamous photo of Big Foot. Sadly, I do see some similarities. Those hairy legs look especially familiar.
Remember the view from the outside of our hotel? Well, this would be the inside. I know, don't look at it too long. The funny thing is, both hubs and I are afraid of heights. So when we'd get off the elevator, we'd walk as far away from the overlook as possible. He was brave enough to snap this one photo for me. "Maybe you should take another to be sure you got it," says I. "I'm sure it's fine." Translation: You ain't gettin' another photo, lady.
The following day, hubs and I met up with our friends and decided to hike the Chimney Tops Trail. It was a pretty intense 2.5 hike straight up a mountain. My out-of-shapeness was really beginning to flair up about midway through the hike. I had to stop and tie my shoes a lot, if you catch my drift.
The view from the top. Only 20% of the folk that take on this hike actually make it to the top of the summit. The map said it was a "scramble" to the top which, I learned, has nothing to do with eggs. In hiking terms that means something like, "there ain't no trail, just a slippery vertical climb." Sorry, that's not my bag. Hubs, however, is now a proud member of the 20% club.
And thank goodness for that. Look at these beautiful photos he snapped from the top. You see that cloud at the top of the frame? Kinda gives you an idea just how high up he was.
Tennessee is such a beautiful place.
Christmas day found hubs and I taking the driving tour of Cades Cove and making our way back home. Tomorrow we are taking another road trip to explore more of Tennessee.
I hope you all have a safe and fun New Year! I'm sure to be spending mine with two of the biggest party animals I know, hubs and Asha the Cat. Thanks for dropping by and allowing me to share my endless vacation photos. I'll be back soon with a new Anthropologie DIY!


Thursday, December 27, 2012

DIY: Gnome for the Holidays

Ah! Giant Photo Alert! Just tryin' to make sure you can see the gnome-tastic-ness happening at the bottom of my dress. AND that annoying yoke thing that you can easily see put more wrinkles on my face and gray in my hair. I shoulda known anything called a yoke was gonna be trouble...guess the yoke was on me.
 Greetings from my gnome to your gnome! I present to you the latest in Crazy Art Teacher Style: The Gnome for the Holidays Dress. Please, make yourself at gnome as you read all about the trials and tribulations of the dress I worked on until the cows came gnome. And I promise you that will be that last of my home-meets-gnome idioms for at least a full 30 seconds. But that's all I can promise.
I'd like to have you believe that this dress was created for the children. After all, my wee artists are learning all about gnomes in art class (mini-gnome history lesson here) and I do love to dress the part.

But that "for the children" bit, that's just a complete lie.

One late night, whilst googling gnomes, I stumbled upon this Michael Miller fabric (from his collection so awesomely called Gnomeville) and I just knew I had to have it in my life and in my wardrobe. Because, in those quiet contemplative moments I have between one crazy art class to the next, I often think, "what is missing from my life?"

"Duh. A Gnome Dress."

While waiting for my fab fabric to arrive in the mail, I began plotting out my dress-terpiece. I decided to use the same Simplicity Pattern #1803 that I used on my Cuckoo Clock Dress and my Light-Up Blue Christmas Dress. Always a glutton for sewing punishment, I decided to attempt the yoke and cap sleeves for this dress. I felt for sure I was about to hit a fashion gnome run (it's been 30 seconds, right?).
And then the fabric arrived. All two yards of it. Oops. Turns out ordering gnome fabric in the middle of the night is not a good idea. After laying out the pattern pieces, I realized I could make the bodice of this dress but not the full skirt. But more on that later. 

For now, let's have a chat about the yoke. 

I'd like to summarize my feelings about the yoke in a little haiku I wrote one night while seam ripping for the umpteenth time. It goes a little something like this. Ahem:

For the love of gnomes
An art teacher makes a dress
Foiled! By a yoke!

Look, it's just a rough draft. I'm working on it.
To be fair, it wasn't the yoke's fault. I blame the author of the pattern that chose to leave out some vital steps. Having limited sewing experience, I am a strict step follower. So when this pattern just skipped several steps, I did too. And then the seam ripping commenced. When that became too annoying, I did a quick google search to find out what others were saying about the pattern. Several shared my frustration but then I read one that burned me up (read in your most annoying Nellie Oleson voice): "Oh, this is a great pattern for a beginner sewer."
Oh, gnome she didn't! After reading that, I snapped my laptop shut, stomped up to my sewing room, grabbed my seam ripper and went to town. Then I went about pinning the entire bodice together adding in the steps the author left out. When that worked, I unpinned the whole contraption and sewed it together. Yoke, you have replaced my hatred of sleeves. When it came time for the skirt, I decided to use my tried and true vintage Simplicity Pattern #8087. I opted for the skirt in view #2 but adding pockets from the other pattern. It's quite the hybrid of a dress.

Using two different patterns together had me nervous. I wasn't sure if the pocket thing would work and if the bodice and skirt would actually fit together. However, putting in that yoke made me bold enough to think I could do it. And it really was a snap. I opted to wear the bow of the belt in the back so as not to take away from my gnomies at the bottom of the dress.
The following day, when I wore it to school, the kids had great fun chillin' wit my gnomies.
Probably because we've been chatting about them for some time. Remember that midnight gnome fabric shopping spree I told you about? Well, I also picked up the two books on the left from a used book seller via amazon. The hilarious gnome book on the right is from my super Secret Santa at school.
And it turns out gnomes-disease is quite contagious. My sweet first grade artists have been bringing in these drawings since we began learning about them. They are currently creating a beautiful Black Forrest collage for their gnomes to call home. I'll be certain to share those with you soon.
Even my house is looking like Gnomeville from my Christmas tree (which is still up and will most likely stay up for entirely too long) to my knicky-knacks (thanks again, Secret Santa!). I do believe I have a new addiction.
Although, I don't think this is gonna be my "starter gnome" because I don't foresee too many more gnome frocks in my future. Especially with a yoke. However, since finishing this thing, I've updated my haiku. What's that? You wanna hear it? Well, (waving hand sheepishly) okay:

Yoke, who's yo mama?
Why, me and my seam ripper
And my wee gnomies.

Thanks for dropping by!


Monday, December 24, 2012

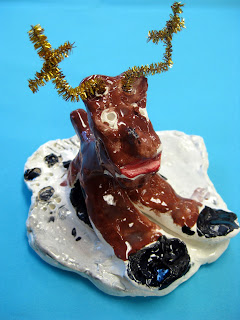
In the Art Room: Kindergarten Reindeer

Have you ever seen a reindeer that A.) Resembles Jay Leno and B.) Looks this cute resembling Jay Leno? I didn't think so.
Happy Christmas Eve to you! So the story goes that if you've been well-behaved, you'll be getting a visit from some chubby dude and his entourage of reindeer this evening. Lead by the one and only Rudolph, of course.

My kindergarten artists spent several art classes sculpting these reindeer masterpieces that, despite leaving me feeling as though it was not Grandma that got run over by reindeer but the Art Teacher, made me seriously proud. And, after one told me, "My mom is going to be so happy about my reindeer that she is going to say, 'Oh! Goodness that is the best little reindeer ever!'", I knew they were proud too.
How on earth did these five and six year olds create such amazement? With a half an hour, it really was nothing short of a Christmas Miracle. This lesson had some serious "Okay! Plan B!" moments so I thought I'd share with you how they were created. 
Our inspiration, of course. I've had this book since childhood. In fact, it even has my name written on the inside in my five year old handwriting.

For this lesson, we used the following:
  • Low fire clay
  • A stencil for the base
  • Brown, clear, white, black and red Stroke and Coat Glaze
  • Clay mats
  • Skewer sticks
  • Toothbrushes and cups of water
  • Ziplock bags and damp paper towels
  • A mountain of baby wipes
Several of my students put their reindeer together just as they would draw them: with their legs all in a row. 

I broke this lesson down in many days after trying to cram too much in during one class. When that lesson ended in tears (I managed to dry up before the fourth graders walked in), I decided to drag the lesson out even further. I'd rather give the kids too much time then to rush them. Being a super slow processor myself, I understand the need for lots of time. And tissues. Here's how I broke it down, yo:

On the First Day of Reindeer Clay, I gave to them one grapefruit sized piece of clay. I told them something crazy like, "hold your clay in front of your chest above your clay mat, drop it and pound it flat as a pancake." For a full minute the art room sounded like an elephant stampede with kid giggles throughout. Once flattened, the kids flipped their clay over to the smooth, not-pounded-on side and used their skewer sticks to trace the base shape. And that took us the entire art class, believe it or not. Each child was given a damp paper towel and a ziplock bag with their name on it. They were to "wrap their clay up in its blanket, put it in it's sleeping bag and say 'nightie-night'" until next time.
On the Second Day of Reindeer Figurines, I gave to them one piece of clay the size of a tangerine. We chatted about how many legs a deer has and I showed the children how to divide their clay into fourths. Twist sphere of clay in half and Viola! two pieces of clay. Twist other two pieces and Double Viola! now you have four. From there, they learned how to roll their clay into coils the length of their finger.
On the Second Day of Reindeer Clay, that really wasn't all, for the head I gave them one small ball. Once their coil legs were complete, they created a head. For one class, I tried to have them create all the coils, the head and assemble. That proved to be a reindeer train wreck. We just didn't have the time. Plan B for the following classes was to create all of the parts, wrap them up in a paper towel, gently place them on the base and place the base back into the bag until next time.

On the Third day of Reindeer Crazy, we had zero time for being lazy. The kids assembled their reindeer by "gluing" with the toothbrush and some slip to legs together for the front and two legs together for the back. These two sets were then glued together. Hooves were bent outward and assembled to the base. Lastly the head was added and our reindeer were kiln ready. Once dry, of course.

While the reindeer were drying, my other classes would come in and notice the reindeer. Except they didn't take them for reindeer. They'd say, "Oh! What cute dogs! Who made them?!" It reminded me of the story I read to the kindergarteners while we waited for some of our friends to finish sculpting, Olive the Other Reindeer. Like Olive, our little reindeer just needed some antlers to complete their look.
On the Fourth Day of Reindeer Craze, my little artists were ready to glaze! And I was so proud of their careful attention to detail.
"My Rudolph is a girl and she likes to wear a lot of red lipstick."
On the Last Day of our Reindeer Critter, our reindeer received his antlers made of pipe cleaner glitter! Now I was down to the wire on this, time wise. Normally, I'd expect the kids to create their own antlers, but between programs, field trips and assemblies, we just ran out of time. Thankfully, a very kind aide (thank you, Heidi!) and I managed to get them hot glued in just in time to send them home with the artists.
 I love the unintentional resemblance to Beaker on the left. Notice the sweet little black foot prints in the snow on the one on the right.

And there you have it! Just in time to guide someone's sleigh tonight. I hope you have a wonderful Christmas Eve and Day tomorrow. Enjoy!