Wednesday, January 2, 2013

DIY: Felting a Holey Mess, Anthro-Style

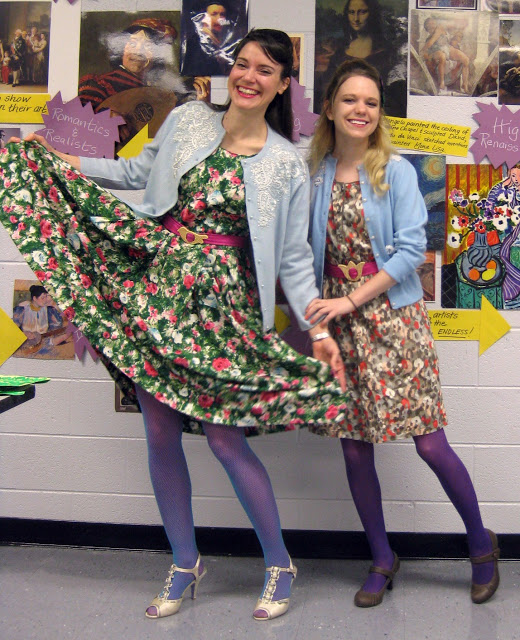
Hey guys! I'm updating this post with a link to another needle felting DIY I just completed...here AND one here...just can't stop felting! I don't normally stand around with my arms crossed. Unless I'm cold. Or I'm going head-to-head with a fourth grader and their attitude. In which case, one of my eyebrows are raised and my lips are pursed. Neither scenario is the case in this photo. I'm actually trying to show off my felt-y floral elbows.
Just to clarify: Anthro-Style is not at all similar to Gangnam Style. Least you be confused.

Anthro-Style is a way around paying through the nose for some adorable skirt/dress/sweater that you just know you could make. You can see my attempts here and here.

Gangnam Style is a way of dancing if you want to, well, have a female look at you as if you just ate your socks. You can see my attempts here and here (ha! made you look!).

I caught a bad case of Anthro-Style when I was at said store with a buddy. I spotted this sweet felted cardigan and was drawn to it's delicate colors and motif. However, the $138 price tag was just a pinch off-putting (ahem!). It was then I remembered the huge mound of roving I'd acquired during one of my hobby hoarding episodes and decided to attempt my own felted floral cardi.

Now when I say hobby hoarder, I mean that I've tried my hand at just about every craft under the sun. I collect hobbies like some people do baseball cards and coins. And I've got the garage full of potter's wheels, mosaic tiles, looms and jewelry making supplies to prove it. Occasionally I think to myself, "I should really get rid of all that macrame" and then I dream up something to do with it. For example. As I've yet to figure out how to craft a non-itchy macrame dress. But I will. Someday-ish.
 My version of the Anthro sweater. Granted, it doesn't look a thing like the original and I'm okay with that. Mine's the cheery-happy-kiddie version to their sophisicated-grown-up-lady original.
But my cashmere sweater cost $3.99 at the thrift store not $138. So you can add penny-pincher to my cheery-happy-kiddie version as well, you sophisticated-grown-up-broke-lady.

 Wait, what? You too wanna make a Felt-y Floral Anthro-Style Sweater? Duuuude, it is so easy. But you will need the following:
  •  A Sweater. I was under the misconception that the sweater must be 100% wool. Oh no. You can needle felt on any fabric. I'd had this thrifted cashmere sweater in my give-to-Goodwill pile because it was a little holey. Turns out you can felt-patch those holes. 
  • Wool Roving. I purchased mine at a workshop I attended a couple of years ago. I've made felted soaps and ornaments with it as well as this sweater. So, a little goes a long way. I wouldn't buy it at your local craft store because it will be a rip off. I'd look into some online vendors
  • Needle Felting Tool. This I did pick up at the craft store. I bought one by the company Clover with three needles in it. They are sharp as a mother so be careful as you stab away on your sweater.
  • A Sponge or Bristle Brush Block. Again, I snagged mine at the local craft joint. This is the cushion that you use under the punching of the needle.
Having never needle felted before, I watched a couple videos on youtube. I have found that when learning a new craft, the more tutorials, the better. Here's my feeble attempt:
  1. Pulling the roving. When you get ready to needle felt, pull apart the roving carefully, as if you are gently pulling off a piece of cotton candy. Done correctly, it should look like the photo above.
2.  Shaping the roving. I was creating circles in the above photo, so I gently rolled the roving into a ball and held it in place with my finger. Place your sweater on top of your sponge or bristle brush punching pad.
3.  Punching the Roving. Seriously, watch your fingers! Getting stabbed is not a pleasant experience as those needles are not only sharp but slightly serrated. As you needle punch, your roving will shrink in size as half of it will go through the other side of your sweater. You can shape the roving by angling your punching tool.
4. Making Diana Ross Hair. Because that's what you wanted on your sweater, right? To add a circle around your dot, pull roving as in step one, lay onto sweater and start punching.
5. Punching, Punching, Punching. It's like Fight Club but without Brad Pitt. Sorry.
6. Shaping the Roving. I love that you can shape the direction of the roving just by angling the punching tool and moving the roving. Here I am completing my circle by overlapping the roving.
This photo and the one below should give you an idea how much the roving shrinks as you punch it. I formed the roving into a leaf shape...
...and used my needle to do the rest of the shaping. I added a very thin strip of dark green for the vein in the leaf. Again, for those small details, watch those digits!
Here's a view of the back of my sweater. I flipped over the Anthro sweater to see if theirs was as fuzzy and it wasn't. I'm not sure if that means they trimmed the back or if they just didn't punch as hard as me.
And here's a view of my dining room table. Which has now become Needle Felting Central. Sorry, hubs.
Again, I blame the ridonkulousness of this pose on my showing off my felt-y elbows. sweater: cashmere with Target tags, thrifted; wood paneled skirt: old, Target; tights: geez, Target!; boots: Frye found second hand
I gotta tell you, this needle felting business is addictive. I started on this one morning and didn't stop until well after noon. I was so excited when I was finished, I showed it off to hubs and the following transaction went down (you know, I just can't have a single post without a lil bit of dialog):

Me (complete with bedhead and pyjamas at 3pm): Look! I finished my sweater! (realizing I'm still with bedhead and pyjamas) And I'm still in my pj's! And it's after 3!

Hubs: Yep. Just what I'd always hoped married life would be like.

Yeah, well, as I always like to tell him, you're stuck with me now, mister! 

I do hope this here post has inspired you to do some punching of your own. Of the needle felting variety, that is. Happy Punching!

Tuesday, January 1, 2013

12 Favorites of 2012

Favorite Memories: Star Wars Weekends at Disney. We had so much fun that plans to return are already in the works. This dress I crafted from my childhood bedsheets got some serious attention with complete strangers asking if they could snap photos of it. Sketches of the next SW dress are underway. 
 Happiest of New Years to you! I hope you managed to ring in the new year in style. And, if your style is anything like mine, you were in your pj's fast asleep wondering who was blowing up your cell phone at midnight. I know, I'm such a party animal. 

Since I woke up feeling all reminiscent-y, I thought I'd share with you my 12 faves of 2012. I started this blog back up again a year ago as one of my resolutions of 2012. I wanted a place to share my DIY's, the art projects of my students, what I wore and, just, life stuff. While scrolling through my blog this morning, I picked out some of my favorites and thought I'd share them with you. So, here they are, 12 of my Favorite Memories, What I Wore, DIY's and Art Class Projects of 2012.
Favorite Memories: A Day Trip to Graceland: I have been a big follower of both Quincy and Emma's blogs for a while. So when the stars aligned for us to all take a day trip to Memphis, I was thrilled. One of the funniest things that happened was at the end of the tour, we decided to have our photos taken. Suddenly, a newspaper dude came up and started snapping away. And then some publicity guy for Graceland. And then complete strangers who asked to have their photos taken with us. It was a hilarious moment I won't soon forget.
Favorite Memories: A European Vacation: Well, for me anyway. Hubs spent most of his days working while I tooled around Germany in my VW exploring cities, eating entirely too much gelato and shopping for souvenirs. We did spend several days vacationing in the Netherlands with Amsterdam being my favorite
In the Art Room: Fantastic Frogs: Our clay theme for the end of last year's school year was Monet's Garden and these frogs created by my third grade artists were such a hit. I love the different personalities of each frog and how much it reflected that of the artist.
In the Art Room: Leaf Printing. I learned about this process from a fabulous art instructor at the Tennessee Arts Academy. The results of each print was just breath taking and such a wonderful learning experience for positive and negative space, printing, texture and nature. Complete details of the project here.
In the Art Room: Pouch Weaving. Not to be confused with purse-weaving as the boys would never go in for this project. And it turns out that this one is always a hit, especially with the boys. Each year my fourth grade students complete these pouches as a rite of passage. I wrote out the many steps to completing these pouches in my weaving posts. You can find the first installment here.
DIY: The Blue Christmas Light Up Dress. One of my resolutions for 2012 was to sew my own clothing. Before this year, I'd only sewn one dress completely on my own. This year, I sewed nine! This light up dress was one of my favorites, from it's adorable fabric to the pattern and, most especially, the lights at the bottom (which was my genius hubs idea!).
DIY: Memories of Marilyn. I began creating these ceramic paper doll dresses after finding a bunch of photos of my maternal grandmother Marilyn. I wasn't sure what I was going to do with the dresses but I created about a dozen of them and shared a tutorial here. When a friend mentioned putting them in a shadow box with the photos that inspired them, I knew that was the answer. You can see more of the end result here. I think my grandma Marilyn would have loved this tribute to her.
DIY: Pencil Skirt and Shoes. Okay, I'll just go ahead and admit it: I've got a little bit of an applique addiction. It's kinda my version of be-dazzling something. Got a dull skirt? How about a blank apron? Need to jazz up that boring dress? Just applique the crap outta it! And you'll notice I've got the same issue with painting on shoes. Oh well. My students loved this end result.
What I Wore: Madeline for Halloween. Since the kids were learning all about Paris, France at the beginning of the school year, I decided to go all Madeline on them. This tied in so nicely with the beautiful bulletin board created by one of my practicum students. How I miss those awesome girls!
What We Wore: Dressing like Monet's Garden meets the 1950's. I had the pleasure of having one of the most incredible student teachers this year. We shared the same goofy brain and often dressed alike to teach our lessons. Her middle school students are very lucky to have such a talented and dedicated art teacher.
What I Wore: Read Across America Rainbow. Don't let my expression fool you, you know I'm lovin' this ridiculousness. This photo was taken during Read Across America week and on this day it was silly hat day. The best part about this hat was that I managed to cloud slap anyone that got to close with just the turn of the head.
  Another thing I have loved about this past year is getting to know so many of you! I have been thrilled with your comments, words of encouragement and the discovery of so many other like-minded folk. Thank you for following my blog and my dorkiness. I truly appreciate all of you. 

Happy New Year!


Sunday, December 30, 2012

What the Art Teacher Wore #48

Christmas in the Smokies: I managed to wear this almost everyday while on our vacation in the Smokey Mountains. Not my best look, but fishnets and heels just weren't gonna cut it on these trails. backpack: borrowed from a friend; jacket(s): I'm wearing two with two more shirts underneath. Mountain Hardware; scarf: Urban Outfitters; hat and fleece headband: courtesy of hub's work, Meinl; cargo pants and long johns: army surplus; sneakers: New Balance
Well, happy post-Christmas/pre-New Years Eve to you! I come to you completely overdressed in layers of clothing and under dressed in overall look. When hubs and I decided to spend Christmas in the Smoky Mountains, I did pack up some stylish duds but they never left my suitcase. Because everyday's agenda involved a hike up some mountain or another, I opted to be comfy and warm. So you'll have to forgive my lackluster look and suffer through my vacation photos aplenty. Enjoy!
The Smoky Mountains, Gatlinburg, Tennessee. We left for Gatlinburg last Saturday morning. We took our time and stopped by Knoxville, Tennessee for shopping at two of my favorite vintage shops in the area, Four Sessions Vintage and Nostalgia. Lunch at The Tomato Head was delish. Our hotel in Gatlinburg was pretty high in the Smokies. This was our view of the mountains the following morning.
After leaving Knoxville, we managed to make it to Dollywood in time to meet up with some friends, see a couple shows and ride some rides. Knowing we'd be back for more Dollywood-tasticness, we splurged on some annual passes. Normally the hubs and I take pretty poor photos but these aren't too shabby for us.
Okay, I was trying to snap a shot of this sculpture outside of the Wild Eagle ride because I thought it was pretty cool. What I didn't realize at the time was that it appears this poor unsuspecting dude is about to become an eagle snack. It cracks me up each time I see it! A side note: the moment they pulled the much-too-tight-for-my-taste harness over my head, I asked to be removed from the ride. The young guy strapping everyone in gave me a raised eyebrow and a "Really?" Knowing that I'd have a freak-out-fest if I was not released immediately, I gave him an, "Um, yes. Really. Please! Right now!" Needless to say, that's all it took. So, sorry, can't give you a review of the ride!
The day after our Dollywood adventures and my "get-me-off-this-ride" meltdown, we spent the day hiking. It was a chilly morning and much of the trail was covered in a 2" sheet of ice. But the huge cave at the end of the Alum Cave Trail was worth the slippery slopes.
At least three bridges made from giant logs were apart of the trail. At the end of this bridge, you had to hike inside the cave and climb a large stone staircase. Being in the shade meant that each step was a sheet of ice. I took to crawling up the steps and hoping hubs would break my fall if I fell.
Ya'll see that ice? You had to watch your step and your head. As the day went on and the sun came out, icicles were breaking and crashing to the ground. It was pretty scary as there would be no warning, just a sudden SMASH! on the ground. We managed to scramble up this slick trail pretty quickly.
At Alum Cave. The cave had a very large overhang which kept the ground here dry. It was still very chilly but the workout from the hike had us stripping off our layers. The overhang had huge patches of ice sliding off of it so we didn't stick around too long.


Hubs snapped this photo of me slipping and sliding across some ice. He likened it to the infamous photo of Big Foot. Sadly, I do see some similarities. Those hairy legs look especially familiar.
Remember the view from the outside of our hotel? Well, this would be the inside. I know, don't look at it too long. The funny thing is, both hubs and I are afraid of heights. So when we'd get off the elevator, we'd walk as far away from the overlook as possible. He was brave enough to snap this one photo for me. "Maybe you should take another to be sure you got it," says I. "I'm sure it's fine." Translation: You ain't gettin' another photo, lady.
The following day, hubs and I met up with our friends and decided to hike the Chimney Tops Trail. It was a pretty intense 2.5 hike straight up a mountain. My out-of-shapeness was really beginning to flair up about midway through the hike. I had to stop and tie my shoes a lot, if you catch my drift.
The view from the top. Only 20% of the folk that take on this hike actually make it to the top of the summit. The map said it was a "scramble" to the top which, I learned, has nothing to do with eggs. In hiking terms that means something like, "there ain't no trail, just a slippery vertical climb." Sorry, that's not my bag. Hubs, however, is now a proud member of the 20% club.
And thank goodness for that. Look at these beautiful photos he snapped from the top. You see that cloud at the top of the frame? Kinda gives you an idea just how high up he was.
Tennessee is such a beautiful place.
Christmas day found hubs and I taking the driving tour of Cades Cove and making our way back home. Tomorrow we are taking another road trip to explore more of Tennessee.
I hope you all have a safe and fun New Year! I'm sure to be spending mine with two of the biggest party animals I know, hubs and Asha the Cat. Thanks for dropping by and allowing me to share my endless vacation photos. I'll be back soon with a new Anthropologie DIY!


Thursday, December 27, 2012

DIY: Gnome for the Holidays

Ah! Giant Photo Alert! Just tryin' to make sure you can see the gnome-tastic-ness happening at the bottom of my dress. AND that annoying yoke thing that you can easily see put more wrinkles on my face and gray in my hair. I shoulda known anything called a yoke was gonna be trouble...guess the yoke was on me.
 Greetings from my gnome to your gnome! I present to you the latest in Crazy Art Teacher Style: The Gnome for the Holidays Dress. Please, make yourself at gnome as you read all about the trials and tribulations of the dress I worked on until the cows came gnome. And I promise you that will be that last of my home-meets-gnome idioms for at least a full 30 seconds. But that's all I can promise.
I'd like to have you believe that this dress was created for the children. After all, my wee artists are learning all about gnomes in art class (mini-gnome history lesson here) and I do love to dress the part.

But that "for the children" bit, that's just a complete lie.

One late night, whilst googling gnomes, I stumbled upon this Michael Miller fabric (from his collection so awesomely called Gnomeville) and I just knew I had to have it in my life and in my wardrobe. Because, in those quiet contemplative moments I have between one crazy art class to the next, I often think, "what is missing from my life?"

"Duh. A Gnome Dress."

While waiting for my fab fabric to arrive in the mail, I began plotting out my dress-terpiece. I decided to use the same Simplicity Pattern #1803 that I used on my Cuckoo Clock Dress and my Light-Up Blue Christmas Dress. Always a glutton for sewing punishment, I decided to attempt the yoke and cap sleeves for this dress. I felt for sure I was about to hit a fashion gnome run (it's been 30 seconds, right?).
And then the fabric arrived. All two yards of it. Oops. Turns out ordering gnome fabric in the middle of the night is not a good idea. After laying out the pattern pieces, I realized I could make the bodice of this dress but not the full skirt. But more on that later. 

For now, let's have a chat about the yoke. 

I'd like to summarize my feelings about the yoke in a little haiku I wrote one night while seam ripping for the umpteenth time. It goes a little something like this. Ahem:

For the love of gnomes
An art teacher makes a dress
Foiled! By a yoke!

Look, it's just a rough draft. I'm working on it.
To be fair, it wasn't the yoke's fault. I blame the author of the pattern that chose to leave out some vital steps. Having limited sewing experience, I am a strict step follower. So when this pattern just skipped several steps, I did too. And then the seam ripping commenced. When that became too annoying, I did a quick google search to find out what others were saying about the pattern. Several shared my frustration but then I read one that burned me up (read in your most annoying Nellie Oleson voice): "Oh, this is a great pattern for a beginner sewer."
Oh, gnome she didn't! After reading that, I snapped my laptop shut, stomped up to my sewing room, grabbed my seam ripper and went to town. Then I went about pinning the entire bodice together adding in the steps the author left out. When that worked, I unpinned the whole contraption and sewed it together. Yoke, you have replaced my hatred of sleeves. When it came time for the skirt, I decided to use my tried and true vintage Simplicity Pattern #8087. I opted for the skirt in view #2 but adding pockets from the other pattern. It's quite the hybrid of a dress.

Using two different patterns together had me nervous. I wasn't sure if the pocket thing would work and if the bodice and skirt would actually fit together. However, putting in that yoke made me bold enough to think I could do it. And it really was a snap. I opted to wear the bow of the belt in the back so as not to take away from my gnomies at the bottom of the dress.
The following day, when I wore it to school, the kids had great fun chillin' wit my gnomies.
Probably because we've been chatting about them for some time. Remember that midnight gnome fabric shopping spree I told you about? Well, I also picked up the two books on the left from a used book seller via amazon. The hilarious gnome book on the right is from my super Secret Santa at school.
And it turns out gnomes-disease is quite contagious. My sweet first grade artists have been bringing in these drawings since we began learning about them. They are currently creating a beautiful Black Forrest collage for their gnomes to call home. I'll be certain to share those with you soon.
Even my house is looking like Gnomeville from my Christmas tree (which is still up and will most likely stay up for entirely too long) to my knicky-knacks (thanks again, Secret Santa!). I do believe I have a new addiction.
Although, I don't think this is gonna be my "starter gnome" because I don't foresee too many more gnome frocks in my future. Especially with a yoke. However, since finishing this thing, I've updated my haiku. What's that? You wanna hear it? Well, (waving hand sheepishly) okay:

Yoke, who's yo mama?
Why, me and my seam ripper
And my wee gnomies.

Thanks for dropping by!