Thursday, August 11, 2016

DIY: Shibori, Indigo Tie-Dye

Y'all don't even know how excited I am about my Shibori-dyed napkins. Dinner party, anyone?
True facts about me: I suffer from Public Creating Anxiety. When attending any workshop, craft activity or any adult-art-makerin' of any kind, my stomach muscles tense up, my mouth goes dry and I just can't create anything that doesn't make me wanna cry myself to sleep at night. That doesn't stop me from happily attending any crafty date I get invited to (so, call me, y'all!). I mean, I love learning something new and fun. It's just I'm totally stressed THE.ENTIRE.TIME. 

Case in point: the first time I learned Shibori...(back in the day when I made poor choices in footwear)
Me and my buddy Debbie!
Way back in 2007, I was super fortunate enough to travel to Japan as apart of the Japan Fulbright Memorial Fund Teacher Program (I've been campaigning for them to shorten that name for years). If you aren't familiar, it is a program where 200 teachers from all over the U.S. are invited to stay in Japan for nearly 2 weeks. During that time, you are educated about the culture, taken into schools, toted around and even allowed to stay with a host family. I made so many wonderful friends and learned so much. It truly was an experience I wouldn't swap for all the dark chocolate in the world (which is really saying something). 

At one point during our adventuring, we were taken to Aomori, Japan and a Shibori dying facility. After the tour, we were told that we'd be able to try our hand at this beautiful dying process. Being the only art teacher in the group, all eyeballs were on me and my design. Needless to say, no one was really impressed with my lackluster performance (although, personally, I am more embarrassed by that ensemble. WHAT AM I EVEN WEARING?!)
Needless to say, after that flop nearly 10 years ago, I didn't attempt Shibori again...until a couple weekends ago when my friend Sara had some art teachers over for a Shibori party!
Where I made much better outfit choices but STILL sucked at dying. You can see my dud of a dye hanging on the far left. I was so sad at how my attempts at dying turned out. I mean, how can I stink at tie dye?! I love me some fiber arts, that's my jam. That afternoon, determined to better my dying skills, I ordered a dying kit and a couple books on Shibori. And last weekend, I went NUTS.
And, it's official: I'm in love with Shibori! 
If you wanna give Shibori dying a try, I recommend this kit and purchasing a bolt of muslin (so you can really go to town like I did) and bunches of rubber bands. Be sure to follow the dye mixing directions carefully for best results. If you'd like to learn the techniques I tried, I go thru each and every one of them in this video. 
Even if you follow my folding and banding techniques to a T, that doesn't mean they will turn out just like mine. The fun is not knowing what you are gonna get.
Baby Banding: I picked up some of those tiny rubber bands for fine hair at the Dollar Tree. For this look, mark your fabric with a disappearing ink pin where you want your designs to be. Then pinch the fabric just a little and place a rubber band around it, wrapping it several times. If you do that with one rubber band, it will create the circle you see. If you add more rubber bands, one below the other, it will create the larger circles. 
Over Dying: If you dye a piece of fabric and you are disappointed by the outcome, don't throw it away. Just try something new and toss it back into the dye bath. For this piece, I first just scrunched the fabric into a ball and banded it. Unfortunately, not enough dye was able to get into the bound areas which left big areas of white. To add more design and color, I placed wooden beads under the fabric and attached them to the fabric with rubber bands. I threw that back into the dye bath. Once the rubber bands and beads were removed, they left behind those beautiful floral designs.
Paperclip Dying: This one was super easy. Just accordion fold the fabric and bind it with paperclips. You can see the halos of the clips on the top and the bottom.
Wooden Block Dying: The kit I mentioned comes with directions and suggestions for dying. One was this method. To achieve this look, accordion fold the fabric. Then triangle fold the fabric (see video). Once complete, add a block of wood to either side of the triangle and bind with rubber bands. The dye only manages to seep into the outer edges of the fabric.
Diagonal Fold: Instead of starting your accordion fold at the bottom, try something different by starting at one of the orders of your fabric. Once finished, add rubber bands every 2" for this kind of look. 
Accordion Fold: Same method as above...but start the fold on the side instead of the corner.
Faded Look: This was one of my first pieces. I tried the wad-it-up-and-band-it method and it was a dud as it left me with large areas of white. So I just threw it in the dye bath for a moment and it added the really beautiful light blue color. Now it's one of my faves.
And then I completely lost my mind and started dying everything from wool yarn that I bound with rubber bands. 
 To wooden beads that I bound with the baby bands.
And wooden bangles that I wrapped in rubber bands (my new fave!).
And, um, my hands. You might have noticed that my finger nails, which I NEVER paint, are currently painted blue. That's to hide the fact that they are indeed blue.
So what does one do with a dozen pieces of Shibori dyed muslin? Make napkins, of course! I simply hemmed the edges and they were done. I scored those napkin rings on the cheap via Amazon.
 This calls for a dinner party! It's a shame that I don't cook. 
Perhaps I'll just host an "Admire my Shibori Napkins" Party. I wonder if anyone would show up. 
Regardless, I'm loving how the indigo blue goes with my dining room...and now I can say that I can Shibori dye! I can't wait until the weekend to do it some more, I'm totally addicted. 

P.S. I attended another craft night on Wednesday hosted by my good friend Tamara...and was again struck by Project Creating Anxiety. Tell me I'm not alone in this! Looks like I'll be working on that craft this weekend and attempting to perfect it as well. 
 photo signature_zpsd10b3273.png

Wednesday, August 10, 2016

Art Teacherin' 101: Episode 14

My very first art teacherin' gig was in Nashville over 15 years ago. I was hired the weekend before school started and I was COMPLETELY CLUELESS. I had absolutely no idea where to begin when I was given the keys to my portable. The only evidence of art teacherin' that I could find was a sad stack of curriculums (shudder), worn SchoolArts Magazines (which I poured over) and a coffee can of broken crayons. I must have turned around and around in that little space a dozen times trying to figure out just where to begin. I stayed up until 3am creating the most beautiful Vincent van Gogh rules posters thinking that the rest would take care of itself. Um. It did not.
If I had known then what I know now, I woulda said that getting ORGANIZED is the most important way to start your art teacherin' life. I don't mean getting that storage closet all tidy or having every bottle of paint in a perfect row, that's all surface stuff that can be whittled away over time. I'm talking about getting the important parts organized: your class lists, your schedule, your lessons and your yearly plan. Once you have that squared away, you'll be able to breathe so much easier and will have a more enjoyable time getting the rest in order. 
Organize Your Day-to-Day: I recycle the same stinkin' 5 folders each year. My schedule changes every day. For my sanity, I print out a copy of each day's events and tape it to the front of each folder. Inside the folder is a class list of who I'll see that day as well as my seating charts. I pull this out each day, sometimes placing a sticky note of some topics I need to touch on with each class on the front. This works fabulously for those days I'm out sick as well as it makes my sub's life so much easier.

Organize Your Student's Art Work: I keep those bins that I shared in the clip handy to organize student work. One thing I failed to mention in the video is that I have my tables organized by color, for example: red table, orange, etc (the video below gives you a room view). I have a folder for each table. At the start of art class, I'll hand a student who sits at that table the folder which they then take back to their seats. From there, they pass out the artwork to their table mates. At the end of class, they collect artwork, return to the folder and put back in the bin.

Organize Your Teaching Life: It's more than just lesson planning, y'all. What I love about my friend Laura's planner is that it covers EVERYTHING. There are lesson plans, a calendar, a day-to-day planner, a monthly agenda, To-Do Lists, like, everything. Because your teaching life is not just lessons. It's knowing what is going on in the seasons, throughout the school, in other areas of curricula. Having all of these things organized in one binder will really save your sanity. Lemme show you how I use mine:
 My school calendar has less items on it than my personal one...although, at school, I do have them open side-by-side. I love how big that calendar is so that I can really scrawl my notes all over it. 
Because I use Laura's template's to write out my lesson plans, what I write on my weekly teaching schedule is an abbreviated version. What I really find to be important is documenting what happened during a particular art class. This helps me to know how to better approach the class the next time I see them. For example, if one class needs to rework their self-portraits or needs a vocabulary review, I like to write that down while it's fresh on my mind. Otherwise, as you know, goes right outta our crazy lil heads. 

Organize Your Personal Life: I'm telling you, I am The Keeper of the Notebooks. I used to have a notebook that held EVERYTHING from school stuff, personal goals, sketches, art, you name it, this bulging lil book held it. Those kind of books always wore me out because it held TOO much information. So I switched to a notebook for each of my different interests: sewing, drawing, ideas for school, ideas for crafts, etc. My purse became a pull-behind suitcase to cart around my library of books. When I discovered that wee 3-ring bound book at Target it was like the heavens opened up and the angels sang. I bought the tabs, the folders, the calendar and everything that went along with the binder. It's small enough to throw in my big ole purse but big enough to hold my thoughts. I can't recommend y'all get one enough!
Once you've got your art teaching ducks in a row THEN you can indulge in the icing on the cake: the decorating! Here's the tour of the art room I have shared with my students this week. Like I said, seeing other teacher's rooms can be so intimidating. But all that decorating comes with time. Be easy on yourself, take your time, be thoughtful as you plan and just know that these things will happen. 
 photo signature_zpsd10b3273.png

Tuesday, August 9, 2016

In the Art Room: The Art Rocks Escape Game!

Welcome back to school! Over the summer, my husband and I played an Escape Game. If y'all aren't familiar, the concept is that you are "locked" in a room that is filled with clues to help you escape. The clues usually involve code-breaking, riddle-solving and just plain old hide-n-seek. We had so much fun that I decided to bring the concept to the art room. I thought it would be a great way to introduce my kids to the rules, routines and the space that we call the art room. It was such a blast that I thought I'd share it with y'all! 
As the students entered the art room, I had one kid stand at the door and pass out these small slips of paper. There were 7 different colors with about 5 of each. This year I average about 32 third and fourth graders per class so I needed to make sure I had enough for everyone. Once seated on the floor, I started this video:
A whole lotta (poor) editing went into this bad boy. Apparently I forget to edit the part where I adjust my wig. AND, if you make it all the way to the end of this video, you'll catch a look of how I really felt wearing that too-tight head piece and super-sweaty pleather jacket. Regardless, the kids ATE.IT.UP.
Just before I let them have at it, I read them the wee rules of the game...
Now, if you're worried that the kids will get a lil to wild playing this game, I found a sure-fire trick: Tell them there are SPIES watching. I fibbed to the kids and told them that before class had started, I had pulled aside a couple of kids to be my spies. Their job was to listen and share the secrets they overheard with other teams. Oh my goodness, y'all. Those fourth graders took that so seriously it was bananaz! My only other rule was no running...I have a big room and there was A LOT of excitement. But we can't be running in the art room, y'all. 

Once I gave them the go-ahead, the kids immediately teamed up and went to their coordinating table. There they found this:
To make things easy for myself, I made all the puzzles identical. Some kids figured out that they were just to look for the yellow heart...but my rule was that all puzzles had to be solved before moving on to the next. My favorite was when one team said, "our puzzle is too hard!"...and I'm all, "Dudes. They are all the same." 
Once the puzzles were solved, the kids went in search of their heart. I made sure to hide these pretty well so it was a bit like an Easter egg hunt. 
Once they found their box, the kids discovered the following inside:
A dry erase board and marker, a decoder and a code to solve. Each of the seven boxes contained riddles which revealed the class rules. They were to solve the riddle and return to our spot on the floor with their dry erase board. 
Just in case you'd like to use the code feel free! The Rockin' Riddle Rules the kids solved here: have fun, be respectful, follow directions, raise your hand, take pride and be nice. 
They were highly engaged, that's for sure! Once everyone had their rules, I played the next clip in the video where I chat about each rule. Then we were on to a self-guided room tour complete with a back-stage pass. 
(Yes, we refer to the place to put our dirty paint brushes as a "hot tub". Don't judge.)
I tried to think of the places in my art room where the kids would visit the most. I also came up with fun clues to help them find those places. I had specific dry erase marker colors in each spot so they couldn't just write the answers in. Also, I had them go to the places on their pass in the order listed so we wouldn't have any traffic jams. 
 A peek at how I labeled the places and placed the markers. 
 Where we play the Smartest Artist game
After the passes were full, we met again on the floor. In the next part of the video, I take them on a tour explaining the different places in the art room and emergency procedures. 
The final phase of the game was a "solo mission". Each artist was given three Post-It's and a Sharpie. They could pick from any of the six questions on my board to answer in a complete sentence. Once finished, they returned to the floor where we played a quick round of Smartest Artist before heading out the door. 

You.Guys. I hadn't had a chance to read what they had written until this morning. It made my day!
I mean...
This was only after a couple of classes had a chance to write. I can't wait to see these filled up! I plan to hang them around the school for our Open House Night. 
Because my focus is Peace, Love and Kindess this year, this is an important question for my kids. 
Their responses let me know that they KNOW the answer...we just gotta make it happen. 

Thank you for allowing me to share this super fun way to kick off the school year! Feel free to steal any ideas you see here. I'd LOVE to know if you do this kind of thing with your students. The kids told me that they are excited to play this kind of game again...which can only mean that this will be a new and fun way to introduce new concepts to the kids. An Elements of Art Escape Game, anyone?! YES, PLEASE! 
 photo signature_zpsd10b3273.png

Sunday, August 7, 2016

What the Art Teacher Wore #168

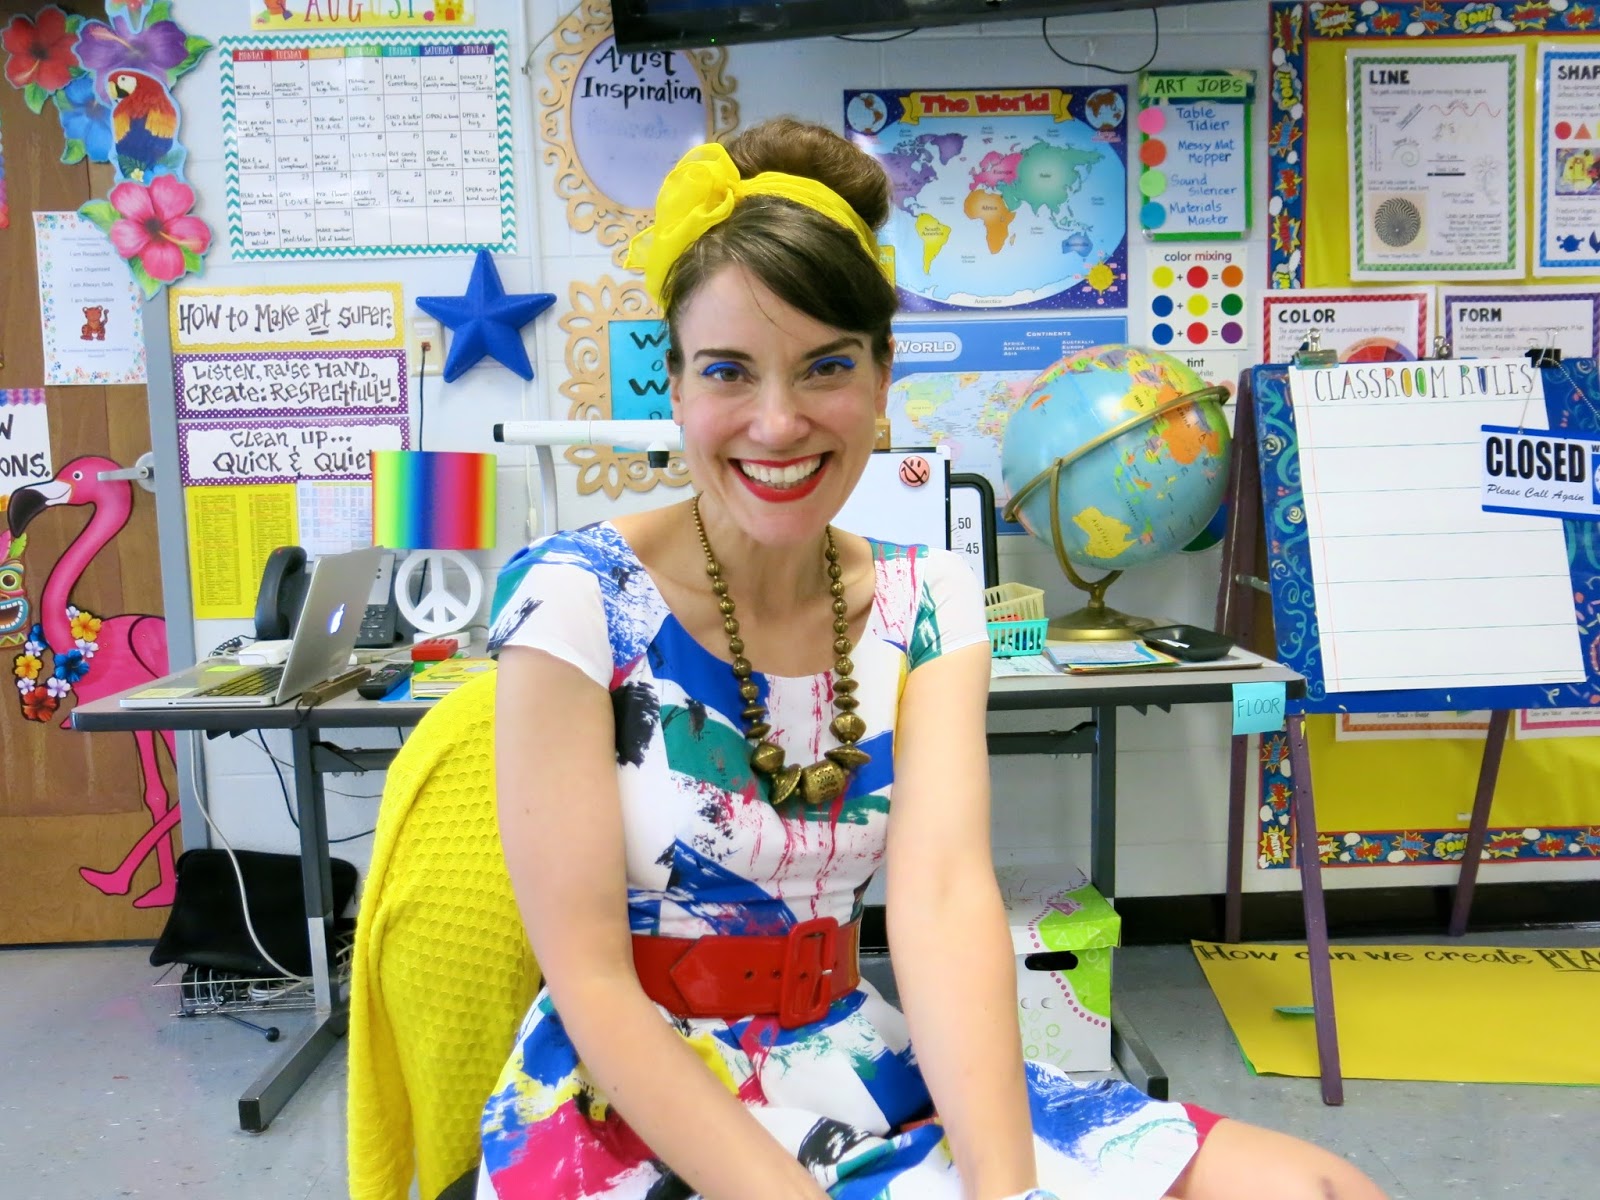
Welcome Back Monday: Yep, just like that, we're back at it! I know, I can't believe it either. It's been a wonderful summer...but busy! I'd love another two weeks just to recovery from my "vacation"...but I suppose that will have to wait. Time to do some art teacherin'! dress: Bernie Dexter; belt and crinoline: Amazon; converse: Um, DSW, I think

Howdy, friends! I dunno why I feel this way, but it seems I've not chatted with y'all in ages. I think it's because with the freedom of summer, I got out of my routine of blogging...but all that's about to change. I'm back to art teacherin' and, hopefully, back to a regular schedule. Cuz I don't think I'll be able to keep up those til-2am-sewing nights much longer. I'm excited to be back and I'm excited to be chatting with you!

I've gotten a lotta emails lately from y'all about heading back to school, how to prepare, how to set up the art room and all the rest. If you've messaged me and I've not responded, please accept my sincerest apologies. I am making an effort...but, honestly, I'm never gonna win the Best Emailer Award. If you'd please leave your questions in the comments, I can address them but the best part is, other folks can chime in as well. Don't think you are the only one with questions, we are all right there with ya. The more knowledge we share for all to see, the better. Also you might wanna subscribe here as I've been addressing those questions in Art Teacherin' 101. 

Now, if I can get my act together, I have some fun DIY and In the Art Room posts planned for you this week...so stay tuned! In the meantime, have a super duper week, y'all!
Calendar of Kindness, Day #1: Write a Thank You Note. True confession: I love writing letters. Mostly because I love receiving letters. When I was a kid, I lived far away from my extended family like my cousins, aunts, uncles and grandparents. I sent them tons of letters and LIVED for the day to get one from them. As I got older, I had pen pals all over the world: Yugoslavia (back when there was a Yugoslavia), Australia, Japan, Canada, you name it. I still have those letters and love rereading them. So writing thank you notes, or notes of any kind, is one of my fave things to do. 
I hope you are joining in on the fun! Some of the prompts are hard to post and reshare on social media (like giving a high five)...but I do love the daily reminder to do something, no matter how small, kind. Snapping a picture and sharing it with the interweb is just a fun way to get that wee reminder out there. You can find me (over)sharing here
I thought it would be fun to make a kid-friendly edition too! I just might have to continue this on a monthly basis. My thought is to plant the seed with these daily reminders...and also to use them as prompts for my early finishers. Done with that painting? Write someone a Thank You note! 
 Meet the Teacher Tuesday: Our sweet students come to school in the evening on this day to meet their teachers! It's such a fun way to welcome the kids back. Definitely one of my favorite events as a teacher. The enthusiasm is contagious! dress: by the brand CowCow, found on Amazon; belt and crinoline: Amazon; converse: DSW; sweater and scarf: thrifted; necklace: Paper Source
 How can you quickly become everyone's favorite? Bring a ton of chocolate to those long back-to-school meetings. Nothing makes data-mining sweeter. 
 Wonder Wall Wednesday: When I'm at school, I often snap my photos in front of my Art Rocks wall. You can read more about that here. I love how this dress from Wearing History matches so well! 
Like, WHUT. So my friend Beth Moore turned me on to these inexpensive (under 20!) dresses on Amazon. Search the brand-name Cowcow (if that doesn't make you feel self-conscious...). My buddy Rebecca found TONS of dresses by them in different themes like space, Halloween, Christmas, the list goes on. Go get yourself into some trouble and get you some new back to schoolin' duds. Then we can be twinzies!
 Back to School Eve Thursday: We were so fortunate to have this day to work in our rooms and prep for the kids. I am STILL not ready but I'm ready enough! And excited for the new year, so much fun stuff is in the works! I can't wait to share with y'all how we are kicking off the school year. Stay tuned. dress: Bernie Dexter

So I decided to "Thank an Officer" by taking a couple dozen donuts to the police station. I know, stereotype much? They certainly didn't seem to mind. At the end of the school day, we had about four dozen donuts left over from our morning treat that were sitting untouched in the copy room...so I took those to the police station as well. The sweet woman working the desk must have thought I was nuts! "You're back!? Well, the night crew will love it!" 
 First Day Friday: We started our school year with a half day. No kids in my art room...but we do grade-level assemblies to acquaint the students with the school, school rules, procedures and expectations. I'm itching to get 'em in my art room! dress, crinoline and converse: Amazon; sweater: Target
Calendar of Kindness said to plant something...so I planted my beautiful spider palm, Mildred Pierce, in the Jungle Lounge. I got tired of watching Asha (my sweet tabby) chew her leaves off. I'm excited to have something with bigger hair than me in my art room!
 photo signature_zpsd10b3273.png