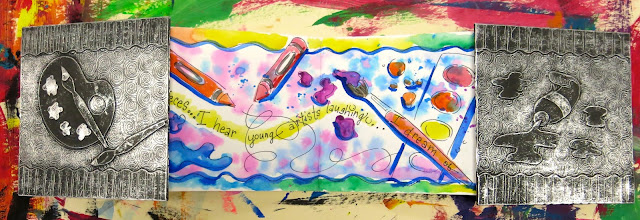
These books are a barrel of fun and so easy to make...not to mention they tie in so much literacy, it's enough to make your reading specialist's heart grow three times it's size! Daryle recommended doing this project with the fourth grade and up set. I can't wait to give it a-go with my favorite wee artists.
Let's start with the best part of this here accordion-style book: the cover. We used the same relief-style method that I've shared in this blog post where we used leaves.
To start, we each had two pieces of square 5 1/2" pieces of matte board. Very thin poster board (or heavy weight paper would work as well) was used and a collaged design was glued into place with good ole Elmers.
Once finished, we used 8" X 8" pieces of foil. DULL SIDE UP (that's super duper importante, hence the ALL CAPZ), spray adhesive was applied to the foil and our collaged piece was placed face down. The edges of the foil were then wrapped around the backside of the matte board.
Using a cotton ball, the surface was rubbed until our design appeared. To get into those hard-to-reach places, a q-tip was used.
BOOM, y'all! Because heavy-ish gauge foil was used, designed could then be drawn into the foil with a dull pencil. And no foil was harmed in the process...an art makin' miracle!
Using that super cheapo $1 black matte spray paint from your fave hardware joint, lightly dust those bad boys.
And buff off the spray paint to reveal your incredible design. Prepare yourself for the oooohhhhssss and ahhhhhhssss, y'all. Cuz they're coming...
Like, right? I done tole you.
Now, let's talk about that writing portion. Daryle provided us with an I Am poem prompt that inspired our narratives.
There are truck loads of examples of I Am poems online. If you ask Mr. Google, he can help you out.
Now, prepare yourself as I share my poem-writing soul with you. You're welcome.
We used heavy duty watercolor paper for this portion. The paper was 5" X 30" (me thinks. Don't quote me on this. I'll deny everything).
Read on, my poetry skillz are pretty much unmatched.
Just got the memo, I've been named Poet Laureate. Who is Laureate, anyways?
And there you have it! Have y'all done these kind of books with your students? I'd love some more ideas. And Happy Back to Art Teacherin'!


Amazing work! I'm impressed with your corporation letting you all have an ART professional development day. How awesome! Even though I'm now retired from teaching I think I might just have to try this myself! Thank you for sharing this activity in such great detail! (Paula Dearringer)
ReplyDeleteI work in a very awesome district...out superintendent even popped by to say hello and bought one piece of art from our instructor! We have so much support in our district!
DeleteThis comment has been removed by the author.
ReplyDeleteOops! Sorry, I must have been so excited when I first read it. Went back and saw that you did the designs with pencil...thanks for sharing!!
DeleteNo prob! I was at first afraid that the pencil would poke through the foil...so I used a blending tool. Then switched to a dull pencil and it worked fine!
DeleteLove these! Do you happen to know the gauge of the foil? And it looks like you buffed with steel wool?
ReplyDeleteThe foil was heavy duty grocery store grade. And the steel wool was 000, the finest you can get your kitten mittens on.
DeleteWhat a treasure this would be to receive for a parent!
ReplyDeleteI happen to be doing these with students right now... I'm curious, why is it so important to have the dull side glued against the matte board? (I was doing it the opposite way so the dull side would be exposed...maybe I should be doing it differently?!?)
ReplyDeleteAlso meant to write that these looks terrific! Thanks for sharing all the awesomeness that you and your kiddies do :o)
DeleteWOW! What a great project! I love having the students write poetry and have used the "I AM" Poem format you shared as an ice-breaker during high school critiques (the students needed to write the poem from the perspective of something/someone IN a surrealist painting). So fun! But this idea combining the poem and book is fantastic!! Thanks for sharing and pass my thanks on to Daryle Grenead too! Mrs. P
ReplyDeleteThank you! It was a great project, I can't wait to give it a go in my art room!
DeleteIs your poem painted with regular watercolor or liquid? P.S. You have mad poem skillz! ;P
ReplyDeleteHi! I wrote my poem in sharpie! Then when I painted in watercolor, it didn't run. AND thank you ;)
DeleteHow did you construct the accordion part? (I'm a brand new art teacher with not the most training in the world...)
ReplyDeleteI love this project! What a fun way to tackle some challenging concepts! Thank you buckets! But would love to know....what grade did you do this project with?
ReplyDelete