Showing posts with label art class. Show all posts

Sunday, October 19, 2014

What the Art Teacher Wore #119 and Spooky Ensembles of Halloween Past

A Return from Fall Break: Ain't gonna lie, that break sure was nice but it was good to be back. Looking at this photo, I can't help but notice all the creepy things that stare at the kids while they work: SeƱor Roy G. Biv (um, that's what we call the big-eyed rainbow), Graffiti Mona and those rando drawings of mine on the board. owl sweater: felted DIY, details here; dress: BCBG, old; belt, tights and necklace: Target, old; boots: Buffalo Exchange; hair bow: um, I'm wearing the belt from the dress as a hair bow. What?

Hey, friends! I hope you all are enjoying your weekend. Here the leaves are turning, the temps are as unpredictable (warm-then-cold-then-warm-again-and-now-rain-for-three-days-straight) as my moods and it's now dark way too early. I think that's the only thing I don't dig about fall: the fact that it's, like, 5pm and the pitch black night has me convinced I need to hop into my pajamas and consume multiple cups of hot chocolate. Not that there's anything wrong with that, I suppose. 

Now since Halloween is right around the corner, I thought I'd share with you some of my fave spooky ensembles from years past. I'm hoping this will inspire you to start dreaming up your creation for the Dress-Like-A-Famous-Artist/Artwork Contest! Y'all have been coming up ideas for your costume, riiiiight? Halloween is on Friday this year which means you can totes wear your costume to school (if you are a teacher although any of my non-teacherin' friends can enter!) and tie it in to whatever it is you are teaching. I don't plan to enter (although I will be in costume that day!). I did spend my weekend wrapping up a coupla costume ideas (come on back on Tuesday and I'll show ya!). Grand prize is your pretty face in SchoolArts Magazine, y'all! For all the details, please click here

Speaking of creating, have y'all been gathering up your fabric and stitching supplies for our next Sew-Along? In case you missed it, we will be creating dresses for Dress a Girl Around the World, an organization that sends dresses to girls in need. I am so excited about this that a group of my teacher buddies and I are doing this in the afternoons as well! I was really hoping that I could get the first tutorial up by the week of October 27th but I forgot to consult my calendar. This coming weekend is my state art conference where I'll be, wait for it, recognized as Tennessee Elementary Art Educator of the Year! (Or, "Art Teacher of the Universe" to anyone who asks. You'd be surprised how many "REALLY?!"s I get. Sigh.) Since I won't be around to film any tutorials this coming weekend, I'm going to push it back a week. However, you really don't need my help as the Dress a Girl website has very clear directions. Have any of you already started? I can't wait for us to begin!

Other than that, I got nuthin, kids. I hope you have a super awesome fall-ish week. Until Tuesday, I hope y'all enjoy these spooky ensembles of Halloween past.
Last year I was so stinkin good at getting my Halloweenin' on. I felted eyeballs on my Target pants, created that leaf printed garland and even painted some pumpkins. This year, um, not so much. The season totally got away from me! I've decided not to let that happen with Christmas, gonna start early-ish on that one. 
Rainy Chilliness: Suriously? Where's my coat/hat/scarf? I swear, in my art room, I had my heat running one day and my ac the next. top: Buffalo Exchange; skirt: Anthro; necklace: El Dia de los Muertos DIY; tights: Target; shoes: thrifted
Part of the prob this year was that I got too late of a Halloween start. I mean, it's only a coupla weeks away and I have two dresses that I'd love to bust out before then (totally wishful thinking as I'm the slowest sewer everrrr). This Day of the Dead dress and matching planters were all created in early September of that year. What happened to that plan-ahead person? Where did she goooo? (and just who is she because I've never been one to plan ahead. I do think this was that time aliens clawed in my ear while I was sleeping and took over my brain for a hot minute before realizing that the battery was too low.)

Bustin Out Them Boots: It's that time. Tights -n- boots, y'all. I really am so glad that tights season is here as it means one happy thing: no more leg shaving until May! Let the glorious gorilla legs begin! sweater: felted fox DIY, here; dress: Anthro label found at Buffalo Exchange; tights: Target; boots: Frye, found at a discount joint because Frye boots are INSANELY expensive, kids; belt: Anthro
This outfit was super fun to make. Well, the needle felted sweater was actually the fun part. Sewing doesn't always go smoothly for me (I do more seam-ripping than stitchin, kids. True Story.) but felting I feel I can't mess up. I do seriously wish I had a white streak in my hair. Hmmm. 
Squirrelly Sweaterness: I love this sweater but I only wear it during the fall. I paired it with this funky 1960s sleeveless two-piece because, well, I thought they looked like a perfect match. sweater: Urban Outfitters, couple fall's ago; top, skirt, shoes: thrifted
One Halloween dress that wins my fave fabric award is this one. It's got al the famous Universal Studios monsters featured on it and it's just a buncha fun to wear. You can find the gory deets here, if you dare. 
Spook-tacular!: A friend of mine told me about a house just down from my school that was decked out in the Halloween spirit. Mitch and I took a trip there this weekend and I just had to share it with you. It really makes me sad that I didn't decorate at all for Halloween (we're always gone to haunted houses on the night of Halloween anyway, sigh). Next year I will attempt this level of amazingness. sweater: vintage, thrifted; skirt: Anthro found at Buffalo Exchange
Until next time, I hope your week is simply Be-witched!


 photo signature_zpsd10b3273.png
Read more »

Thursday, October 16, 2014

In the Art Room: A One Class Clay Project

So I've got this super fun group of kids that hang out in my art room every Tuesday and make stuff outta clay. It's a class of about 15-ish first through fourth grade kids. We have a glorious hour of art makin' together and this here is one project we busted out in one of those classes. It's a project that I used to do all the time with my second grade kids until I just got so tired of it, I couldn't do it anymore. You know what I'm talking about, right? Howevers, it is one of those everybody-loves-it/they-always-turn-out-fab/personalized-and-thusly-awesome project that bears repeating (gah, I do love that saying as it always puts the image of a buncha repeating bears in my head).
This is also one of those fire-it-once type of projects which is always a plus. Most projects I do with the kids usually require both a bisque and a glaze firing. Which is tiresome for a super lazy art teacher like myself. Without sounding like an old lady, does anyone else experience a little back aching from leaning over the kiln whilst loading and unloading? Please tell me it's not just me and my whiny/gripey personality.
So just how were the bad boys completed in under 60 minutes? Well, lemme show ya.
I gave each of the kids a hunk of low fire (Cone O6) clay the size of  a large orange. I have a variety of doilies, pieces of burlap and lace that we use for texture. The kids pick one and place it on their clay mat.
The lump of clay is then dropped onto the doily covered mat and pounded flat. This is usually when my left eye begins to twitch and the onset of a headache begins. A room full of 15 kids pounding the daylights outta clay is just a lil holy-crap-this-is-my-life?! inducing. Thankfully it ends rather quickly as the kids know to stop the pounding when their clay is as thick as a cookie.
The clay is then pealed off the doily and placed right-side-up on the clay mat.
I then gave the kids a variety of templates to trace for their wall hanging. Some are flower shaped, square, round, whateves. When tracing with a skewer, it's key that the stick stand tall and vertical ("like a soldier") so that it can cut all the way through the clay. Otherwise, you'll get that unappealing shark's tooth edge and, like I always tell 'em, it's not Shark Week in the art room.
Then the glazing begins. Now, we used Stroke and Coat by Mayco for this project. Normally, I'd only use that kind of glaze after a bisque fire. However, for this project, the glaze had double duty (OMG, do your kids also loose their sh%% if you say the word "duty"? Make it stooooop, y'all!) by not only acting as a colorant but as glue. 
See? Roll a coil, shape it into your initials, a shape, whatever you like and press it into the wet glaze. 
Most kids opted to also paint their letters and add a lil decoration to the background. I used the back of the paint brushes to create two holes to hang the masterpiece.
When they came outta the kiln, the kids were given a piece of Twisteez wire cut in half and the chance to dig around in my big ole bucket of beads.
So I was gifted this giant stash of beads which is cool because the beads are super unique. There's dolphins and cat beads, flower and sparkle beads. You name it, there's a bead for it. However, I warn you, if you unleash the kids on beads, it's like a piranha attack (P.S. never EVER image search "piranha attack". I can't unsee what the interwebs just showed me, waaaahhhh!). Just place a handful of beads on a couple plates on the tables and step back. I did limit the kids to only 10-ish beads so they could pick the ones that meant the most to them...and save some for the rest of the kids on the planet.
We have a lotta school pride at my school. This dude showcased the school initials and used school colors. 
So often our clay projects take many sessions. With this quick lesson, the kids were thrilled to be able to take their creations home and share them with their families. And who can blame 'em? They're pretty rad.


 photo signature_zpsd10b3273.png
Read more »

Thursday, October 2, 2014

In the Art Room: Reversible Dot Paintings

Okay, I know what you're thinking: Holy crap, Stephens, Dot Day ended, like, a month ago! 

Y'all. I know. But I never did tell ya the whys and hows and who's-its of these here Reversible Dot Paintings. So don't gimme none of that "holy crap" biznatch, ya hear?
Way back when I started dreaming up ideas for Dot Day, I knew I wanted to use some cardboard pizza rounds. I dunno why. You know how it is when you get an idea stuck in your head for no reasonable reason and you just can't get rid of it. Kinda like herpes. Well that was me with this cardboard pizza round thing. So I ordered a hundred of 'em from School Specialty and got the notion that we'd make some reversible abstract paintings out of 'em. 
What gave me that thought was the movie Six Degrees of Separation (if you've heard me tell this tale before, sorry for the repeat. I'm a repeat-asaurus, it's what I do). I knew I wanted the kids to learn about Kandinsky because he's got a big fat showing at our local art museum. And then I recalled this movie clip and was all: YES! REVERSIBLE KANDINSKY PAINTINGS. I'M. A. GENIUS.

That is until I found out that Kandinsky never actually did paint any reversible painting. Which could only lead me to one conclusion: The Prince of Bel Air is a LIAR (okay, so it was Donald Sutherland in the clip, whateves).
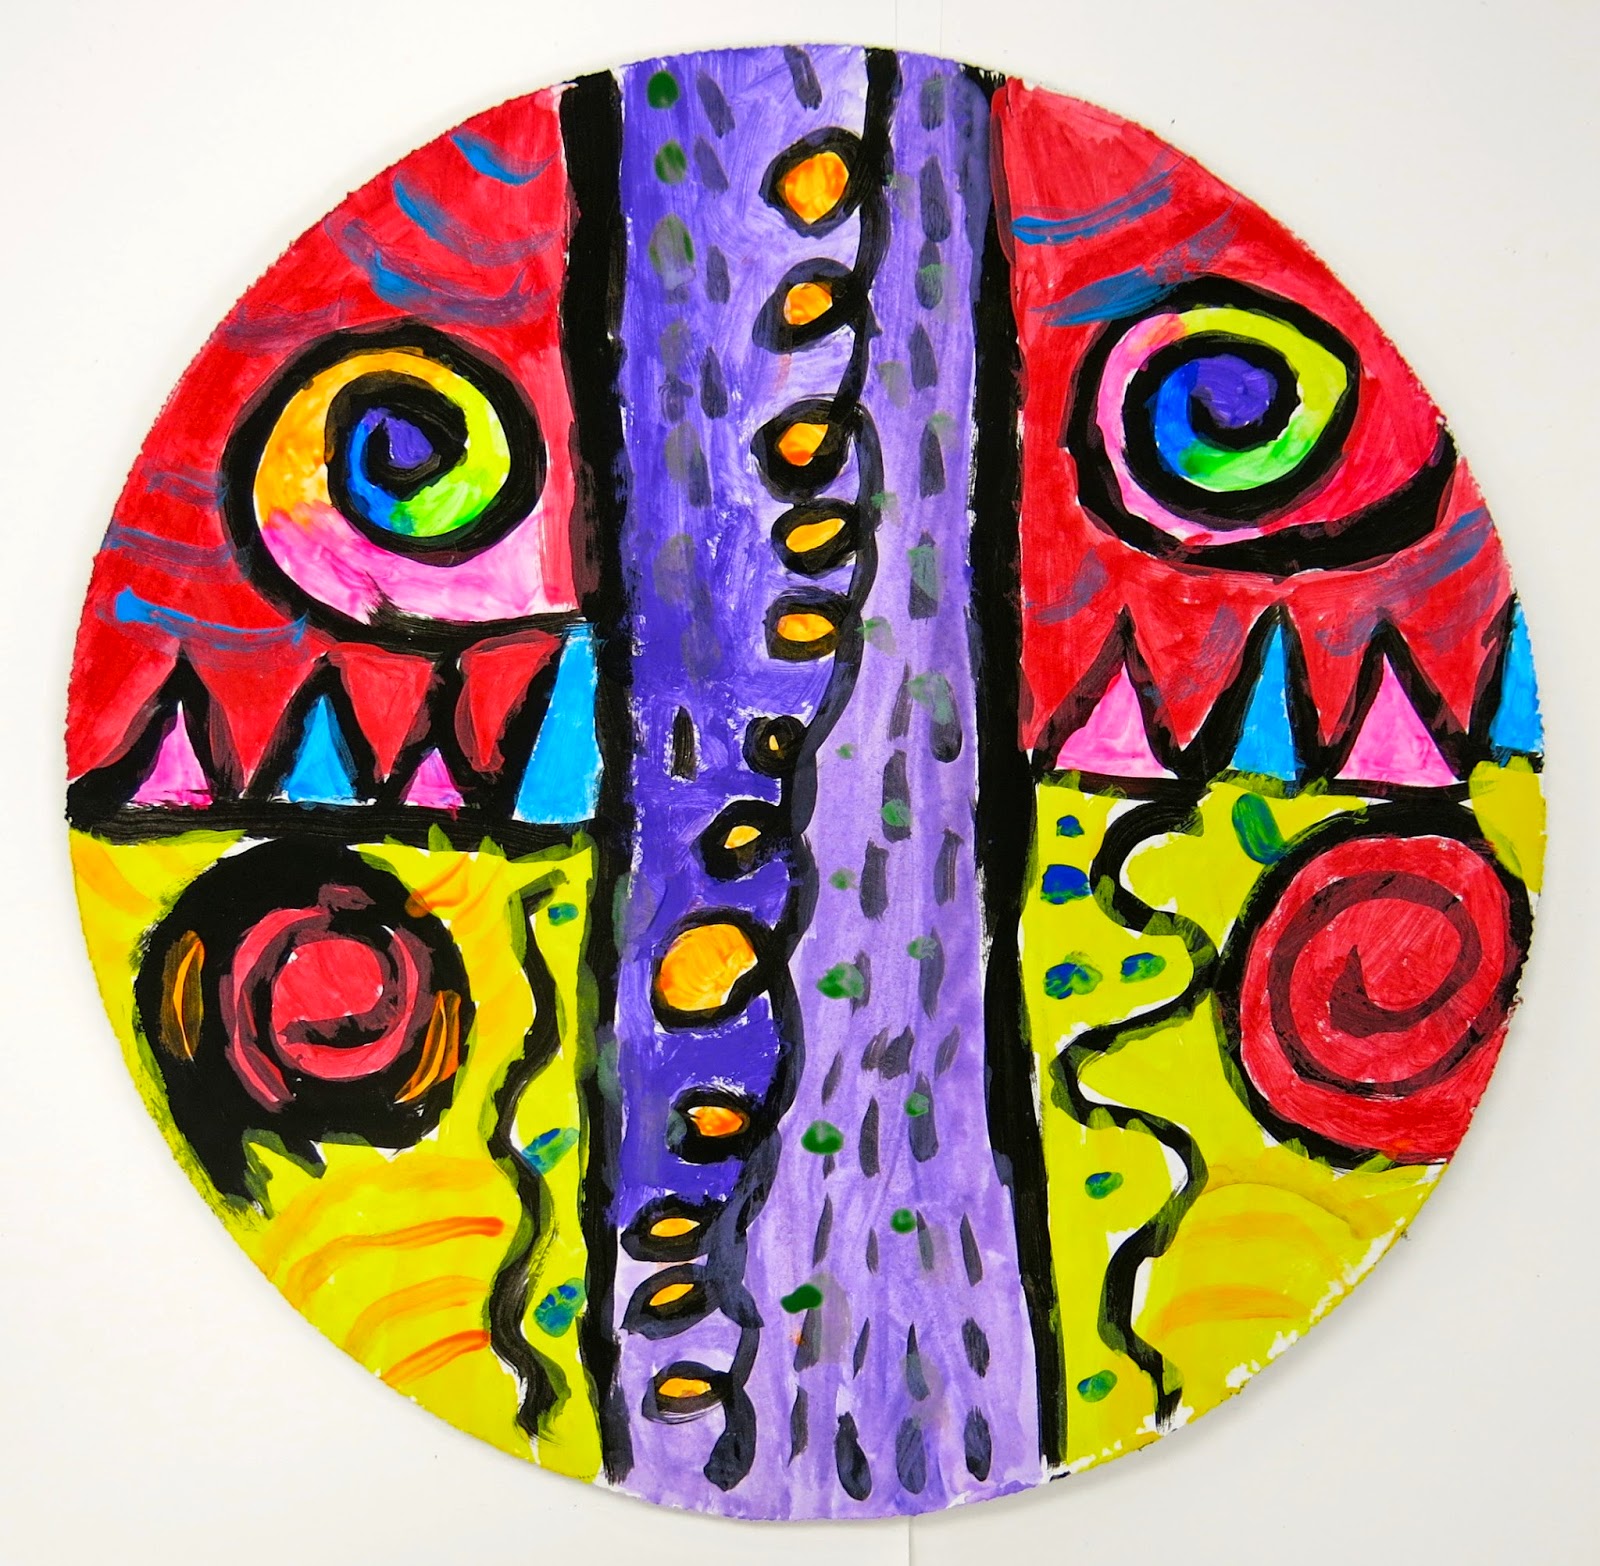
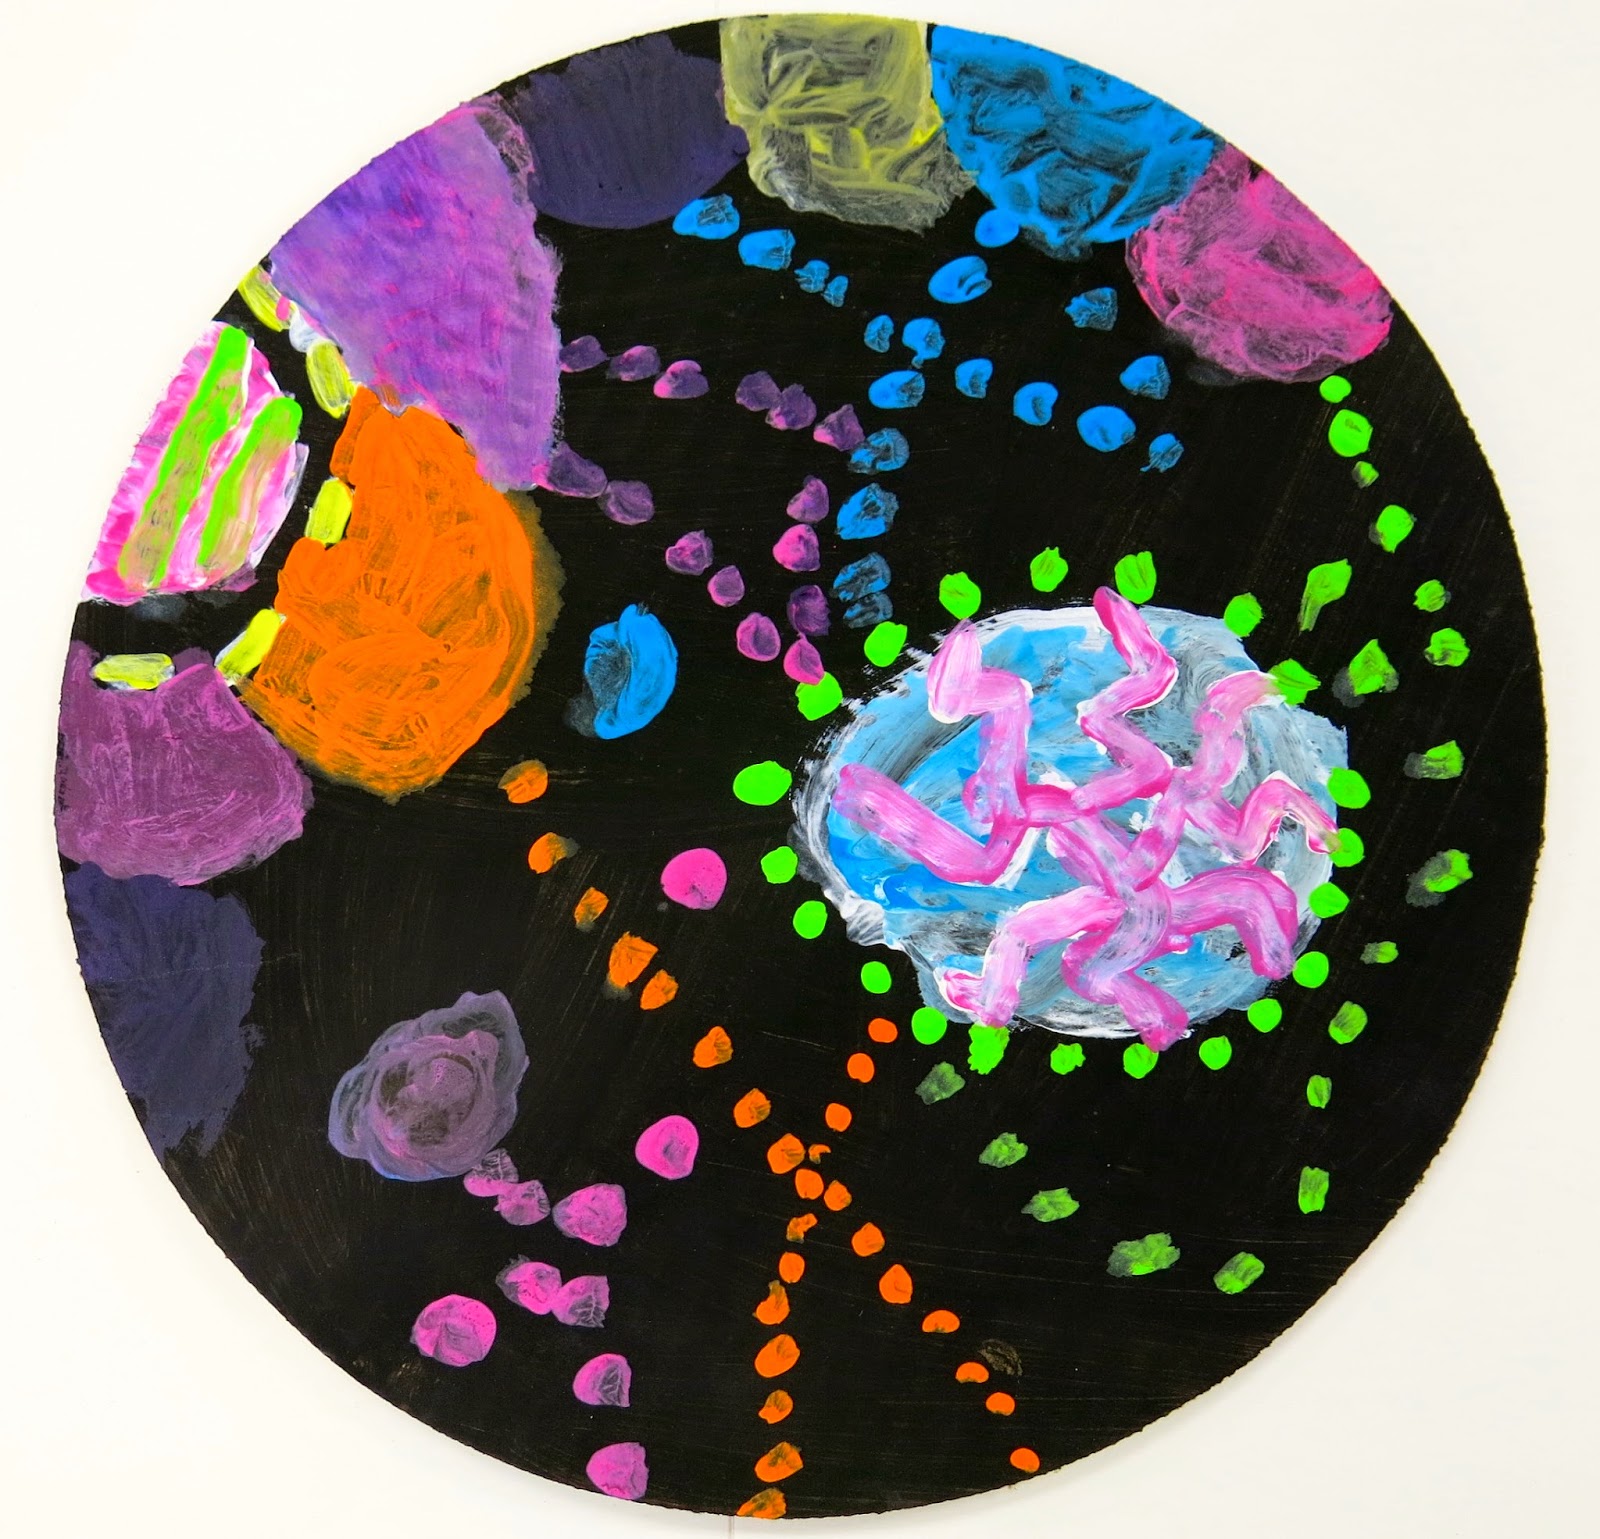
I still thought the idea was a good one and a fun way to start the school year so I went with it any ole way. Whatcha see above is one child's reversible painting. I love how different one side is from the other. Lemme tell you how we did it. It all started on the first day of school...
Yeah, I know. You've prolly seen this thing too. Told ya I'm a repeat-asaurus. Just ask my students. 


On our first days of art class, after our chats about Kandinsky and his painting to music, we tackled our own abstract paintings. We listened to music and musical instruments to inspire a variety of lines. Our first Word of the Week was "artist" which we all decided we most definitely are.
The following classes were spent painting and our word of the week was "unique". I really wanted to emphasize that our paintings are all going to be different, no one better than the other. We also talked about how color could evoke mood and that was the focus behind our color choices. This wasn't a color mixing lesson, per se (gah, I've always wanted to say "per se" on this blog. Today's my lucky day, I dare per se!). If the kids created new colors, HURRAY!, we celebrated that. But our focus was on using colors to show emotion.

And by the looks of things we were all pretty happy. By the way, the paint we were using was whatever-was-left-over-from-last-school-year. My art supply order hadn't arrived yet (because, um, I forgot to place it. Der.) so we may have been scraping the bottom of some bottles. I do have to tell you that upon YOUR recommendations, I ordered VersaTemp from Sax and, y'all. I LOVE IT. Best paint I've used with the kids yet. I can't wait for you to see their new paintings! But, um, back to this.
I think a kid's personality really shines in an abstract painting. This dude is very meticulous, organized and precise. 
And this little girl is very free and comfortable with her sense of expression. She's already decided she's an artist now and when she grows up (gotta love that!).
I see a landscape painter every time I look at this painting.
Because I thought the boards should be the opposite on the back, I did go ahead and paint them all black. Which really didn't take as long as it sounds...but I didn't want the kids to use one of their precious art classes painting something black. We looked at a couple of Kandinsky's circle paintings and I gave the kids a "creative challenge" ("creative" being our Word of the Week): Create a painting using only circles. 
Because the surface was black, the kids did have to paint the circles white first and then add color. Which was great because then we could learn all about tints and value.
I see a budding Edvard Munch, don't you?
So clever, I love it!
The week of Dot Day, our word was "inspire". This was because our beautiful reversible paintings were to inspire the school just as Peter H. Reynolds had inspired our dot theme. To hang, I simply punched a super small hole in the top and bottom of each painting and paper clipped them together. 
And the serve as this super colorful reminder of the unique and creative artists that made them. They're so happy, I think I'll leave 'em up for a while. 

By the way, I now have a thing for cardboard pizza rounds. I gotta know, what have y'all ever used 'em for? 

Until next time!
 photo signature_zpsd10b3273.png

Read more »

Sunday, September 28, 2014

What the Art Teacher Wore #116 and an Art Project Update

Oh, Flowery Day!: I've already started the long-drawn out process of packing up my summer duds and replacing 'em with fall frocks (which I'll do all over again in two months when I pack up the fall clothing and bust out the winter stuff. The fun of being a clothing hoarder never ends. Sigh). Howevers, since we are learning about colorful Latin America, I wanted to dress the part one more week before saying adios to all my colorful clothes. dress and belt: thrifted; jacket: Lucky Brand; sandals: Frye; big fat hair flower: DIY
And another photo because I just wanted you to see the back of this groovy jacket. I can't take credit for it but it's long inspired me to do the same to some snooze-fest sweaters in my closet. 

Well, hello there, kids! I dunno about you but these past coupla weeks have seemed to swallow me whole. By the time I get home from work, make some feeble attempt at cooking dinner (by the way, am I the only one that will occasionally [and by "occasionally", I mean once a week] have Pop Corn/Ice Cream dinners?) and kinda clean, up it's practically bedtime. Which is driving me crazy because my DIY mountain is piling up. My sewing room currently looks like a studio for a dozen different nut-job artsy types who lack direction and have seriously low standards of cleanliness. Which is pretty much how it always looks, dunno why I'm acting like that's anything new. 

Aside from all that slack-tasticness, I gotta tell ya that my email inbox has been filling up with some super fantastic Costume Contest entries! Are y'all planning on dressing up as an artist or artwork? If so, don't forget to send your photos my way (cassieart75@gmail.com) to enter to win a feature here as well as spot in SchoolArts magazine! Looking forward to see your costume!
In other news, I'll be speaking at Bowling Green State University Monday, October 6th! I'm excited to share with y'all how I use my (questionable) fashion sense as an inspiration for teaching. At least I think that's what I'll be sharing. Regardless, I'd love to see and meet you there!

All that aside, I thought I'd share with you the start of some Latin American-inspired work that my students began this week. Last week, you saw our inspiration and now here's a sneak peak at our works-in-progress. What in the world are your kids doing in the art room this week? 
In first grade-ville, we're working on our Amate-inspired drawings of floral and fauna. After learning about Mexico, Amate paper and macaws, we were introduced to a lil Spanish by this guy:

That's right, I totes upped my geeky art teacher game and used this giant macaw puppet to teach the kids Spanish as well as the primary colors (thanks, Folkmanis, for that wise choice of feathers!). I picked up this guy from amazon and the kids loved him. They were so excited to draw their own macaws after Manuel (his name) made his appearance.
Warm/Cool Days of Fall: I never know how to dress when it comes to fall. Cool in the mornings, warm by noon, this weather is as moody as me. dress: thrifted; scarf: Urban Outfitters; belt: Anthro 
My second grade artists are working on collage landscapes with the arpilleras of Chile in mind. We worked for several days creating painted papers (inspired by one of my fave blogs, Painted Paper! Thanks, Laura!). Now that our land is complete, it's time to add some fun details. I'll keep you posted on these beauties.
Florals and Frida: Did anyone else scoop up those Frida shirts that Forever 21 was selling? Did you know they have a "Artist Series"? They've featured the artwork of Keith Haring and Jean-Michel Basquiat which is awesome. What's not so awesome is that it's usually crop tops and tube tops. Not exactly teacher attire. But I suppose they aren't expecting teachers to shop at a place called "Forever 21", now are they? Frida top: Forever 21; skirt and shoes: thrifted
My third grade is getting ready to embark on one of my fave projects: Tree Weaving. This week they created their backgrounds. We learned how to mix three different values to create space in our landscape. The kids were allowed to use whatever colors they wanted for their paintings which meant some created deserts, fields or beaches. I can't wait to see how their woven tree looks in the foreground. 
Bird Brained Friday: Since my first graders were drawing birds, I thought a bird-themed dress would be appropriate. Not that it could compete with that bird puppet, lemme tell you. They were all, "cool dress, Stephens, now BRING OUT THE PUPPET!" Kids these days, I tell ya. sweater and dress: thrifted
Lastly, we have my fourth graders Metepec suns. These kids used the same method that my third grade students did to create a three-dimensional face. Several kids are creating a sun/moon face (those are the unfinished ones). I borrowed heavily Denise Logan's book Dynamic Art Projects (great book, y'all. Check it.) but I'm planning on having the kids do a little something different for the rays of the sun. For that, you'll have to stay tuned. Until next time!

 photo signature_zpsd10b3273.png

Read more »