Showing posts with label art class. Show all posts

Thursday, July 19, 2018

Painting my WHY I TEACH

 Hey, kids! In my last post I shared that during our LIVE chat, we'd be sharing our WHYs. Why do we teach? It's such a simple and important question that I can honestly say I've never been asked or given thought to. WHICH IS JUST PLAIN CRAZY. 

The question was brought up during our online bookclub chat. We are currently reading The Wild Card by Hope and Wade King. You are always welcome to join our chats, even if you are not reading. This summer, I've been going LIVE every Wednesday at about 9:15pm CST. 

Last week, during our chat, we decided it would be fun to come up with our WHYs, put them in kid-friendly terms and make a work of art featuring our WHYs for our classrooms. I started to paint mine while live last night and, in usual form, it looked like a flaming hot turd. However, now I'm pleased as punch with it! So here is my WHY: 
 I've had this round canvas forever and I thought it would make a fun surface to paint my WHY on. Once I decided upon my WHY, I came up with the palette idea. I finished that off after our chat:
Here's a lil behind the scenes of the process:

I'm THRILLED to see so many other teachers jump on the paint-your-why train. I think it will be so wonderful to share with out students at the start of the school year. Check out these amazing WHY works of art created by other teachers. Be sure and give them a follow on their social media as they are all amazing and inspiring! 
 My sweet buddy Ashley created this precious WHY for her art room. In case you don't know, Ashley is INSANELY talented and known for creating teacher caricatures. You'll have to check out her IG to see more. Side note: her husband is a super talented art teacher also who just opened an Etsy shop with posters for the art room!   
 I love Sarah's WHY so much. The message, the colors and the drawings around the border are just so cute! You can follow more of Sarah's colorful adventures in her art room here.
 Kim's rainbow-tastic WHY is the stuff of art teacherin' dreams. I love how simple and colorful and PERFECT this is!! I want one! Be sure and give Kim a follow. She's fabulous!
 Another rainbow-lover! Crystal's WHY is another one that is just perfectly simple and kid-relatable. That's what I feel is so important...so the kids can read them and understand just why we are there! 
 Isn't this quote just the most amazing thing? I LOVE this so much, Phyllis! Sharing what art means to us and why we value it's place in our student's lives is such an important thing to share with our kiddos. Beautifully put, Phyllis!
 If you don't follow this Disney-loving art teacher, you are not livin' your best life. Everything Mrs. Cook shares is sprinkled with pixie dust including this quote! 
 Over on Facebook, during our LIVE session, folks were painting right along! Check out Raquel's reason for teaching art...the kids are like a fountain of youth!
 Michele's WHY is perfect for the kiddos to see and understand...but my favorite part is the heart, the palette and the 3D element with the paint brushes. LOVE it! 
 Jacqui's art makes me so happy. I know my students would LOVE that happy faced, big-eyed Earth and would probably love to replicate it. I think her quote and image are just magical. 
 YES, Shelby! This is kinda what I was going for too with my quote. You put it into words perfectly...and with a rainbow to boot. 
Hilary, this just makes me so happy. The different fonts, the rainbow order and THE MESSAGE. Y'all...you nailed it!
If you feel inspired to create a WHY, feel free to share it on my IG and tag me, I'd love to see it! 
 photo signature_zpsd10b3273.png
Read more »

Monday, July 16, 2018

In the Art Room: Finding Your WHY

 Howdy, friends! I've been busily plugging away, getting my art room ready. My students will be here in just three short weeks...which I know sounds like plenty of time. However, I go back in two weeks (and two days, but who's counting? ME, THAT'S WHO) and have decided not to come in at all next week. That leaves just this week to get my room ready...and I decided to only allow myself two days. If you follow me on Instagram, you were able to see my progress. I drank two pots of coffee AND GOT SO MUCH DONE! Proper room tour to come...once I clear the hot mess off my counters (like, did an art supply store bomb go off over there or what?!)
 In case you didn't know, I've got a book club happenin' over on my IG and my FB pages. Every Wednesday evening, I've been going LIVE around 9:15pm CST to chat with y'all about The Wild Card, our current teacherin' read by Hope and Wade King. Recently, in the book, they mentioned finding your WHY...why do you teach? During our chat, we had the idea to each come up with our own WHY (if you don't know it already), put it in kid-friendly terms and make a work of art out of it! Here, lemme 'splain:
Clear as mud?
Easy enough, right?
Sound good? Great! Even if you can't join the fun, be sure and tag me, I'd love to know your WHY! It will surely inspire others. 

 photo signature_zpsd10b3273.png
Read more »

Friday, July 6, 2018

DIY: Beach Towel to Circle Skirt!

I got a joke for you: Crazy art teacher walks into Walmart and sees these:
 Totally ignoring the words "beach towels", she immediately thinks CIRCLE SKIRT and the rest is extra pepperoni history...
Now if you've been around this blog during the holidays, then you already know that I have a thing for buying tree skirts and making them into lady skirts. When I spotted these round beach towels, I thought of doing the same. I mean, why should such an amazing print like this be limited to just the beach?!
While stitching last night, I filmed the process so you could see just how stinkin' easy it was. I wasn't quite sure if it was all gonna work out so at the time, I only bought the pizza towel. Y'all better believe I went back to day and bought ALL OF THE REST OF THE TOWELS. Can you even blame me?
 I totally went to Walmart in my skirt. As I was leaving the house, a neighbor drove by and shouted "is that a PIZZA skirt?! AWESOME!" I didn't get much attention while at Walmart (I mean, it's WALMART, there's a whole website dedicated to the crazy stuff people wear there. Pretty sure I flew under the radar!) but I did get a lot of giggles and stares from little kids. Which means my students are gonna love it. 
 I can't wait to wear this skirt during the upcoming school year...we just might have to make Pizza Pillows again! 
 I'll keep you posted on the many more beach towels to circle skirts to come! If you decide to make one, the supplies are:

* One round beach towel. Mine was 58" in diameter, the perfect length.

* One circle skirt pattern. I used Anna Maria Horner's circle skirt pattern in the video. Any one would work. You could probably even find a tutorial online to make the pattern yourself!

* One 7" zipper.

* Fabric for the waistband. 
And the steps are just as easy. I'd go through them all but, meh, I'm lazy. Just watch the video, y'all! And have fun! 
Oh, snap! This just in: Walmart commented on my IG...AND quoted the one and only Tim Gunn! WHHHHHAAAAAA. I'm dead.

 photo signature_zpsd10b3273.png
Read more »

Monday, June 4, 2018

DIY: National Donut Day Dress, Part 2

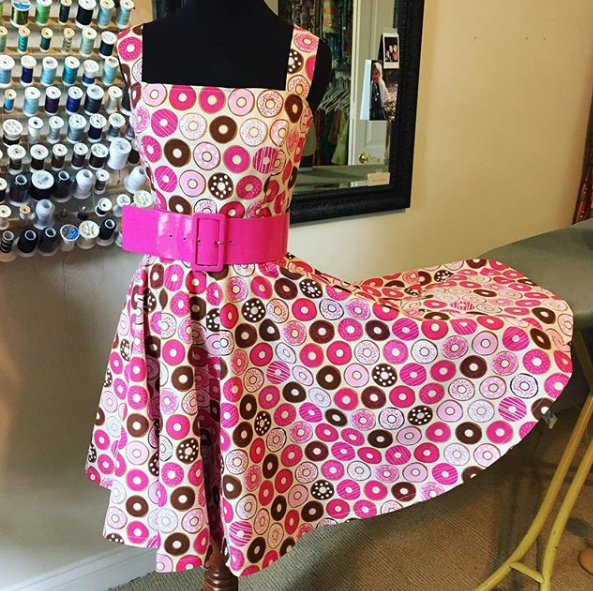
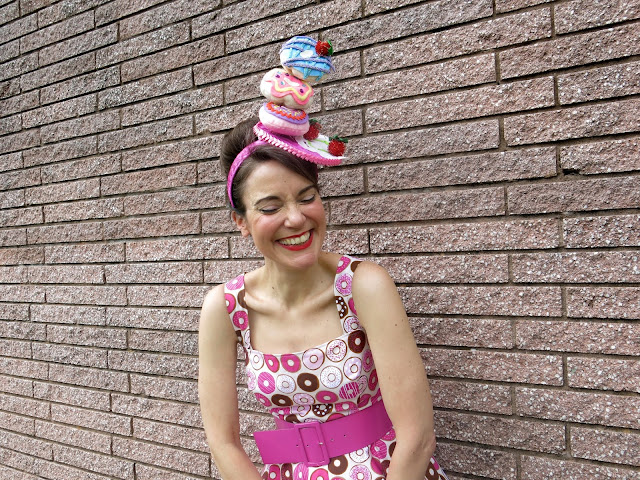
This past Friday was National Donut Day! Because I'm pretty much a crazy person, I decided to create not one but TWO dresses for the occasion (the extremes I will go to to avoid cleaning my house HAS NO BOUNDS, PEOPLE). The first dress I made was an ode to Krispie Kreme. This here dress was dedicated to all the other fabulous donut joints out there! 
I decided to pair my dress with the Donut Hat (er, fascinator?) that I created a couple of years ago at a workshop. I started the dress at about 11:30pm on Thursday night. I'm a total night owl and it gets really out of hand during my summer vacation time!
 I used my easiest dress pattern that I've repeated both here and here. I love this dress pattern because it really just involves to pattern pieces (not including the two straps): the bodice and the skirt! It's a vintage Vogue pattern, number 8571. When looking for vintage patterns, your best bet is eBay or etsy. Using the sewing pattern number makes the search a lot easier. 
I decided to opt out of the waist tie (I did that here) and just wear my big ole pink belt. I did go with a circle skirt (like I did here) which took me a bit longer. I didn't have enough fabric so I had to do some "tasteful additions" to one of the back panels. I'm not telling you which one, I'll let you see if you can figure it out! 
 With the pattern pieces cut the night before, I got up at 7am and started sewing. This dress took me until 11am to complete...not bad, I don't think! Adding pockets and hemming that beast of a circle skirt did slow me down some but I was happy with my time. Then I had to bust it to wear both dresses to all my donut stops!
After hitting Krispie Kreme in my KK dress, where I picked up donuts for our school's custodial staff (and any other takers in the building!), I did a quick change into this number. These photos were shot by me with my self-timer right outside my art room door. Then I was off to Dunkin'!
So it turns out that Dunkin wasn't giving away free donuts...you had to buy a drink before you got a freebie. I bought a dozen donuts from there to take to my school's central office where the big wigs work. I work in a very small school district of just 8 schools and we're like family. It just so happens that they are less than a half mile down the road from Dunkin so it totally worked out. Everyone was so excited to get a donut and see my wild ensemble that it totally made my day. But they didn't eat all the donuts, I still had half a dozen left!
I remembered I had some banking to do which is also just down the road. I popped in there and delivered donuts to those hard workin' folks at the bank. Our bank is next door to our post office, right in downtown Franklin, so I popped in there too and delivered the rest of the donuts. Y'all. Folks were so stinkin' happy and excited...this was such a fun day! Who knew dressing crazy and giving away free sweets was so much fun? I really need to do it more often! 
 photo signature_zpsd10b3273.png
Read more »

Monday, May 28, 2018

In the Art Room: A Collaborative Painting for Field Day!

Disclaimer: Since discovering Instagram and my love for it, I've gotten super bad about snapping photos with my camera and simply using my phone. So what you have in this blog post are phone photos and for that, I apologize. If you'd like to see me overshare my art room happenings (as well as just my hot mess of a life), you can find me here

In my last post, I shared what we did for the art station portion of Field Day...when I thought it was going to be rained out. The night before Field Day, while I was head scratching what we could do, I thought creating a collaborative canvas painting would be fun (this is what happens when your brain is fried, y'all). So I pulled this giant canvas out of my closet and went to town. 
 I've had this canvas for years. I had started a painting on it years ago and never did anything with it. So I simply painted over it with a cream color paint (cuz that's all I had on hand) and used watered down black acrylic paint to create this. Why watered down acrylic? Because it has better viscosity that way. I began by sketching out four wavy lines across the canvas. Then I wrote out the letters of our school. Once I was happy with the placement, I painted it with a flat brush and called it a night. 
 Along with our other painting station, I let the kids go to town on this. My only "rule" was that one color go in one space...and TRY to stay within the lines. As you can see above, that was a struggle. But it was field day, we were wound up and I knew I could lean up the lines by simply going back over them. So no worries. 
 This was after the first day. I was tempted to leave it this way...and then I added the little pattern on the top and thought it would be fun for the kids to add patterns the following day. 
 Again, so sorry for the grainy photo. My only rule for the patterns was that the kids had to pick one pattern and color and stick with it. For the dots, they used wine corks dipped in paint (fave part of the day? A kid saying, "oh my mom has TONS of these!" Ha!) and thin brushes for the designs. Again, other than that, little direction was given. This was on the last day of school where I had free choice centers set up around the room. This just happened to be one of them. 
 Once dry, I went back over the black to once again clean up the edges. Then I thought it might be fun to add some white highlights to make the letters pop. Look, even the edge got painted!
The admin had no idea we were creating this painting. When I was sharing it with them, our school librarian saw it and LOVED IT. It was decided that this painting would go in the library for everyone to see. AND I'm really excited to share that now the librarian and I are collaborating to create an entire ALPHABET WALL in this style! The kids will kick off the new school year painting a canvas for each letter in the alphabet to showcase in the library. Y'all I'm so stoked! This project was so easy, colorful, happy and fun. I'm looking forward to making more. LOVE to hear if you give this a go! 
 photo signature_zpsd10b3273.png
Read more »

Thursday, May 24, 2018

In the Art Room: 2017-18 Art Show, 3D Displays Part 3

Here is the final installment of the 3D tour of our art show. Our school-wide art show features every work of art created by every student. The halls are filled with your 2D pieces (future blog posts on those displays!) while the art room showcases our 3D creations. You can see Part 1 and Part 2 of our art show tour of 3D works. Our art show was Superhero themed (tho you'd never know it by this display) and the kiddos were asked to dress the part. You can read more about that here
 My fourth graders stitched up these massive Pizza Pillows this spring and I knew I wanted a fun display for them. I had thought about creating oversized pizza boxes to put them in like we did with these clay pizzas created a couple years ago.
While they look cool, they only are impactful if you are standing right over them. So I got this idea to create a Pie in the Sky display!
I started by painting and hanging one paper panel and pizzas in front of it, just to see how it looked. I immediately loved it and decided to make the whole display this way. 
If you are interested in more details about this project, here's the video I created last summer. In this video, I am creating a variety of pizza plushies. However, for my kiddos, we went bigger. That's really the only difference.
Complete lesson here and here. 
Here's a terrible picture of how I hung the paper. I put a strip of masking tape across the back. Then I created a tab of masking tape by folding a piece of tape in half. From there I used two paperclips linked together. One went thru the tape tab and the other was stabbed into the ceiling tile. 
 To hang the pizzas, I simply used fishing line. I fed the line thru the pizza and hung it also with linked paperclips. To prevent the pizzas from twirling in the wind, I made sure they butted up against the paper so they would not rotate. 
This was definitely a show stopper...and the younger kids were all asking "when are we making THOSE?!" That's when you you know you got a winner!
 photo signature_zpsd10b3273.png
Read more »