Make no mistake: that big toothy grin is one part love-for-my-Time-Timer and one (BIG) part it's-the-last-day-of-school! That's right, y'all! I gave as many of the kids a big squeeze and a "love y'all!" before booting them out the door and lunching with some teacher buddies. I'll be right back at school next week do work on some projects but tomorrow we leave on a jet plane to sunny So Cal and I couldn't be happier! But, in the meantime, I thought I'd share with y'all one of my favorite tools in the art room, my Time Timer. This bad boy serves many purposes in my art room from classroom management to differentiated instruction to motivational tool. Lemme tell you the many ways I use that guy in my art room:
And to think I'm not even a paid endorser. Yo, Time Timer, call me!
Just to recap, I use it the following ways: * After giving instruction, I set the timer for 5 minutes. During that time, my students gather supplies and begin work SILENTLY until the timer goes off. Then they can chat calmly with their table buddies. This allows them to collect their supplies and get settled and started in a calm manner. * I use it for my longer classes when I have a lesson with many steps that needs to be broken down into bite sized pieces. For example, when we are weaving, I might give them the first steps of warping their loom. When the timer goes off, regardless as to whether or not they are finished, they are to hit the pause button and meet me on the floor for the next set of instructions. This breaks up the lesson so as not to overwhelm the kids with directions. * I often have students who are "stumped". For example, I gave my students a writing task that I noticed was taking them FOREVER. So I set my timer and gave them only five minutes to complete their writing task. This made it so they were motivated and focused to complete their writing. * Some students work best with a visual and with less instruction. For those, I use my Time Timer to differentiate. I'll give them fewer steps, set the timer and ask that they complete the steps before the timer.
My kids love the timer as much as I do! I have several that have made themselves my designated "timer" who are in charge of setting and maintaining the time. It's so simple to operate and durable. I don't know what I did without it! What tools do you use in your art room that are vital to your instruction? I'd love to hear!
Hello, friends! I've been packing and preparing for my upcoming trip to Chicago for NAEA and I'm so excited. While I do love me some art teacherin' conferencing, I don't love the multi-day sub plan preppin' it entails. The subs I've lined up are super-fab and I know they will have fun creating with the kids. However, they aren't art teachers by trade so I do like to have sub plans that are not only easy for them to follow but ones they can do with all my classes. This means less confusion for them and less supply prep for me! I think I've come up with a plan and I thought I'd share it with y'all in case you wanna use it too.
It's an autobiographical three-dimensional star! Our school-wide art show is coming up and I love to have the kids do a little writing about themselves. What better way to let their star's shine than with this fun project?
I mean, check out that three-dimensional star, y'all! I created both a sub video AND a photographed step-by-step. This way, if technology-town decides to be uncooperative, my sub-o can use the visuals. I'm printing each of the following photos with directions and plan to have them posted for both the students and the sub to refer to. But, before I get to all that...LET'S TALK ABOUT NAEA 2016!
I'll be presenting a handful of times and meeting y'all at the AOE "Meet the Bloggers" event! Here are the deets... * "Come Blog with Us - Three Art Ed Bloggers Share Tips" Thursday, March 17th // 12 - 12:50pm McCormick Place, North Building, N426c, Level 4 A presentation I'll be doing with some of my fave bloggy friends, Laura Lohmann and Phyllis Brown! Thursday, March 17th // 12 - 12:50 // McCormick Place, North Building, N426c, Level 4 * "Dress Like a Masterpiece: Needle Felting Wearable Art!" Thursday, March 17th // 1:30 - 3:20pm McCormick Place, Lakeside Center, E272b, Leve 2 PLEASE NOTE: This is a ticketed event. It is currently sold out. Sorry, buddies! * "Leaving a Legacy Without Losing Your Mind" Friday, March 18th // 8- 8:50am McCormick Place, North Building, N227a, Level 2 I'm so excited to present with Janine about something we are both passionate about: school-wide collaboratives! For some reason, NAEA has me listed as Cassandra Stephens (which, technically, is my name but I ain't fancy so I never use it!). * "Meet Your Fave Art Teacherin' Bloggers!" I'm super excited to meet y'all and my fave art bloggers! Here are the deets in a super cute graphic that I didn't create (thanks, Alecia and AOE!)...
I'm seriously cannot wait to see/meet/chat/high five all y'all! But until then, let's sort out these subbie plans, shall we? Below is the video I am leaving with the sub. I don't anticipate that she'll get thru the entire lesson while I'm away. However, this will be a super great way for me to ease back into things, what with the kids all working on the same project. I like a mellow-comeback after being gone for a spell, don't you? Here's a wee list of supplies used in this here art makerin':
* Copy paper cut to a square 8.5" X 8.5" * Sharpies * Markers * 12" X 12" black construction paper * Metallic markers * Glue * Chalk
This project was inspired by my current obsession with Sly and the Family Stone and the song Everybody is a Star. Take a look-see!
And here's my sub plan video! (By the way, in case this sub plan doesn't suit your fancy, check this one. Also, I'm always sharing video'ed plans here so you might wanna subscribe). Sidenote: I am going to have my sub create a stockpile of these stars for my kindergarten friends and for any kids who have a hard time following the directions. We don't wanna leave any artist behind!
(Please ignore the crazy image...and the fact that I have blue chalk smeared on my cheek for about 1/8th of the video). In case the video isn't the best format for y'all, I also snapped step-by-step photos because I'm such a giver. Here you go!
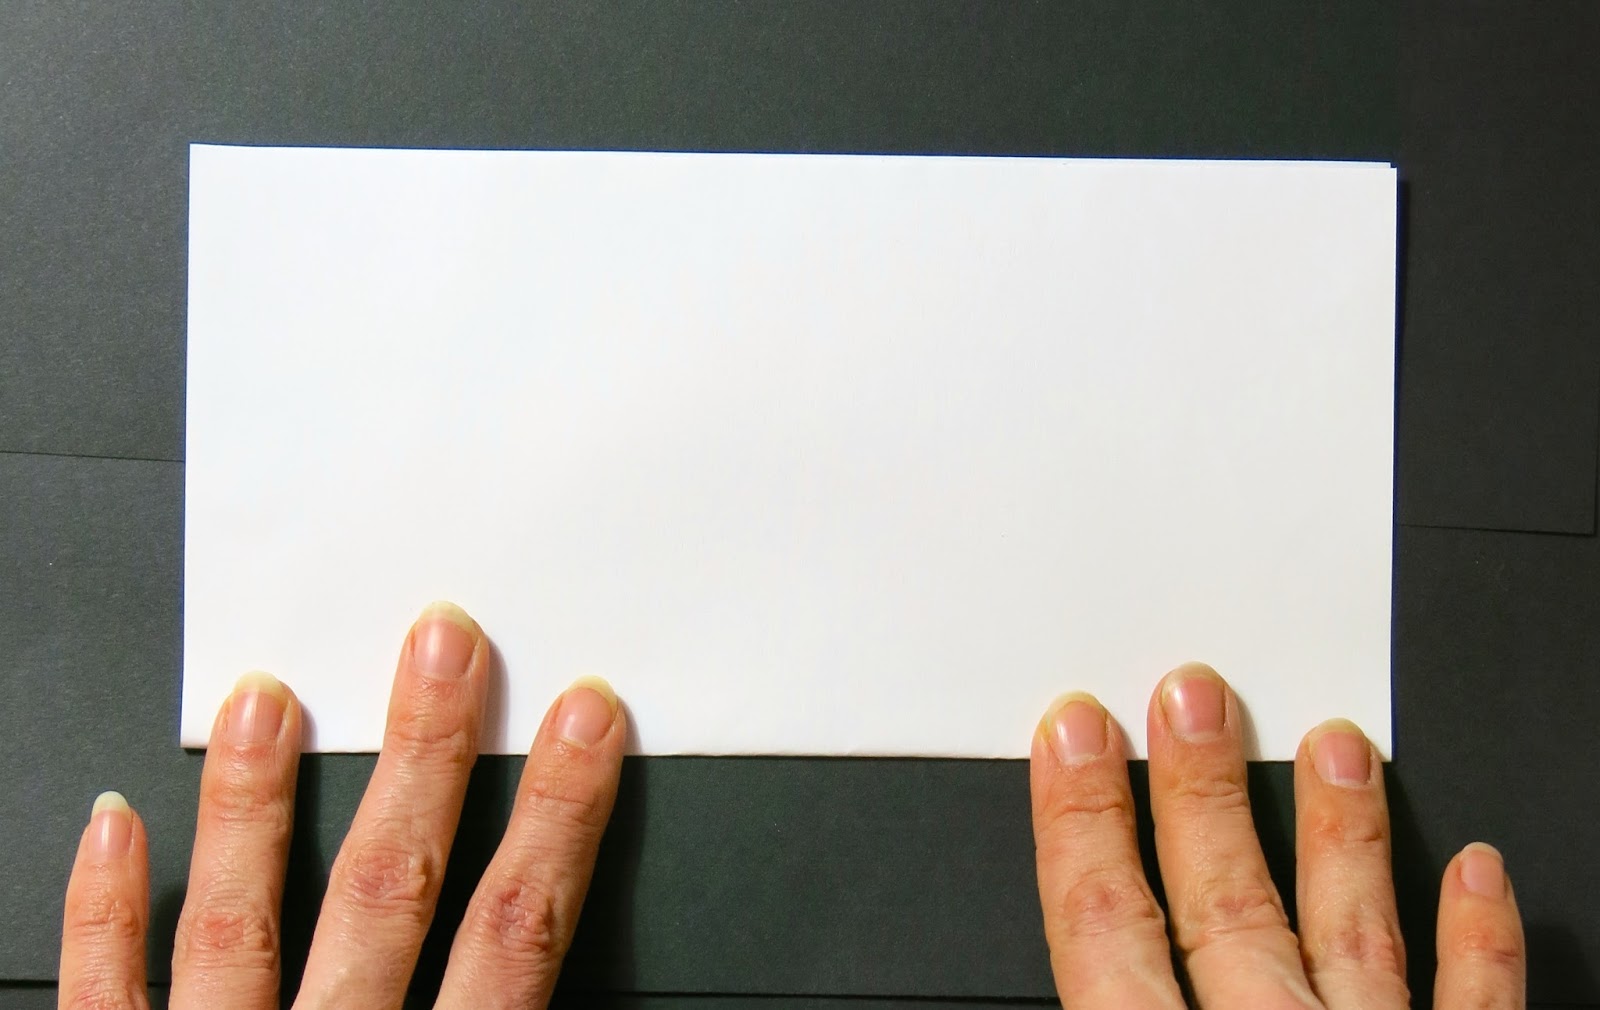
1. Fold copy paper square in half.
2. Be sure to press the fold down firmly.
3. Each corner has been labeled (my apologies for the blurry photo).
4. Take corner C and bring it to the middle of the line segment between corners A and D.
It should look like this. Press the fold firmly.
5. Then bring D up and fold a small triangle.
Press firmly.
It should look like this!
6. Now bring the left hand side over to the right.
It might be difficult to fold all of those papers. Be patient with yourself and your paper!
It should look like this.
7. Now, using a pencil, put a dot in the corner of the two angle lines on the left side...
and another dot on the other side just a little below the middle of that line segment.
Like this!
8. Connect the dots with a cut line and...
Snip!
9. Open it up and you are now the proud owner of a three dimensional star! Congratulations!
10. Now, using a Sharpie, start in the middle of your star and trace each creased line that you made with all of that folding.
You'll end up with ten sections to your star. Each section you can decorate with a different pattern and design.
Here are some ideas for you!
11. Draw your designs in each section.
12. Use markers to add color.
13. Once you are finished, place your star in the middle of a piece of black paper and trace it.
Your pencil lines will be barely visible and that's perfect!
14. Let's write about what makes us a star! As you write, be sure to hop over the outline of the star. You might want to begin each sentence with "I am a star because..."
Fill up that whole page!
15. To get your star to pop out, all you have to do is fold along the long lines of the star.
The long lines of the star should be folded up (that's called a mountain fold) and the short lines of the star should be folded down (that's called a valley fold!).
16. Add a tiny dot of glue to each tip of the star.
17. Press each tip of the star and hold for about 10 seconds to get it to stick.
18. Use chalk to color on your pencil line of the star.
Which should look a little like this when you are done.
19. Use your finger to push the chalk away from the star.
20. Let's do the same thing to the outside edge of the square! Color...
Then smear and viola! You are finished and YOU are a STAR!
Art teacherin' friends, I do hope to see y'all real soon! PLEASE feel free to use this lesson. I'd love to see what your kids create. You can always snap a pic and share it on instagram (you can find me here) with the hashtag #everybodyisastar.
So I kinda sorta told the kids that if they painted and printed their winter selfies really well, we just might get the magic of snow. Snow seems to elude us in these parts...but not this year. Turns out these cute things really DID bring on the snow which was totes fab...except for the fact that it meant we've been working on these bad boys for a coupla days weeks. But that's all right. I mean, just take a lil look-see at how stinkin' awesome these printed and collaged winter self-portraits are!
I knew I wanted to introduce my second graders to printmaking but how? I remembered that my buddy Laura over at this fab-o blog taught her students how to create adorable winter selfies last year. I thought it'd be fun to add the printmaking element to this lesson and viola! Here you have it!
This lesson was chuck full o' art teacherin' moments: we learned how to use the elements of art to create pattern, we learned how to make both marker and ink prints, we learned how to create a tint of blue and print snowflakes in the background, how to draw selfies and design a pleasing composition. In short, we was busy.
Lemme break it down for you:
Day #1: Intro to carving a print. We used Scratch-Art Foam Board but styrofoam plates would work in a pinch. I had created hat and mitten templates so that we could move on to the pattern designing and printmaking faster. I have 30 minutes art classes so I have to take the guess work outta some things. After the first class, most of us had this:
Day #2: On the second day, we continued our pattern design with ink pen. I encouraged the kids to go over their lines more than once just to make sure they'd have a successful print. Early finishers colored with marker and we started to pull marker prints. You can see that in the video...if you've never done it, it's magical!
Day #3: We are ready to use brayers and ink to pull prints! I like to use water soluble Speedball ink because it's the jam. I usually lay out a couple of colors and the kids rotated creating two different color prints on colorful copy paper. (This video was created for my third graders but it's the same idea so I thought I'd share!)
Day #4: We learned how to create a tint of blue and painted a piece of construction paper. We also used cut pieces of mat board to dip into white paint and print snowflakes. It was fun to introduce the kids to a coupla printing processes.
Day #5: Selfie time! The kids had mirrors, this idea sheet and sketch paper. They had to create three thumbnail selfie sketches before moving on to drawing on their final paper. Pink chalk was used to show just how cold it was outside!
Day #6: Time to start assembling our collage. We had a long chat about composition and balance before going on this adventure. The kids could use their favorite prints, whether that was their marker or ink prints (we'll use the extra prints for another project, stay tuned!). I happened to have a ton of scrap paper from another project so many of the kids used oil pastels to create scarves!
Some of the girls used chalk for their long hair.
So in love with this self-portrait! I love how vibrant the marker prints are, it made my happy when the kids chose them.
Several students decided to arrange their composition on a horizontal format.
Last thing added was the pompom! For that, have the kids wrap an 18" long piece of yarn many times around a 2" piece of cardboard. Carefully slide it off and double knot tie another string around the middle. Trim the loops of yarn and you have a pompom! Now...maybe sharing these snowy selfies here will get me one more snow day, eep!