I have been in my current art room for close to 15 years...which is hard to believe. I've only ever taught at two schools. I spent my first five years teaching in Nashville and the last 13 in my current school in beautiful Franklin, Tennessee. Can you guess what convinced me to change schools? If you are thinking all the storage and space, you are correct! I'm absolutely spoiled rotten, I'll be the first to admit.
Before I arrived at my school, this room was the school library. After a renovation, it became the most glorious art room with former bookshelves becoming wall to wall cabinets. Which I love...because, well, storage. BUT I'm not wild and crazy about wall to wall brown. For years I've tried to jazz up my cabinets: word walls cabinets; artwork displays; artist showcases; you name it, I've tried it. None of those things were something I could maintain because of my self-diagnosed ADHD and my self-diagnosed chronic laziness and, also, my self-diagnosed starter/not-finisher prognosis. I really should have been a doctor because it's obvious I'm good at diagnosing. But my handwriting was far too pretty so they kicked me out of med school.
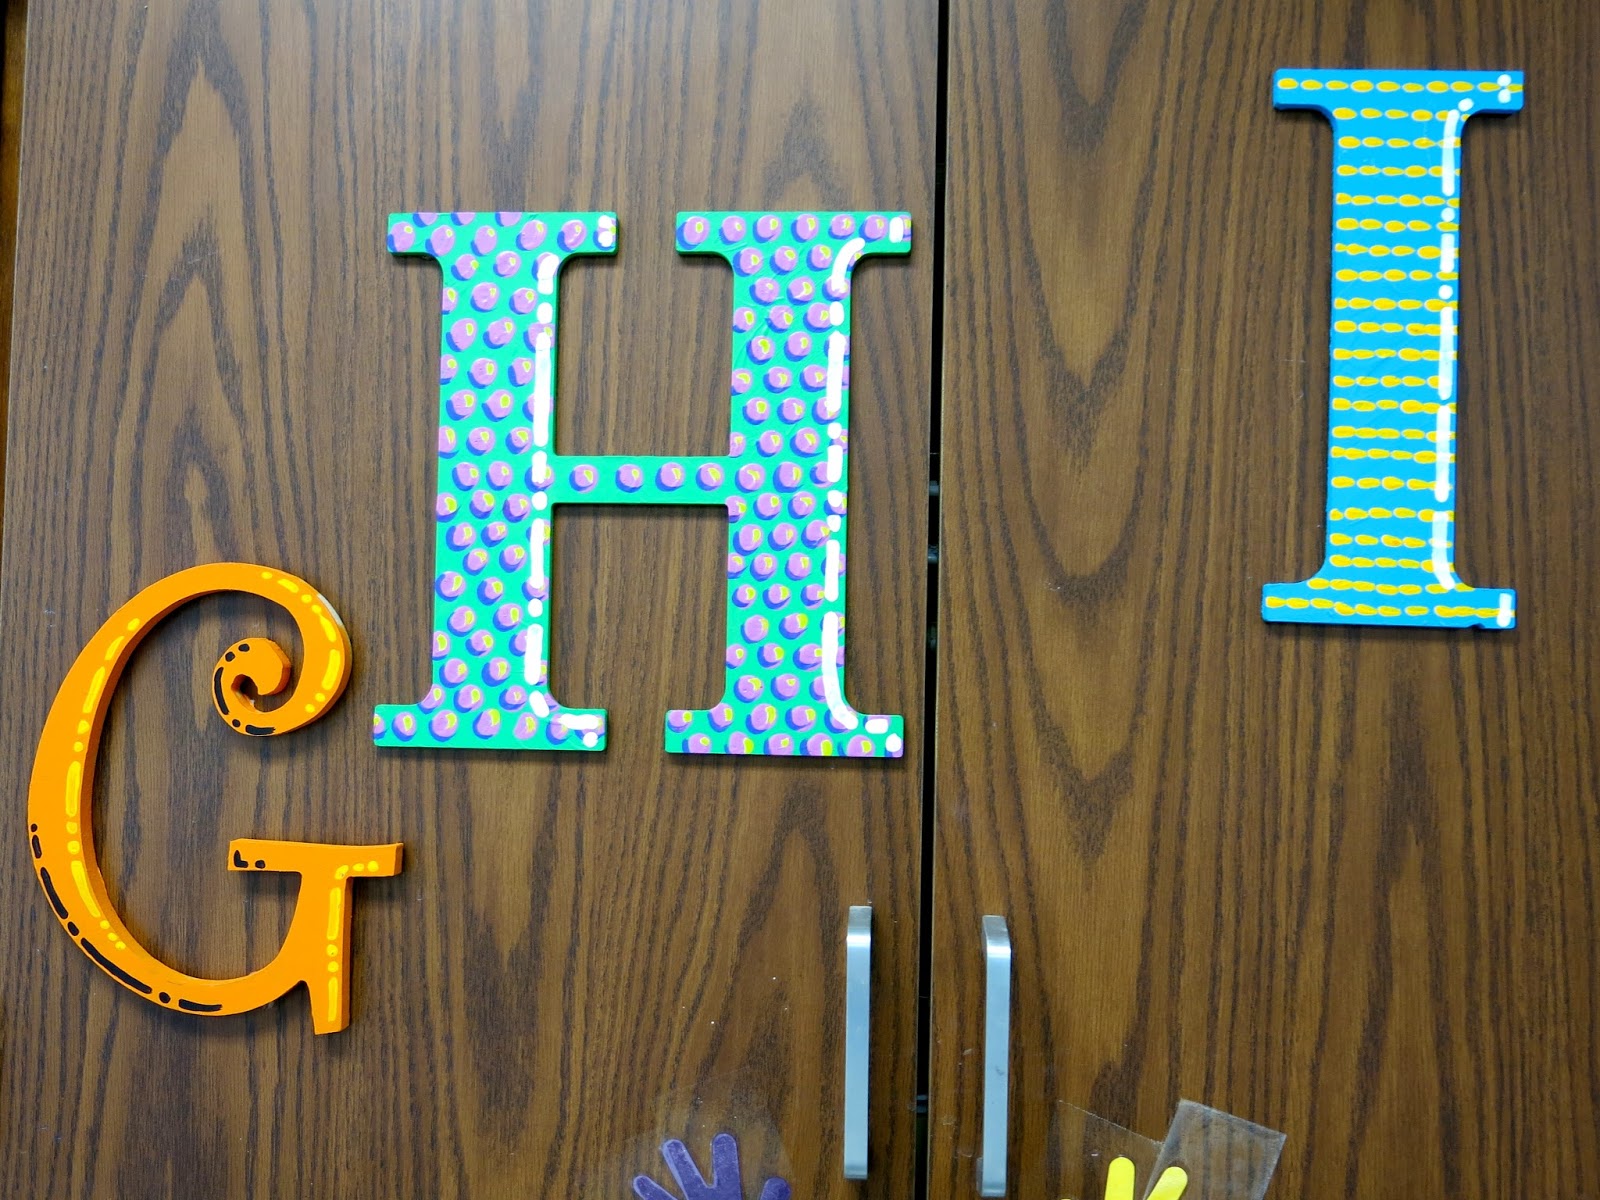
Recently, on a trip to the craft store, I spotted a variety of letters and I got the idea to paint letters on my cabinets. If you've been following me since the beginning of the school year, than you know I'm on a redecorating kick with the idea to decorate to educate.
So when I settled on the idea, I searched the discount bins at the craft stores, always bought the ones on super sale and used my teacher discount...not too shabby when all was said and done. I didn't bother priming the letters because of my self-diagnosed battles with chronic laziness. I just lathered on the acrylic paint and they were fine.
I didn't want the letters to be too matchy-match but I didn't want them to look out of place either. So I decided to stick with the same color palette and just went with patterns for some and plain for the other.
I worked on these sporadically between a handful of other projects (ADHD, remember? You should see my house! It's a mess of "a handful of other projects"...starter, not a finisher, remember?!). Total, it probably took me 2 and a half weeks to get these complete. I used our school wide open house as my deadline.
These letters do make me so happy. Although now I kinda wanna take down what is above my cabinets. I have finds from other countries...but it currently looks like Cracker Barrel if Cracker Barrel was a World Market.
I really had a great time painting. I really helps me unwind to get my craft on and this was a fun outlet.
How did I get them to stick to the cabinets, you ask? Hot glue. But that stays between us, okay? Command Strips woulda worked great...but I had hot glue on hand so...you know. I used it.
I do need to update my wee hands as some of them are no longer accurate. Not to mention, those have bee up since I first started teaching at the school! Which means they're vintage and I could probably sell 'em on ebay.
The thing with redecorating and rearranging...once you start, you just can't quit. I have a dozen more projects I'm dreaming up. The fun never ends, does it?
Thanks for letting me share this new project with you...they letters really make my cabinets so much happier.
Mostly because I love all things brightly colored and patterned!
Last week, as I was piling the day's art bins on the floor around my desk, I managed to accidentally kick one of 'em, spilling the contents, and trip over two of them. I muttered WHY ARE THESE ON THE FLOOR ANYWAY?! I literally barricade myself in them daily. That's when I decided, after 19 years, NO MORE! I'm getting a cart to hold these bad boys. And, thus, the Paint Stick Pencil Cabinet was born!
I picked up a ton of these paint stirring sticks not long ago as apart of a collaborative the kids are creating (don't ask...I'm still trying to figure that mess out). I had some left over and one night, in a fit of painting all the wooden thingies, I painted them like pencils. And I just couldn't stop! Here's how they were created:
So now I had two things: a need for a bin cabinet and a plethora of pencils. What to do? I'm super lucky in that I'm surrounded by thrift stores where I work. I popped by one and spotted this sad little back T.V. cart on wheels for a mere $2. I had not done any measuring (because math, ew) but I had a feeling it would hold two of my bins side by side. AND it was only 2 bucks so there's that. I took it to school and was super stoked to see that my lack of measuring paid off! A perfect fit! Now to start bedazzling.
This extraordinarily handcrafted (ahem), pressed board piece was in decent shape but dreadfully dull. My P.E. teacher buddy primed it for me and I used whatever latex paint I had around from this episode. After painting it, I was happy with the color...but still bored.
I mean, meh, right?
So the next day, I brought in the sticks I'd been painting and started hot gluing them on...and suddenly I was diggin' it.
In just a couple of minutes, the cabinet was complete!
Here's how it looks when the kids enter the art room. So fun! I'll keep my morning classes in the cabinet and then swap them out at lunch with my afternoon classes. These bins came with my art room and they are so handy. Our large work does not go in here...but our smaller pieces do. And now we have a cabinet to hold the bins...so I won't be tripping all over them anymore.
You can find out more details of all the newly created decor for my art room here.
The top of the cart will come in handy too. Many times, when my students enter, I have them gather supplies right away. This usually means they have to turn the left corner in my art room and go to "the store". Now, I can simply place the supplies on this cabinet and they can grab them there...much faster! When you have 30 minute art classes, every second counts.
I contemplated painting the pencils at different heights or even alternate flipping them, meaning one upside down and one right side up. But in the end, I liked the consistent look the best.
Not gonna like, all my new decor makes me super happy...and excited to have a less cluttered and unorganized space. Now...to tackle the rest of my Hot Mess Express of an art room!
Until then, I have a pretty cabinet to look at, right?
There are pegs for a shelf...but the shelf was missing. Maybe one day I'll get a shelf cut to fit. That way I don't have to stack the boxes. I need a wood shop, y'all!
Thanks for letting me share my latest addition to the art room!
Well, I'm back at it: picking up more things from the Wooden Thingies You Can Paint aisle and goin' to town. I've painted paddles into paint brushes, a picket fence into a stack of pencils and now this fun Tints and Shade sign!
The other day, I was at Hobby Lobby and spotted this fun little fence. I picked up two of them and used a coupla coupons to bring the price down a pinch. I wasn't sure what I'd do with them until the idea of creating a value scale of tints and shades came to my mind.
Over a couple of evenings, I managed to get this bad boy complete. It was very similarly to my Stay Sharp pencils. I will say, mixing up a gradient is no joke, especially when you do it over the course of a couple of days. I did struggle a couple of times getting colors to great an even value scale.
Once the pencils were complete, I added the lettering and the fine lines. I love using black and white lines to give things a cartoon-y look
I was going to go with "value scale" or "gradation" but those aren't words we use a lot in my art room. We do talk a lot about mixing up tints and shades...so this was what I went with!
Don't be throwin' no shade now, y'all.
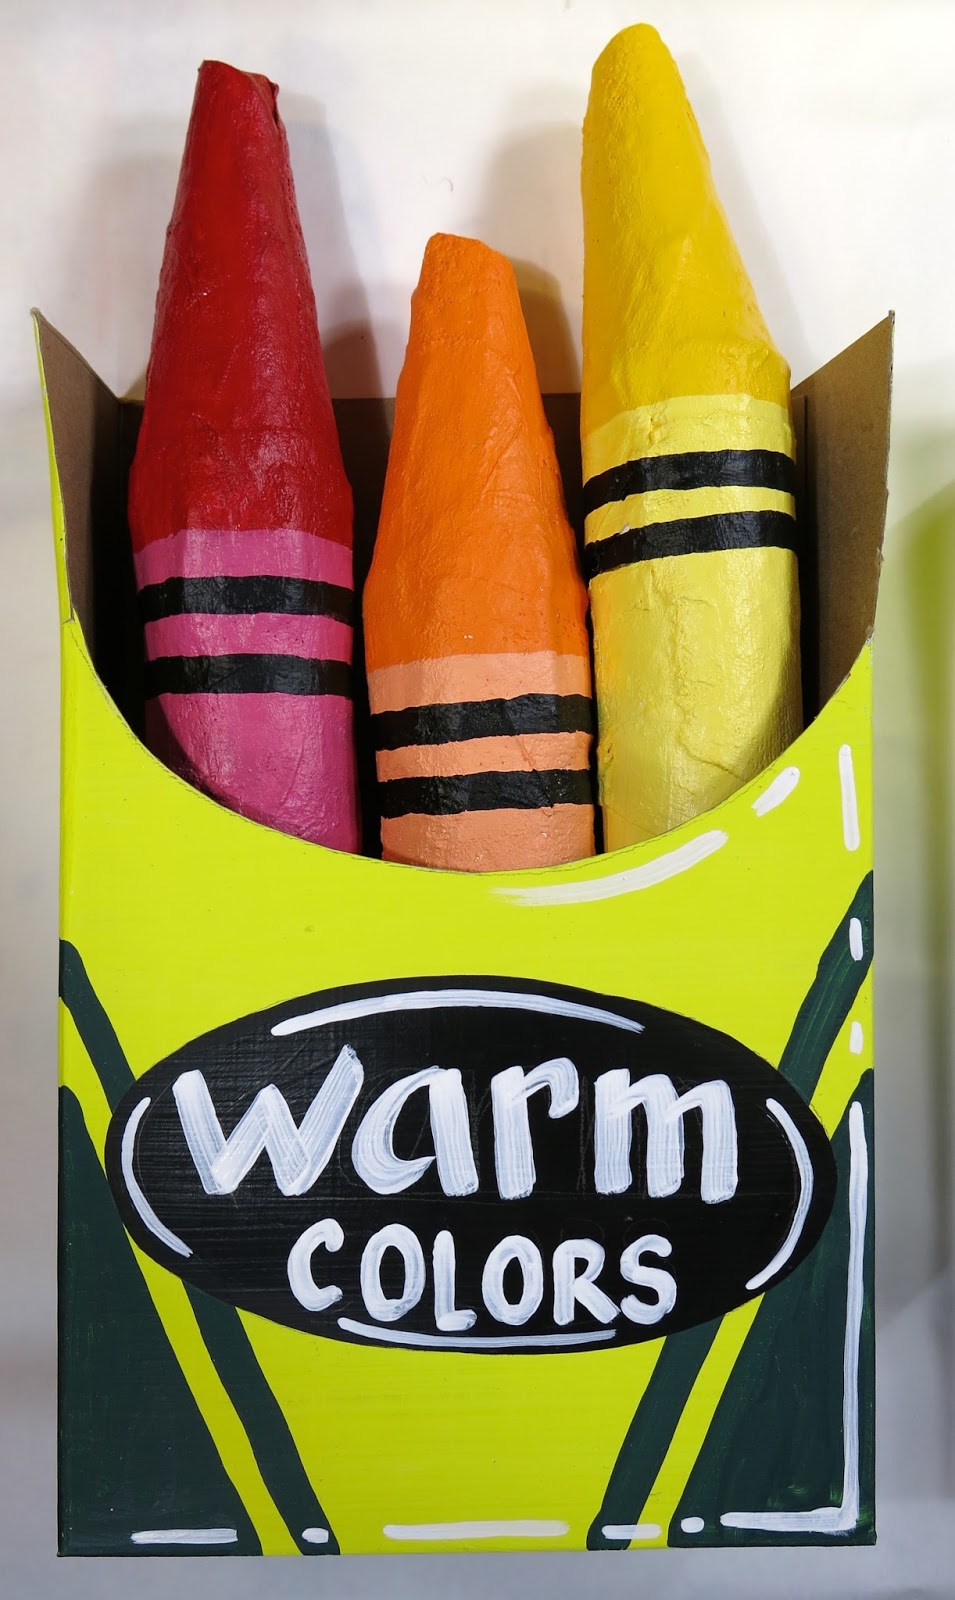
I also had a chance to hang my Color Families display today! I used Command Velcro strips to hang these and my Tints and Shade sign.
Because I want to be able to remove the crayons and use the as teaching tools, I used velcro dots to add them to the crayon boxes. You can see them in the secondary color box.
Now I did mention that I purchased two of these wooden thingies...the other will go over the door to the left of my clock. I plan to paint that in a rainbow gradation...but not sure what I'll write on it yet, if anything. I'm really excited about this area of my art room now! I am loving the new look so much...I am slowly working on giving my entire art room a make over! This is an area that the kids see a lot so it gets first priority. I even painted my easel to match some bookcases I recently redid. I'll have to give a complete tour once complete...although who knows when that will be!
So there are some things I decided shortly before school started. Let's start with the first: I had too much purposeless decor in my art room. I'm an over-decorator. Just take a peak into my sewing room or my crafting space (yes, these are two separate rooms and yes, I'm spoiled rotten) and you'll know I ain't lyin'. When it comes to my art room, I tend to overdo it there as well. I have a bad habit of getting sucked into the vortex that is the Target Dollar Spot and purchasing every cute thing under the sun. When I bring these colorful happies to my art room, I don't think: Is this going to benefit the art makin' of my students? Is this going to educate and not just decorate? Oh no. Instead I'm all: WHERE'S AN EMPTY SPACE, I MUST FILL IT MEOW. I realized the error of my ways over the summer when I came in to grab some things and I took a good look around. All I saw was clutter. Cute, colorful clutter. And in a fit of coffee-fueled redecorating rage, I tore down posters of unicorns, giant maps (why three? WHY?) and reference images that I never, er, referenced. I crumbled it all up into a big heaping wad and stepped back. Immediately I was horrified. What had I done?! My room looked so bare! And that's when I came to my second conclusion: Eh, you'll figure out what you need as you go. Your room DOES NOT have to look PERFECT on the very first day...week...shoot, man, even month! of school.
Since then, I've slowly started rethinking my decor and redecorating my art room. I made the following decisions: what I use to decorate must also educate; if I can't find what I'm looking for, I'll make it; more 3-D and less 2-D when it comes to visuals. Basically, I want my art room to be a space that really inspires my kids without cluttering their creativity.
So, what have I created so far? Why, I'm so happy you asked. Here you go:
* My ART room rules that are (hopefully) life rules and inspired by growth mindsets.
I was inspired by art teacher Katie Lynn. She shared this image of a color family on the Elementary Art Teachers page on Facebook.
I thought her idea was GENIUS...and decided to create a set of my own. Her drawings are so stinkin' cute, they are inspired by the book The Day the Crayons Quit, a kid fave. Big shout out to Katie Lynn for the inspo!
Since I had these "crayon boxes" left over from an art display, I decided to borrow her idea and create this 3-D color family. My kiddos did this very project a couple of years ago and it was a HUGE hit. I'm thinking I need to bring this project back this year...but I'll definitely be going about it a different (and much easier!) way. I'll share that below. In the meantime, here's a video I created back then for this project.
So what did I do differently this time around? I skipped the papier mache and used plaster strips instead. But let's start at the start, shall we?
My good buddy the custodian started collecting the paper towel tubes at my school. I like these better than you standard paper towel tube as they are much sturdier. Added bonus: upcycling! (can we please just go back to calling it REcycling? I dunno why, new words for old things always drives me bonkers).
My very artsy mom-in-law was visiting this weekend and I knew she'd be up for the crafting challenge. I cut rectangles of used tagboard (lookie, more recycling!) while she cut the strips of plaster. We found the plaster strips at our local craft store. After I rolled the tag board into a cone shape, I added a bit of tape, fitted the cone over the tube, cut tabs for easy folding and added a few more bits of tape just to hold.
While I did that, Diana took to plastering. I loved this so much more than papier mache because it dries faster, harder and isn't a snotty, slimy mess.
With her help, creating these 12 crayons went by in a blink!
We did find that one roll of plaster just didn't cut it. We ended up using two. We didn't cover the tube completely as the paint would take care of hiding the fact that we didn't. Also, when I hang these at school, I plan to display them hanging up with the crayons in the box...so no one will see the bottom. Altho, now that I say that, it might be fun to make them removable to make them interactive. I'll have to think on that idea.
I burned a little too much of the midnight oil (2am, ahem) getting them painted and STILL didn't quite get them complete. Diana helped me finish painting the "paper" and the crayon part.
I used a flat paint brush and watered down black paint for the stripes.
Done, son!
You better believe I contemplated making ANOTHER color wheel with these guys. But I forced myself to stick with my plan.
Initially, these boxes were created for the kids' display a couple years ago. I'm so glad I hung on to them. They were created from cereal boxes.
I just cut off the top, cut a curve, gessoed them a few times before adding the paint.
Since they needed "labels", I just painted a black oval and used white for the color fam names.
I'm excited to hang these in my art room next week! I'll use Command Velcro strips and they should do the trick. These guys are pretty light weight. The strips have done a bang up job holding up my painted oars!
I know my older kids are going to be so stoked when I tell them that they'll be creating their own versions of these as well. I foresee a TON of giant plaster art supplies in their future (eep!).
Take that, Target Dollar Spot. Get thee behind me, Satan, er, Target!
I'm so happy I decided to wait and only decorate when I feel it will educate...and it is necessary. More to come. Just know: your art room, if you are lucky enough to have one, doesn't have to be perfect on the first day of school. Go with what is pleasing and needed by your kiddos. You know best!