Showing posts with label elementary art lessons. Show all posts

Monday, May 25, 2015

What the Art Teacher Wore #141

Mondrian Monday: Ah, the day before the art show. Always 100% white-hot panic enduring. Thankfully my library buddy (hi, Barb!) offered to take my classes so I could spend the day unloading 400 clay projects from the kiln room and transforming the art room into a miniature gallery. She was a life-saver, I tell ya! Mondrian dress DIY: blog post here; shoes: from a friend 

Oh, hey! Look who said "I'll be right back on Wednesday with an art show blog post!" and then promptly when MIA. What can I say, I succumbed to pure exhaustion (even missing the end-of-the-school year party to collapse in bed at 7:30 on Thursday night). Not to mention, I didn't say which Wednesday I'd be talkin' at ya, did I? Lemme see if I can pull together that art show post this week. There's just so much to share I almost don't know where to start (including my secret recipe for hanging artwork that will NEVER HAVE IT FALL OF THE WALL AGAIN)! I'll be giving you a sneak peak in this here blog post.

Another thing that's had me busy is my full blown attempted at declutterin' my life. I'm in it for realz this time, y'all. I'm reading this great book that I've told nearly everyone who will listen to me (which means I've told 5 people.) The book is The Life Changing Magic of Tidying Up by Marie Kondo. Have any of y'all read it? Her whole theory is that you should only keep stuff that brings you joy. And she says you should start by decluttering your closets first. Y'all. Do you even KNOW how much clothing I have in my closets?! It's.In.Sane. 

In an attempt to declutter, make some cashola and share my amazing vintage finds with the universe, I've been spending the weekend snapping photos and uploading lovelies into my etsy shop: vintage domestic. I'll keep y'all posted on what other goodies I add in el shoppo. 

Oh! And I toooootally forgot to mention, I'm now on summer vacay! Hurray! Which means endless days of crafting and sewing whilst soaking up the summer sun are in my future, eeeee! Chat soon, y'all!
 I have a love of vintage clothing. Much of this clothing I'm selling are pieces I've been collecting since high school. Sadly, most have never been worn due to fit issues or simply the fact that I've no place to wear them. It's very hard for me to say goodbye but I know they'll go to someone who can truly appreciate them. 
 Art Show Tuesday: My sweet mom drove 7 hours down from Indiana to attend my student's art show. She's done that a couple of times in the past, usually arriving early enough for me to put her to work. She wised up this visit...although I did have her help me bag and tag clay projects the following day. I'm one of those evil people that if you pop into my art room even for a moment, Ima put you to work, even if you are my mama! splatter paint dress: made by me, DIY here; sweater: Betsy Johnson; sandals: ooooold, Target
Our annual art show is BANANAS, y'all. It was established well before I got there and it's always a packed house. I think we had well over 450 attendees with a school population under 400. We also provide free ice cream so that's a big draw: if you feed 'em ice creams, they will come.
 The Aftermath Wednesday: I felt like I'd survived a Great Wave after all that! My mom and I spent the day bagging and tagging clay projects with the teachers as they brought their kids to my room to collect their work. In my art show post, I'll 'splain to you just how I run the Big Fat Operation that is an Art Show. Great Wave dress: blog post here; sweater: Target
The hubs was my super sweet photographer during the art show. He took a ton of snaps, can't wait to share them with you!

 More Me Made May Thursday: I really didn't think I'd have enough clothing to make it thru this month of me-mades but it turns out Ima have plenty. This little vintage hankie skirt I created ages ago after seeing on similar in Anthropologie for One.Million.Dollars. Or $100 which is pretty much the same in my checkbook. top: vintage, gift from a friend; skirt: made by me, here
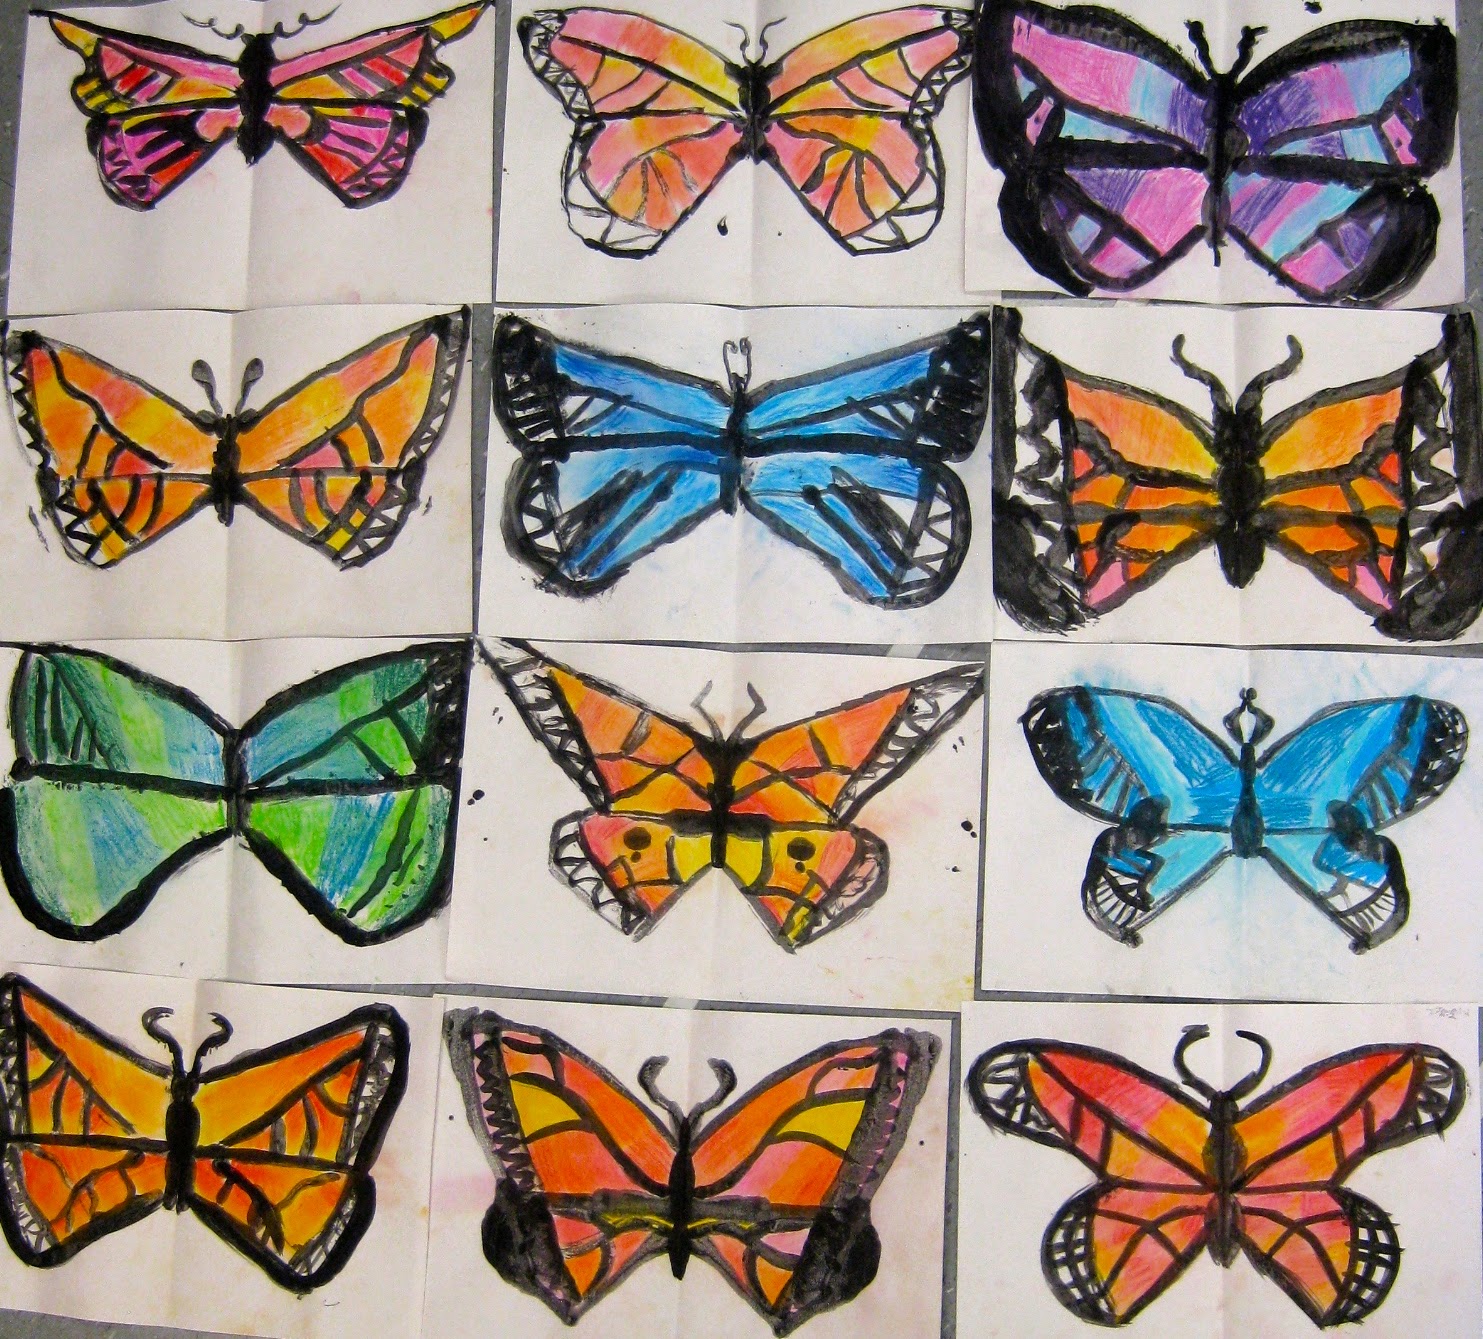
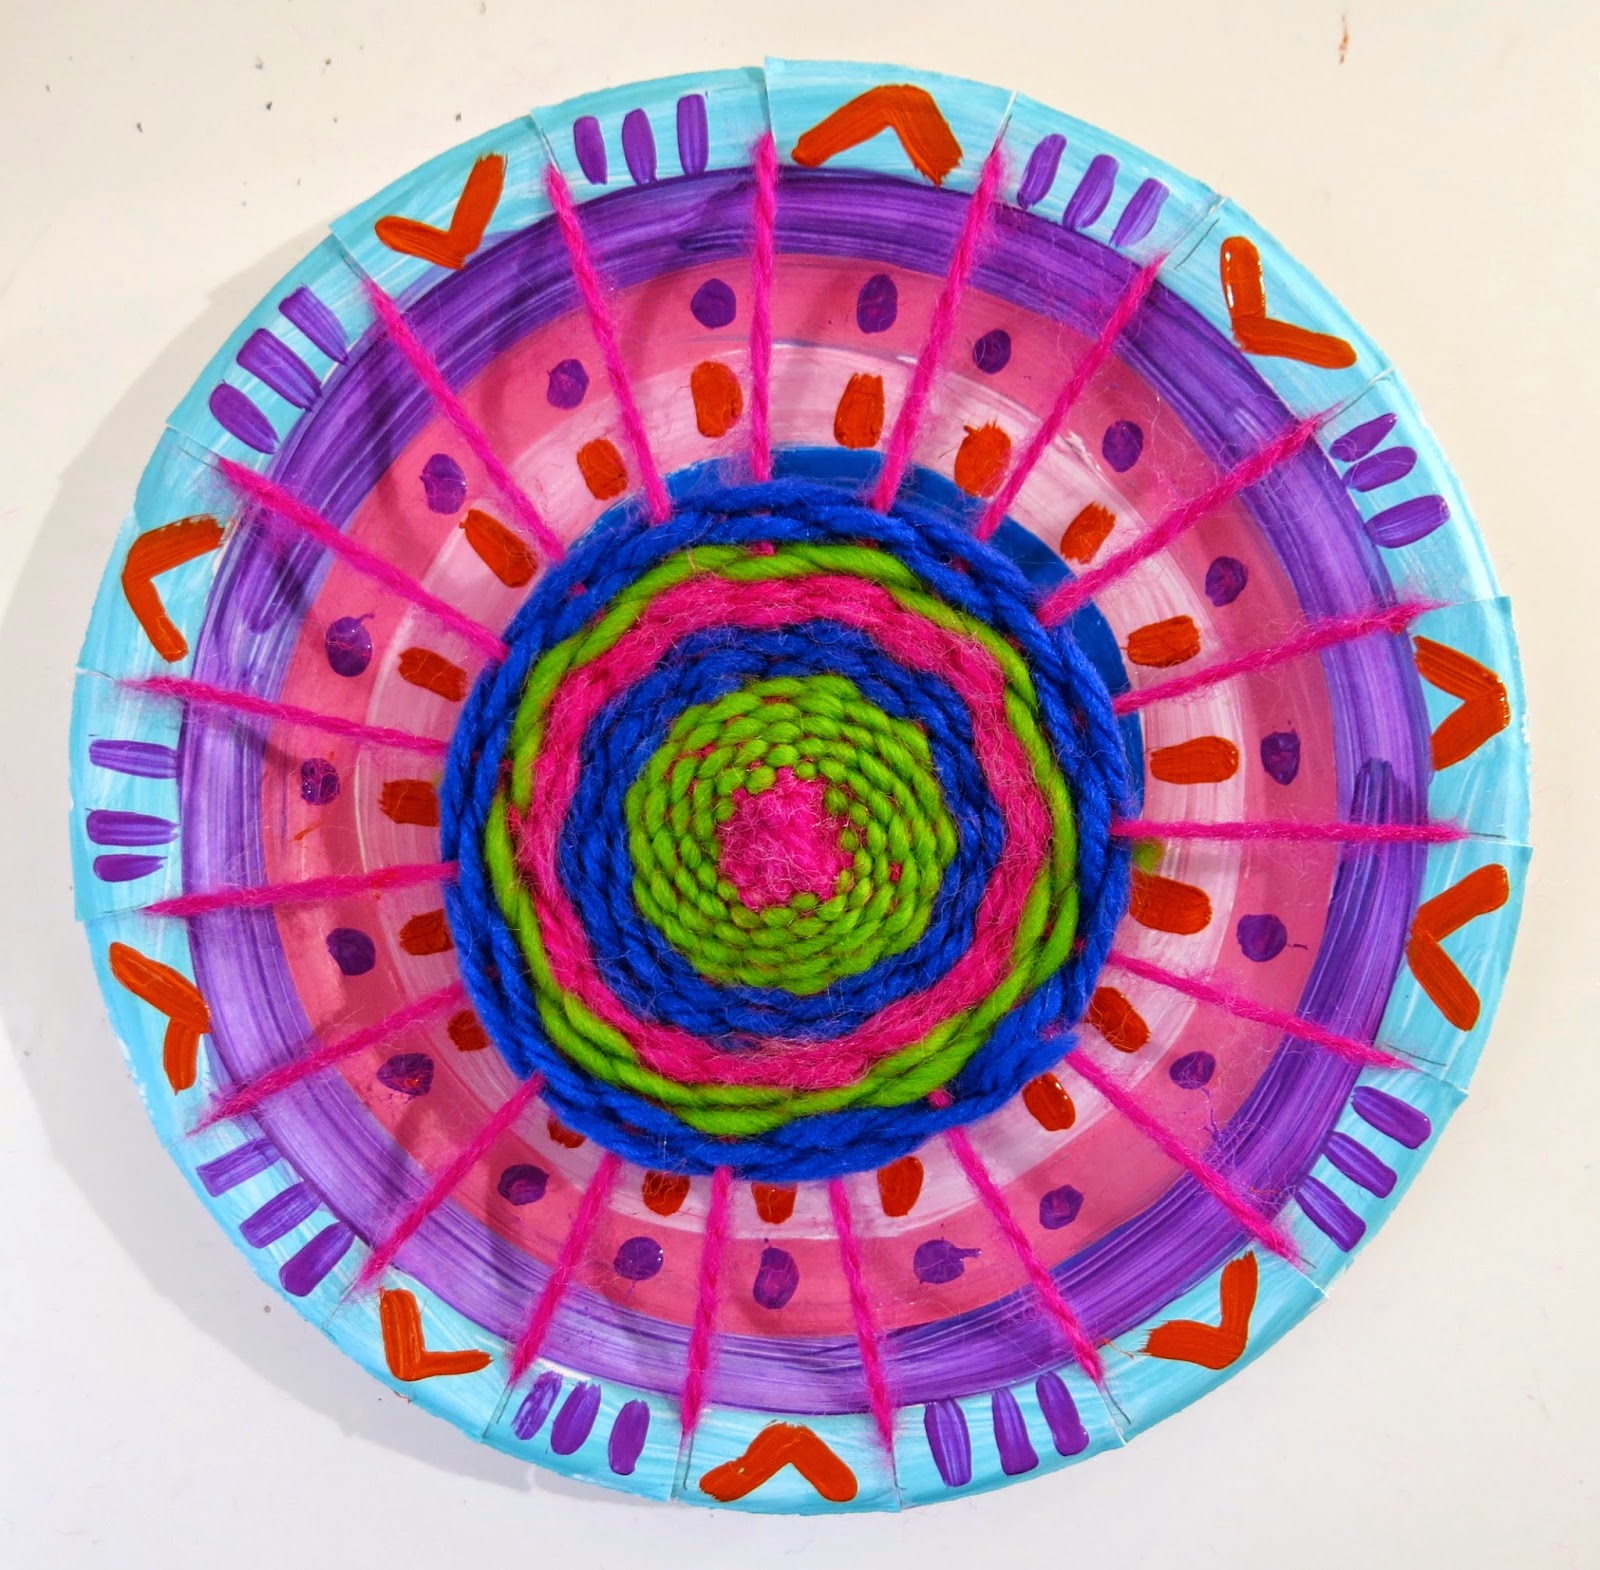
We had wall-to-wall clay projects on display in the art room. My second graders created those butterflies (we were on a butterfly roll, with this and that, what can I say?) and my third grade sculpted the flowers (complete lesson here).
School's Out for the Summer Friday!: Oh, yeah, y'all. I'm ready! Although it came so fast and after so much stuff going down, it almost seems unreal. By the way, that skirt was created pre-blogging days! Twas my first (and currently last) article of clothing in which I stitched an invisible zipper! That's on my summer to-do list. top: I dunno, Target?; skirt: made by me with vintage and new fabric

 photo signature_zpsd10b3273.png
Read more »

Tuesday, April 7, 2015

In the Art Room: 2nd Grade Printed and Chalked Butterflies

Next week my super awesome second grade students are going to be involved in a street painting event! Chalk artist Lee Jones will be coming to our school and working with the second grade to create street paintings. Because the kids are learning about the Monarch butterfly in their classroom (they'll be getting their very own caterpillar this spring), I thought they could chalk butterfly designs. To practice for next week's event, the kids busted out these butterfly beauties this week. I popped a photo of 'em up on my instagram yesterday and it blew up with questions. So I thought I'd try to answer 'em today. Let's hope it makes a smidge of sense. 
This lesson was short and sweet. It took us a grand total of two 30 minute art classes to complete. Here is a list of supplies we used:

* 12" X 18" paper folded in half
* watered down black tempera paint (I love Sax's Versa Temp)
* paint brushes
* KOSS chalk pastels
 During the intro to this lesson, we chatted briefly about our upcoming visit from Lee Jones. I then introduced the Monarch butterfly to the kids with this prezi. Feel free to borrow away! 
After that chat, each student collected the paper and paint brushes. They jotted their names down on their papers and immediately turned their attention to me. At this point, we only had a short 15 minutes to get this bad boy painted so there was no time to lose. 
This painting process was great because I could introduce all sorts of groovy math terms like symmetrical and parallel. I made a short clip for y'all to explain the process. I do hope it helps! You can find more of my lesson video clips here
Like, Holy Cats, how simple is that, right?!
 And I love how each one turned out. I got the idea this weekend when I googled butterfly artists. Of course, my homeboy Andy popped up. 
This summer when I taught a workshop based on an Andy Warhol exhibit, the docent revealed just how Andy accomplished that blotted look which he is so known for in his early work. Apparently he would paint with ink then blot his work with a paper. This would give the effect of an uneven line. I thought this would be a great way for the kids to create their butterflies as well. 
 In the video clip, I mention how I tell the kids that something is "practice". I often tell the children that to have them relax a bit. If they think that it's just a fun creative experience (cuz, duh, it is), I've found that they loosen up a bit and let go of the notion of perfection. 9 times outta 10, they grow to love their "practice" piece so much that they never ask to start again. 
Some kids were bothered that the line didn't appear as clearly once printed. In which case, some repainted those lines on the other side. 
 Now let's talk chalk, shall we? I purchased this KOSS chalk just for our sidewalk painting event. And, I gotta tell ya, we've been using it nonstop since I got it! My third graders are currently chalking these lovely desert landscapes. This chalk is loaded with pigment and it's just so stinkin' rich. Check it out, y'all!

On the second day of art, I told the kids that there were just a coupla tips for chalking: they shouldn't use more than three colors and the colors should be analogous. Notice all the warm colors at the top? Those colors look great together! Pick three from that side. Love all the colors at the bottom? Perfect, they love being with each other, feel free to pick three from there. But mixing the two sets of colors may result in dull colors. And who wants a dull butterfly y'all? That's what moths are for! 
 A kid after my own heart: mixing the chalk with her fingers. Some used tissues but I found that often wiped the color away. 
 Many kids went the Monarch route...
While some wanted theirs to be "camo-greens". Sargent Flappy Wings. You got it!
 Each one of 'em was an absolute stunner. I cannot wait to see just what these kids chalk outside!
By the way, I think I'm in love with the white background. The kids and I chatted about cutting them out ("Let's hang them up! From the ceiling!" Oh, yeah, kids. The Fire Marshall would LOVE that!). For now, I think they'll stay this way. But if you have any suggestions, I'd love to hear 'em! Until next time, y'all!
 photo signature_zpsd10b3273.png
Read more »

Tuesday, January 6, 2015

In the Art Room: Circle Loom Weaving

Wuz happening, my wild and wacky weavers?! I hope the return to art teacherin' (if that's your bag) has been a smooth one. Personally, I find it a cruel joke to return to school the week of a full moon but, once again, the powers that be neglected to ask my opinion. When will they ever learn?

So, show of hands, how many of y'all decided to go down Weaving Street this month? If you need a refresher, you can start with this paper weaving lesson then transition to this super fun straw weaving project. I just had my fourth graders start their pouch weaving and they were beside themselves with excitement. Like, they were all, "enough with the History of Weaving prezi, lady, let's weeaaavvveee." I'll be sharing that prezi with y'all later this week (still tweaking it) but you can find the complete steps for pouch weaving starting here
But let's talk Circle Loom Weaving, shall we? This lesson I do with my second grade kids but if you've never taught weaving to your students before, I recommend teaching this to third grade. Again, always start with that basic paper loom weaving as it teaches all the vocabulary and techniques making all weaving projects that follow much easier. 
Supplies:

Chinet Plates: When plate weaving, I always use these. They are the thickest and most durable plates. I like to use the smaller size.

Yarn: Any kind will do. Funky yarn is fun but only use that for the actual weaving portion. For warping, use regular yarn.

A Loom Template: I have two for each of my five tables so the kids can share. Each template has 19 notches on it.

Masking Tape: You'll need this to tape down the initial warp strand. And for closing the mouths of those "I Can't Do It" kids. Oh, I kid! Kinda.
Last year I typed out all the steps which you can find here. I'm hoping that you'll find the video even more helpful. If you still have any questions, please ask in the comments and I'll get back to you.
For those of you that don't like video, here's some pitchers and werds. Place the loom template on the painted plate. Trace and cut the 19 notches. I always encourage the kids to count and be certain they have 19 lines drawn before cutting (as some will end up with 190 which is not what you're going for).
NOT GONNA LIE: Warping is the least fun part. Especially when some of the kids stop listening and get stuck on repeat: I Don't Get It. When that happens, I have everyone put everything down, we stand up, we stretch, we shake it off. Then, I tell 'em that they are going to sit back down, not touch a thing, and listen to me. Again. 

I have also found that peer tutoring is priceless. These kids speak the same language. Have them help each other, they communicate much better with each other I have found!
Once you are beyond the warping hump (um, the whuh?), the weaving portion is much easier. That is WHEN you get beyond that initial confusion I mention in the second clip. However, if you do that little trick that I share with you, I think you'll find that the kids get it and will really take off with weaving. They love to sit on the floor and weave and chat. I let them sit with buddies, sometimes we go outside if the weather permits. It's just such a fun, relaxing project...once you are beyond the warping and initial day of learning to weave. Stick with it, you'll find that you and the kids will love the process! 
Granted, this weaving project does take time. However on Thursday I'm going to share with you a similar weaving project that takes have the amount of time for those of you that are limited. 

Until then, I do hope you found this helpful and will consider giving weaving a go! And I'd love to know, what weaving projects do you just love to do? 

 photo signature_zpsd10b3273.png

Read more »

Tuesday, August 12, 2014

DIY: An Optical Illusion of Embroidery

Dontcha think it's pretty safe to say that the interests you had as a kid kinda-sorta shape your interests as an adult? Now, granted, not all the things you were fascinated with translate into adulthood (my super mad collection of Hot Wheels cars never resulted in my becoming a mechanic even if the grimy paint/clay combo under my nails kinda makes me look that way) but you gotta admit, some things leave their mark. For example, if you know me even a lil bit, would it surprise you that I loved my Fashion Plates growing up?
Gah, anyone else out there have these? My fave thing to do was to put together the most ridiculous outfits possible. Not at all like what I do on a daily basis. Not. At. All. 

There were some toys that I wanted with every ounce of my lil kid fiber which my parental units just flat out refused me. Take this Make Me Pretty Barbie, for instance. Just because I had this habit of hacking the hair off my dolls didn't mean I'd do the same to ole Babs. If Ida had this bad boy growin' up, I wonder how that woulda translated to adulthood. Would I have frosted my tips? Become tanorexic? The funny thing is, as I'm typing this post, I'm currently wearing a hot pink necklace, a side pony and a bow. So I guess some things stick with ya no matter whut. 
 What toy creator thought, "hey! Let's create a decapitated life-size Babs to make lil girls feel totes inadequate about their looks!" Sadly most of my buddy's Make Me Pretty Barbies ended up with Sharpie'ed faces and half burnt scalps. Which, with her edgy and punk-ish looks, always made her the Angsty Artsy Babs in my book. 

Naw, my parents couldn't be bothered with fun stuff like Decap Babs. Instead I was given educational and crafty stuff like my beloved calligraphy set and a never-ending latch hook kit. If you grew up in the 1980s, I wanna know what toys you had, yo. Take the wee quiz on the right and click on the toys you grew up with. Do you think stuff had anything to do with who you are now?
I spent weeks latch hookin' the crap outta that mushroom on my babysitters couch. I never did finish the thing...but I have always loved creating with fibers. So there's that.
Oh, my bad. They DID get me a Barbie (or twenty) along with an office chair (whuh?) and a 500 piece puzzle. To this very day I freaking hate puzzles. Why would anyone wanna put together 500 pieces of anything let alone a crappy 1980s landscape. These are the questions that haunt my sleepless nights. 

Often times, when I'm dreaming up lesson plans for the kids, I think to myself, "what did I love to do as a kid?" It's then that I think back to my Fashion Plates and my latch hookin' ways and retro fun-ness comes to mind. Like working with my spirograph for instance.
I'd totes forgotten about Spirograph until I discovered one in my art room a couple years back. Granted, it's missing some key pieces but I still had fun toying around with it. Over the summer, I found this very vintage version of a Spirograph called a Magic Designer. Did y'all have either of those growin' up?
When I first found that Spirograph in my room years ago, I spent a couple hours playing with the designs. I love the look of 'em -- they are so 1950s space-age-y. It was then that I decided to make several photos copies of them, trace them onto a piece of fabric and embroider a design. Hence the pillow. 
If only I'd had a Magic Designer in my life. Have y'all ever seen this bad boy? Check out what it can do.
Yeah. Magic. I don't think I'll be stitching up that anytime soon but I do love the look of the designs, don't you?
I really want like a half dozen of these in my art room for the kids to tinker around with. That's not too much ask, right? What I really like about the Magic Designer is that it's like a little self operating machine. You seriously just adjust the settings, insert your drawing tool and turn the crank. It's fascinating to watch. 
The only problemo? That little holder for your drawing tool is so narrow that I can't seem to get anything to fit. I tried to place the inside of an ink pen into the holder but it didn't work. The lovely artwork I showed above was left behind in the box from the previous owner. So now I'm in search of a wee pen. Along with the meaning of life. Wish me luck. 
But back to teaching. So you know I scored all those lovely embroidery hoops for my fourth grade kids. Now my brain is just in "embroidery project"mode. I dunno about having the kids stitch up this kind of optical illusion-ness as it took me forever but I do like the thought. So I'm working on it. Any and all advice/comments/here's-what-you-should-do's would be greatly appreciated. Purty puhlease and tank ew.
When I stitched this up a couple years ago, I really wanted to play around with a variety of stitches. My grandma taught me how to embroider one summer as a kid (see, back to my what-you-do-as-a-child theory). At the time, I really only learned the running stitch. It was fun creating this pillow because it forced me to learn add new stitches to my life.
So, whuh about y'all? Where there interests/toys/things-you-learned-and-loved as a kid that hang with you to this day? Still going to therapy because you're freaked out at My Buddy going "anywhere I go, he goooooes" (gah, stalker much?) or at Jem and the Holograms [my bad, spelled her name wrong in my poll!] being so "truly truly truly outrageous" that you'll never measure up (really? I wanna know what crap songwriter came up with those lyrics, y'all!). Take the lil quiz and fill me in! Oh and if I've forgotten any of your fave 1980s toys, please do fill me in. 

Until then, hope your week is Truly Truly Truly Outrageous! 
Read more »

Tuesday, November 27, 2012

In the Art Room: Hot Air Balloons Over Paris

After weeks of working on this collage landscape, this little first grade dude is ready to take his hot air balloon for a ride. Over Paris, France, no less.
Hey there, artsy folk! Look who's launched their hot air balloons -- my fantastic first grade artists! This project has been so much fun but the icing on the cake were the giggles and squeals of laughter the kids let out when they finally saw their little likeness in the balloon. It was a lengthy project (as all of mine are, sigh) but well worth the wait. 
A hallway of hot air.
We began this project right after our world-mural self-portrait and our passport/suitcase project. I like to use this landscape collage as an introduction at the beginning of the year because so much can be packed into this lesson (painting, color mixing, texture, collage, landscape, etc). I used a similar collage landscape lesson with my second grade students for the Parisian Landscape Collage. And I also used this project last year for an Egyptian Landscape. It's one of those tried and true projects that I absolutely love.
I love how this artist positioned his Eiffel Tower in such a way that he seems to be gazing at it.
Now, I've got my students for half an hour. By the time I'm done jibber-jabbering and they are settled down to work, they have around 15 minutes of work time. That's with 5 minutes at the end for clean up and The Smartest Artist if we are really lucky. So my lessons are in baby bites. Here's how I broke down the creating part of the lesson. After looking at many a sunset and other artists works, here's what we did:

  • Day 1: Using a large vertical paper folded in half, students learn how to paint a tint of yellow (that's light yellow created with white and yellow) and a tint of orange (learning to mix the orange themselves.)
  • Day 2: Create a tint of magenta and mix purple.
  • Day 3: We chatted about clouds. If they are near the horizon, they are oh-so-small. Closer to the top of the paper, they increase in size. Many clouds have a flat bottom (which always gets a giggle) and a fluffy top. Texture is our word of the day.
  • Day 4: Using a separate piece of paper that is about a third the size of our large sheet, we create a green tint and give it a texture.
  • Day 5: Same as above, this time with blue paint.
  • Day 6: Collage Time! We looked at a map of Paris and found that there is the River Seine runs right through it. So we glued our blue textured paper to the bottom. Then we tore our green papers in half. The kids then separated the green papers depending on how wide they wanted their rivers to be. Once decided, they glued the land down.
Once that was complete, we put our landscapes away for a bit to learn about hot air balloons. This book was a wonderful resource as it names and explains each part of the balloon.
When placing our hot air balloons on our paper, we chatted about drifting outside of the rectangle format of our paper. This little one looks like she's floating away.
After reading about the balloons, we created out own:
  • Day 7: Using either warm or cold color pieces of tissue paper, the kids used watered down Modge-Podge to cover a piece of paper that they had drawn a balloon shape on.
  • Day 8: They cut out their balloons and used a sharpie to add lines that would help their balloon look more three-dimensional. 
  • Day 9: Photography Day! While the kids painted their hot air balloon baskets (which were toilet paper tubes cut in half) with vertical and horizontal lines, I took their photos. They stood in front of a large piece of blue butcher paper and put their hands over the back of a chair that had brown paper on it. I snapped two shots, one of the looking up and the other, looking down. We chatted about what they might see and that helped them become animated for their photos.
Sometimes we have early finishers. They usually meet on the floor to "play teacher" (where one student sits in my chair and quizzes the other students on a basket of three-dimensional shapes I have) or we read a book. This book was perfect. We found out that the first hot air balloon was launched in France! And that the first passengers were a rooster, a lamb and a duck.
  • Day 10: We glued down our hot air balloon, our basket and carefully cut out our photo.
  • Day 11: We chatted some more about the Eiffel Tower and it's history. We learned out to cut out a symmetrical tower and decorate it using the same lines that Gustave Eiffel used in his tower. I was determined that this would be our last day, so I may or may not have been late getting the kids to get those towers decorated and glued down.
Don't you just LOVE this?! I know I do! It was created by one of my practicum students to help support my lesson. The kids adore it, especially the fact that Jes made an appearance.
Now, while I do love these, I am secretly dying for the kids to continue to add to the landscape. But did you see how many DAYS this took? Like, a million! So, I thought I'd ask your opinion (I have in the past and you guys always come through for me, thanks!)...what do you think? Collage some more or leave it be?

Regardless, I know that these artists couldn't be more pleased with their masterpieces. Thanks for reading!


Read more »