Showing posts with label art project. Show all posts

Tuesday, October 3, 2023

Easy Pumpkin Sculptures!

Hey, y'all! 

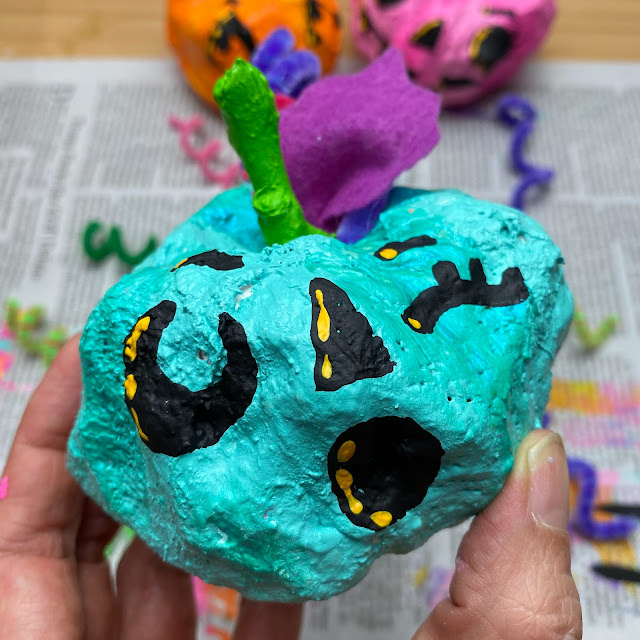
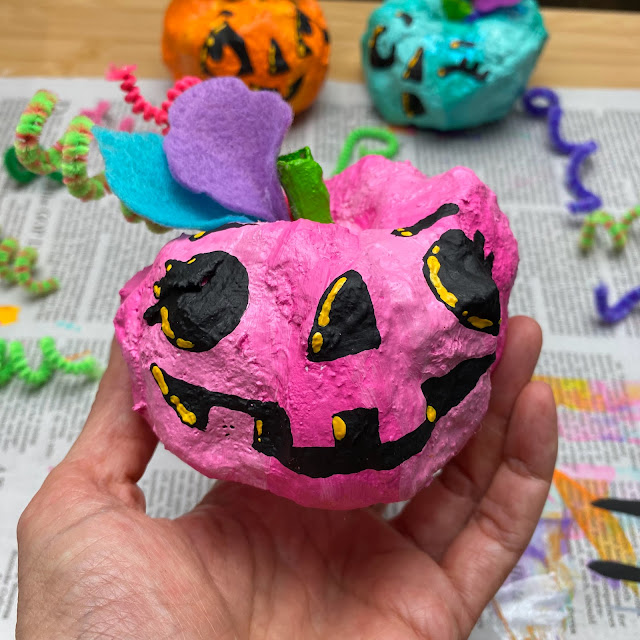
I'm all about the Halloween projects lately and I came up with one that I know your students will love! I mean...I loved making it so even if you just need a fun little weekend craft to unwind, you may want to try this one on for size. 

You can find the supplies for this right here. But really...it's just foil sheets, plaster wrap and acrylic paint. Sticks, felt and pipe cleaners are things the average art teacher has in surplus so...you can add that to your shopping list if necessary. But if you are anything like me, those types of supplies seem to multiply in your supply closet!

I created a kid-friendly video for you to share with your students if you'd like. You can find it here:


Personally, I know my students would struggle with the face. So! I talk about embracing your mistakes a lot in the video. I also chat about practicing first. I would recommend doing the faces with a paint pen if you have younger students. I know paint pens like Posca markers are expensive...so maybe it's a station students can rotate to when finished.
But who's to say they have to add a face? They could designs like dots with a sponge brush. Or they could collage a face onto the pumpkin. That might be easier for them. OR you could bust out those googly eyes that also multiply in your closet. I mean, really, the possibilites are endless. Just start with a cute pumpkin base!
If you need a little time between pumpkins drying, you might want to check out this post. Students could work on this pumpkin drawing activity in addition!
Full video right here!
Most of all, have fun! And if you create these cuties, please be sure and tag me on social media. I love to see what you and your students create!


photo signature_zpsd10b3273.png
Read more »

Tuesday, January 8, 2019

In the Art Room: Snow Globe Cities!

When I posted this photo on my Instagram a while back it got a whole lot of love. I promised I'd share this lesson with you all and here I am! My fourth graders are ALMOST done with these, hoping to do the last step within the next couple of art classes. I'll be sure to share the end results. Until then, I've created a lesson video for you and your kids! I'll walk you thru the lesson break down and supplies in this blog post. 

I hope you and your students enjoy! 

Supplies:

* Watercolor paint. In the video, and in my room, the kids used Pelikan brand watercolor paint. I'll be sharing more about watercolor in a blog post tomorrow so stay tuned if you have quesions.

* Cardboard pizza rounds. I get mine from a restaurant supply place called GFS or Gordon Food Service. Amazon used to sell them. I usually can get 100 for under $20.

* Paper. I always order 80-90 lbs paper and we use that for EVERYTHING.

* Glitter (ugh!) or fake snow. I found some super cheap after Christmas!
Day 1: I see my fourth graders for an hour. On the first day, we were able to create our practice sketches and paint our final circles.
Day 2: What I didn't show in the video was how we added a little sparkle to our circles. At the start of art, the big circles were passed back. The kids "painted" them with ModPodge mixed with glitter. Once those were done, we chatted on the floor about how to paint these papers for their cities. 
Day 3: Cities! We really talked about how to make a building look 3-D and the kids rocked it. Many of them drew in pencil first...but that was just suggested, not required. 
Up next...cut these out, add or our cities and start on our snow! I'm excited, I cannot wait to see these complete! I'll be sure to pop back by and share more as we finish. 

 photo signature_zpsd10b3273.png
Read more »

Tuesday, November 26, 2013

In the Art Room: The Magritte Project, Two

I'm sure ya'll remember that Mammoth-Magritte-Mural I previously rambled about (I mean, you'd have to unless you suffer from short-term memory loss. Which sometimes I worry that I do. I mean, I know everyone says, "oh, I walked into this room and totally forgot what I came for," but I'll drive all the way to the grocery store, stock up on moisturizer and People magazines and totally forget food. Pretty sure if I try to serve hubs Pasta a la Aveeno one more time, he's gonna demand I start taking my meds...again.)

Speaking of short term memory...what was I just talking about?!
Ah, yes, Magritte. I do remember I told you that this particular project is like the gift that keeps on giving. Because after the kids cut out their day and night birds (go here if you are confused), it turns out I only needed one for their mural. Any more and it woulda looked like a scene outta Hitchcock's The Birds. This left them with either a cloud-filled or star-studded bird for the project you see here.
Magritte's The Return was the inspiration behind these small works of art. And, by small, I mean the paper was 9" X 12". We usually work twice as large in the art room despite our half an hour art class time constraints. But I had a sneaky suspicion that this whole tissue-paper collage thing just might take for-evah. Turns out, like sooo many things, I was right (hubs, are you reading this?! Say it with me: I. Was. Right. I know this has nothing to do with you, I just like to hear you say it!).
This spin-off project turned out to be a hit with the kids. They learned about analogous colors, creating contrast, making a collage landscape all while working with an art material they'd not used in a long time: tissue paper. Lemme tell they went about creating these works of art. 

Bonus: You'll hear the story about how a third grader taught me the correct name of my favorite art supply. Deep stuff, I know. Read on.
In my last post, I told you about how the kids were given 12" X 18" pieces of paper on which they were to paint a tint of blue and a shade of blue. These colors were premixed so that the colors in our mural would be consistent. I know, I'm a control freak. Once those were dried, the kids added clouds and stars in oil pastel. From there, they flipped their paintings over and traced the day and night bird templates on the back. This yielded two birds, one for the mural, one for this project, and an awesome negative paper to be used in the future.

ACK!! I must pause this post and tell you why this scene made my hands sweat and caused the following convo:

Me: WHERE IS YOUR MESSY MAT?!
Kid: Um. My what?
Me: YOUR. MESSY. MAT. You're getting Modge Podge all over the table. 
Kid: Oh, sorry...(attempting a distraction technique) but don't you like my beautiful nighttime sky?

Yeah, I do. Le sigh. Those kids. They get me everytime. 

On the first day of this project, we looked at Magritte's The Return and had a long chat about two things: contract and analogous colors. We noticed how Magritte used a contrasting sky to make his bird stand out. Then we talked about ways we could do that in our sky without making just a blue daytime or black nighttime sky. This led to a chat about the different times of day and the colors you might see. Then I focused on the color wheel. I told the kids that they were to choose four pieces of tissue paper that were analogous in color. I placed a color wheel on each table to help them along. Once their four colors were chosen, they were to hold the tissue paper up in the air so the rest of us could see what they'd chosen and decide if there were indeed analogous. From there, they commenced tearing the paper into strips.
Now, just a note on that. I noticed that the paper has a grain. Meaning it will tear in nice long strips going one way, but the other direction it tears in short pieces. There is no way to know the grain, it's just a matter of tearing. Torn pieces of tissue were kept in labeled envelopes for the next class.

And a note on adhering the tissue paper. I asked that the paper go horizontally as clouds would move across the sky. I demonstrated how to apply a thin layer of varnish to the paper, place tissue on top and then apply another layer. When applying second layer, start in the middle of the tissue paper and brush outward. This prevents those annoying and unsightly crumpled pieces of tissue paper.
EEK.  Yet another cringe-worthy photo: scissors dangerously close to varnish brush...paper waaay off the messy mat...one of those rubber band bracelets that are going to be the end of meeee. Deep breath, focusing on lovely work of art. Whew. Okay. Better now. Back to whatever I was rambling about...

I had folded the paper so there was about 2-3" at the bottom for the horizon line. Once their sky was complete, the kids could dive into my massive box of sparkly fabric and create stars, a moon or a sun and clouds. This was applied in the same manner as the tissue paper. By the second art class, most skies were complete.

For the land, the kids were to choose two different colors of green (a couple even opted for green fabric), tear into large pieces and adhere to the bottom. This took them no time at all.
Once their landscape was complete, the kids were to glue their birds. I had them play around with the placement of the bird until they settled on a composition they liked. For a little pop, I used my paper cutter to slice a million little pieces of foam core. The kids glued about 5 pieces of foam core to the back of their bird and then glued that to their piece. I love the subtle 3-D element and it also introduced the concept of relief sculpture to the kids.
Now I know some of ya'll are stick-sun haters but how you gonna hate on this?
And now for a moment of art teacher humiliation. As if that doesn't happen about a dozen-twenty times in a day...

Kid: Mrs. Stephens, why do you call that stuff "Modge Podge"?
Me: (holding up the jug of stuff so the kid could see the label) Because that's what it's called, see?
Kid: Then why does it say MOD Podge?!

Wait, WHAT?! 
And that's when my teeny-tiny brain was blown. I looked at the label and, sure enough, the stuff that I'd been calling Modge Podge for years is indeed called MOD Podge. Wah-hut?! How in the world did I not catch that? It's toootally got that rad 1960's mod-style label.  

Please, puh-lease tell me I'm not the only one that's been calling it that. And please tell me why none of yous never corrected me on my ignorance? Have all ya'll been laughin at me (more than normal) behind my illiterate back?! JUST as I suspected, humph!
Whatevers. This Thanksgiving, I'm placing MOD Podge on the long list of things I'm thankful for...my lack of reading skillz, not so much.

Speaking of, I hope you have a wonderful Thanksgiving, friends! And, if you don't celebrate such, just pat your bottle of Mod Podge fondly on the head and think of me. I'll be back soonish with an embroidery project I'm just Thankful to be finished with. 

Until then, have a great one!
Read more »

Tuesday, November 27, 2012

In the Art Room: Hot Air Balloons Over Paris

After weeks of working on this collage landscape, this little first grade dude is ready to take his hot air balloon for a ride. Over Paris, France, no less.
Hey there, artsy folk! Look who's launched their hot air balloons -- my fantastic first grade artists! This project has been so much fun but the icing on the cake were the giggles and squeals of laughter the kids let out when they finally saw their little likeness in the balloon. It was a lengthy project (as all of mine are, sigh) but well worth the wait. 
A hallway of hot air.
We began this project right after our world-mural self-portrait and our passport/suitcase project. I like to use this landscape collage as an introduction at the beginning of the year because so much can be packed into this lesson (painting, color mixing, texture, collage, landscape, etc). I used a similar collage landscape lesson with my second grade students for the Parisian Landscape Collage. And I also used this project last year for an Egyptian Landscape. It's one of those tried and true projects that I absolutely love.
I love how this artist positioned his Eiffel Tower in such a way that he seems to be gazing at it.
Now, I've got my students for half an hour. By the time I'm done jibber-jabbering and they are settled down to work, they have around 15 minutes of work time. That's with 5 minutes at the end for clean up and The Smartest Artist if we are really lucky. So my lessons are in baby bites. Here's how I broke down the creating part of the lesson. After looking at many a sunset and other artists works, here's what we did:

  • Day 1: Using a large vertical paper folded in half, students learn how to paint a tint of yellow (that's light yellow created with white and yellow) and a tint of orange (learning to mix the orange themselves.)
  • Day 2: Create a tint of magenta and mix purple.
  • Day 3: We chatted about clouds. If they are near the horizon, they are oh-so-small. Closer to the top of the paper, they increase in size. Many clouds have a flat bottom (which always gets a giggle) and a fluffy top. Texture is our word of the day.
  • Day 4: Using a separate piece of paper that is about a third the size of our large sheet, we create a green tint and give it a texture.
  • Day 5: Same as above, this time with blue paint.
  • Day 6: Collage Time! We looked at a map of Paris and found that there is the River Seine runs right through it. So we glued our blue textured paper to the bottom. Then we tore our green papers in half. The kids then separated the green papers depending on how wide they wanted their rivers to be. Once decided, they glued the land down.
Once that was complete, we put our landscapes away for a bit to learn about hot air balloons. This book was a wonderful resource as it names and explains each part of the balloon.
When placing our hot air balloons on our paper, we chatted about drifting outside of the rectangle format of our paper. This little one looks like she's floating away.
After reading about the balloons, we created out own:
  • Day 7: Using either warm or cold color pieces of tissue paper, the kids used watered down Modge-Podge to cover a piece of paper that they had drawn a balloon shape on.
  • Day 8: They cut out their balloons and used a sharpie to add lines that would help their balloon look more three-dimensional. 
  • Day 9: Photography Day! While the kids painted their hot air balloon baskets (which were toilet paper tubes cut in half) with vertical and horizontal lines, I took their photos. They stood in front of a large piece of blue butcher paper and put their hands over the back of a chair that had brown paper on it. I snapped two shots, one of the looking up and the other, looking down. We chatted about what they might see and that helped them become animated for their photos.
Sometimes we have early finishers. They usually meet on the floor to "play teacher" (where one student sits in my chair and quizzes the other students on a basket of three-dimensional shapes I have) or we read a book. This book was perfect. We found out that the first hot air balloon was launched in France! And that the first passengers were a rooster, a lamb and a duck.
  • Day 10: We glued down our hot air balloon, our basket and carefully cut out our photo.
  • Day 11: We chatted some more about the Eiffel Tower and it's history. We learned out to cut out a symmetrical tower and decorate it using the same lines that Gustave Eiffel used in his tower. I was determined that this would be our last day, so I may or may not have been late getting the kids to get those towers decorated and glued down.
Don't you just LOVE this?! I know I do! It was created by one of my practicum students to help support my lesson. The kids adore it, especially the fact that Jes made an appearance.
Now, while I do love these, I am secretly dying for the kids to continue to add to the landscape. But did you see how many DAYS this took? Like, a million! So, I thought I'd ask your opinion (I have in the past and you guys always come through for me, thanks!)...what do you think? Collage some more or leave it be?

Regardless, I know that these artists couldn't be more pleased with their masterpieces. Thanks for reading!


Read more »