Showing posts with label vintage dress. Show all posts

Tuesday, September 11, 2012

Vintage 911: Shrink My Dress

Vintage 911 before...and after.

Just recently a totally awesome coworker gave me this amazing vintage dress. I immediately fell in love with the print. I mean, it's got it all: umbrellas, toucans, starfish, a startled lady in a swim cap  -- it's just the most adorable thing ever. The prob? There was just a little too much fabric. Everywhere. A nip/tuck was in order.

Upon close examination, I found that this dress was entirely hand sewn. Can you imagine? In high school, when I was sewing-machine-less, I hand stitched the hem of a skirt. The process and the end result were equally painful.
 When thinking of how I would alter this dress, my first thought was to simply take in the sides and be done with it. However, that proved to be impossible for a couple of reasons. One, the dress only had a top button at the back of the neck. If the dress was altered to be form fitting, there would be no getting in and out of it. Two, the dress was pretty poorly crafted. I mean, it was hand sewn, the seamstress did what she could. But I wanted to do this dress up right. So, no short cuts. No slight modifications. This was gonna need to be a complete redo.
 I began by dissecting the dress. This was so hard to do as I wasn't sure exactly how this was going to end. I couldn't bear the thought of facing my work buddy knowing that I'd needlessly slaughtered her dress. Despite my sweaty palms and worry, I hacked away.

After cutting the back of the dress from top to bottom, I then took out the seam connecting the bodice to the skirt.

The original dress had a bodice that was gathered at the waist. I prefer a darted bodice, so I got out the dress pattern that I've used here, here, here and here. This cleaned up the bodice and created a more fitted look.

The sides were still wide, so I pinned and altered on my mannequin, as seen in the photo on the right.

 To be certain I took in an equal amount on both sides, I created a tissue pattern. I sewed along the line of the tissue paper, trimmed and ironed open.
 Once the bodice was complete, I was ready to add the skirt. Before I did, I took up 3 1/2" from the bottom. I then baste stitched two rows at the top of the skirt so that I could gather it.

I gathered the skirt to fit the bodice, pinned it like mad and stitched it to the bodice as seen on the right.

Gotta love a wind-created crinoline.
And, viola! Couple hours later and the dress was complete.
After adding even bigger darts on the second fitting, the dress fit much better.

Putting in the zipper was the last step. I used the zipper/tape trick again and it worked great. This dress has a beautiful pearl button at the top that I was able to keep in the dress.

Now, with the dress complete, I need your help: do I keep the parts of the dress that come off the shoulders (on left) or get rid of them (on right)? Hubs is leaning toward the look on the right...while I'm not sure if I want to take away from that wide collar.

So, what's your vote? You can cast your vote at the top of this page on the right. The last time we played this game, I was seriously out-voted (gee, thanks guys). After you vote, feel free to leave me a comment and lemme know what you think. Thanks for playing!

Read more »

Wednesday, September 5, 2012

DIY: The Zipper Blowout

"Vintage 911, please state your emergency." ..."Well, aside from the fact that my hair is beginning to get so long that it's resembling Cousin It (sorry, still stuck in that Horror Flick Phase), I believe I just blew out my zipper! Please send help (and hair clippers) right away!"
Have you ever found yourself in a dress (and guys, if you have, you are welcome here) that was a little, um, snuggish? And when in said dress, did you ever take a deep breath and hear that horrific pop! of a button or nightmarish rrriiiip! of a seam? This has happened to me in too-tight, no-room-for-stretch, Spanx-ain't-gonna-save-you-now vintage more times that I'd like to admit. I feel like The Hulk bustin' loose of my garb but without those fab pectoral muscles and that delightfully green skin.
This beauty was found at the thrift store. Half off. I know, right! So that totally justifies the old lady I pushed out of the way and the toddler I booty bumped, right?
Ah. Look at this dress, would you? I mean, it's just divine. The Thrift Store Gods were good to me on this day. However, the Waist Line Demons were not. Their temptation of Jeni's Goat Cheese and Berry Ice Cream has been too great for this weak mortal. And, thus, The Zipper Blowout.
To be fair to my ice-cream-lovin'-waistline, the zipper did look like this when I purchased the dress. I think. Regardless, it had to come out. As heavenly as this dress is, a Holy, ahem, a Whole-y zipper just won't do.
Now putting in zippers used to be my least favorite thing, right after squeezing into Spanx and busting out of vintage, but I've since found a way to do it that's relatively pain-free. So I thought I'd share it with you. The thrifted vintage dress is handmade and a wee bit of a mess so I thought I'd demo with my Horror Flick Dress

Step 1: Set your sewing machine to a baste stitch. That means you are going to have very long, temporary stitches. Baste stitch the fabric together 5/8" away from the seam from the top of there the zipper will be placed to the bottom. Iron seam open like shown above.
 Step #2: Once you have ironed the seam open, lay your zipper on the open seam.
Step #3: For my dress, I tucked the top of the zipper in between the fabric to hide it and make it so the zipper reached the top of the dress.
Step #4: Align the zipper on the open seam.
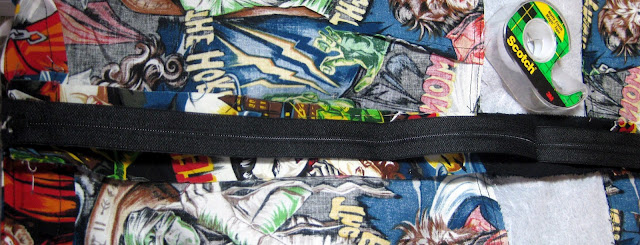
Step #5: And tape it down on open seam with Scotch tape.
Step #6: With tape still on the dress, turn the dress right side out. Change your sewing foot to a zipper foot (not sure which is the zipper foot? Read that neglected manual. I promise your machine came with a zipper foot. It should be shaped like the letter "I".) Change your setting from a basting stitch to a sewing stitch (which means your stitches will be shorter and more permanent). Sew 1/4" away from the basting seam.
Step #7: Don't forget to sew across the bottom of the zipper with a teeny tiny little stitch as seen on the left. Turn the garment inside out. Start the fun process of picking off the tape.
Step #8: Turn garment right side out. Using a seam ripper carefully remove basting stitches. Once complete, you have installed your zipper! I'd give you a high five, but I don't want you smacking the life outta your fancy ipad. Goodness knows my uber chic Compaq can't handle it.
And there you have it. Fixing a Zipper Blowout. Piece of cake. Which I won't be having anytime soon in this teeny (can't breathe!) tiny (I think I'm gonna pass out!) dress (you call this a dress?! I call this a Medieval Gut-Squeezing Torture Device!).
Vintage 911 Update: Thank you so much with your help on my last Vintage 911. I asked for suggestions on removing the stain from my dress and I got so much great advice (none of which I've taken but that's besides the point). Jenny of The Southern Institute and Casey over at Casey's Elegant Musings both suggested Oxiclean. I also had advice on trying Windex, Dreft and Flortex Carpet Cleaner. And, if all else fails, fellow art teacher Phyl suggested applique. A girl after my own heart.

Read more »

Monday, September 3, 2012

DIY: The Horror Flick Dress

My cardboard suitcase is packed and I'm ready: Horrifying Haunts, here we come.
Ah, Labor Day weekend. A time for cookouts, catching up with friends and, of course, sewing a Horror Flick Dress. Oh, you didn't know that was on the agenda? Well, you best get crackin, friend.

I know what you are thinking: Dude (feel free to call me Cassie), it's September! Halloween isn't for weeks!

Or maybe your thought is: Wow! That dude (seriously? It's Cassie) has cured her infamous Pro-Cass-tination problem. 

Or perhaps, in all of your ADHD-ness, you are comtemplating: Another dress? From the same pattern as the Empire Strikes Back, Presley Poodle and the I-See-London-I-See-France frocks? Huh. So versatile (hey, is that sarcasm?). I think I need more chocolate. My feet itch. Is the cat reading my mind right now? Duuude! (I give up).
As soon as I saw this Horror Flick fabric by Robert Kaufman, I knew I had to have some. I shared some extra yardage with Jen over at Peachy Tuesday. I cannot wait to see what awesome hair accessories she busts out with this fabric. I snagged my yardage from Lady Buttons Fabric.
 Okay, so lemme explain. I'm actually not way ahead of schedule because here, at Creepy Casa de Cassie, Halloween begins very early (in less than 10 days!) and continues for every weekend until the end of October. I confessed in this post that hubs and I love going to haunted events. You know, the kind where you pay money for someone in their zombie-finest to chase you with a chainsaw. After seeing this fabric, I knew I had a make a dress for the occasion.

 Our addiction to these haunted events started at Universal Studios Halloween Horror Nights (I dare you to say "Candyman" three times and click on the link). I remember walking up to the first haunted house behind a group of girls. Whatever they saw at the entrance of the house scared them so much, they shrieked and took off running. This left hubs and I staring into the eyes of an actress dressed as a psych patient complete with bloody gown, crazy grimace and one big butcher knife. After escaping that house with sweaty palms, nervous knees and laughter, we were hooked.

It's very fitting that Universal Studios would host such a spook-tacular event as it's kind of like the Godfather of Horror. Founded by Carl Laemmle in 1912, the studio is the oldest in the U.S. In the 1930's Carl's son, Laemmle, Jr., began producing a series of monster movies, nicknamed Universal Monsters. Those movies can be found in the posters above...and in the fabric of my dress.

If you find yourself at Universal Studios in Orlando, please make sure you see the Universal Studios Horror Make-Up Show. It gives a great history on the horror movies of Universal all while being super silly. Not gonna be in Orlando anytime soon? Check out this bootleg.
When I wear this to the haunted houses, it will not be in these shoes. I'll be pairing this dress with my less-than-glamorous-but-oh-so-comfy Chacos. Perfect for running from chain-saw-wielding-homocidal-maniacs.
Not that I'll be doing any running. Oh no. This year, I'm gonna put on my best Morticia Addams face and be brave. Look those monsters right in the eye and not even blink, take my hands off my hips or have a hair out of place. My evil eye will have them running from me.
Dude, seriously?! If I could perfect that glare, I'd never have a single ounce of backtalk in my class room. The only thing more frightening than that stare is that drive-in movie screen sized fivehead, er, forehead.
Oh who am I kidding. My evil eye will quickly fade and become a Big Fat Baby Cry. Like every year. It's the only time the monsters break character and give me a "Duuude! Relax! Can someone please come get this crazy?!"
 Thanks for dropping by. I'll keep you posted on the haunted events the dress and I visit. Enjoy your Labor Day, dudes!


Read more »

Tuesday, August 14, 2012

DIY: The I-See-London-I-See-France Dress

I am a bit of a haphazard seamstress. So I have this fear, when I wear my own sewn dresses, that  some rogue seam is gonna come loose and the end of the phrase "I see London, I see France..." will actually become my reality.
 Bonjour, compadres! What you are looking at here is an example of Pro-Cass-tination. Oh, you didn't know I was the Queen of Puttin'-Off-Everything-'Cept-Candy-Eatin'? It's true. And this dress is no exception. After months of sitting on this half-finished dress, I finally knocked it out. And just in the nick o' time, as me and the wee artists are about to be neck deep in all things Paris, France. Oui oui, ya'll.
Um, did you know I have a bit of a Mary Blair obsession? Have you seen the movie Single White Female...? Just kidding, my therapist and I have it way under control. As long as I take my meds. This photo of It's a Small World was taken last Christmas at Disneyland.
 So I picked up the Parisian-themed fabric over the summer. I knew I'd be taking the kids on European adventures in art and wanted to create a dress for the occasion. When hubs said, "that fabric looks very It's-a-Small-World," I knew I'd made the right choice.
If you are thinking this dress design looks  familiar, then you might be thinking of my Empire Strikes Back dress and the Presley Poodle Dress. Yep, all three are from the same vintage pattern. I'm a repeat offender.
 After sorting through my mountain of dress patterns I went with the same ole dress pattern I've used before. I really like this pattern for a couple of reasons: that giant band around the waist is super slimming and, because of the three parts of the dress, I can have fun playing around with fabric combinations. For the top half, I decided to go with my two favorite colors, salmon pink (with polka dots?! yes, please!) and turquoise blue. The skirt fabric is from Hoodie's Collection "L'amour de la vie" for Timeless Treasures Fabrics.
You remember my embroidered poodle from my traveling DIY? Well, this was also completed on that same trip. For this I used an embroidery design from Stitcher's Revolution.
Now if only Mary Blair paintings were made into fabric designs, I'd be oh-so-happy.
To top off the look (like literally), my friend Jen of Peachy Tuesday created this awesome Eiffel Tower headband. I love it! And I know the kids are going to as well. You can find Jen's shop here...and you can preview her designs before they go up for sale on her Facebook page. Merci, Jen!
The gorgeous Mary Blair. A little bit of history on her: she and her hubs joined Walt Disney Studios in the 1940's where she worked on concept art for movies like Alice in Wonderland and Cinderella. The designs for both are beautifully published in childrens books, along with a couple others she illustrated (if you have not seen the adorable I Can Fly book, please check it out). She is most famous for creating the designs for It's a Small World. Sigh. If I could live in that sweet world, I totally would.
Now that I think about it, this seems like the perfect dress to wear the next time I ride It's a Small World. Given I don't experience the dreaded butt-blowout before then.
 

 Oh, look, there's me attempting my best Mary Blair pose. Yeah, I'll keep workin' on it. The beautiful portrait of Mary was created by comic book guru Michael Netzer.

 Whew, I-See-London-I-See-France-Please-Lemme-Be-Wearing-Clean-Underpants Dress complete! Next up on my sewing table: my Halloween Horror Movie Dress to be worn at the countless haunted houses we'll be attending this fall (yes, seriously). When I mentioned that upcoming dress to hubs, the following convo ensued:

Hubs: I know you haven't started on that dress yet.
Moi: Oh yeah, how do you know?
Hubs: Because it's not the night before you need to wear it.

Hey, they don't call it pro-Cass-tination fer nutin'.

Au revoir!


Read more »

Sunday, August 12, 2012

What the Art Teacher Wore #29

Meetings Monday: Thankfully I had a cushion-y chair to help with the hours of sittin' and listenin'. Said chair is muy importante to prevent the onset of butt fatigue. dress: vintage, thrifted; belt: sale, Anthro; shoes: um, Softee
 Ya'll are the best. I've gotten so much great advice on how to remove (or cover if removal becomes the impossible) that pesky brown stain from the dress featured in my Vintage 911 spot. Thank you! I'll be sure to keep you all posted.

This week in art teacher land was an exciting one. The kids returned to school on Thursday and we've been having a ball every since. And they've not even made it down to my art room yet! The invasion begins tomorrow and I cannot wait.

Getting ready for the kids this week, I was all about the details. Putting the finishing touches on the outside of my art room and well as the inside. In keeping with that train of thought, I thought I'd share with you some of my favorite details of this week's wacky outfits. I'd love to hear which detail you like the best. Enjoy your upcoming week!

This dress also spent some time in Vintage 911 as it was missing buttons, was spotty and torn. But how could I not restore a dress with such adorable fabric?
Incoming! Tuesday: On this day we keep our school open late and registered the kids. I didn't want any newcomers to be confused about what I teach. necklaces: thrifted; top: Target; crayon shoes: painted by me, tutorial here; rainbow wrap skirt: gogovintage, via etsy.

A detail you cannot see very well in the outfit photo is my crayon hair clip. The kids loved it and it was super easy to make: hot glue crayons to small piece of felt and hot glue felt to hair clip. Boom. Crayons in Yo Hairs.
Oh, More Meetings?! Why, Let Me Do My Happy Dance Wednesday: jumper: Esprit, from high school...because I NEVER get rid of ANYTHING; blouse: thrifted, vintage; belt: Anthro; sandals: old, Target

Oh, look, it's Gary. Lots of Gary's. Meow. (if you've no clue what I'm talking about, don't worry. It's a Sponge Bob thing.)
The Official First Day of School: And, like every year for the last 14 (gah!!), I had the same dream I always do: A room full of 50 plus kids who are all yakking at once and I cannot maintain any sort of control. And I yell and yell and yell. Do any of you teachers out there have back-to-school nightmares? top: Banana Republic, garage sale; skirt: the awesome etsy shop OpalMaeandMissDot via etsy sandals: Target, you gotta check out their big ole shoe sale!; palette hair clip: made by moi
Kid Convo between a newbie and a veteran kid. Newbie: "She has a paint brush and a paint thingie in her hair." Veteran: "She also wears pencil shoes and ones with Santa Claus painted on them. She's the art teacher!" That's right. It's what I do.
Red White and Blue Friday: Our whole school got decked out in their red white and blues on Friday in celebration of the final weekend of the Olympics. dress: from a shop in Germany; belt and head band: dotted fabric from my stash; anchor sandals: Sperry
Anchors aweigh! Whatever that might mean.


Read more »