Since I recently shared a tips and tricks video on all things watercolor paint, I thought I'd dive in with my very favorite watercolor lessons of all time. I have 16 of 'em just for you but before we get to those...I thought I'd share some of my all things watercolor.
And here's a short video of me introducing my kindergarten students to watercolor!
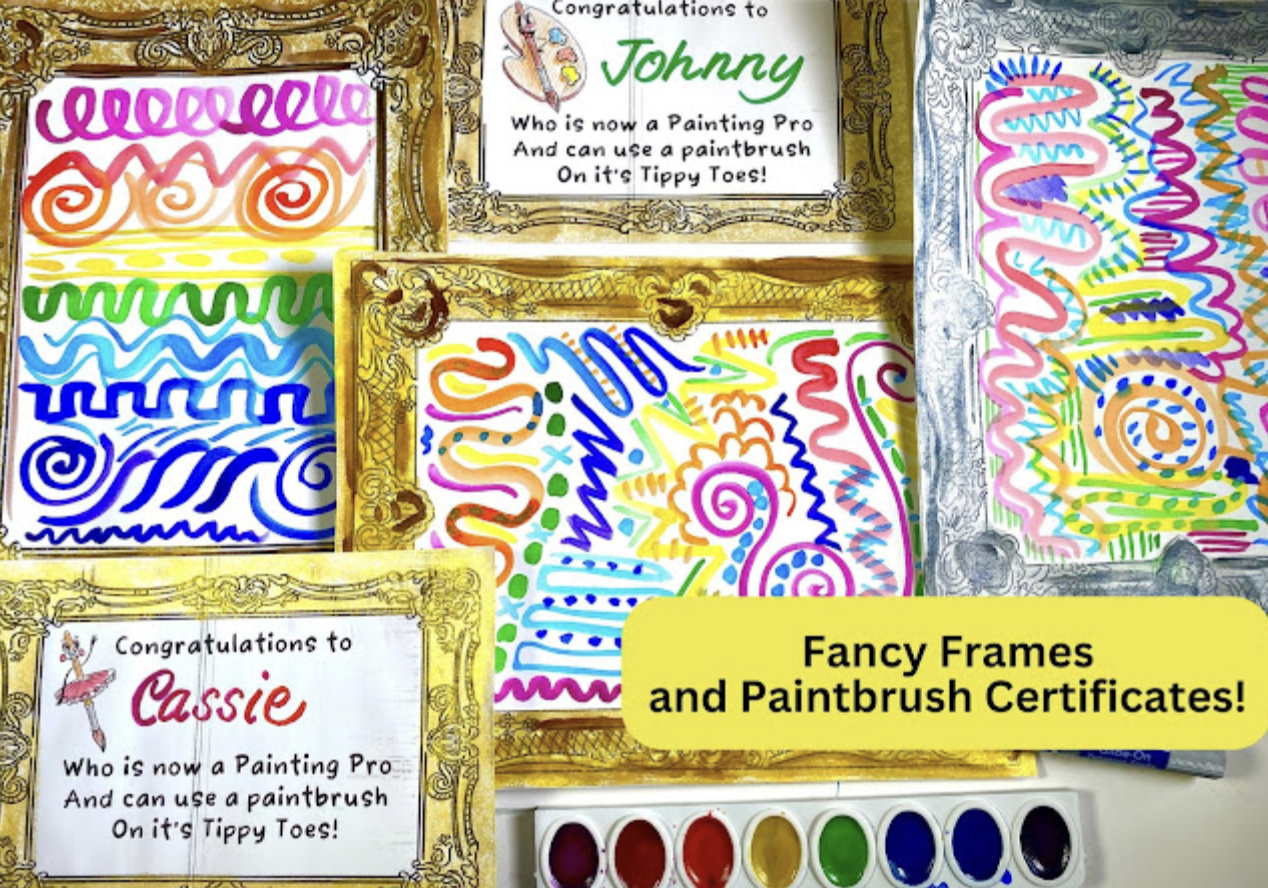
If one of the things your students struggle with is BRUSH CONTROL (or just not abusing those poor paintbrushes!), might I recommend my Paintbrush Ballerina method? You can kick things off with my book The Paintbrush Ballerina and then dive into my free downloads!
Once complete, students can 'graduate' to painting with watercolor paint in these fancy frames...and even earn a Paintbrush Pro certificate! Those downloads are here.
Now let's get to those lessons!
In my Tips and Tricks video, I share that one of my favorite things to do is create customized watercolor trays. I like to have a warm and a cool tray on hand as that allows my students to explore with watercolor paint without the messy/muddy paintings. Warm and cool colors are analogous which means that they not only sit next to each other on the color wheel but...they also look great when mixed!
For this second grade lesson, students had to decide which they wanted to use: warm or cool. Then we traced a circle and created this sunset or sunrise scene.
Once dry, we created these silhouettes with India ink. You can find the lesson details here!
Here's an oldie from over 10 years ago but LOOOOK how pretty! This is a similar process to painting the background with an exploration of Ming vases. Details here.
If you'd like to see my introducing watercolor paint to my kindergarten friends, visit here!
Now this lesson is usually one I do with tempera cakes BUT you could also do it with watercolor paint. It's the perfect rainbow follow up lesson for kindergarten (or any grade!). Lesson here!
Now I never did a blog post on what we did with those rainbows but...I do have the evidence! I did this lesson EVERY YEAR (which is wild I never blogged about it) and they always made me so happy. We created the sun and cloud images and added them later. We used blue chalk to add color to the sky before we added the cloud and the sun.
Exploring abstract painting is always fun...especially when you can tie it in with the combo of crayons or oil pastels and watercolor. They always look so fab together! This could also be a super fun LINE review. Which seems like the perfect time to reread my book Larry the Line! Find this lesson here.
Now I don't think I ever created a lesson on this one (my googling turned up empty handed) but what we did with the weavings was create these fun houses! To do this, we painted with tempera on a large sheet of paper a sky and the ground. Once dry, we cut out a house silhouette and glued it over our weavings. Early finishers had fun learning how to do a little bit of stitching!
I love this lesson for learning how to do a fun wet-on-wet technique. In the video, I'll walk your artists through the process and they will love the magic!
One of my VERY favorite things to do is create these texture cards for use with oil pastels and watercolor. I've created several vidoes on how to create these but...it's so easy! Just use tag board and glue to draw some line designs. I used the line ideas I created in Larry the Line.
To create them quickly, I cut a ton of those little cards and laid them all on a table before attacking them with lines drawn by my glue gun. Then my kindergarten friends used oil pastels to create texture rubbings!
From there, they painted over the texture rubbings with watercolor before using ink filled bingo daubers to add an alphabet. This lesson is always a hit! Also...those texture cards will last FOREVER. I made one set and used it for over 10 years! Lesson details here.
This lesson was created for a sub to use and the kids LOVED it! This one comes with a video and a free download. You can find it here!
Check out this fun one! This could be the next step in the house lesson where your artists create little pop up houses. The most fun was in created the patterned background. Lesson details here.
I love a lesson that ties in a couple of concepts. This one explores LINE (featuring Larry!) as well as the wet-on-wet watercolor technique. You can find the full lesson here.
Hey there, friends! I hope this here blog post finds you enjoying your summer vacation if you are stateside! I know the last thing you probably wanna think about is TEMPERA PAINT...but I always find it much more relaxing to thing about art, organization, lessons and the like when I'm on a break. So I created a big ole video just for you with my very favorite tips and tricks.
But before we do...if you would like to peruse some tempera painting lessons, I did put together a blog post of my 20 favorite painting projects here. Not all of these are tempera paint but many are and will, hopefully, get the creative art teacherin' wheels turnin'. Just click here!
Tip #1: Limit those color palettes!
I like to distribute paint with a couple of customized paint trays. For example, on the first day I paint with kindergarten, they all receive a tray of warm color paint. On the next, it may be cool color. This helps keep our paint trays from getting completely demolished by students who are new to learning my painting routines. This method also allows students to learn the warm/cool colors as well as the notion of analogous colors.
My favorite way to distribute paint is...ice cube trays! I've been doing this since my first year teaching way back in 1998. Back then, we didn't have fancy ice cube trays like these. I had to do the stack-and-sack method of stacking my trays and putting them in plastic garbage bags overnight. Thankfully, we have these neat trays that do an excellent job of keeping paint from drying out.
What I love about them is that no only do they not tip but they also have a spot for my sponges. The sponge is where my students dry their brushes, further removing drippy water from their brush. What I don't love about these is that the water reservoir is shallow and I have to change out the water between classes. So...it's a trade off. If you don't use the sponges or want a deeper water cup, I also love these:
They legit don't spill!
AND they come in a rainbow assortment which is fun if you color code your tables. I also love the wavy rim for resting paintbrushes.
If you are looking for a way to have students really scrub their brush while cleaning it, you could get some of these Paint Pucks to suction into the bottom of the watercup. OR...you could also use your glue gun and put dots of glue at the bottom of the glue cup and that would do the same thing!
Tip #4: A sponge to further clean the brush!
Or, as we call it, Dirty Ole Sponge Bob. If you teach students my trick of drawing an X on the sponge, it will help them remember to wipe their paintbrush AND keep the tip nice and pointy. You can find sponges at the Dollar Tree or you can also find them here.
Tip #5: Contain the mess with TRAYS!
Okay, so these trays are a little expensive BUT they are super thick and sturdy which means they will be able to handle the weight of the painting supplies placed on them. However, I have purchased trays from Dollar Tree on their site and was able to purchase an entire box. The only thing is that if they don't have this available in store, you will have to pay for shipping. It's cheaper if you have them shipped to the store and pick up there. The Dollar Tree trays are much thinner and not as sturdy. But I loved them for having my young students create their artwork on. Not only did it help to capture and contain the mess but it also made it so much easier for them to carry their work to the drying rack.
Tip #6: Distribute paint without the mess!
FIFO bottles are a great way to get paint to your students without lugging a gallon of paint around the room. I also love them because you can customize and mix your own colors! You can find them here and learn more about them in the video if you aren't familiar.
Tip #7: Texture combs are a must with tempera paint!
Thick tempera paint is made for texture! And while I used to love to pick up bags of texture making supplies at the dollar store what I found is that I spent so much time at the sink CLEANING. I eventually stopped using them and switched to the ole stand by: the texture comb. They are easy for kids to use without their hands getting too messy and, even better, they are much easier for ME to clean! I love 'em and they are constantly being used in my art room. Find them here.
Tip #8: Cover those tables with Messy Mats!
We don't have time to wash the paint from our tables! I mean, we might have time but do we really wanna spend our time that way? For me, I had classes back to back with no time for cleaning so Messy Mats saved the day with keeping our tables covered and clean. You can color code them with this railboard found here.
I also just like the ole standby of tagboard! You can buy a pack of 100 and it will last you for a couple years (maybe longer!) here.
Tip #9: Clean those hands and tables with these!
I like to keep a bin of soapy water and a couple of these towels on each table. The kids know that they are ONLY to use these towels during clean up...otherwise you may have friends washing their hands throughout the lesson. I show them how to wring the water from the towel before using it on their hands and table. I swap these out with clean towels and water while the students work so each class has a fresh bin of water. These towels wash up great in the washing machine!
Tip #10: Only buy the paint colors you need...and you don't need 'em all!
Share with your students how to mix paint so you don't have to buy them all! The colors you WILL want to order are: red, magenta, yellow, blue, turquoise (or cyan), white, black and brown. I usually order my paint by the gallon so we don't run out. You can find the paint I buy as well as anything I may have forgotten here.
As for paintbrushes, when I first began teaching, I used what I had in my art room: those coarse, long-handled bristle brushes. They usually wiped more paint OFF the paper than they did put it on! Now I only have students use soft hair brushes like these.
And of course you need a copy of The Paintbrush Ballerina to share with your students how to use and care for their paintbrush! You can get a copy here. I also created some painting practice sheets that you might find handy as you introduce your students to painting!
These totally free downloads will have your students handling their paintbrush correctly in no time. Whether they are working with watercolor, tempra or tempra cakes, these sheets will save those paintbrushes! Find them free here.
I created a video to share with you how I would use these sheets in my art room...I put them in a sheet protector so that students can practice painting with just water! More details here.
Personally...you could tell me how to paint with children all day long but until I see how someone teaches it, I just don't get it. So! I thought I'd share a series of teaching tempera painting videos here. For lesson details, check out this blog post.
Here's a video of my sharing my painting set up in my art room.
I hope this big ole blog post helps you feel more comfortable busting out the tempera paint in your art room. NOW...it's summer so go put those pjs back on, grab a snack and take a nap!
Today I thought I'd put together a big ole blog post of some of my very favorite lessons that both introduce and continue to explore painting with children. So if you are looking for a fun and engaging lesson for kids of all ages, I think you'll find something here. Thanks for dropping by!
If you've been hanging out with me for a while, then you've seen me share my method of painting with my students. Here's a little background on how the journey of the Paintbrush Ballerina began:
If you'd like to hear a little big of the book, check this out:
I wrote the book in rhyme as those have always been my most favorite books to read to children. In this story, our paintbrush friend who has been abandoned in a watercup in front of palette tells the tale of the Paintbrush Ballerina. You can read more of the book and see the illustrations here.
It's tough to watch out students struggle with the most essential art supply: the paintbrush. And it's a real bummer to see the destruction they do to our expensive brushes! So I took everything that I learned from 25 years of teaching art to small children and put it into this book!
If you'd like to see me talking to my kindergarten about how to use their paintbrush, then check out this video here:
If you are curious about my teaching methods and would like to see more, I have a playlist on my YouTube channel called "A Glimpse Inside" where you can visit me as I teach my students.
Keeping that brush on it's toes is always the goal! Check out this sweet kindergartener doing just that!
Alright, now let's dive into those lessons, shall we? I have no rhyme or reason to the order of these lessons. This is just a big ole smattering of some of my faves!
Let's start with kindergarten who are my very favorite! After learning about the order of the color of the rainbow, we dive into painting our own with tempera cakes. Tempera cakes are a fave in my art room as they are low mess and, low prep and the colors are just beautiful! I'll circle back to this lesson in a moment.
Now let's skip forward to third grade. By then, you'd think they'd have a better idea of how to handle their brush. BUT I gotta tell ya, 'tis not the case. Even tho it feels like we say the same things all day long (cuz we do!) we are saying it to different groups of students! So I had the same sayings and phrases on constant repeat...and the bit about the Paintbrush Ballerina was one I always said. AND they always love!
To read all about bingo daubers and why I love them in the art room, visit here. If you've not tried them out in your art room yet...be prepared to fall in love!
When it comes to painting, it can be overwhelming as to where to start! Do I begin with color mixing? Mark making? Introducing white and black to share tints and shades?
Here's what I've learned: start wherever you like! BUT start with just one thing. That's the easiest for you and your students. So, first things first, begin with how to use the paintbrush! THEN...maybe go with mark-making. I introduced my students to a wide range of color and mark-making ideas to create these beauties.
For many years, this is how I introduced both painting and line to my kindergarten students. By limiting the color to just black (we used a diluted black ink to allow the brush to paint more smoothly), we could focus on just the brush and the lines. From there, we were able to add color!
When it came to introducing color to kindergarten, I usually did that, like I mentioned, the day after our black and white line painting lesson. That's when we did the rainbow paintings. BUT...since I'm skipping around a bit, you'll have to scroll down a pinch to see that first rainbow lessons.
Many of my kindergarten lessons are born out of "the fast finishers need another something to paint!". And that's what happened here! After painting the rainbow, many students then got a sheet of paper and painting stripes of rainbow color. This served to be the perfect background for these adorable self-portraits!
So sorry these are kinda out of order. Truth be told, when I try to edit or move images around, they tend to disappear. So...it's easier if you just scroll then if I sprout more gray hairs.
Meanwhile, in first grade, we took the idea of our paintbrush being a ballerina a little further. We listened to music and had her paint across our page!
More info here. You can also check out how we made these into beautiful weavings!
And now...color mixing! These wee Mouse Paint masterpieces were created by kindergarten. The best part...the Hobby Lobby frames!
I recently had someone give me a hard time about this...
I shared that often, at the start of the school year, I do the same lesson with all of my students, kindergarten through fourth grade. Why? FOR MY SANITY! I'm usually trying to set up my classroom, introduce a thousand routines and just keep my head above water. Once I have my Back to School footing, I feel good venturing into different lessons with everyone. But, to start, we all begin with the same supplies, same visuals and same lesson.
This commenter DID NOT like that and let me know.
Now look, I'm cool with sharing your thoughts and opinions but...there's a way to do it. AND if you aren't an art teacher then...you might just wanna sit it out, you know?
Regardless! I did THIS same lesson with all students AND put a twist on it so it ended up being a big ole collaborative. So there! ;)
Now, let's jump forward to fourth grade! Here's one of my favorite landscape lessons based on folk art. We created these with tempera paint and you can check out more about this lesson here.
My second grade students created these paintings with either a warm or cool color watercolor background. When using watercolor, I often have my students decide if they will use one family of color or the other. This keeps their paintings from becoming 'muddy'.
This lesson with fourth grade introduced my students to tempera cakes and many different painting methods. We began by painting these stripes of color that were later used to draw buildings in Sharpie. Full lesson on this process, with video, here.
We used cardboard circles as our base for our snowglobe. I had my students create three sketches first. They LOVED those little small circle paintings so much that we turned THEM into a project too!
This snowglobe lesson was done with tempera cakes. And glitter...which I don't recommend, ha!
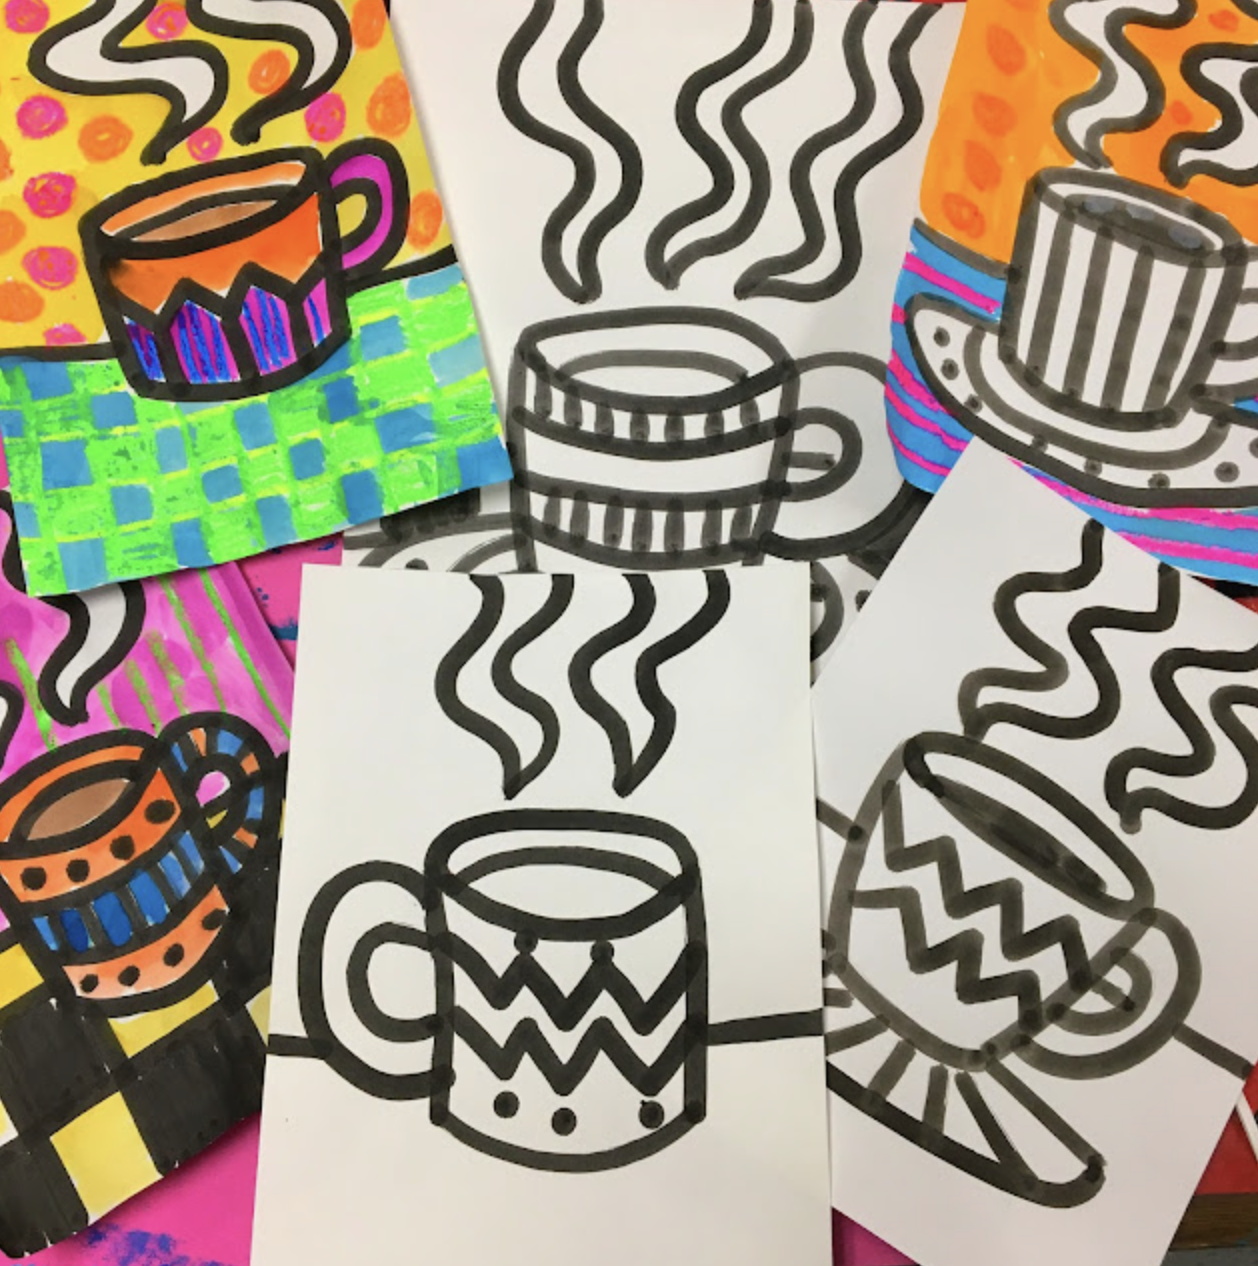
I've done a couple hot chocolate/cup of coffee based lessons (I may be a little biased, I suppose!) and you can find this lesson here!
Let's circle back to the ole bingo dauber, shall we? It's like a Sharpie on steriods!
I LOVE that we can create the most epic contrast with the bold black ink and these bright paints! We are using Jack Richeson's neon tempera cakes here.


.jpg)


.png)