Monday, April 23, 2012

DIY: Stripping and Hooking

Look at that sweet face, poised and ready to get her hookin' on. Photos from a 1951 Rug Hooking Bee. What I wouldn't give to travel back in time, dress spectacularly and join the fun.
My mother-in-law is a stripper. And a hooker.

It's not a secret or anything, we're all cool with it. To each his own, we say. It's good to have a hobby.

It was just a little something she started doing on the side a couple of years ago. We didn't think much of it. She got her sister interested in it and now, me.

That's right. I'm a hooker. 

A rug hooker, that is. Why, is there any other kind?

Now, lemme clarify. Because when my MIL first began speaking of rug hooking, I immediately had a flash back of the rug hooking I did in elementary school. I remember sitting on my babysitter's couch every afternoon hooking an image of a mushroom with short little strips of yarn. My dad even made one of these types of rugs, a large red number featuring a running tiger. Very 1970's chic. But that's not what I'm talking about. That's latch rug hooking.
The rug hooking I'm talking about involves strips of wool, not yarn. And, if you'll notice in above photo, the surface that is hooked upon is a fabric called Monk's Cloth. Not the holey grid-like fabric used in latch hooking.
My mother-in-law with one of her many hooked designs. The barn she is hooking is from a drawing my hubs did in junior high school.

And an adorable rug hooking she made for me. Notice the turquoise and orange variegated wool near the border? It came from an old wool jacket of mine. And the brown wool on the inside border is from a jacket of hubs. This hooking will one day be made into a pillow or to cover of a footstool.

So, to try your hand at rug hooking, the first thing you'd have to do is strip some wool. Wool fabric, which can be purchased or recycled from wool clothing, is stripped through a device that leaves it looking like colorful linguine. A rug hook, best seen in the hand of the freckly little girl, is inserted into the Monk's Cloth with one hand while your other hand works underneath looping the wool over the hook.
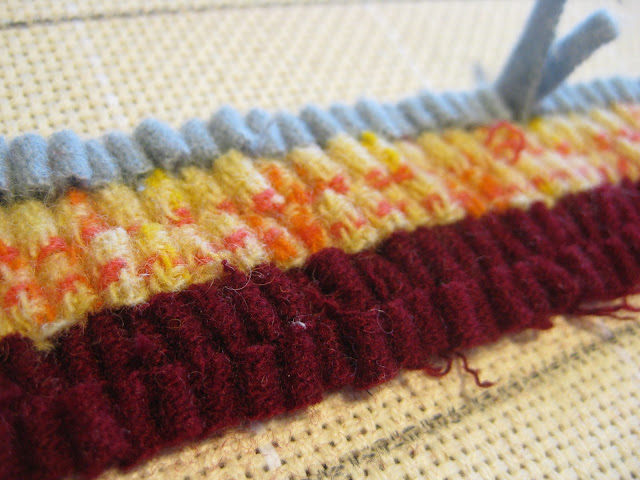
Once the wool is looped over the hook, it is then pulled to the surface of the Monk's Cloth. With your other hand still underneath the fabric, it pulls the excess strip down to make the wool loops even with the others.
Once a couple of rows are completed, the loops should look like little rows of soldiers standing in a row, not crowded but straight and even.
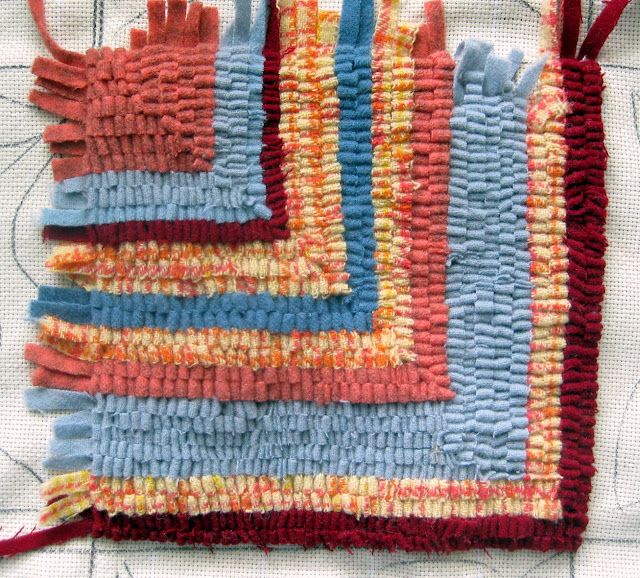
My wee little finished section! My hope is to create a decent sized rug for my kitchen. I just had to share this little square (it's about 8" x 8") with you as I was just so excited by the result. Who knew I'd love hooking so much?
Er, I dunno if I'll ever like it that much. Ahem.
As always, thanks for dropping by! I'll be sure to keep you posted on my progress. Now if you'll excuse me, I've got important hooking to do.

Friday, April 20, 2012

What the Art Teacher Wore #13

Monday, you sure do know how to sneak up on a girl: sweater: vintage, hand knit and thrifted; dress: vintage, thrifted; fishnets: Marshall's; flats: Urban Outfitters via the interweb
Hiya, kids! I do hope you've had a lovely week and have an action packed weekend planned. Me? If I can manage to just sleep past 6:15am without some 20 lbs cat clawing my arm, knocking things off the dresser and meowing incessantly demanding her breakfast, I'll be in heaven.

Until then, here's a little peak at what I wore this week. I am having so much fun discovering new works of art based on my outfits that I can't help sharing them with you. Enjoy!
Do these shoes look kinda-sorta familiar? They were created by the makers of the leopard shoes found in last week's outfit post.
Can you believe this beauty? This is an obi, which is the sash-like belt that is tied around a kimono. I learned that the Japanese believe the crane can live up to a 1000 years and therefore represents a long life. The crane also mate for life and so represent a happy marriage. Aren't they beautiful? I discovered this obi here.
Totally rainy and a bad day for sandals Tuesday: dress: vintage, thrifted and embroidered by me here; belt: made by me, available in my shop; anchor sandals: Sperry, my once-in-a-lifetime preppy shoe brand purchase
One of my little embroidered ladies reminded me so much of the painting below.
I love this painting as well as the other pinup-style paintings by the artist Gil Elvgren who is called " The Norman Rockwell of Cheesecake." From here, I learned that Elvgren was interested in painting the girl-next-door type who finds herself in adorably embarrassing situations. You know, the kind where you just happen to have great legs, clean underwear and a non-holey slip when the wind decides to blow your dress up.
Wild Wednesday: dress: awesome etsy shop Supayana, the owner of the shops is so sweet and was able to create and ship my dress from Montreal in less than two weeks! headband: Super Awesome Peachy Tuesday; tights: Target; shoes: Indigo by Clarks

I love this detail. Many of Supayana's dresses and tops feature an adorably designed illustration. This one reminded me of a much happier version of Picasso's Blue Period couple below.
Pablo Picasso, Couple in Cafe, 1903
Sunny Thursday: dress: vintage, thrifted, dyed brown; belt: by me, available in my shop; shoes: Lucky Brand, found for cheap at one of those shoe resale shops
Ha! I wish I could look as pretty as this picture. From head to toe, I love everything about this girl's look. Heck, everyone looks divine this in this photo, even the Snooty Girl in the Snood! Secretary Jane Yaeger walking Hollywood and Vine, 1944 by John Florea
Friday, if you were a dude, I would so totally go out with you: top: vintage, thrifted; skirt and tights: Target; shoes: Indigo by Clarks
Sorry, but with the black and white bird on my shirt, Picasso was just the obvious choice. Dove of Peace, Pablo Picasso, 1952


Thursday, April 19, 2012

In the Artroom: Full Moon Rising

Every year my school hosts an end of the year art show. Throughout the year, I hoard all of the masterpieces the kids create. A couple of weeks before the art show, my Army of Amazing Moms start to mount, sort and organize. Once completed, each teacher is given the mountain of masterpieces for their class. They recruit their room moms who then hang all the works of art.

I teach 420 kids. Each of them makes roughly 5 works of art.

That's 2100 pieces of artwork that fill the hall's walls of our school.

And it freaks me out every year...will I be able to get everything ready in time? What about those absent kids who need to finish? And where on earth did I put that class' paintings?!
As I was making a feeble attempt to organize for the show, I stumbled upon these beauties created by my genius fourth grade students. They painted these masterpieces at the beginning of the school year and I'd completely forgotten about how amazing they were. It was a great lesson for the start of the school year as it allowed me to introduce the elements of art and a couple of the Big Name artists.
So I thought I'd share it with you!
For this lesson, we used the following:
  • charcoal sticks
  • large rectangular sheets of paper
  • black tempra paint
  • naked crayons (our name for crayons sans paper)
  • Crayola watercolor paints with the addition of turquoise and magenta
  • watercolor brushes
  • color diffusing paper in leaf shapes
Here's how we went about creating:
  1. We started the year learning about Leonardo da Vinci. Using charcoal sticks (because Leo would have used 'em!) and the element of art of line, we drew a tree branch from observation. 
  2. From there, we drew a circle for the moon anywhere on our painting and painted over our charcoal lines with black tempra paint.
  3. Next, we chatted about Leo's love of nature and did some leaf rubbing. This introduced organic shapes, texture and color. 
  4. Finally we were ready to paint. First warm colors were introduced with the leaf painting.
  5. For the background, we used the cool colors and a variety of values.
  6. During this time, Vincent van Gogh and his love of line, texture and movement were introduced. I'm sure you can see his influence in some of the paintings.
I love the variety of lines this artist used on her tree branch.

Just like any lesson, you've always got the Early Finishers and the Pokey Little Puppies. I myself fall under the PLP category, so I don't like to rush the kids. For my early finishers, they were given the format of a cinquain poem and told to use their artwork as the inspiration.

There are a couple of different ways to go about a cinquain poem. We wrote ours like this:

Line 1: A noun
Line 2: Two adjectives
Line 3: Three -ing words
Line 4: A phrase
Line 5: Repeat Line 1


The kids wrote their poems onto these leaves with a sharpie. These leaves are made from what's called a color-diffusing paper. After writing their poem, the kids used warm color water based markers to color their leaves. Then they simply painted their leaves with water and viola! A beautiful poem-y leaf to accompany their masterpiece.
Because of the dark sky in this painting, the artist used white to paint their tree branch to make it more visible.

I love how this branch seems to hug the moon!
And there you have it! A great addition to our art show. When it all finally comes together, I'll be certain to share photos of the show with you. Thanks for stopping by!

Tuesday, April 17, 2012

DIY: The Rock Star Apron

Dude, am I in tune? Oh, wait, I'm the lead guitarist. I don't have to be for the ladies to love me.
So I was recently asked how I managed to keep my clothes clean in the art room. Firstly, lemme just say that I have a very loose interpretation of clean. As long as you don't get too close to me, I always look relatively presentable. But, just like a specimen under the microscope, up close and personal, it's a whole 'nother dirty, dingy paint-splatterly story.
Hey, man, can we turn down the bass? And the drums? And maybe the vocals? No one can hear my sweet riffs.
Secondly, what I've failed to show you in my outfit posts is that I wear an apron daily. I've been wearing aprons since my first year teaching when one of my sweet hands-covered-in-paint kindergarten friends decided to give me a hug...and left two paw prints on my tooshie.

But I grew tired of the traditional kitchen apron so, several years ago, I made this one. That's right, this is an oldie. But just like Classic Rock, it's yet to go outta style. Says me, anyway.
Wanna make a Rockin' Apron? Just get your groupies to collect the following:
  • Pair of old jeans (I thirfted these little girl jeans...in my rock star fantasy, I got the hips like Jaggar)
  • 1/2 yard of felt for the guitar
  • 1/4 yard of felt for the guitar
  • A heavy cotton fabric for the apron itself
  • Buttons for the guitar
  • Some sweet rockin' fabric for the shirt
Okay, I didn't go about this sewing project the traditional way. I was too busy at the School of Rock to pay attention in sewing class. So, this is a hot mess of an assembly. Just follow my lead, man.

Puttin' it all together:
  1. Lay your favorite apron on top of the background fabric and trace around it leaving a couple inches for the hem. Fold hem under and stitch around the entire apron.
  2. Using your funkiest fabric, create a shirt. Lay your apron over the shirt fabric, trace around leaving a couple of inches, fold under and sew this to the apron.
  3. Cut off the back of the jeans. Lay this on top of your apron but do not sew yet.
  4. Using a sheet of large thin paper, lay this over your apron and start sketching out your guitar. Once you have that sketch complete, cut it out.
  5. Lay this guitar sketch over your apron (which should still have the jeans on it). Trace where you plan to add the guitar onto the jeans and cut off this portion of the jeans. If you don't do this, you'll end up with a lumpy guitar. Chicks aren't into that. Pin jeans into place.
  6. Trace your guitar onto the felt and pin into place. Do the same with the neck and the white part of the guitar (I'm sure it has a name, but when I asked a guitarist, he didn't know it either). Use a zigzag stitch to attach.
  7. Add the strings with a zigzag. Sew on your buttons.
  8. Sew your jeans to the apron.
  9. Add straps for the neck and waist ties. I used an old belt to give it that guitar strap look.
  10. Now, ROCK THAT APRON.
I added a little flair to my jeans. Notice the paint splatter.

For being several years old, this apron has held up pretty well. I wash it occasionally on a super gentle cycle and allow it to air dry.
What does a lead guitarist use as birth control? His personality.
Well, man, I do hope you'll give this Rockin' Apron a go. It's super easy and very fun to wear. Though I do know what you're thinking...this apron needs more Cowbell.

Rock on, dude!

Sunday, April 15, 2012

Weekend Adventure: An Identity Crisis

"May I please get my picture taken with you?," says me, attempting to bat my eyes. "Sure, but you gotta hold my musket," says dude in the white gloves trying to figure out what's wrong with my eyes.


Yesterday hubs and I decided to take a little adventure to what was supposed to be a Pioneer Festival. But then the Civil War reenactment dudes showed up. Who were followed by the vintage car show folk, the crafty booth people, the dip-your-hand-in-wax guy, the funnel cake carts and the I-have-a-donkey-if-you-want-a-ride dude. Basically it was a festival with an identity crisis. My favorite kind.
The festival was held at Cannonsburgh Village which is in Murfreesboro, Tennessee. It's a village which is supposed to represent 100 years of early Tennessee life from 1830 to 1930. On the property there is a gristmill, a school house, a caboose, a wedding chapel, a doctor's office, you get the idea. The above was the general store.
The best part about the festival was that all of the buildings on the property were open. Inside of one home I was able to see the bedrooms, closets and wedding dress worn by the former owner. The tour guides were two young girls who looked like they'd just walked off the set of Little House on the Prairie. They eloquently explained all of the details of the home and it's former occupants.
The doctor's office...if I were a patient, one look at that frightening array of torture-inducing instruments would suddenly have me feeling MUCH better.

These bottles were on display in the doc's office. They look just like the bottles that Mitch (that would be hubs) and I found when we stumbled upon a vintage landfill on one of our off-trial hikes. You better believe I loaded up my backpack with old Coca Cola and 7-up bottles.
The only pioneers at the Pioneer Festival.
Excuse me, I have a question...does one actually have to become a Hillbilly Clogger in order to obtain the petticoat-astic dress and tap shoes? If so, sign me up.
These dudes kill me. They make it look so stinkin' easy.
I was so excited to see this old loom as my third and fourth graders are weaving right now. I told them the story of the giant loom I wove on in college in my terrible textile class...and how I accidentally cut a warping thread...and didn't fix it...and got a C in the class for it. But I digress. This Loom! They will love it.
The Wedding Chapel.
Snapping creepy photos in the bedroom of one of the colonial homes. I swear the giant black moles growing on my neck and Mitch's left eye are marks on the mirror.
And that concludes our adventure at the Pioneer/Civil War/Craft Fair/Food Cart/Clogging/Face Painting/and Henna-Anywhere-On-Your-Body Festival. Next time a festival of this kind is in your neck of the woods, I highly recommend you drop by.