Thursday, April 9, 2015

In the Art Room: Kindergarten Clay Birds

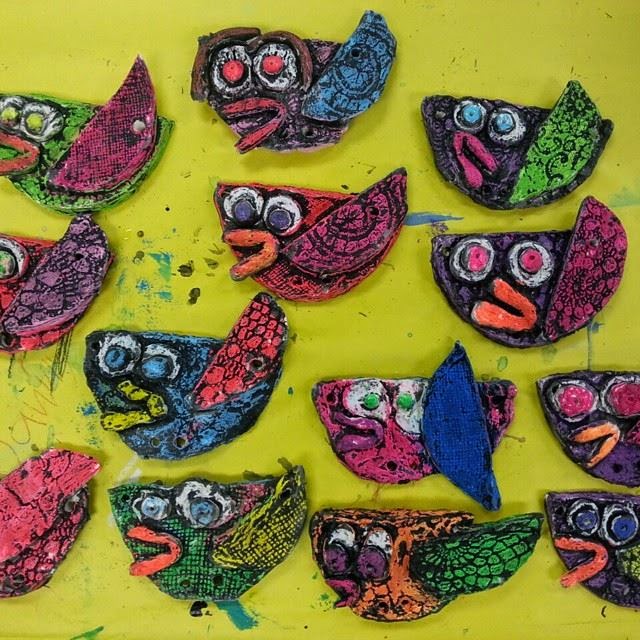
Well, hey there, bird legs! It looks like you are getting a two-fer this week as I'm sharing yet another "In the Art Room" with y'all! That's partly because I've not had two seconds to do any sort of creating of my own (which is making my right eye twitch a lil) so no DIY-ness this week. And also because what the kids have been busting out in the art room lately has been so stinkin' sweet I just had to share. For zample, check out these kindergarten clay birds!
 Like, riiiight?! The kids created these birds in just under 45 minutes and they couldn't have been more proud of themselves. They were all created during our school-wide Clay Week (aka Cray Week). I'll be sharing what each grade level created in upcoming posts. But just had to start with these as they're currently my fave. 

Supplies:
* Low fire (cone 06) clay. Okay, so we don't all have a kiln. For that, I'm so sorry! Working with kids and clay is one of my fave things in the universe. I've already decided that next year, we're gonna have two separate clay events just so me and the kids have more clay time! 
* No clay? How about Model Magic? Or another air dry substitute?
* Sargent brand fluorescent oil pastels. Any oil pastels would work...but I personally loved the vibrancy of the fluorescents. 
* Watered down India Ink. Like, real watered down. I use a cup of water to a splash of India ink.
* Big brushes or...a bucket to simply dunk the birds into.
* Pipe cleaners and beads.
Since y'all seemed to like the butterfly video (despite the lackluster quality) I decided to film another clip for y'all. Once again you're sitting on a stack of miscellaneous art room stuffs. Next time, I promise I'll bring my tripod! AND not pound on the table during a taped demo. Der. 
Once the clay projects were complete, they dried over spring break (and then some. I'm a firm believer in a good two week dry out period. But only for clay. Ahem.). From there they were bisque fired. I then decided to have the kids do this lil pastel resist trick on 'em because it looked so groovy on these butterflies last year. And because I like to reserve my glaze (and that super fun second round of kiln firing) for my 2nd thru 4th grade kidz. 
Now I've gone about the painting portion two dif ways and I think I've found a winner. Normally, I give the kids a big moppy brush and let them have at it. The prob with that is that there are always white spots. Which means I gotta tell 'em one million times to go back and repaint. So today, for sanity and time-savin's sake, I had the kids gather round while I dunked each bird in a watered down bucket o' India ink. Which they though was like the bestest thing everrr. I then handed the birds to them on a plate (they're only drippy for a moment as the bisque absorbs the paint rapidly) and the kids set to work on the next step (which I briefly explained in the clip until my camera decided to shut me up).
 So what my lil clip didn't give me time to say was that once the feet were complete, the kids had the option to add beads. I did limit their bead intake to no more than 5 beads per foot. You'll notice that one lil bird in this post didn't quite get the memo. Que sera. 
 
Once the feet were created, the kids simply inserted the top of the pipe cleaner through the hole, bent it around and twisted. And I say "simply" but it's kindergarten. So it wasn't quite that simple. But those that did get it were great teaching buddies to their friends. And in the end, they all were complete.
Just to make sure the birds didn't lose their feet, I did add a touch of hot glue to the back. I also added the pipe cleaner hanger and hit that with glue as well. 
And there you have it, some super cute kindergarten clay birds! Have fun, y'all!
 photo signature_zpsd10b3273.png

Tuesday, April 7, 2015

In the Art Room: 2nd Grade Printed and Chalked Butterflies

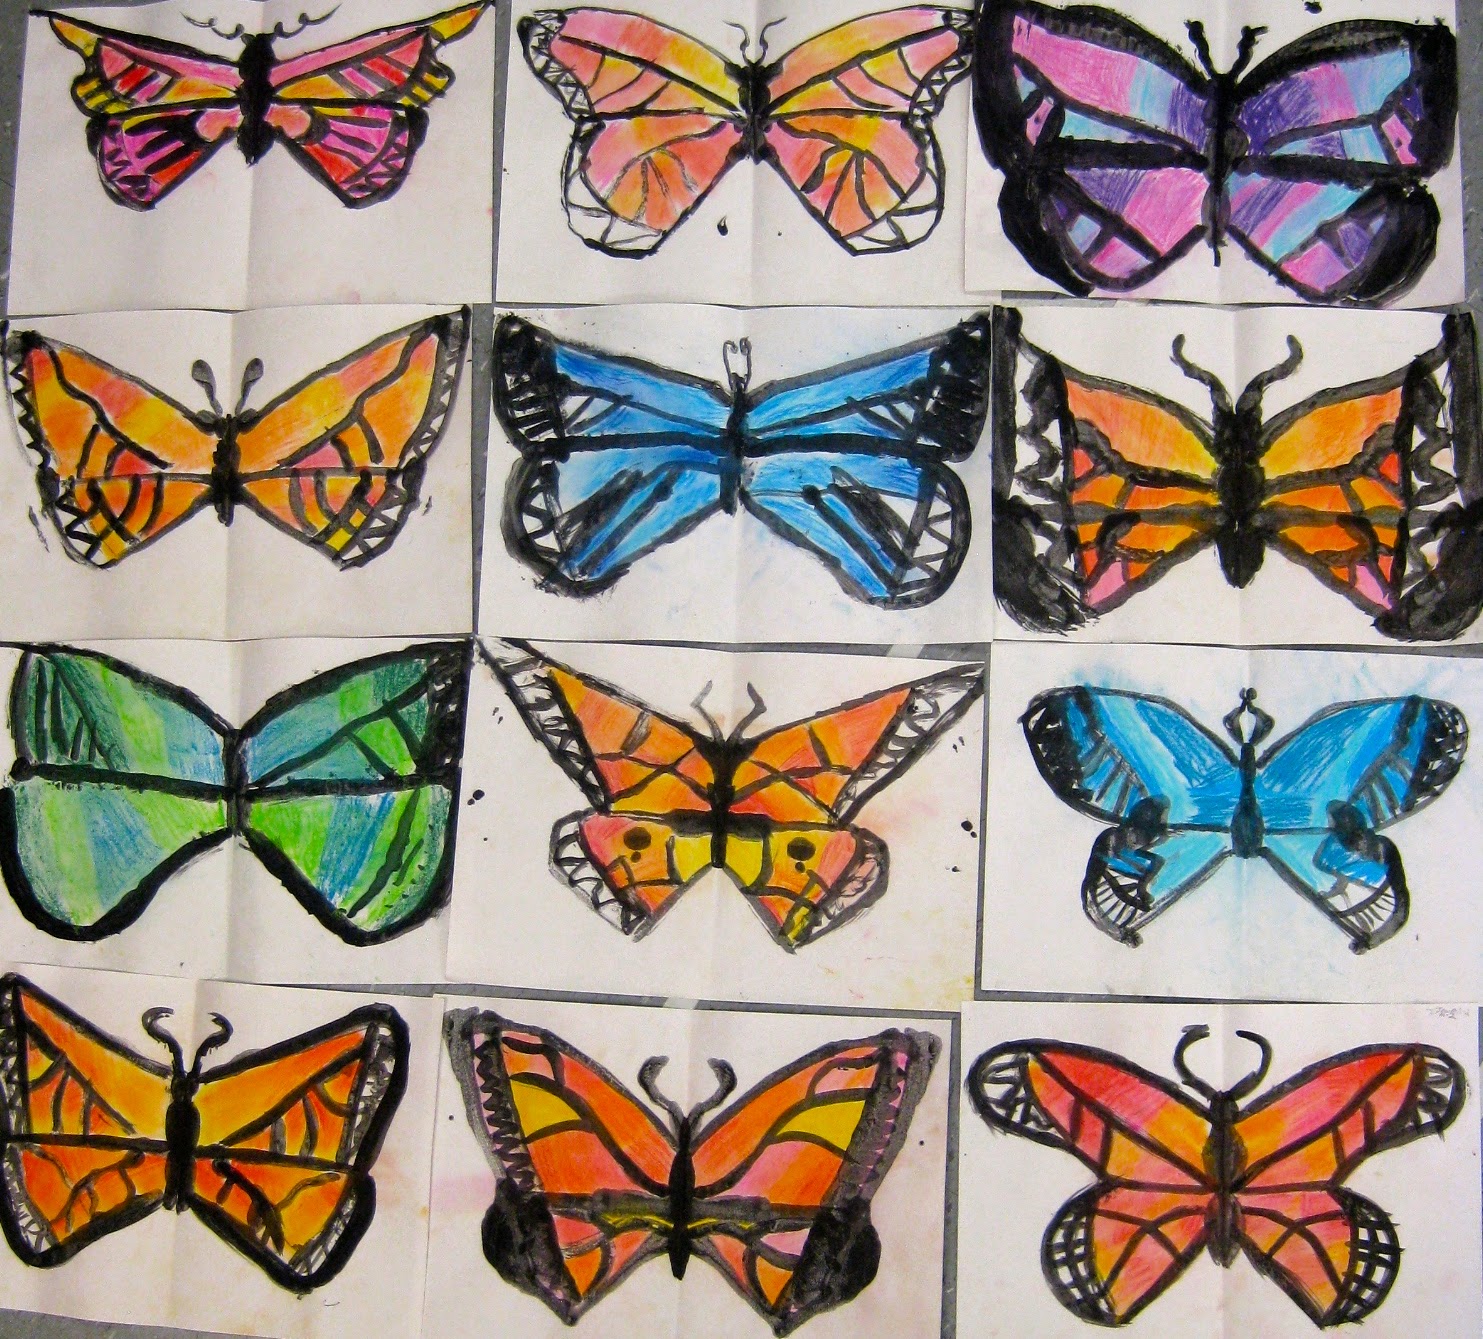
Next week my super awesome second grade students are going to be involved in a street painting event! Chalk artist Lee Jones will be coming to our school and working with the second grade to create street paintings. Because the kids are learning about the Monarch butterfly in their classroom (they'll be getting their very own caterpillar this spring), I thought they could chalk butterfly designs. To practice for next week's event, the kids busted out these butterfly beauties this week. I popped a photo of 'em up on my instagram yesterday and it blew up with questions. So I thought I'd try to answer 'em today. Let's hope it makes a smidge of sense. 
This lesson was short and sweet. It took us a grand total of two 30 minute art classes to complete. Here is a list of supplies we used:

* 12" X 18" paper folded in half
* watered down black tempera paint (I love Sax's Versa Temp)
* paint brushes
* KOSS chalk pastels
 During the intro to this lesson, we chatted briefly about our upcoming visit from Lee Jones. I then introduced the Monarch butterfly to the kids with this prezi. Feel free to borrow away! 
After that chat, each student collected the paper and paint brushes. They jotted their names down on their papers and immediately turned their attention to me. At this point, we only had a short 15 minutes to get this bad boy painted so there was no time to lose. 
This painting process was great because I could introduce all sorts of groovy math terms like symmetrical and parallel. I made a short clip for y'all to explain the process. I do hope it helps! You can find more of my lesson video clips here
Like, Holy Cats, how simple is that, right?!
 And I love how each one turned out. I got the idea this weekend when I googled butterfly artists. Of course, my homeboy Andy popped up. 
This summer when I taught a workshop based on an Andy Warhol exhibit, the docent revealed just how Andy accomplished that blotted look which he is so known for in his early work. Apparently he would paint with ink then blot his work with a paper. This would give the effect of an uneven line. I thought this would be a great way for the kids to create their butterflies as well. 
 In the video clip, I mention how I tell the kids that something is "practice". I often tell the children that to have them relax a bit. If they think that it's just a fun creative experience (cuz, duh, it is), I've found that they loosen up a bit and let go of the notion of perfection. 9 times outta 10, they grow to love their "practice" piece so much that they never ask to start again. 
Some kids were bothered that the line didn't appear as clearly once printed. In which case, some repainted those lines on the other side. 
 Now let's talk chalk, shall we? I purchased this KOSS chalk just for our sidewalk painting event. And, I gotta tell ya, we've been using it nonstop since I got it! My third graders are currently chalking these lovely desert landscapes. This chalk is loaded with pigment and it's just so stinkin' rich. Check it out, y'all!
On the second day of art, I told the kids that there were just a coupla tips for chalking: they shouldn't use more than three colors and the colors should be analogous. Notice all the warm colors at the top? Those colors look great together! Pick three from that side. Love all the colors at the bottom? Perfect, they love being with each other, feel free to pick three from there. But mixing the two sets of colors may result in dull colors. And who wants a dull butterfly y'all? That's what moths are for! 
 A kid after my own heart: mixing the chalk with her fingers. Some used tissues but I found that often wiped the color away. 
 Many kids went the Monarch route...
While some wanted theirs to be "camo-greens". Sargent Flappy Wings. You got it!
 Each one of 'em was an absolute stunner. I cannot wait to see just what these kids chalk outside!
By the way, I think I'm in love with the white background. The kids and I chatted about cutting them out ("Let's hang them up! From the ceiling!" Oh, yeah, kids. The Fire Marshall would LOVE that!). For now, I think they'll stay this way. But if you have any suggestions, I'd love to hear 'em! Until next time, y'all!
 photo signature_zpsd10b3273.png

Saturday, April 4, 2015

What the Art Teacher Wore #135

Retro-Lovin' Monday: So my time in NOLA may or may not have involved some heavy credit card exercising on Magazine. That street was just full of block after block of shopper's delights. My fave? Trashy Diva (thank you, Annette, for taking me!). I walked right out with this dress and a hat to match! shoes: vintage Fluevogs; fishnets: Target

How are all y'all? If you celebrate Easter, I hope you've had a delightful one. If you're experiencing spring, I hope you've had time to absorb some vitamin D. And if you're anything like me, you waited entirely too long to cut your grass and you've spent your weekend tossing grass clippings into your neighbor's yard (oh! I kid! Ish!). Seriously, y'all. I hope you are fab.

I thought I'd share with ya this week a lil bit of What I Wore and What Went Down in Art Teacherin'ville. It's been a wild week. I taught four awesome kindergarten classes in one day and lived to tell about it; I endured an hour long stint in the pie-in-yo-face booth at the school carnival and I hosted two lovely art teachers from Chicago (hi, Michelle and Pat!). I'm so thankful for the extra day to recoup. 

I'll be back with you this week to share my 10 Exciting Tips to Teaching Vocabulary in the Art Room (brace yourselves, y'all!) as well as a DIY (lawd, I hope.). Until then, I do hope your week is a magical My-Lil-Pony one! 
And just like that, I now have a thing for hats. I've actually had it in my mind to start creating hats to go with my outfits for some time. I'm excited to say that me and a coupla other art teacherin' buddies are taking a hat making class at the end of this month. I'm already dreaming up ideas.
Totally Pencilly Tuesday: With all of our snow days this year (a glorious 10 days that we don't have to make up!), I was able to stitch up so many art teacherin' dresses! The prob? I've not had a chance to wear 'em to school. So this lil number complete with my first bolero made it's debut this week. dress: DIY, details here; turquoise tights: Target; florescent fishnets: Free! I found them in our teacher's lounge! Our local grocery store donates items that don't sell and these were Halloween has-beens; flats: dunno; "artsy" necklace: crafted from Scrabble tiles by my blogger buddy Phyl
So way back in Feb I shared this post with y'all. Every student in my school created a wee lil 3" X 3" heart to be used for a school wide "Our School has Heart!" mural. Unfortunately our mountain of snow days (and my intense case of the lazy-es) prevented me from gluing down all these masterpieces in a timely fashion. This week, I did make some progress and get one portion of the mural complete! It's my goal to finish off the rest on Monday and have it up by the end of the week. So stay tuned, kids!
Gentlemen, Start Your Crayons Wednesday: The temps are getting warmer here in Tennessee and I gotta tell ya, I don't trust 'em. Because every spring I've lived here, it's like clockwork: lovely flower-planting weather then BOOM! a hard flower-freezing night. So I'm still clutching to my sweaters until the bitter mid-April end. needle-felted crayon sweater: DIY, here; dress: Anthro; tights: Target; crayon pumps: DIY here
The week before my spring break was Clay Week (or Cray Week as I dubbed it). Now that we're back, my kindergarteners began the finishing process for their clay birds. We did that whole oil pastel/watered down India ink method and I was super stoked to see the result. This coming week, the kinder-kids will be adding legs to their feathered friends. I'll be sharing a series of clay posts (with video clips!) very soon. 
A Thursday that's my Friday!: Gotta love a short week, y'all. Especially one that involves a full moon, an upcoming holiday AND a school carnival event. I mean, whut are we, nutz?! I do believe if we didn't have Friday off, an "emotionally unstable day" woulda been in order. school supply dress: DIY here; crinoline: Amazon; tights: Target; shoes: Fluevog
The parent volunteers at my school do this school carnival every year and it's simply amazing. I'm very fortunate to teach children whose parents are so involved in their education. As a way to say thanks, I opted to go a full hour in the pie-in-the-face booth. And, as much as I love those parents and their kids, I dunno if I can handle that scandal again. I've had the smell of curdled milk up my nose all weekend long!
A Good Friday for Brunching and Shopping: Ah, a glorious day to catch up with a good friend over brunch and money-spending. I'm proud to say that one trip to Anthropologie involved the purchase of a $9 sweater (like, whuh?!). My fave part of the day was running into so many buddies who were also out enjoying their time off even if we were in the midst of a tornado warning (it's spring in the South...when are we NOT about to get swept away to Oz?). dress: vintage find in NOLA; necklace: Franklin farmer's market; flower hair clip: made by me
I love mail. And I really love getting sweet and thoughtful gifties in the mail. My sweet Aunt Kimmy and Uncle Keith sent these bad boys my way. I love 'em so! I can't wait to wear 'em with this number
 photo signature_zpsd10b3273.png

Wednesday, April 1, 2015

DIY: Starting Your Very Own Blogtasticness

 Just a few vintage blogging images from my vast library of crazy: (l-r) DIY Rock Star Apron; The Seven Habits of a Crazily Dressed Art Teacher; 12 Favorites of 2012

Hey, friends! Today I thought I'd tell y'all about a presentation I gave at the NAEA conference: Tip-Toeing into the Wide World of Blogtasticness. I've been blogging [seriously] for three years (and I say "seriously" because I did have a blog for a hot minute a couple years previous. You'll find out why that was a flop in a hot minute) and I've learned a whole lotta stuff along the way. So being the caring-is-sharing-and-sharing-is-caring person that I am, I thought I'd give y'all a few of my tips and tricks to bloggin'. 
DISCLAIMER: Look at me. Do I look like an expert in anything other than crazy to you (please don't answer that)?! I'm no bloggin' pro, howeverness, I do know a thing or two (okay, two. I know TWO things) about bloggin' and I thought I'd share 'em with you. Take 'em. Leave 'em. Put 'em in your pipe and smoke 'em (on second thought, don't. Smoking killz.). And puh-lease feel free to add your two cents in the comments. I'm sure it will be way more enlightening than whutz found here.
So. If Ima gonna talk at ya about blogging, I need to give y'all a lil back history as to why I started to blog. Honestly, I started blogging because I was as stale as a Poptart left behind on the kitchen counter: I wasn't creating and I was regurgitating the same ole art lessons. As a way to snap outta my funk, I thought a blog, where I would feature my weekly creations and art lessons, would hold me accountable. This was my way of holding my own feet to the fire; for creating deadlines and obligations for myself. This blog was started for purely selfish, "hey, stop being so doggone lazy!", reasons. The surprise bonus that I NEVER imagined: meeting you. Meeting other passionate folk who love sewing or teaching or creating or just dressing like a nut. I never imagined this twist of events and I really, like really-really, couldn't be more thankful. More on those lovely bloggin'/art teacherin' ladies above here
Okay, y'all, time for a quiz! Let's find out if this blogging thing is for you! So, grab your No. 2 Pencil and a sheet o' paper and jot down the answers to the following (yes, I'm fur realz. And, YES, I can totally see you):

1. What is your fave craft/hobby?

2. How often do you create weekly (this can include anything from crafting a superb meal for your fam to gardening)?

3. If you didn't have the job you have currently, what would you do for a living?

Okay! Pencils away. Pass those sheets forward, kids. Let's see how you did.

So, the first question asked what's your fave thing to do. Mine is sewing and creating crazy clothing. What's yours? Figure it out cuz that's the key which will open up your blog and make it unique. There are, like, ONE MILLION blogs out there. What could possibly make yours a stand out?! YOU. You are what makes your blog unique. So, find your passion, harness it and have it be the star of your blog.

My next question was how often do you create weekly, no matter what you were creating (the way I see it, if you are using your creative juices [whether that be picking out fabric, arranging your furniture, planting flowers], you are creating!). Just so you know, that time you spent creating? if you have a blog, you are gonna lose that time to blogging. I'm writing this post up right now. I chose not to finish cleaning the bathrooms just.for.you. I opted out of putting a zipper in a dress just.to.tell.you.this. Are you ready for that give-n-give? Y'all better think about it.

Finally, I asked: if you weren't currently employed in your job, what would you be? Well, kids, I hope you said "writer" or "photographer" cuz in the Land of Blogging, there's a whole lotta that. 
Let's Talk Passion: In my pre-bloggin days, I had my life very compartmentalized. I had my art teacherin' day and my art-makerin night (if I was lucky). When I had to lesson plan, I resented that time was being zapped from my creative time. Then, one day, while grumbling over my stitching time being used for "work" time, I just thought: What if I sew a dress that co-insides with my lesson?! What if, while the kids are learning about England, I craft a Mary Poppins ensemble and read 'em some P.L. Travers' books while serving tea and biscuits. And, suddenly, I became very excited. About teaching. About creating. About blogging. When you connect as many dots as possible in your life it will feel like suddenly you've got the ball rolling and there's no stopping it. Try it. I ain't lyin.
Let's Talk Time Management: Haha! If you even knew what an Epic Time Waster I am! My hubs is prolly on the floor rolling around laughing at this very statement. But, in all seriousness, blogging is an absolute time-suck. However, if you want readers (and, really, isn't that why we blog?!), you gotta be consistent and manage that time of yours. For me, that means I attempt to blog three times weekly. And I like to have a theme. I rotate between the following: In the Art Room, What the Art Teacher Wore and DIY. If you are blogging, you might wanna consider some sort of theme. People like to know what to expect. They also like consistency. So give 'em that. If you are just starting out, blog once weekly (on a consistent day of the week so they know when to check back) and have a theme. Tip-toe into it y'all. It will feel more like a kiddie pool and less like an ocean that way.
Finding your voice: Let's face it. One of the biggest hurtles of blogging? Writing. Many folks are terrified of writing. Look, y'all. My mean-a## aunt was my English teacher: I lived in fear of writing! She always hated my "casual" tone. And now...it works for me. Because it's my voice. It's how I talk and, therefore, how I write. But it's not for everyone. So, ask yourself: who are my desired readers? How would I speak to them? For me, my desired reader is my BFF (hello, Mallory!) and this is how I speak to her. 

Just a coupla tips: Read your blog post out loud. Does it sound like how you would speak? Also, have a no-holds-barred friend read through it. They'll tell ya the truth. 
Photo 101: Allow me to introduce you to my camera. The one that's been dropped more times than I can count, the one that's been bandaged in Scotch Tape and the one who snaps all the photos for this here blog. That's right, y'all. You don't need no million dollar camera to get decent pics for your blog. Save your dinero. Get a point -n- shoot. These types of cameras can take fab photos if you use 'em correctly. Read that lil manual. Learn how to set your camera to take high res photos. The money you save on a super cheapo camera? Spend it on a tripod! I gotta tell ya, my pet peeve on blogs is when the photos are stinky and shaky. Set that camera on a tripod (no matter WHAT you are snapping), set the timer (yes, your camera has one) and allow the camera to do the work for you. THEN, edit those babies. Crop out the background, bump up the color/contrast, polish 'em up (but try to steer clear of too many photo treatments, kay?). The result will be clear, colorful and interesting photos. All the pictures of me you see on my blog were taken this way. That's right, my hubs isn't the photographer, it's me and my camera. 
Connect with Others: Okay. So, let's pretend you're a blogger. And you've been at this bloggin' biz for sometime and, well, you ain't gettin' nuthin back from your readers. Your comment box is empty, your viewship is down and you're thinking to yourself, what am I doing wrong?! Consider this: are you making a connection with your readers? Are you listening to them...or are you just talking at them? In my experience, one way to hear back from you readers is to host giveaways (I did an entire slew right before Christmas and it was a great way to connect!), contests (for me that meant a dress-up contest), book clubs and craft alongs. The more you engage and interact with your readers, the better, y'all!

And, well, there you have it. My purely two-cents worthy two-cents. These are my lil bloggin' rules...and I do hope they help you out a bit. I absolutely love teaching, creating, and blogging, in that order. This lil set of philosophies works for me. And I hope you might gain a pinch from it as well. I'd love to hear your tips, tricks and advice as well! And if you have any questions, please feel free to ask, y'all. 
 photo signature_zpsd10b3273.png