Showing posts sorted by date for query ancient. Sort by relevance Show all posts

Tuesday, January 16, 2018

In the Art Room: Art Room Tour Before and After (Part 1)

In this blog post, I'll be sharing a lot of images from my art room over the years. This image is from a post about my New Years Art Teacherin' Resolutions from 2016. Check it out if you'd like to see how I created my art room placemats!

Over the summer, I dropped by my art room to grab some things and I saw my art room with fresh eyes. The above was my view. And all I could think was: LOOK AT ALL OF THIS VISUAL CLUTTER! One of the posters was falling down (as all things do on those cinder block walls) and it inspired me. Before I could stop myself, I was tearing it ALL down until the wall was blank. Hearing the commotion, my custodian buddy, Mr. Joe, walks in and asks me what I'm doing. Decluttering! Like you always tell me to do! 

"Yeah, but now what are you going to put there?"

I had no idea. But I did know that it was definitely going to be more visually pleasing and less visually noisy than what had been there before. 
And here is what that space looks like now, after much work. I moved my demo/document camera table so that it is now perpendicular to the wall. This allows me to create and not have my back to the kids while doing so (never a good idea, amirite?!). I created the giant color wheel with wooden oars; repurposed the thrift store cart with pencils and it now holds the artwork of the classes I see on that particular day; I came up with a new set of rules and had a blast painting them (downloadable PDF here) and hung some fun folk art along with my paintings. 
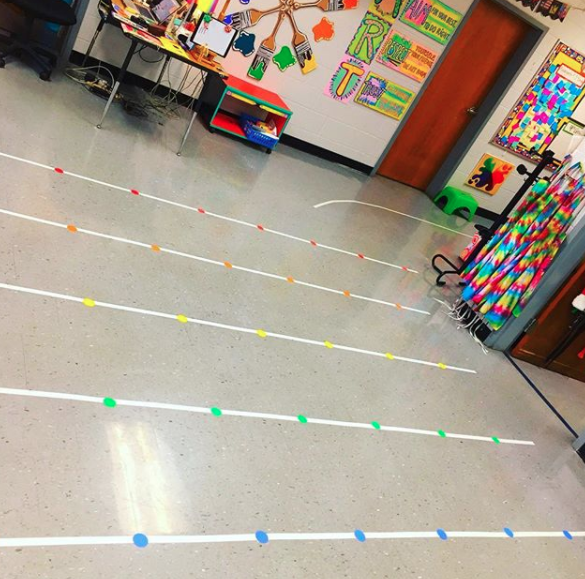
 With my 30 minute art classes with my younger students (1st and 2nd grade) and my doubled up classes with my older students (which allows me to have them for an hour), getting in, seated and settled right away is really important. I've always used taped lines on the floor to create rows. However, my older kids, believe it or not, need seat spots. These are not assigned spots...just so they know to fill up all the space we can to make room for everyone. The spots are die-cut circles with clear packing tape on top. They've really helped speed up our walk-in, sit-down process.
 Of course, I've gotten the rainbow-bug so all things in my art room have been rainbow-ized. Including my demo table! When I saw this cute bunting at Target, I had to get it. The rainbow peace lamp is from Walmart and the pattern pencil cups were created by me. I still use my Happy/Sad Board...it's my old standby and the kids respond well to it. 
For Christmas, my mama got me this amazing chair from IKEA which I hose down with Scotch Guard twice a day. Seriously, I love it! I'm afraid it will be my messy hands that will mess it up! Let's take a look at this area before...
Check out a blog post all about the first days of school in my art room, here

When I first began teaching at my school, close to 15 years ago (I taught for 5 years in Nashville prior to my current school-home) I used to spend my summers decorating my art room. Seriously. I'd drive in at 8am, work through lunch and leave at 3:30 when they kicked me out. Every.Day.Of.My.Summer. I would pick a cultural theme that we were to study and completely transform my art room into that environment. That was pre-blogging days but I do have a couple images from then (will share in a moment). At the time, I had this kind of freaked-out perfectionist mentality. It made it so that my room was sweet but I was burnt to a crisp when August rolled around. Over the last several summers, I've hardly gone in to my room at all...which is good, that's how it should be! But at the same time, my art room started to get neglected and feel stale. Posters had been up for ages. It had the look of an art room where the art teacher had lost interested. At least according to me. Here's how this space has now changed:
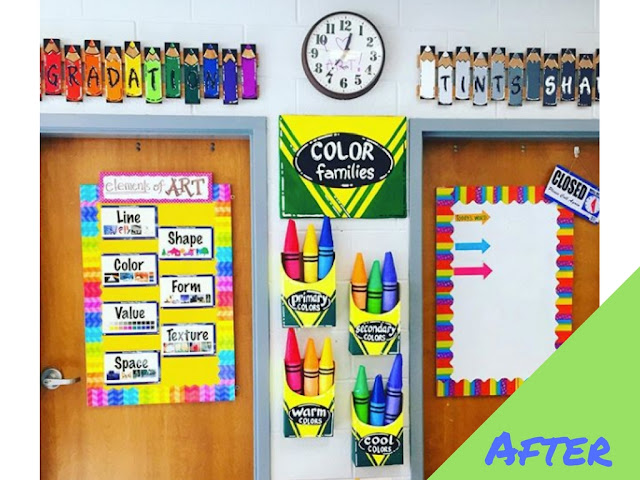
When I was given a large TV and a document camera, it was installed in an area of the room where I never used to do my instruction. So that took some adjusting. Previously, I did all my instructing in front of my giant dry erase board which is further in my art room (scroll down to see...might help you visualize the lay of the art teacherin' land). That dry erase board was super because I could draw, demo, hang examples and reference it all day long. In this new spot, I'm trying to add more demo and writing space without adding junk as is my usual MO. So, with Command Velcro Strips, I hung both this dry erase board and this painted cork board on the doors of my kiln room and my storage closet. I created the Crayon Color Family Display this summer with the help of my mother in law and the kids LOVE it. Along with my giant color wheel, it has made a huge difference in them retaining color theory information. I also had big fun painting my Tints and Shade pencils as well as my Gradation one. 
Just to the left of my Gradation sign are these colorful plants! I found these laser cut wooden flowers at Target a while back and had no plans for them. Then one day on a whim, I painted them in rainbow order and hung them above my kiln room window. 
 Images from this post about the first days of school in my art room.

When my students enter my art room, this used to be their view. It's changed so much! Before we talk about that area behind the gong, let's chat about what I call The Masterpiece Gallery
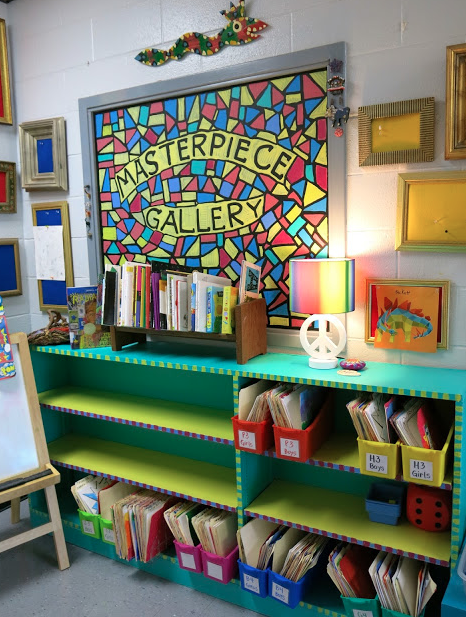
This is an image of what that area used to look like. By the way, the dry erase board is for our game that we sometimes play called The Smartest Artist. Back to the gallery: when I first started at my school all those years ago, this was one of the first things I did: create this gallery. You know all of those drawings the kids create at home? This is where I hang them. The window looks directly into my office (yeah, I have an office...not that it even remotely resembles anything other than a huge dumping ground but I'm working on it!). I painted it many years ago with window paint. I scored the frames from the thrift store and backed them with cardboard, cork and fabric, in that order. I love this space but it has also seen some change:
Because I really wanted to introduce my students to sketchbooks this year, I knew I had to figure out storage. I picked up a bookshelf from an abandoned classroom and gave it a painted makeover. 
Since creating this space and this sketchbook system, I've already made changes! If you read the sketchbook post, you'll see how I formally had the kids pass out the sketchbooks. It was a decent system and it worked...but this past week, I came up with something even better. So, soon, those book bins will be empty. More storage for something else. I'll share the new process with y'all super soon.
Read my original post about sketchbooks with kids here

This space in my art room, just past my instructional space, ALWAYS sees change. Remember when I said that I often change the area to match the culture we were learning about? Here is what it has looked like in the past:
 One year, we "traveled" to Paris...
Another, Ancient Egypt. 
 And Mexico to name a few. 

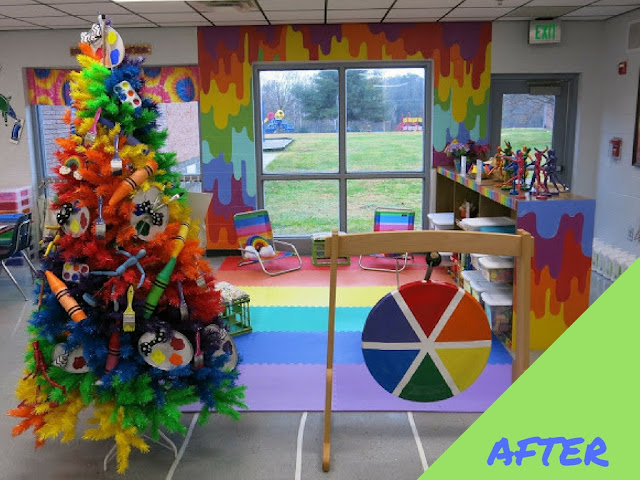
But recently, I decided that I didn't want to have one culture dominate my art room for the entire year. So now I present cultures with videos, books and artifacts. This also means I don't have to start all over every summer and redecorate this space. When I got an email fro Treetopia this year, asking me if I'd like a rainbow tree for my art room, I jumped at the chance...but knew I'd have to make the surrounding area just as awesome. So I washed the Rousseau-inspired tiger off my window, painted my wall, painted my GONG(!) and got new flooring. Here's the before, right when I got my tree up:
And after:
The kids FLIPPED.OUT. when they saw this new area. I'm so excited by all of the color. The winter afternoon sun has had a habit of blasting through that window and making it hard for the kids to see. So I have since changed the space even more...
By adding curtains! I've also hung up our "I Am" collaborative which makes me all kinds of warm and fuzzy. Folks have been asking me lately about my aprons. We hang them on Command Hooks under the window. I accidentally ordered them via a website online...I had ordered adult aprons for a workshop but these were way too small! So I brought them to the art room and we've been using them since. The kids do have to help each other when tying them but I see that as good practice. 
The curtains were easy to make: I had this amazing IKEA fabric in my stash and just hemmed and hung with an extension rod.
I've been working so hard on a fun space for my early finishers this year...a space that provides more than just the usual books, dry erase boards and blocks. I'm tweaking this area every week and adding more things almost daily. The kids LOVE it! You can read more about my early finisher activities and policies here and here. By the way, I have been getting a lot of questions about my art room placemats. I made them...you can find out the details here
I have the Fire Marshall to thank for a lot of my redecorating (insert side eye). No more hanging things from the ceiling, she said. Boo! At the start of the school year, my cute crayons and other ceiling decorations all came down. You can check out how I made that big ART sign here
That left my space so bare! As a lot of you know, this table is my Art Supply Store. After giving lesson instructions, this is where my students "shop" for their individual supplies like paper, paint brushes, you name it. That large wooden drying rack has since been moved into my office which is right behind that door. I'm hoping to add a pegboard to hold supplies in it's place. 
I created this Roy G. Biv wall display with Duct tape, paint brushes and letters. By the way, Duct tape has become my fave go-to decorating tool...I've used it so much in my art room. 
 It's funny, as I continue to see what works and what does not, the coat rack has stopped holding my Art Teachers in Training aprons but actual coats and jackets on days when we are painting. Here's that area currently:
That little chalkboard sign is from Hobby Lobby. 
I don't have much of a before photo of my cabinets as they've pretty much just always been cabinets. This whole area of my art room, the counter space, is definitely under construction. I would love to have pegboard added either under the cupboard or at my "store" area. Regardless, the only thing I'm happy with here are my Alphabet Cabinets
Art room set up on the first day for our Escape Game.

Yep, the Fire Marshall wasn't a fan of the paper chains and all the rest I had hanging from the ceiling. When I took it down, I took down a ton of other stuff too. I also had a sweet and kind friend of the school custom build me a shelving unit to go right under my dry erase board area. I had always thought was a waste that space was...and I now have all of these fabulous shelves for our supplies!
I used to color code my tables with bulletin board paper. That got to be too much to change out and keep up with...so my alternative was to place Duct tape on the edge of the tables and it has been working perfectly! If you look closely, you'll see the new shelving under my dry erase board. That board now serves as my I Can statement wall.
The baskets are from the Dollar tree. They didn't have all of the colors to allow me to color code them...so, if you look at my labels, you'll see I color coded them.
Above my dry erase board, I created this line display with...Duct tape! I also made that clock a while back with paint samples. 
 These trashcans are ones I brought from home. The art room ones are so small! And I'm always moving them around and unable to find them when I need them. So I decided to color code them and keep them at the end of each corresponding tables. 
Now I keep the cans and the drying racks at the end of each group of two tables...and I love it. Although I STILL get the question: Where is the trashcan?
I swear, this is the year of trying new things...and one that I'm really excited about are my seat sacks. I found some at the Dollar Tree...but they didn't have a rainbow so I had to make my own! 
And, yes, they've already gotten paint on them. It is an art room, after all!
In this area of my art room, I also have two new things: the Blabber Brush behavior system and my Color Mixing Spray Paint Cans!

One of my most favorite things in my art room has always been my Art History Wall. I had had it up FOR YEARS...and was over it. The art history wall was rarely visited or seen by my students. So I decided to take it down and replaced it with this:
My It's a Small World mural! This new area makes everyone smile. I even painted a broken globe to fit right in. 
This bookcase is new too...another abandoned find. I'll share more about the supplies on this shelf soon...I'm still working out the kinks on this system.
So...the REAL reason for sharing all of this with you? Honestly? BECAUSE I'M SO FRUSTRATED. Every morning when I walk in my room and I just see all the projects that I want to accomplish to make my art room as fun and exciting (and clutter free) as it can be for my young artists. I shared my anxiety recently with a coworker and she said, "Are you kidding?! Look at everything you've done so far!!" That's when I realized just how hard I had been working...and that there was progress. 

At the start of the year, I knew I would want to make changes, so many changes, and I told myself: go easy, take it slow, change what doesn't work, keep what does. I can often get excited, ahead of myself and frustrated. Seeing all of the changes I've made in one VERY LONG blog post has made me happy...I am working hard. I still have so much to do but it's like eating an elephant: one bite at a time. 

So, what's next? I want to create an early finishers fibers area as I have started to do in the photo above. I want to create an area where the kids can take photos of their art work and upload to Artsonia independently. I want to create binders for each table that will have idea sheets and drawing prompts. I have already purchased supply carts for each table (they have not arrived yet, will share soon) so that the kids can get their own supplies and I don't have to hustle to have everything out. And I really REALLY want to tackle that counter, my cabinets and my closets. 

Do you see why I get overwhelmed?! 

But I'm getting there...and I'm so happy I decided to scrap the old this year. It's really been making going to school every day and teaching in a bright, colorful and less cluttered place so much better.

Thank you for dropping by this VERY long-winded blog post! xo!
 photo signature_zpsd10b3273.png

Sunday, October 29, 2017

Sketching Art History: Stonehenge

Hey there! A couple of weeks ago, I mentioned that my third and fourth grade kids would be Sketching through Art History in their sketchbooks this year. I go into more detail on this idea, the sketchbooks and the process of making this idea work here. I'll try to give you a quick look-see here: When my students enter the room, they pass a bin of sketchbooks, taking out theirs and placing it on the floor in front of them. Kind of like this:

Once they've watched a Hot Minute of History video, they then watch another one minute drawing prompt video. Here is the one I created for Stonehenge:
The kids now know the drill: during their 5-7 minutes of sketch time, their is no talking. I want them to be mindful, engaged and drawing the entire time. When the timer goes off, they often groan and ask for more time...which is music to my ears. I often splurge and give them a few more minutes. This week, I asked students to share their drawings with their neighbor. I put two minutes on the clock and asked them to spend one minute being a good listener and another being a good explainer. I think they really enjoyed sharing their ideas with their friends. 
I have been putting our art history nuggets into song form to the tune of We Will Rock You! It's been so fun, I actually am a miserable poet but I do love writing these. Here is the PDF if you'd like a copy. 
And here is the one I wrote for Cave Art. Next up: Ancient Egypt! You can stay up to date on these by subscribing here
 photo signature_zpsd10b3273.png

Wednesday, July 5, 2017

Art Teacher Travels: Florence

 Hey there, friends! Thank you so much for the response to my last Art Teacher Travels post. When it comes to sharing photos and memories of a travel adventure, I know it can bore folks real quick. Thank you for hangin' in there with me. I learned so much from this trip to Italy with my mom from the planning, preparing to the actual setting foot in such a beautiful country that I thought I'd share my tips. There is a learning curve when traveling to a foreign country! Here is what I explored, learned and discovered during our three day stay (not long enough) in Firenze.
Florence, Day #4: I'm picking up where I left off in my previous post. On our fourth morning in Rome, mom and I took a taxi from our hotel to the train station, giving ourselves an hour to make the short trek. And I'm really glad we did! If it is one thing I learned while in Italy, it is that Italians love to strike and protest. Good for them! Not so good when you are trying to get from point A to B. The day before, taxi drivers were on strike. Knowing that, I asked at the front desk if we'd be able to get one today. "Oh, yes," said the concierge, "The strike is now over." What he didn't know was that there was a protest about a half mile in front of the train station. This was discovered when our cab driver hit an epic traffic jam complete with honking horns and shaking fists. "This is as far as I can go!" the cab driver said while simultaneously opening our doors and putting our suitcases on the curb. "The station is that way!" he said with a wave of his arm before hoping back into his car and making the most insane u-turn known to man. We joined the herd of suitcase toting folks who suddenly found themselves in same predicament. 
When we navigated through the protest (which we didn't find out the details, unfortunately) and made it to the train station it was just as crazy. The Rome train station is a little bonkers. Thankfully we already had our tickets purchased and in hand (thanks to Costco Travel. More about that in this post)...but no clue where to go or what to do. Again, giving ourselves plenty of time was a gift in a confusing situation such as this. With our tickets in hand and our confused expression, we became the obvious target of a porter. Porters are folks who walk around train stations offering to "help" tourists for a tip. I had read not to talk to porters but I have to tell you, I gladly listened to and tipped the kind gentleman who read our ticket and showed us exactly where to go. Without his help, we might have still been at the train station!

When we arrived in Florence, we exited the train station and went across the street to a tourist office. There I purchased Florence Cards for my mom and myself. Florence cards are expensive (72 euro each) but not only get you into almost all of the museums in Florence but also to the front of the line. I knew we'd get good use out of them. From there, we flagged a cab which took us to Hotel Pierre. Again, we had a hotel that was right in the middle of town, just a few steps away from the Palazzo Vecchio. And check out the chalk art right outside our window!
After dropping off our backs, I filmed a Facebook LIVE from our hotel room. You can still view it here. It was nearly noon so mom and I set off exploring...which is code for gelato hunting. I was thrilled to find this site just a block from our hotel. 

Here is what I love about Florence...it's a city that never seems to sleep. The palazzo is a large open courtyard where several restaurants are located...and all the action is. We witnessed a wedding, a Renaissance style parade and even a big band playing well past midnight! They leave the Vecchio doors open so you can just roam in and out of the entrance. But if you want to go to the top of the tower or explore the museum, you will have to get a ticket, even if you have a Florence card. If you have a card, you don't have to pay for the ticket...but you do have to have one to enter. More on that in a moment. 
Here is something to be aware of before traveling to Florence: all the museums are closed on Monday. ALL of them. We arrived in Florence on a Saturday and we were intent on just exploring, seeing sites and taking in the lay of the land. I did not want to be inside a museum. That meant we only had Sunday for museums and, I'm gonna just say it: I'm not a museumophile. I don't enjoy spending my day in museums...especially when outside is this gorgeous. So I was pretty picky with what museums we explored. But back to our stroll...
Unlike Rome, Florence is super small and carless. Which I loved! I never felt like I was about to be run down by a Roman on a Vespa. Being small, it's super easy to navigate. The roads are well marked but you really don't need to know them. Just look up: the Vecchio and the Duomo are always there to offer you guidance. 
Having done a little of homework, I knew that the San Lorenzo Market and the Mercato Centrale were something I wanted to hit. Anything with the word "market" in it is gonna get my attention. I had read that the market is closed on Sunday so I wanted to be sure to get there on our first day. I will say this: you can skip San Lorenzo Market. It is just filled with small outdoor stalls of vendors selling the same Made in China leather bags, t-shirts and other cheap souvenirs. Items there are not worth your money. 
Mercato Centrale, however, was a completely different story. This is where the locals go. On the first floor, you'll find a farmer's style market with fruits, veggies, spices, pasta, fish, meat, you name it. It was so fun to explore and gobble up free samples. But the second floor is where it's at! Mom and I rubbed shoulders with the locals while sampling many delights. Here's a video I made of the market:
Hungry yet? 
From there, mom and I walked back through Florence to the Ponte Vecchio. We loved catching a sunset at this spot. 
Florence, Day 5: In my last post, I mentioned the many tours mom and I took with groups in Rome. I had not planned a tour in Florence except for our bike adventure (more in a moment). However, just walking through Florence and seeing so much history, I wanted to learn more...and I didn't want to read about it in a book. So that evening, I booked mom and I another tour. This one was a two hour walking tour with a company called Florence Town. They have a kiosk right at the Republic Square which was around the corner from our hotel. 
I was so glad we took the tour with a Florentine. She was a wonderful story teller and we learned so much about the history while walking all over Florence. Our tour even included a stop for gelato. You can't beat that! 
One fun thing we noticed around town were how clever the street signs are. I need to do a bit of research to find out the story behind these signs. 
But allow me to back track to our walking tour. We explored the Vecchio with new ideas and information. The city of Florence came to be during the Renaissance thanks to the Medici family. With their banking wealth, the Medici commissioned such artists as Botticelli and Michelangelo. In fact, Michelangelo was discovered when he was just an apprentice at the age of 14 and asked to live and work for the Medici family. His statute of David stood for many years outside the Vecchio until it was damaged and finally moved to Academia. You can spot fake Davids all over Rome. 
Get yourself inside the Vecchio, you won't be disappointed. Seeing the glamorously painted rooms...and the exaggerated stories that the paintings tell of the Medici family is quite a site. In a time of kings and queens being the ruling class, it's interesting to think that a family of bankers rose to such power. 
Turns out things did not end well for Michelangelo and the Medici fam. He was slated to design the front of Santa Croce but the pope, a Medici, pulled the financial plug. Extremely upset, Michelangelo wrote the pope a letter which basically said, "What the heck, bruh?!" and immediately left Florence, never to return. That is, until he passed when he was buried in the very church he was not allowed to finish. Crazy huh? These are all the things I learned during my tour. Worth the euro!
We were also introduced to these small vino doors from the Renaissance. Wealthy folks had them outside of their homes. People could tap on the door and ask for wine. If the owners had wine to share, they would pass it to those asking through this small door. 
Our tour ended at the Uffizi Gallery so we whipped out our Florence card and popped in. I mentioned tickets earlier...as our tour guide stated and we found out: Florentines LOVE their tickets! And finding where to get your ticket is not always easy. Usually ticket "offices" are a hole in the wall near the attraction. They are not always easy to spot. However, if you don't go there and get yourself a ticket, you won't be getting into a museum. For example, the Duomo ticket booth is behind the Baptista. Just think of it as an adventure and you'll be fine. 
The Uffizi is the only museum we visited aside from the Vecchio, the Duomo and countless churches. I have been to Florence before and on that trip, I did go to Academia to visit David, among others. I felt bad not getting to it this time...but not bad enough to spend two hours in the Ufizzi then spend more hours in Academia. 
The Uffizi is like walking into an art history book. Here is a video I made of that trip:
From there, mom and I had to make our daily decision...where to catch the sunset? Since we didn't make it to Academia and see David, we decided to make the hike to Piazzale Michelanglo, catch another fake David and take in the incredible view.
So here's a fun fact: Italy did not become a united country until 1861...long after the US...and we are a "young" country! For that reason, the regions in Italy all have their own "thing": drinks, food, art, icons, you name it. It was fun to find out what each part we traveled to was known for. Florence, it turns out, is known for their Aperol Spritz. Mom and I decided to try one while taking in this view:
I know, right?! We enjoyed the view way more than the drink. Too sweet for me, I'll stick with my red. 
Florence, Day 6: Knowing that everything would be closed on Monday, I decided to book mom and myself a bike tour thru Tuscany! Y'all, I think this was my favorite day of our trip. I found the tour on TripAdvisor and while I am not a biker, my mom loves to ride. This was another trip booked with Florencetown and I really enjoyed it. 
Our ride started with a 30 minute drive out into the Tuscan countryside. Once there, we were given water, a bike and a helmet. Our ride was about 8 miles and, for the most part, downhill. The entire ride I was in a panic thinking that we'd end up having to ride uphill on the way home. Thankfully, we did not! 
Here's a quick glimpse at our ride:
When we reached our destination, we took a tour of the winery and learned so much about the history and process of wine making. 
Our traditional Tuscan lunch was one of the best meals we had in Italy: everything was home cooked and made from veggies grown locally. 
And of course we had wine. Lots of wine. Just not from these ancient bottles of priceless red!
Since it was our last day in Florence, mom and I knew it was the only time we'd have to accomplish our main mission: to climb to the top of the Duomo. All 400 plus steps...after our bike ride. 
To climb the Duomo, you will need a ticket (of course) and you'll need to book ahead of time. They only sell so many spots during the day to prevent overcrowding. Knowing that, we picked up our Monday tickets on the Saturday we arrived to insure we'd get a chance to climb. Again, the ticket booth is behind the Baptista. 
I will admit, I was nervous going in. I'm claustrophobic and it was hot outside. Surprisingly though, the inside of the stairwell was not nearly as warm as I had assumed...probably due to the thick, insulated concrete walls. What ended up being the biggest struggle: all of these stairs!
But then, the view. The view made me forget about my spaghetti legs. 
Again, I had to film a short clip:
We stayed on top for a very long time...mostly because it was such work to get there. Like I said in my previous post, one thing we learned to always do in each city: find a good spot everyday for the sunset and make sure to see the city from above. 
Perspective is everything. 
I really enjoyed Florence, more so than Rome. We only had three days there and I could have easily had another day. 
But what goes up most come down. And so we did. 
I did alright. I just didn't dig the spiral staircase. 
With the endless stairs, I felt like I was trapped in an M.C. Escher painting! 
On our final night, we shopped, dined and collapsed from our adventurous day. Next stop: Venice! Stay tuned! 
 photo signature_zpsd10b3273.png