Monday, February 4, 2013

DIY: Bedazzled Bobbie Pins

I think a hand-written letter is one of my favorite things in the world. Not only do I keep just about every note I've ever received, but I also have a thing for collecting the letters of others. In fact, last year I was inspired by old letters to create these two paintings. My favorite line in the letter above: You must surely write to me here as sometime the time hangs heavily passes slowly and I like to then, more than ever, read something from U.S.A. So poetic, that Fred!
 So, have I ever told you the story about the time I got busted taking photos inside of Anthropologie? I don't even remember what I was snapping a picture of but I do recall attempting to be all stealthy-like with my camera phone. You know, pretending to dial while preparing to snap away. The prob? I had never figured out how to silence that stupid fake camera click. And as soon as I took a couple pictures sounding every bit like a crazed paparazzi outside Lindsay Lohan's latest rehab clinic, I knew I was done. The once super-sweet Anthro girl who was arranging the two hundred dollar dresses on the rack froze and turned around slowly with one eye brow raised and lips pursed.

"Excuse me, but are you taking PICTURES? Because we do not allow people to take PICTURES in Anthropologie."

"Oh! So sorry! Um, it was my phone. It makes picture-taking sounds..."

"You mean when it's taking PICTURES."

"Um, yeah. I guess."

Eye roll and sigh. Don't ask me how she managed to do that with her eyebrow raised. Must be an Anthro thing. "Please, do not take any more PICTURES." 

 Oh, look, sweetie, I don't need to! I can just pull them from your website. These clips are currently going for $28 for a group of four. Which is too much for something I will most likely lose to a coat pocket, counter top or down the sink drain. And I wonder why the doggone thing gets stopped up.


On a recent shopping trip to Anthro with a buddy (having one less than a mile from my school has become super duper dangerous), I was recounting the above tale. Because I'm a notorious loud talker, one of the Anthro girls, who'd yet to perfect her snotty face, interjected, "You can take all the pictures you want in here!" 

Wait, what?

"Yeah, we were told to allow people to take pictures of whatever they want. I mean, it's not like they are going to open up their own Anthropologie."

"Ha, right? Or copy everything and blog about it!"

"Exactly!" 
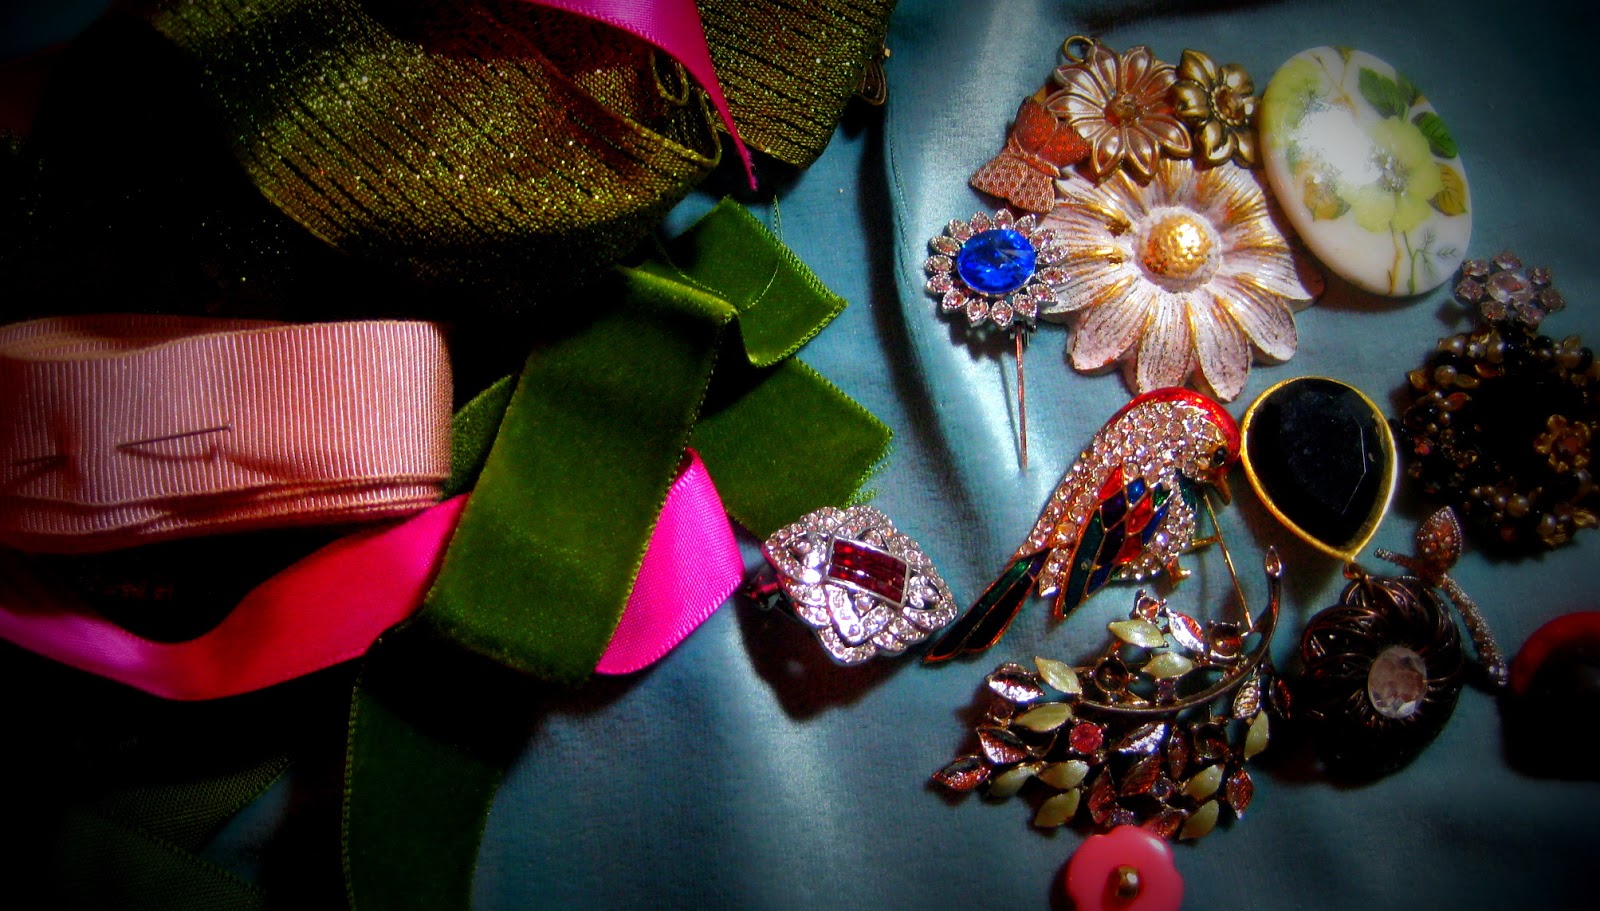
A friend at work gave me a huge bag of old broken jewelry. I didn't have a clue what to do with it until I saw those hair clips. Armed with my hot glue gun and jewelers tools, I set to work with some ribbon, babbles and bobbie pins.
 But not just any bobbie pins. I picked these up at the craft store. Because I didn't think that wee circle would be large enough to hold my bedazzles, I also bought small cork circles to attach to the bobbie pin circle. This gave me a larger surface to glue my jewels to.

 For some reason, as I was creating these, I made them into miniature groupings. Probably because that's how they are sold at Anthro. When they were finished, I thought: How sweet would a grouping of these be as Valentine's Gifts? The above are apart of the Shy Bathing Suit Girl set.

 Little back story: hubs saw this photo and informed me that the long lost key hot glued to one of the clips was one that belonged to his grandfather. Apparently one of the few things he brought back from World War II was this wood crafted box from Africa that can only be opened with, you guessed it, my hair clip key. Oops.

 Last year, I bought a grouping of vintage teacher Valentines off etsy. Each one is painstakingly signed by a student with a name like "Marsha" or "Deborah" on the back. These bobbie pins were created with beads from an old necklace and velvet ribbon from my stash.
 

 And I think they might be too cute to give away. I kinda sorta have a secret love affair with red and leopard print. I'm trying to keep it on the down low but it's really starting to show in my wardrobe. Whatcha gonna do? Ya can't stop true love.

Oh! And P.S. the right is a sneak peak at next week's DIY, eep!

 If you look closely at the blue jeweled piece, that is actually two different broken pieces of jewelry put together. Because they were both pretty unstable, I attached a cork circle to the bobbie pin, covered it in pink ribbon and glued the jewels to the top. The dog looks pretty happy. The awkward placement of the boy's foot is kinda freakin' me out though.
I scooped up these vintage postcards of Nuremburg during my trip there this summer. I love this grouping of hair clips with the velvety moss green and the pale pink. You'll notice that many of these hair-cessories are just broken jewels glued to the 'pins. Easy.
 Put a bird on it. Seriously, do I ever NOT put a bird on something? It's a disease, people. I'm bird-anorexic.

So let's say you wanna make some bedazzled bobbie pins of your own...you see it's super easy. And the best places to find broken jewels: the thrift store, your junk draw and your mom's old jewelry box. Just avoid anything that looks like an old key. Trust me on that one.

And the next time you are in Anthro, remember to snap a couple pictures for me!


Sunday, February 3, 2013

What the Art Teacher Wore #53

Oh, Monday: A coupla weekends ago, I dug some dresses out of my closet that I had never worn. Some were holey, too summery or just a pinch too tight. I forced myself to try them all on and see if they should be sold, kept or donated. I always thought this one was too tight but a lil Spanx came to the rescue. dress: vintage, thrifted; brown tights: Target; sparkle fishnets: TJMaxx; booties and belt: Anthropologie
 Well, kids, I finally got my wish: I scored a Snow Day this past Friday! How many weeks have I spent whining about getting gypped outta a day of freedom? Apparently the Snow Day Gods were just so sick and tired of the endless bellyaching, they threw a day my way. And, lemme tell you, I totally spent my time wisely by enjoying a bubble bath, catching up on Project Runway and sewing (read seam ripping) up a storm. What a gift.

But now it's back to reality. Wah-wah-waaahhh. So I'm doing a little multitasking with this here blog post: I'm sharing what I wore as well as a brief history of wool and weaving. My second and fourth grade students are ready to leave our study of Germany and travel to the United Kingdom where we will enter the Wild World of Weaving. We're trying some new things this year so wish me luck. 

Until next time, enjoy your week!
The story of man-wearing-wool began way back before recorded history with the primitive man. Not wanting to waste any parts of the animals that were hunted for food, man discovered that this fur could keep him cool in the day and warm at night. And because no other fabric has been able to match it, wool is still just as popular today.
Mary Poppins Tuesday:  Several students commented that I looked Mary-Poppins-esque on this day. Which I totally took as a compliment. However, that afternoon when I was walking to a coffee shop, a group of teenagers stopped their convo when I walked by. When one started belting out,"Just a spoon full of sugar makes the medicine go down!", it just wasn't as cute. dress: vintage, picked up at an arts festival in Memphis; sparkly tights: TJMaxx; shoes: Softt; belt: Pin Up Girl
Wool is a part of Britain's history and heritage more than anything else produced in the islands. They began weaving it into cloth during the Bronze Age (which is in between the Glitter and the Bedazzled Ages) around 1900 BC.
Wood Panel Skirt Wednesday: This funny skirt spent time in my donate pile before I returned it to my closet. Which, according to The Secret Lives of Hoarders means I have a problem. One of many, I'm sure. sweater: felted by me, DIY here; wood panel skirt: Target, super old; boots: Frye
How is wool made? Why, you looking for a new hobby? Well, okay then, first get yourself a super furry sheep. Or goat, camel, alpaca, llama -- many animals have fur that can produce wool. Then shear them. I'm guessing with a shearing tool like that above, not your Bic razor.
Once the wool is sheared, it must be cleaned and carded. In the painting above, you'll notice the woman is holding two large wooden carding combs. The wool fiber is raked through these combs to alight the fibers of the wool. This makes it easier for spinning the wool into yarn.
I mean, look, doesn't that look so super easy? Can you imagine how precious your possessions would be to you if these were the lengths you had to go to create them? From shearing to carding and spinning and still nothin' to wear. I could have never survived back in the day. It's no wonder their lives were short-lived.
Midway Thursday: On this day our school was hosting a carnival in the evening. I'd never heard a carnival called a "midway" before. I'm curious about the history of that name. I decided my Fulla Hot Air Frock would be appropriate. dress: DIY here; sweater: thrifted; tights: Target: scarf: Urban Outfitters; belt: Anthropologie; shoes: Opposites Attract
Somehow I ended up in the Throw-a-Pie-at-Your-Teacher booth! I was supposed to sit behind that banner and put my head through the hole but that just felt like a cop-out. However, after ending up with stinky whipped cream everywhere, I realized that would have been a pretty good idea.
Weaving Cloth for Battle, 1940. Sadly, the artist is not listed on the website. This would have been every wool fiber factory in the United Kingdom during the war. All normal production ceased to create military uniforms. Clothing and fabric were among the many things rationed during World War II.
Art Museum Saturday: That's right, I skipped Snow Day Friday. Because I was in my pajamas all day! So here's what I wore to the Frist Center for Visual Arts. Only ten of my amazing little artists had their works of art featured there along with the other chosen artists in my school district. It was an exciting day for such hard working artists. suit: vintage, thrifted; tights: Target: shoes: Anthropologie
 Of course, I just can't introduce the United Kingdom and weaving without a nod to the woolen woven kilt. Men have been wearing kilts since the 16th century. The first worn was something called the great kilt which is more of a full length affair. Those featured above are called small kilts or walking kilts. The word kilt means to "tuck up the clothes around the body." I'm thinking this is just what the hubs needs to complete his wardrobe.


Wednesday, January 30, 2013

In the Art Room: Cuckoo for Cuckoo Clocks

Ain't no doubt about it, that's one cuckoo bird.
Dunno what time your alarm clock sounded this morning, but I was awoken at 2:55 am by tornado sirens. I flew outta bed looking every bit as crazed as the little pink bird above to check the weather...and, okay, to see if quite possibly they cancelled school for a severe storm. No go. And doncha know I couldn't fall back asleep. Which left me feeling a little tired and blue kinda like the cuckoo bird below.

Now doncha go and take me the wrong way, I love that quite little bird. Especially since it's every bit the opposite as it's feisty young creator.
However, once my second grade students starting putting the finishing touches on their cuckoo clocks and they started filling the drying racks with their masterpieces, my attitude quickly changed. I mean, just look at these guys! It's been a long project but I'm totally nuts, er, cuckoo over it.

A flock of Cuckoo-Bird-tasticness.
We began this lesson before Christmas with an introduction to Germany. From there we chatted all about the history of cuckoo clocks which I shared on What I Wore this Week #43. Ya'll might also recall I even crafted a Cuckoo Clock Frock. To begin creating their own wooden cuckoo clocks, the students began by painting two faux wood papers with brown paint and texture combs.

The following art class, the students used one piece of paper to cut a loom and the other paper to weave with. This was pretty easy for them as these guys are the ones who wove the Croco'Nile Puppets last year.
 Once the weaving was complete, we began working on our Roman Numeral clock faces. This was a big time math lesson for the kids and they enjoyed it. I'm lucky that my school has a dye cut machine for the clock hands as cutting out miniature clock hands would have driven us all cuckoo.
 The next couple of art classes were spent in Cardboard Printing Town. The students used 1" X 2" pieces of cardboard and some yellow paint that I added gold glitter to (I'm currently on this kick where I add that super fine glitter to all of the paint. I want everything to be sparkly!).
 We had a big time chat about patterns. I had tri-folded their 12" X 18" piece of construction paper and explained to them that what ever pattern they printed in the first column had to be repeated in the following two. We also had to have a chat about the dif between printing and painting as some of us were using our pieces of cardboard like a palette knife and just painting the paper gold (I'm not the only one addicted to sparkle). I have found the best way to explain the dif is this: printing is when you put something down and you pick it back up; painting is when you put something down and you move it all around. Or something like that.
 Once all of the pieces were complete, we were ready to assemble our clocks. We began by cutting the top of our weaving so it would resemble a house and glued it to the center of our printed paper. From there, we added our roof, a door for our birds and our clocks. The kids had a lot of fun coming up with what their version of a cuckoo bird would look like. Some added a feather for the tale. All of them zigzag folded a piece of paper that served as their pop out.
 After that, a symmetrically cut piece of paper (which we called the "bottom decoration") and a bottom ledge was added. Some kids were inspired by the cuckoo clock visuals I had hanging up to create a little Black Forest scene to the bottom ledge.
I love the flapping wings and the wonky pine cones.
 For our final step of adding the pine cones, I brought in some pine cones from my yard. I placed several on the tables to inspire the kids. These were attached by a couple of strings and, viola! our Cuckoo Clocks were complete. 

The kids were so thrilled by the end result that several asked if we were now going to create real clocks. You know, like with whittled birds and working clock mechanisms. Yeah, um, no. I do believe I'm cuckoo'ed out.

 And now I believe Ima go and catch up on some much needed sleep. Until next time, enjoy the rest of your week!

Monday, January 28, 2013

DIY: Fulla Hot Air Frock

Oh, you know. Just another photo of me standing next to my kitchen window. In a mucho belated DIY.

You know those people that just talk and talk and talk, interrupt you when you try to get a word in edgewise, and talk some more? And it's always the same stories, isn't it? Same jokes, same "hey, did I tell you about this one time..." while you attempt to look at your watch and gauge how much longer you have to sit and listen before you can politely excuse yourself. You know the type, right?

Yeah. That's me.

So how appropriate that I'd create a Fulla Hot Air Frock.
The "before" photo on the left is from  What I Wore this Week #23 on my last day in Germany. Of course the "after" photo is the result of my most recent DIY.

 Oh, this dress. I first spotted it when shopping in Nuremburg, Germany and, even though I loved the vintage-esque cut of the dress, I just didn't spring for it. From which point on I was haunted by the silly thing. Does that happen to you? Do you ever have shoulda-shopping remorse? Well, I knew it was a mistake when I couldn't get it outta my head. Which is why when I saw it again in Amsterdam, I bought it in a blink.
And then proceeded to never ever wear it. Every time I put it on it was just too short for my taste. There's a lot of bending, reaching, squatting and crawling on the floor in the art room, believe it or not. And this dress just wasn't suited for the task.

That's why, way way waaaaaaay back in October, I decided to DIY this little number. And the first thing I did was lengthen the hem with this sweet soft buttery yellow. Do you see the yellow zipper sticking out of the top of the dress? The dress came with it and I was attempted to match it.
So, you heard me say that I began this back in October right? If you are good at math, then you know that was, like, four months ago or something. I had originally began it to coincide with my first graders Hot Air Balloons over Paris and my third graders Parisian Silhouettes.
But what I thought would be the easy/fun part turned out to be a big fat headache. I don't know why I struggled with what patterns of fabric to put together. I usually enjoy playing with pattern and color. But when this just didn't come together easily for me, I put it on the back burner until it was smoking, smoldering, burnt to a crisp and then complete ashes. At which point I thought: does the dress even need the balloons?
In true pro-Cass-tination style, I crafted these light bulb/hot air balloons while hiding from the dress in my sewing room. The Christmas tree should date these ornaments just a bit.
This weekend, with hubs gone and the cat sitting with me on my sewing stool, I decided that it did indeed. Cuz if I hated it, I could just seam rip them out, right? So using my zigzag stitch, I set to work. 

Applique is one of my fave ways to revamp clothing. I've used it on an Urban Outfitters dress, a felted floral sweater, my Rock Star apron and my 1970's art teacher skirt. Since I'm a regular pro (insert sarcasm here), lemme give you the following tips:
  • Tack your pieces down with some stitch witchery. This iron-on stuff will keep your pieces in place without pins sticking out in every direction.
  • If you can, applique light fabrics onto heavier ones. Which I didn't do in this case. And what happens is that the fabric you are adding the applique to has a tendency to pucker. You might notice that in some of my photos despite my ironing. 
  • When sewing, be sure the needle goes from the inside of the piece being appliqued to the edge of said piece. Can you see that in the photo above? Because if you go beyond that edge, the needle will pull the fabric you are appliquing onto thus causing puckers. And no one likes a pucker.
The back and front. You'll notice I did nothing to the back. I usually don't. Because I like my DIY's like a mullet cut: Business in the front, don't give a toot about the back.
Now originally I had plans of adding lines to attach the basket to the balloon but, honestly, I don't think it needs it. I also left some of the balloons basket-less. I just didn't think the fabric (or my patience) could take any more of the heavy stitching. So I skipped it and back-from-the-back-burner ashes, this dress was done.
Outfit Details: Okay, truth? That belt I scooped up at an Anthropologie sale is the real reason I finished this dress. I just couldn't wait to pair it with the dress! tights: Target; shoes: Miss Albright
And there you have it. Yet another long-winded, going-on-and-on-forever, Fulla Hot Air blog post. You can stop checking your watch now, I'm all done. 

Maybe. 

Oh, wait! Did I tell you about this one time...(no, not at Band Camp)...

Seriously, thanks for dropping by. Chat with you soon.