Tuesday, July 21, 2015

DIY: Artsy Sew Along, Stitching // Gathering and a Winner!

Whut-whut?! Guess who finally decided to come back to her own sew-along party? Das right, kiddies! My bottom-of-the-heartest apologies for the delay. I always forget that July is pretty stinkin' busy in Cassie-town, what with laying on the couch, taking a shower (occasionally) and deciding whether or not to get dressed to get the mail or just shock the neighbors again and do it in a bathrobe with the backside accidentally tucked into my grannie panties (like that visual image? Yer welcome!). I know, right?! It's amazing I've even managed to find the time to put together these two short clippies for you! Here's what I'll be yappin' about today:

1. You've already got your pockets in, riiiiiight? And it was super simple, yeeeeeessss? If you've not done that yet, no worries! Just hop over here and come back in an hour.  Now we are ready to stitch the front of the skirt to the back two panels!

2. From there, I'll show you how to add your gathering stitches

And that's it for this post. Short and simple. My plan is to be bacattcha soon buuuuut we'll see how I feel after a couple more days of couch rollin' around and Mad Men power-watching. It's a rough life, summer livin', I tell ya.

OH!! The giveaway! Thank you so much to all y'all that entered to win the goods to make your own Palette Purse! I recently carried my purse to an art event and got so many stinkin' compliments, if I do say so (and I just did. So there.) My fave comment is always, "Oh! Where did you get that?!" which is way better than "ooOOoooooh, that's...cute. Did you make that?!" like I'm some five year old wearing a moldy macaroni necklace. All y'all crafters know what I'm talkin' about. Anyway! The winner is...Andie Anders! Congrats, buddy! And thanks all y'all for playing. I seem to give away stuffs pretty frequently around here so if you don't come here for my good looks and charm (whuuuuuut?!) then pop back by for the free shizz. 

Now, let's stitch!
Please ignore that crazy nonsense about entering to win the contest! We already have a winner, duh, me.
I dunno what you do when you need a sewing break but I fabric shop. It's most def a bad idea that I don't recommend. I mean, lookie what's currently in my slacker-shopping cart: kitties
Bananas! 
And back to werk. 

Next time, we'll work on that waistband and the zip. Hemming should be a snap and we're done! Yay! If you are stitching, please be sure to share on the Artsy Sew Along page and on instragramz with the #artsysewalong. Thanks, kids!
 I leave you with more eye candy from one of my fave fabric brands Cotton and Steel. Til next times!
 photo signature_zpsd10b3273.png

Sunday, July 19, 2015

In the Art Room: Tennessee Arts Academy, 2015

Every summer, right in the middle o' July, I attend the most amazing professional development known to man: The Tennessee Arts Academy in beautiful (albeit hawt as Hades) Nashville, TN. If you follow me on the Instagramz than you've prolly seen me sharing the most amazing projects, craziness and overall good times which all went down this past week. AND if you've been hangin around this here blog for a pinch, then you've seen my past TAA adventures here and here. This year was easily one of my faves because I got to spend time with my craziest art teacherin' buddy, Laura Lohmann of Painted Paper
Laura is a powerhouse of an art teacher, y'all. My group stayed with her for just two days and we learned so stinkin' much about her amazing approach to teaching art to children. I'm gonna share just a handful of her projects but I gotta encourage you to visit her Teachers Pay Teachers store to purchase complete copies of her lesson plans. Laura pours over these plans and they are a steal of a purchase when you see all of the art history and project ideas included. Y'all can thank me laters.

On our first day with Laura, we worked with Model Magic to create flowers. Our inspo was Monet but Laura left the creativity and imagination up to us. Her projects are very open-ended and her directions are short and to the point. Once the flowers were done, we set about painting paper. This is Laura's whole deal: have the students create tons of painted paper to use in later projects. That stack in front of her was created by my group in a matter of an hour. We used a variety of texture tools and simply painted as many papers as we could in the time we had. This became our beautiful stash to create later projects with. Like those flowers I mentioned...
Once the Model Magic was dry, we painted our flowers anyway we liked an adhered them to a piece of cardboard with Aleene's Tacky Glue. Our painted papers serving as a background. After gluing my papers, I did enhance them with a small brush and some white paint. 
Because of Laura's anything-goes teaching technique, everyone created a wonderfully different piece. 
This photo gives you a little peak into how Laura teaching painting to children: without water. RIGHT?! The kids work from paint palettes that have been set up in Roy G. Biv order. When they paint, they start with the lightest colors first and work their way around the color wheel. When they wish to change colors, they simply wipe their brush on their place mats. We used maps of Laura's home state of Ohio for our mats!
Laura's suggestion of painting tools included many that I'd never thought to use with my students: round stencil brushes, scouring pads, odd looking paint tools from Lakeshore, you name it, her kids are painting with it! 
Next up, we created Tikis! Using our painted papers, we learned about Paul Gauguin, Tahiti and the history of tikis. Then Laura let us loose and we created the most amazingly fun tikis ever, if I do say so mah-self.
 Like, riiiiight?
 On our second day with Laura, we painted large flowers on tag board. This lesson is actually FREE on Laura's TPT page right meow. You needs to get it because these flowers were so beautiful and fun! 
What a lovely way to start off the school year and brighten the halls of our schools, right?!
 After that, Laura had us creating landscapes inspired by Monet...
Like this lovely reflections painting by a fellow art teacher buddy.
And Gauguin. Now, I gotta tell ya, normally, I'm all chatty at TAA because I do love to hang with "my people". However, I was so into what I was creating on this day that I don't believe I said a peep...and I ended up with a stack of ideas to bring back to my classroom. I'm so excited!
A view of our Gauguin-inspired landscapes.
On the third day, it was time to switch classes and go spend the next coupla days with one of the funniest dudes I've ever met: Jim McNeill. Jim is the illustrator of Pam Stephens' "Dropping in on [insert famous artists' name here] with Puffer" and Tessellations: History & Making of Design.  I gotta tell ya, I've never been a fan of tessellations myself and had some pretty serious reservations about this two day event. However, I really got into it! I fell in love with creating my Diner Dames, as I've dubbed them, and actually think I might have to make more! 
Folks had some super clever ideas for their tessellations. There were even ones that popped out, morphed and transformed! It was pretty magical. 
I even did a lil art teacher teachin' for a couple days and taught some fiber techniques for teachers to take back to their classrooms.
My art teacherin' students learned needle felting, string art, yarn bombing and how to teach embroidery to small children. I absolutely love teaching art teachers, they come up with THE BEST ideas!
On Thursday, Laura and I had to get all pretty for our big AOE conference! I was so glad that Jessica of AOE allowed that crazy girl and me to present back to back since we were at TAA that day. I had the opportunity to watch the presentations last night and, as always, I learned so much (Alecia Eggers, can you PLEASE come organize my liiiiiiifeeeee?!). 
Now, whilst I was painted paperin' and gettin' my tessellation on (er, whuuuut?) the high school art teachers were hanging with Debbi Engbring, high school teacher from Arizona (pictured second from the left) and Laurie Gatlin (on left) from SoCal. 
Laurie is an incredible teacher with a unique way of teaching her students through the use of sketchbooks. And I'm not talkin a black-leather bound book or some spiral bound nonsense. Naw, her kids MAKE the books, paint the pages, and sketch daily. I first met Laurie this past fall at our state conference where she was our keynote speaker and shared her method. I was blown away. She's amazing!
Debbi had her students IN TWO DAYS create these magnificent teapots. Y'all. These were not thrown on the wheel! She had a very clever way of having the students use half styrofoam sphere's to create each half of the sphere and then put the two together. From there, more clay was added to decorate as well as black glaze for some sgraffito. Super amazing.
 Now, I gotta tell ya, my favorite-favorite part of TAA is hanging out with this bunch! We are the facilitators or the helpers for the arts portion of TAA. Jim Dodson, on the left, is our fearless leader who organizes everything from the art shows that take place (both student and teacher art shows happen at TAA) as well as arranging all of our presenters and speakers. Libby Lynch (second from the left) organizes the art shows mentioned including the finale art show that features the work of all the teachers. And the rest of that line up is just a buncha trouble! From the right, there's Ken, me, Debbie Flynt and Kim Shamblin, all art teachers and all TAA buds for life. 

Okay, that's a wrap! For more information on Tennessee Arts Academy and how you can attend (anyone can, y'all!), be sure to pop over here. There's A LOT more to it than I've managed to squeeze into this already-large post. So, if you have any questions, leave 'em in the comments! 
  photo signature_zpsd10b3273.png

Tuesday, July 14, 2015

In the Art Room: School-Wide Collaboratives!

Hey, kids! I'm comin' atcha with a mere two and some change weeks o' summer vacay left before The Return. Which means, if you are anything like me (and, Lordie help you if you are), you are dreaming up ideas for the new school year. One of my fave things to do to kick off the beginning of the year is have a big ole school-wide collaborative (or "scollab" as I like to call 'em). And lemme tell you why:

1. It gets the kids creating right at the start of the school year! If your kids are anything like mine, they spend their first full week learning rules -n- routines everywhere they go. The cafeteria. The classroom. The playground. The bus. WHICH I know is important BUT I'm dealing with the under-10 set. When they come to the art room they are soooo over that mess. Not only that, but I've had most of my students since kindergartenland. If they don't know my R-n-R's by now, well, when they see that we're gonna create on the first day o' art, they learn 'em real fast. Nothing like a big ole fun and messy carrot to get 'em behaved and ready to create, amirate?!

2. It makes the school look lovely! At the start of the school year, our school halls are empty and nuthin but wall to wall BLAH-eige (my friend Debbie coined this term: blah + beige = BLAH-eige). What better way to spice 'em up than with some kid-created masterpieces?!

3. It shines a spotlight on your art program! Let's face it, you ARE the Donna Summer of your school:
Sing it with me, "I work hard for the money. So hard for it, honey! I work hard for the money so you better treat me right!" However, you just can't run around tellin' folk how hard you and your young artists are working. You gotta show them. Put up a show stopper at the start of the year and you'll have everyone talkin' about your art program. 
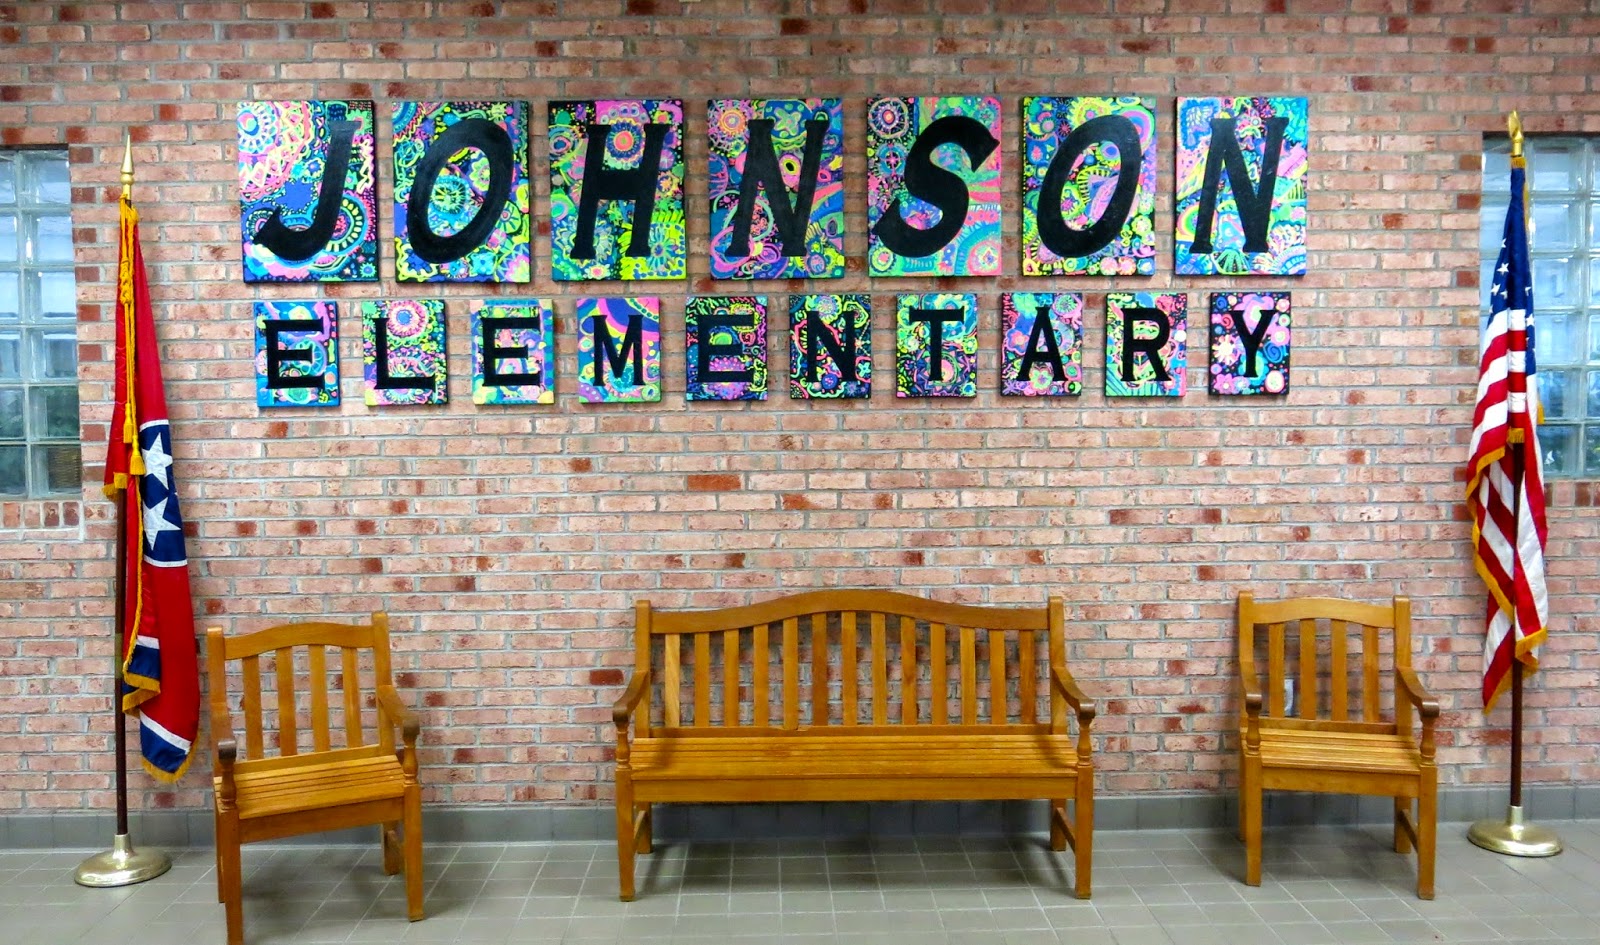
Now, I know y'all are thinking, "That's all well -n- swell but what scollabs should I dooooo?!" Well, I'm here today to share with y'all some of my very faves with linky-loos to the blog posts that will walk you thru all of the steppies. Let's start with this fourth grade legacy mural! And, good news, if you are attending this Thursday's AOE conference...
You can hear me chat at length about each of these projects! As well as me questions live at the conference. AND take a tour of my school and get an even better view of these masterpieces. However, if you can't attend, don't you sweat it. I've got ya covered in this here blog post!
The mural is proudly displayed in the front lobby of our school and give a fair amount of fun -n- funk to our entrance way, doncha think?
Another fun scollab we did this year was our Village of Kindness mural/installation. 
Our theme for the school year was Be Nice and what better way to do so than with a village full of houses with kind messages to greet the viewer.
This also incorporated a fun backdrop that was painted by my rockin' second grade artists! More on that process here
This scollab is prolly one of my all time faves and it was purely by accident. Our school hosted a "street painter" or sidewalk chalk artist who introduced the kids to her trade. The kids were then supposed to try their hand at chalk art outside on our sidewalks but the weather decided against it. So we used the flip side of ceiling tiles instead! Full details here
Now we're thinking of doing this project every year because my administration loved it so much!
 If you want a scollab that will have EVERYONE feeling all warm and fuzzy at the start of the school year, have I got the one for you. The Gallery of Gratitude is an idea I played with forever...and I totes wish I had done it sooner. It meant so much to the faculty and staff to see their portraits and words of kindness written about them. 
Who doesn't love to feel appreciated?! This project def did the trick.
And, last but not least, the final scollab I've got for you here in this post is the Johnson Elementary has Heart mural! If you need a heart stopping show stopper (sorry, had to), this is it, kids!

So, what do you think? Are you ready to tackle a scollab to kick off the start of your school year? If so, what do you have in mind? I'd love to know. Leave me a lil sumpin sumpin in the comments, would ya? Til then...

 photo signature_zpsd10b3273.png

Thursday, July 9, 2015

DIY: A Palette Dress, Purse and GIVEAWAY!

At one point, every summer vacation, I start to fall into a slacker-esque routine. I'll have my To-Do list all written down, my running shoes by the door, a big ole stack of projects to tackle and then I go all meh, not today. The list gets forgotten, the shoes collect dust and  the stacks of projects turn into towers of tasks I ain't never gonna touch. That was today. YESTERDAY, however, I finished off this number and stitched up that thar palette purse! So I can give myself one day o' estate sale shopping and Mad Men Marathon watching, right?!
I'm super stoked about this lil outfit y'all. But, let's be honest, the purse makes the thing. Amiright?
Let's talk about what inspired this outfit: that fab fabric, y'all. I have this habit: late at night, when I should be fast asleep, I scour the interwebs for fabric. I like to google things like "art supply fabric" or "color wheel fabric" OR, you guesser, Chester: palette fabric. The moment I saw this retro-inspired goodness, I tossed three yards in my virtual shopping cart and scooted on over to checkout faster than you can say "fabric hoarder" (although, why would you say such a thing? I like to think of myself as a Fabric Connoisseur, thank you vury much). The pattern I paired with the fabric is a vintage Simplicity 3877. I decided to go with the bodice of view 3 but I didn't love that skirt (flat front, gathered hips? Because I wanna look like a hippo?!) so I opted to use a regular ole gathered skirt from some rando pattern. I ain't trying to be vague. I'm just sayin, it's literally a big a## rectangle that I gathered and attached to the bodice. The.End.
Now, I'll be the first to admit, that this here fabric pattern is a wee bit overwhelming. That's a whole lotta palette action, you know what I mean? So I decided to break it up with that lil dotted cummerbund.  
I do love me a cummerbund. Or any waist-cinching, belt-esque thingie I can get my kitten mittens on. This one was a snap to make. I have a feeling I'll be busting out more o' these in the future. Magic Eight Ball says it's so (actually she said, "Ask Again" which I always take for a YES! WHATEVER YOU SAY! Magic Eight Ball is kinda like the original Siri but without the attitude.)
But can we fur realz just talk about the show stopper here? I mean, that purse, right?! 
RIIIIIIGHHHHHHT?!
It was pretty easy to make (with my sewing machine only having a hissy fit a mere three times during the making) and, if you are interested, ya outta pay close attention so you can make your own! BECAUSE Ima bout to give away the supplies to do it! But first...
I started with two straw placemats I found on Amazon. I then sketched out my plan and placed it on top, pinning it into place.
Then I snipped away. 
The handle proved to be the biggest beast for a multitude of reasons. The first being it was a drag to cut out. BUT I did it. WITH much complaining. TO the cat. BECAUSE no one else will listen. 
Using extra wide double fold bias tape, I pinned that business around the edge of the mat. Sadly, I didn't have enough for the handle so I had to use the smaller double fold tape I had on hand. That proved to be a real joy (insert sarcasm here) to stitch. But I muscled through. 
And then there was The Great Debate. If you follow me on Instagram and Facebook, I threw out a question because I was stumped how to proceed with the paint splotches. So my question was: round or blobby? I had so many sweet friends offer their advice that it was fab! The prob? Everyone was divided! So I took a closer look at the palette on my skirt and noticed that the paint splotches were ovals. That seemed to be a happy medium. Okay, so the Magic Eight Ball is actually the medium, but you know what I mean. 
This part actually went off without a hitch. I just set my machine to the appliqué stitch (all machines have it, it's just a zigzag stitch with the stitches set close together) and went to town.
Originally I was gonna stitch the two mats together on the black bias tape but it was just too thick. I ended up switching to a light brown thread and sewed the front and back of the bag together on the straw mat. Done and Done. 
BUT I'VE GOT THE SUPPLIES FOR YOU TO MAKE ONE TOOOOOOOO. Well, the purse, perhaps. And just a wee bit of palette fabric. And it can be ALLL YOOOOUURRZZZZ if y'all do the following:

* (If you wanna) follow me on Instagram, that'd be swell. 

* Leave me a message in the comments! I want to know...Who is your fave painter (ya know, since we're talking palettes and all) and why? Also! Don't forget to leave me your email addy so I can let you know if you won, you big winner, you!
 
AND, I'll see you soon! Artsy Sew Along friends, I'll be back shortly with more video clipp-ies of our next phase of skirt stitching. Toodles!
 photo signature_zpsd10b3273.png