OR in the case of this week of craziness, Power to the Cranky, Tired, Gray-Haired-Growin' Art Teacher...wait, scratch that once more. Forget Power. All this art teacherin' lady wants is grape flavored adult drink and chocolate. Copious amounts of chocolate. And no one will end up with a paint brush in their eye.
So this lil jacket o' power has been in my sketchbook and on my mind for many moons, y'all. In fact, my end goal is to have the front of this jacket ablaze with art teacherin' badges like the Girl Scout badges I had on my sash as a kid. Like a "No One Gave Themselves a Haircut in Art" badge and an "I Didn't Huff the Sharpies After a Rough Day with Kindergarten...Today" badge. You know, the ushe.
Y'all might remember from my last needle felted coat that I'm on a bit of a Mad Men bender. Well, I'm nearing the end of the show (noooooo!!) which means I'm in the midst of the late 60's/early 70's. I was fascinated with that era in high school and college, dressing full tilt hippie (with bell bottoms as big as my head, butterfly collared shirts and a sweet stacked sneaker). My fave jams were Sly and the Family Stone, Ohio Players, The Jackson 5 and the soundtrack from Shaft (yes, seriously. Just ask anyone who shared neighboring dorm room walls). I had that time very romanticized in my small little head. As an adult-sized human (with a tween-sized brain) I now realize that time in history was both a frightening and swiftly changing one: the shooting death of a president and his murderer; the shooting of Martin Luther King, Jr.; riots; protests; the Vietnam War; women's rights; racial tension and the list goes on. The Black Panthers were formed during this time and made famous the slogan "All Power to the People" to protest the rich, ruling (and white) class which they found oppressive.
Soon that slogan came to represent all people who felt the injustice and inequality of the time. I find it is similar to how folks now view that ALL lives matter, not just some. I think that fighting for equality will last for many years to come. Thankfully, we live in a country where we are free to express our unhappiness (peacefully, of course) with our many gifts: song, acting and art.
And so all that serious chatter to say, such was my inspo for this here needle felted number! Because I worked on this between Mad Men episodes and was much to lazy to hop up and get my camera, I don't have any process pics. My bad. But I figured y'all have seen enough of my needle felted stuff to get a pictures. If not, I've added a Big Fat Hairy List with Links at the bottom of this here blog post.
In other news, I'm so excited to wear this to NAEA 2016 in just a coupla weeks! Who's going to Chicago for the art teacherin' convention? I do hope to see/meet/watch-netflix-and-chill (er, wait, no) with all my fave friends!
Until next time, Power to the Art Teacherin' Types! And now, for that big list of all my needle felted pieces...
It all started with a hole-y sweater that I thought I'd experiment on...all these sweaters are thrift store finds that I embellished with needle felting. Many of these posts include step by step and video: bird sweater; crayola sweater; puppy sweater
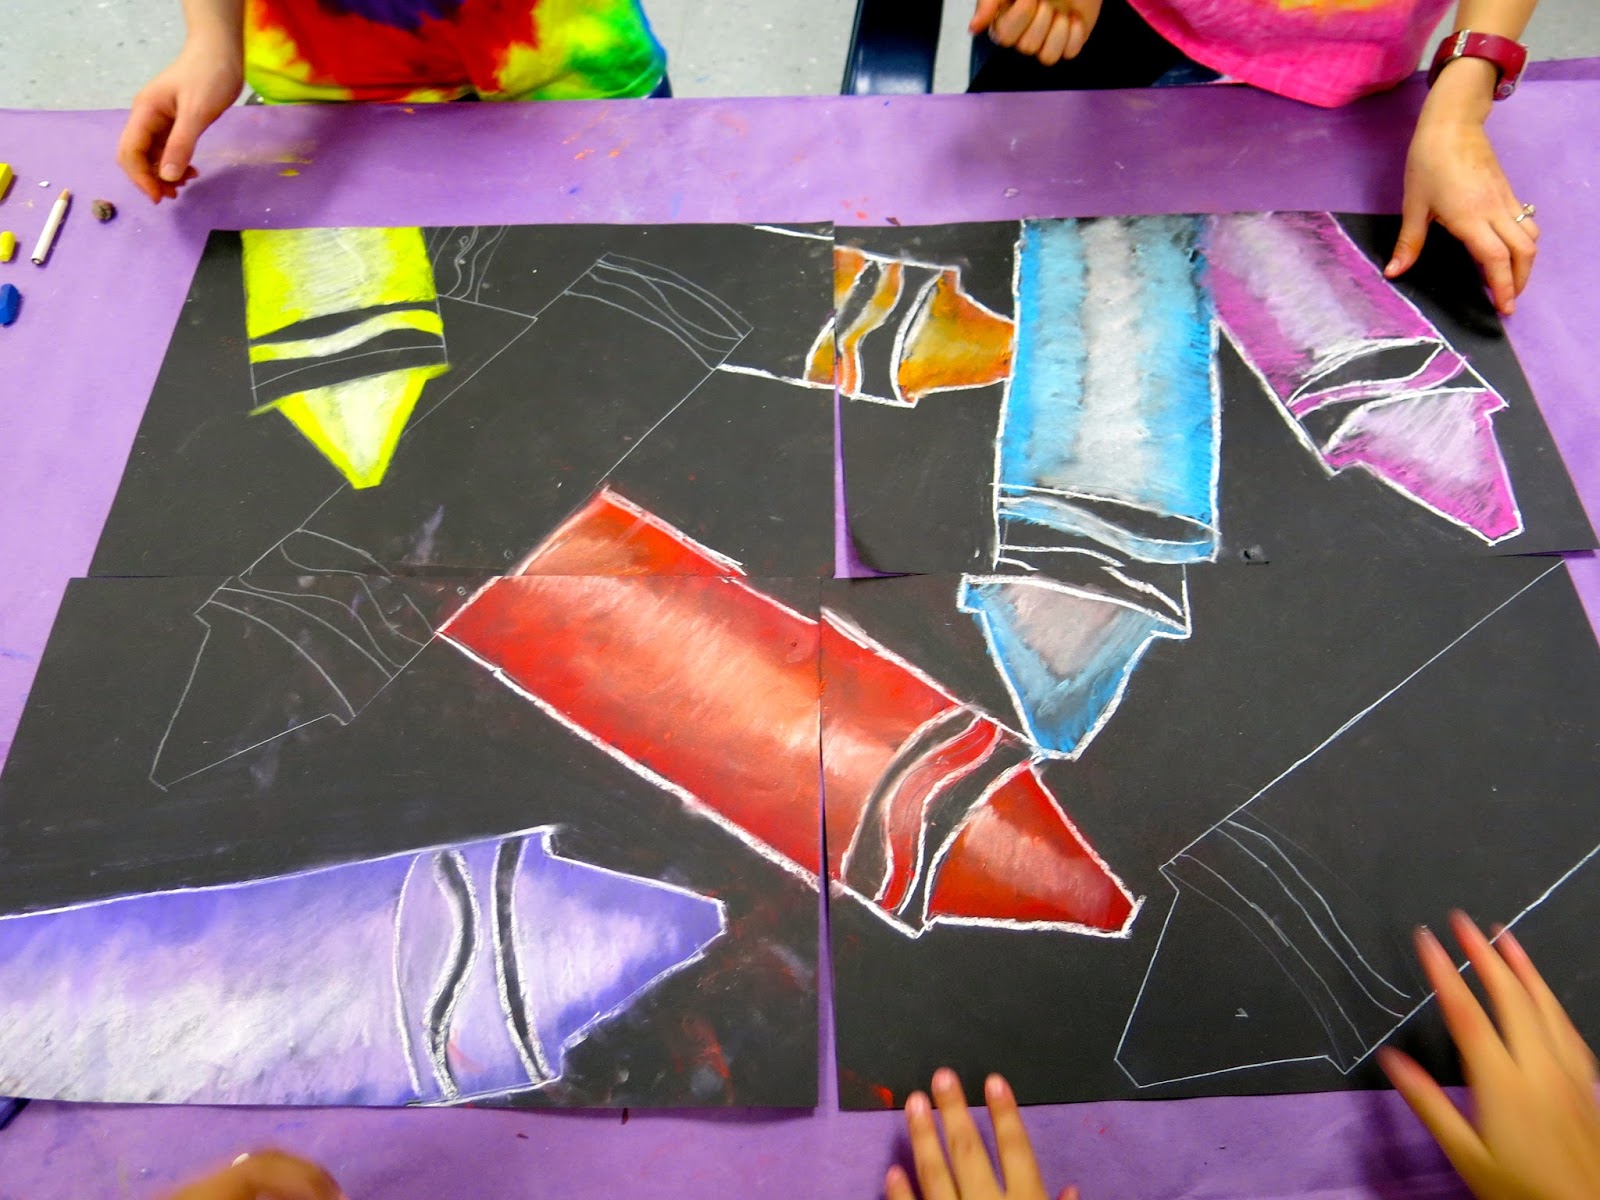
My fourth grade classes have been all over the place, y'all. With snow days, holidays and my jury duty-in', I've got some classes light years ahead of the rest. To try and get everyone back on the same page, I threw this lil Crayon-tastic Collaborative into the mix. The kids are currently creating papier mache crayons and pencils for an installation. I thought this little project would be a nice intro to composition, teamwork and value all while bringing everyone up to speed.
This project took my students an hour and a half (that'd be one and a half art classes). We spent the first 30 minutes of the first day priming our papier mache creations and then jumping right in to the crayon composition portion of the project. To best explain it, I created a video that you can view and share with your students if you'd like. My apologies for the fact that my hairs kept swinging into the demo portion of the video. Note to self: invest in a hair-tie!
Really, youtube? This is the photo you pick (well, they actually give you an option. Sadly, this was the best one).
I have about 20 kids per 4th grade class. To pick the groups, I randomly called on a student to pick a partner. Then I allowed that partner to pick the next and so on. My students are very sweet to each other so there wasn't any weirdness, thank goodness. I did step in when one group was assembled because I knew these particular kids would do more chatting than working. But other than that, the teams did great! Our first half of the day was spent plotting out the composition.
Which looked a lil like this. I gave the kids a stack of templates because I wanted their focus to be on composition, teamwork and learning to create value. I know some folks are anti-templates but not me. With limited amount of time and the lesson focus on other elements, I like to remove as many hurdles as possible. Because, let's face it, why make the struggle even more real when it already is.
Once the team was in agreement about the composition, the tracing started. That was a pinch tricky as the kids had to think about overlapping.
From there it was the drawing of the paper. This was also tricky as the kids had to use curved lines to create the illusion that their crayon was three dimensional.
Once the crayons were all drawn, the kids cleared the messy mats off the tables and picked a table on which to work. I was fairly certain my custodian friend would not have loved chalk pastel all over the floor. We watched this video before diving in (I love Scratch Garden's videos!)...
This helped us review monochromatic and value. The kids were to share the same pastels for one crayon. Meaning, if they agreed on a blue crayon, they had to use the same set of chalk. If they didn't, some of them ended up picking different tints and shades of blue resulting in slightly mismatched crayons.
This group only wants blue crayons. So they are having to come up with a variety of blues.
After the crayons are complete, the kids are to outline with white chalk. As y'all know, chalk is super messy so the final step was to clean up any smudges with a kneaded eraser. Side note: kids go BANANAZ when introduced to kneaded erasers.
I was walking around the room once everyone had started to check on them. This was my chatty group that I looked in on last...my mistake. They'd forgotten to agree on crayon colors and got 'em all mixed up! After correcting MOST of them, they requested to leave one mixed up because, in their words, "we are kind of crazy." Can't argue with that!
Since it is Read Across America week, we have all been decorating our doors with our fave books! I decided upon The Day the Crayons Quit since it seemed to tie in with our fourth grade project! For this, I simply had my first thru third grade early finishers cut out a crayon and shade it in a similar (albeit more simplified!) manner as the fourth graders.
I loved having the kids help me (read: do most of the work) and that it tied in so well with what the older kids are creating! I hope y'all have a Crayon-tastic week! Until next time...
Squidward Monday: I scored this Artists Only Squidward shirt at a resale shop and love it as did the kids. It was the perfect comfy thing to wear on a Monday because, let's face it, Mon-daze are no bueno. top: Buffalo Exchange but also available at Forever21; Matisse-inspired skirt: estate sale; tights: Target; shoes: Fluevog
Sup, buddies?! I do believe it's been a good coupla weeks since I've shown y'all what I've been a-wearing but it's totes not my fault. I've not worked a full week since the holidays, I swear! And it currently seems like I'm buried under my To-Do lists, swimming upstream from the piles of student artwork, stacks of personal projects and just mounds of STUFF. Every weekend, I try and catch up and every Monday, I'm all...
But, whateves. We're all busy, right? It's just a matter of managing the messes. Which, as it turns out, I'm suck-tastic at doing. Oh well. I take heart in knowing that I've got another shot at getting my life together every Monday. Wish me luck, y'all!
Crayon-tastic Tuesday: My fourth graders are in the middle of some crayon-inspired projects. They are making three-dimensional papier mache'd crayons as well as team-work collaborative two-dimensional designs. That lesson (with video!) will be up on my blog this week. I wore this lil ensemble for some inspo! crayon sweater: made by me, DIY here; crazy art teacherin' skirt: made by me, DIY here
Honest speaking: I don't do many team projects. Okay so maybe I've NEVER done a team project. Mostly cuz I didn't know how it would pan out...would the kids get along, would I need to intervene, would they be able to pick their teams, etc. Well, I gotta say, I'm a convert! This has been such a success so far. I only had to step in to tell 'em to stop and clean up! Like I said, this lesson will be up on Tuesday this week so stay tuned (but if you wanna see the lesson video now, go here)!
If you follow me here, you've already seen a sneak preview of how these are turning out!
Hump Day!: My mission of late is to be as comfy as possible so this sweatshirt and stretch pencil skirt is the new yoga pant, says me. Also, I'm totes on a combat boot bender, y'all. I've bought two in the last month. I love the stacked heal but also the comfort. It also reminds me of my 1990's alternative-dressin' days! Keith Haring top: Forever 21; skirt: old, Target; boots: Aldo
I shared my firsties Mad Scientist lesson with y'all here. Here was our final installment of the lesson: bubble printing! It was just about the most funnest thing ever and reminded me about everything I love about teaching art. Lemme tell you how we did it...
Firsties at their finest!
To make the bubble printing paint use the following: aluminum pie pans, dish soap, water and paint. I add about two table spoons of soap to the pan with nearly a 1/4 cup of paint. Then stir in about 1-2 cups of water. There really isn't any exact science to it, I just dumped stuff in but for those of you that like measurements, there you go. Stir it around and it's ready! I had four students at each table with four different colors in each spot: red, blue, black and yellow. The kids were armed with a straw and a piece of construction paper (any thicker stock paper would work).
I then told the kids our routine. When I hit my chime once, they place their paper in the corner of their table and blow into the pan in front of them. When I hit the chime again (10 seconds or so later), they were to "Smash Them Bubbles!" which quickly became our new chat. Then I would say, "Move to the right, move to the right, take your paper and your stray and move to the right, show me you're ready!". The kids would place their paper in the corner of their table again, bend down in front of their new pan and wait for the chime. It worked great! The next day, I spent about 10 minutes gluing their artwork to their new frames. They look fab, says moi!
We're Almost There, Thursday: So the rumors went to flying about bubble printing! My kindergarteners came in asking if they were going to do it because their sibs had told them all about it. Made me so happy! AND I had totes planned on them doing it as well so they were thrilled! sweater: Boden, thrifted; dress: Modcloth; boots: Frye; necklace: Paper Source; belt: Amazon
Finally Friday!: By the way, if you are curious as to why I am standing in front of the same stinkin' back drop this week, it's because my art room has become the armpit of the school. Between bubble printing, papier mache, printmaking, chalking, painting and collage, the art room looks like, well, an art room. But I thought I'd spare you the gory. sweater: old, H&M; paint drip scarf: flea market; scissor skirt: old, Modcloth; boots: Frye; palette hair clip: DIY, here
Just in case you were wondering what my cabinet said! You can take a tour of my art room if you are interested here!