Showing posts with label chalk. Show all posts

Tuesday, August 4, 2026

Line Designs with Chalk and Glue!

At this point, I feel like I'm spamming my own blog with LINE lessons! Just for a recap, I'll add links to them all right here:


I'll be sure and do a Best Line Lessons post soon but if you are looking for more ideas now, see THIS review of my fave line lessons here!

And if you are looking for all of my Larry the Line lessons, see the end of this post!

Before we dive into the lesson at hand, let me just share my LOOOOVE of lessons with black glue! Now for some of these, I didn't know about this epic time-saving hack and I MADE my own black glue with ink and Elmer's Glue All. It's a REAL DRAG, lemme tell you: the bottles clog, the ink spills, the glue leaves a permanent mess because of the ink...it's all such a pain. I will say...the end result of the black glue versus this hack is better but not so much that it's worth the hassle. 

Here's some of my very favorite black glue lessons:

* Stained Glass Trees

When we use chalk, this is our set up: a divided tray with warm and cool colors and black, gray and brown removed. These divider trays were donated to the art room from a hospital...so I can't tell you exactly where they are from. BUT I do love that they keep the colors separate. 

We also use a tissue for cleaning our finger AND a laminated color wheel.

I always get so many questions on where I got the color wheel...I found it online YEARS ago and I couldn't tell you where. So...I made one for you! You can download it here.


And now for the lesson! Here you go:


I know art teachers tend to have a love/hate with chalk pastel (I just call it chalk)...it's messy and often the artwork smears. BUT I love the stuff. The colors are bold and bright. And if you use a color wheel and really teach the kids about analogous colors, I think you'll find it fun to teach. I use that same color wheel method you saw in the video for every chalk lesson.

For my VERY favorite chalk lessons and more of my tips and tricks, visit here!


When studenst are done with their chalk lessons, I will often spray their work with an aerosol hairspray like Aqua Net from the dollar store. It will dull the work a pinch and can leave little speckles of spray but...it works pretty good. As long as the artwork is not man-handled much once complete, the spray works fine.
And, OF COURSE, if you don't have my book on LINE and SHAPE already, now's the time to get 'em!
You can find Larry the Line here.
photo signature_zpsd10b3273.png
Read more »

Tuesday, May 2, 2023

Top Tips and Lessons for Using Chalk in your Art Room!

Hello!

Last week I dumped everything I could think of into one video all about watercolor painting with kids. I hope you got something out of that video and enjoyed it! I made it just for you (and your sanity.

This week, I thought I'd share all things chalk! I know a lot of art teachers avoid chalk because of the mess. I'm going to encourage you to give this video a watch and try some of these tips on for size. I think you'll find it helpful...and maybe even fall in love with using chalk with your students! 

Also in this post, I'm throwing in all of my very favorite chalk lessons and projects. All are free for you and your students to enjoy. 


I shared several projects in that video so I thought I'd place them and the links below for you to use!
Always a hit! This one is done with the liquid starch and chalk hack I shared. Here's the video. And here is a blog post of the finished results!
This project was done with the same method of starch and chalk. It's a huge hit with the kids. Video lesson is included here!
Another method for liquid starch and chalk is this one I did with my fourth grade! Video lesson included here. 

One of my most popular lessons of all time is this one! BUT don't do what I did: don't make black glue! Instead, follow my demo in the video and go the much easier route of using Elmer's Glue All and black marker. 
Here's a blog post with the finished results. This one is always a crowd pleaser!
Here's another one inspired by the artist Sandra Silberzweig! Video lesson included here. 

Yet another glue and chalk combo! Lesson video here. 

Before tackling their butterfly ceiling tile project, one second grade class created these beauties! A fun project for the end of the school year. 
Looking for a quick chalk project that introduces a contemporary artist? Try this one! 

I have a LOT of videos and blog posts on our annual chalked event but this blog post breaks it all down for you, if interested!

This lesson is fun to show kids how to use stencils with chalk! Full lesson and artist reference included in this blog post (with video!).
Floating chalk prints is ALWAYS a huge hit! And this year, I did it with kindergarten. Independently! You can read the details here. 
Read more »

Sunday, January 26, 2020

In the Art Room: My Favorite Chalk Pastels Projects and Techniques!

Hey, friends! We are currently up to our elbows in chalk projects in my art room and it got me thinking...I should share my Top 12 Chalk Pastel Projects with y'all AND my tips and tricks. I steered clear of chalk for the longest time because of the mess; the lack of understanding how to set the stuff and because the chalk I had on hand for my kids was, well, crap. So I'm gonna debunk all of this chalk nonsense and hopefully help you get excited to bring this beautiful and vibrant medium into your art room. In this post, I'll share my fave projects but if you want even more details, check out this podcast episode:
Sandra Silberzweig Inspired Abstract Portraits I don't often repeat lessons, but this one is a hit year after year. Follow the link to a video that you can share in your art room. 
 Symmetrical Butterfly Project with Second Grade This lesson includes a video! It was a fun project that I did with my second graders and each one was a beauty. 
Claire West Inspired Landscapes with Chalk and Liquid Starch If you've never used liquid starch with chalk before, oh boy, y'all are in for a treat! This hack is magical and I cannot wait for you to give it a go. More details in this blog post. 
Faux Stained Glass Project We did this a few years back and the results were so striking! You can find more details here. 
 Sandra Silberzweig Inspired Fish! I love Sandra Silberzweig and her work as do my students. Anytime I can share her with the kids, you better believe I'm gonna. This project did just that. Video included!
 Crayon Chalk Collaborative Working together, my students created these large pieces that were so fab. You can see all the details here. 
 Fourth Grade Fauve Portraits This project uses the chalk and liquid starch trick and the results are so vibrant. More details here. 
 Desert Landscapes with Third Grade Stencils and chalk go so well together. More details on this fun lesson here. 
 Floating Chalk Prints! Behold! This is the coolest thing you can do with chalk. Don't believe me? Check this link! 
 James Russo Inspired Animals with Chalk and Oil Pastel We're the tigers at my school so this project was just perfect. More here. 
 Glennray Tutor Inspired Marble Project This one was fun and had the kids so excited to work in the third dimension! 
Annual Ceiling Tile Legacy Project! This is a massive undertaking I do every year with second-grade students. They create chalked ceiling tiles that are then placed in the ceiling permanently. How fun is that? More here. 

 photo signature_zpsd10b3273.png
Read more »

Sunday, May 5, 2019

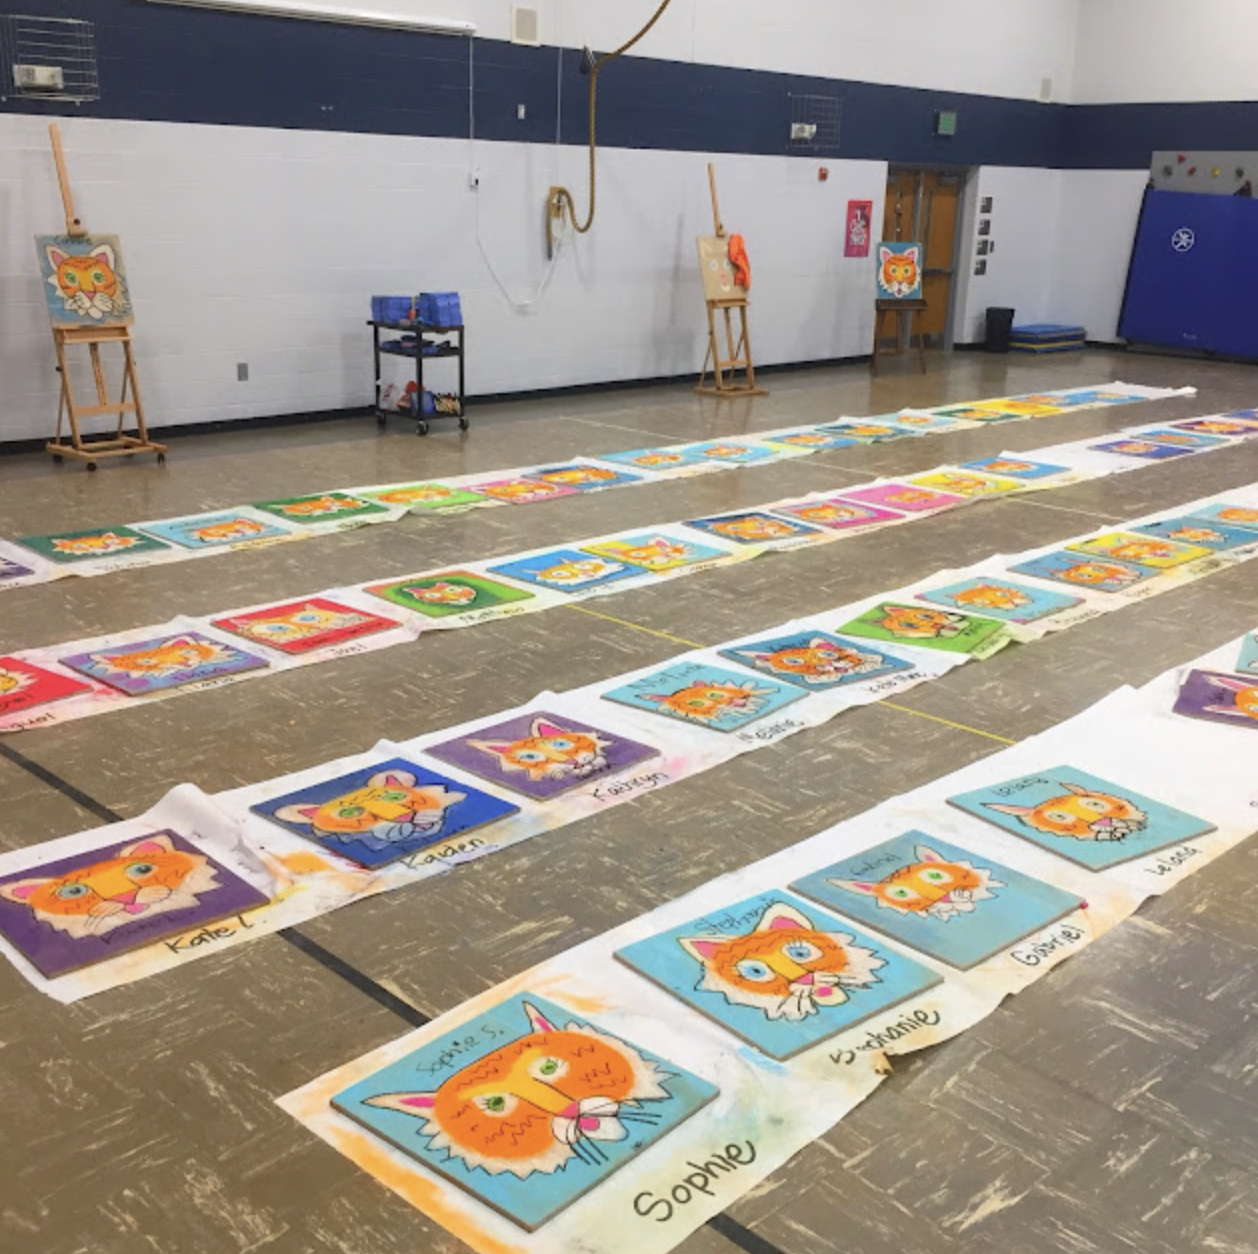
Fifth Annual Chalked Ceiling Tile Event!

This year marks our fifth to do the chalked ceiling tiles with second grade. I can't believe it's been five years...and I'm happy to say that this year's was by far the easiest and least stressful. I guess I've finally learn a thing or two after all these years! 

In case you aren't familiar with this project that we do, it's a legacy piece that my second grade students create on the back side of a ceiling tile. We use chalk and have a different theme each year. This year, we created tigers because we are the Johnson Tigers!

I always get a ton of questions when I share this project on my social media platforms. I thought I'd try and answer them here and also share the last four legacy projects we've created. Be sure and click on the link as many have instructional videos!
Why do you use chalk and not paint? We use chalk because of the history of how we came to doing these tiles. You see, this was an accidental project. Initially, we were going to do a sidewalk chalk project with a visiting artist (more here). But on the day of the event, thunderstorms were predicted. I was at a loss of what we would do until I remembered that my principal had been asking me to have our students decorate ceiling tiles. So I got one and drew on it with the chalk...we had all the chalk prepped and ready for the sidewalk chalk event, so I was determined to use it. The problem was, the chalk didn't work well on the front of the tile. So I flipped it over and, what do you know, it worked perfectly...just like a sidewalk. And that's how the whole thing got started. 
Why do you use the back and not the front? I found the front didn't take to the chalk as well...but the back is perfect. There are numbers on the back but the chalk covers it up.
What brand of chalk do you use? Doesn't it get everywhere? I really like Faber-Castell chalk and Sargent chalk. We do a lot of coloring with the side of the chalk, not holding it like a crayon. This helps fill in large spaces. These two brands make very vibrant chalk colors. Yes, it's super messy...especially since we work on the floor. I tell the kids to wear their play clothes and come ready to make a mess. But, honestly, look at that floor! It's not even that bad. Having a paper banner under their work really helps.
So...how does this work? How do you teach this? On the day of the event, I have all of my second grade classes come to the multipurpose room. I lead all of then in this activity. I don't ask for additional help or teachers to be in the room...I'm kind of a solo act. This year, I did things in a way that I think worked the best: I had my classes all in rows, by class. Each had an assigned spot to cut down on any behavioral issues. Then I lead them, guided drawing style, in the creation of their own unique tiger. It took us an hour and a half. I happened to have a plan period so this worked out well and my other classes still had their art time.
How do you seal the chalked piece when it's finished? I just use hairspray. Yes, some of the chalk smears when it's placed in the ceiling...but not enough to tell. 
Do you do a different theme for the chalked drawing every year? If so, how do you decide what to do? Yes, I do a different theme. It's sometimes based on what the kids are learning about (butterflies) or I also take requests. For example, the cafeteria manager wanted healthy foods, so last year we created fruit tiles. This year, we did tigers as that's our mascot. 
What will you do when you run out of ceiling space? Retire.

Below is a sampling of what the kids have created over the last 5 years...the links have videos too, including clips of the set up and kids working if you are interested.
But first, I thought I'd take you down memory lane so you can see all the tiles my students have created over the years. Let's start with the very first one, which you can read all about here
The second year, we created these flowers. For this demo, I created a video. You can see how I went about doing this lesson with four classes in previous years here. 
Our third year, we created these geometric patterned fish! Prior to this, we did a lesson inspired by Sandra Silberzweig and created these fun black glue and chalk fish
Last year, we did fruit! These are in our cafeteria and I just love them. More details here!
Let me tell you this: it's a bit of prep, a lot of chalk dust, a crazy mob of children...BUT WORTH IT! The big undertakings always are, right? 

 photo signature_zpsd10b3273.png
Read more »