Showing posts with label art blog. Show all posts

Sunday, April 27, 2014

What the Art Teacher Wore #97 and Last Call for the Best Dressed Contest!

Feelin' Frida-ish Monday: I have a coupla after school art clubs, in those small groups, we have the most enlightening convos. One girl asked, "We learn about men artists a lot. Aren't there any girl artists?" I had already been thinking about how I'd like to introduce more contemporary artists next year (this guy does it all the time and has me inspired) but now I know that more female artists need to be thrown into the mix. So! What contemporary/female artists do you introduce in your art room? dress: thrift store; necklaces: Forever39, ahem, 21; belt: Anthropologie; tights: Target; boots: Seychelles 
I don't know what life is like on your end of the world but I'm sure it's crazy-busy. Especially if you are a teacher. End-of-the-school-year projects to wrap up, mountains of artwork to sort for our school-wide art show, let's-get-rid-of-this-stuff spring cleaning, the list grows by the day. So this week, I thought I'd share with you just some of the things we've been working on in the art room. Complete lessons on this here blog to come, but for now, you'll have to savor these sneak-peaks.

AND, just so's ya know, Wednesday, April 30th is the LAST CALL FOR THE BEST DRESSED ART TEACHER CONTEST! Yes, I'm shouting at you, that's how excited I am! So many of you awesome art teachers have sent me snaps that left me rolling in laughter (which is a good thing, I swear! Ya'll are the best!). 

What's the Best Dressed Art Teacher Contest, you ask? 
Well, here's the details:

Nominate yourself or an art teacher buddy!

Simply send an email to me at cassieart75@gmail.com with a photo of your best artsy look. High resolution photos preferred, please.

 Please include a short bio about the art teacher and what inspired the look.

Photos and bio will be shared on this blog on April 30th.

Open voting on this blog will end on May 5th and the winner will be announced May 7th!

The winner will receive a magical prize along with an interview on this blog.

So! what are you waiting for? Shoot me an email, you crazy art teacher, you!
So if I'm not found Buried Alive under the 400+ clay projects that the kids have created over the last coupla weeks, it'll be a miracle. These clay stars were created a couple months back. Our original intent was to glaze them and "sell" them back to our parents with the proceeds going to charity. However, due to some personal stuff, that had to get placed on the back burner. But now we're back! And I just knew I'd never be able to get 400+ stars glazed and fired along with all those projects. So I lurked the interwebs for a possible solution and saw something about coloring clay projects with crayons...(well, construction paper crayons were recommended but, in the state that my room is currently in, there was no finding mine)...

We painted over them with watercolor paint (I asked that the kids pick just one color, por favor) and viola! Colorful and completed in a snap! More details about these stars and how they were created in an upcoming post.
Bump-It Up Tuesday: So I had a hair appointment after school on Tuesday (not that you'd ever be able to tell I got my hair cut. I'm such a chicken, I always just get a couple inches taken off. So boring!). Once seated in the hair-cuttin-hot-seat, I proceeded to unravel the following from my 'do: 11 Bobby Pins, 2 Pink Bows and 1 Extra Large Bumpit. My hair dressers reaction, after regaining her thoughts, "Ohmigawd, IS THAT A BUMPIT?!" I live in the South, ya'll! It's Big Hair or Die! shoes, sweater and top: thrift store; skirt and belt: Pin Up Girl Clothing 
Speaking of clay projects...my 3rd graders created these Chinese-inspired clay dragons. Ya'll, this project was such a hit! I would easily do this again with all grade levels. The creativity was off the chain crazy! I can't wait for them to glaze them so I can share the easy-peasy lesson with you. 

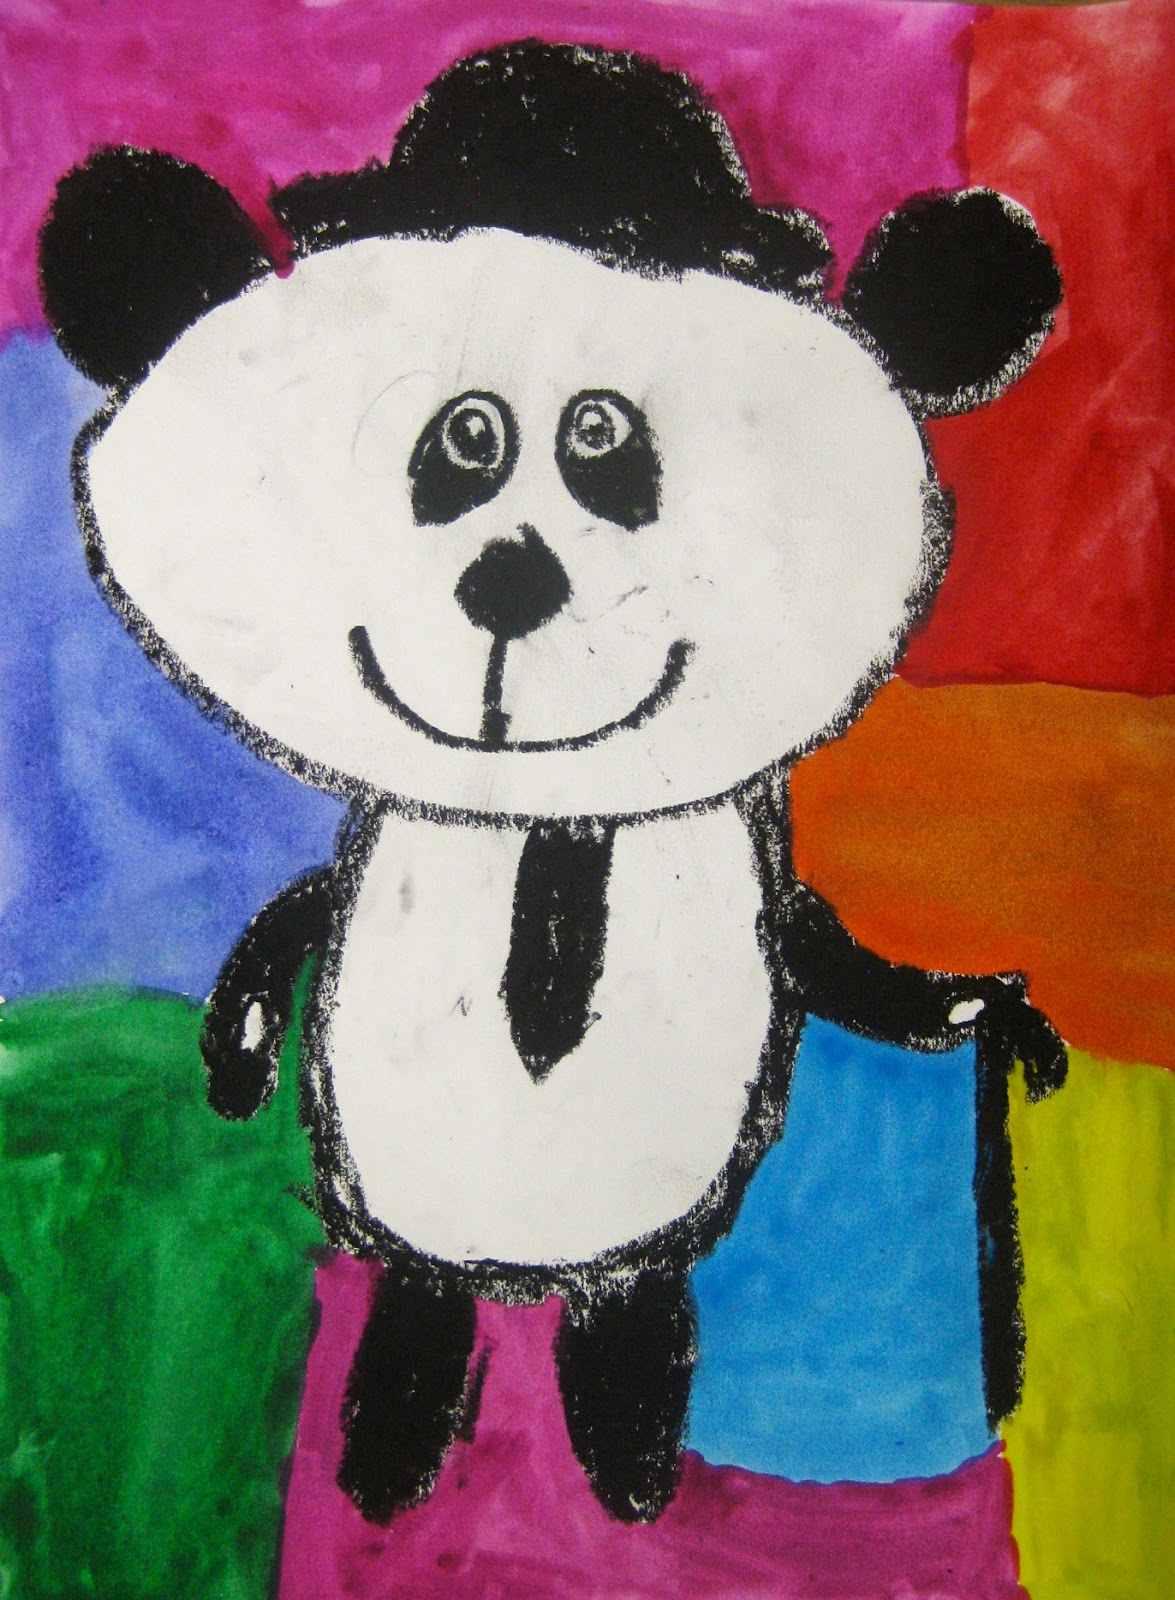
Some of my 4th grade students created Panda's with Personality (oh boy, ya'll. Do they ever have personality!) while another group created Asian elephants inspired by the painted elephants in India. Many added jewelry, fabric and flowers to their elephants. I have a feeling these are going to be the most colorful elephants ever.
So Stinkin' Tired Wednesday: Seriously. The end of the school year is near...and my work load only builds as I'm sure yours does as well. This photo was the only one I managed NOT to be yawning my head off in. dress: vintage, thrifted; tights: Target; shoes: Dolls by Nina
After finishing off our clay projects, We Returned to Our Normally Scheduled Program, Already in Progress (said in that officially dorky voice). Which means my 4th graders added either bamboo, cherry blossom trees or pine trees to their large (12" X 18") watercolor painted backgrounds. Lesson to come, promise!

What is Wrong with You, Thursday?!: Wow, this outfit was a let down to the folks, both big and small, in my school! The 4th grade decided that they had never seen me in "short shoes" (um, I'm guessing that means flats?!) and my librarian buddy dubbed this a "too normal" of an outfit. Humph! Time to get outta these Short Shoes and step up my Non-Normal game, I guess! top: Target; skirt: vintage, etsy; shoes: gift; headband: made by me; necklace: The Paper Source
Meanwhile, in 3rd grade, we excitedly finished these Ming vase inspired still lives. We spent a long time on this project but learned so much...I'll be sharing this lesson later this week. Stay tuned, ya'll!

Hittin' the Town, Friday: Almost everyday after school, there's something going on. Whether it's an art club or meeting up with buddies, I'm always running. I had decided that, with art show approaching, I should spend more after school time in my art room...but I just can't! Not with buddies that I need to chat and shop with. Tamara, thank you for snapping this photo at my happy place -- Anthropologie (where I walked out with a not-at-all-necessary $298 dress for $26, eeee!). dress: made by me (go here for the craziest food-processing-foot-cutting story everrr
My 1st grade friends made clay koi fish...and while those dry, they are creating these koinobori (Japanese for Carp Kite) for May 5th which is Children's Day in Japan.

I actually picked up these die-cut paper fish years ago through Roylco and never got around to having the kids create them. This time it worked to be the perfect tie-in, as well as a super short project while our clay drys out. I'll share with you more about this project soon. Ah! So much to share with ya's!


Read more »

Tuesday, April 22, 2014

DIY: Felting a Dress is a Scream!

So the other day, a maintenance dude was in my art room installing what appears to be The World's Largest Flat Screen T.V. (seriously, ya'll. What am I gonna do with this thing, shop on QVC whilst the kids are art-makin'? Hey...wait a minute...). Annnyway, we got to chatting and dude tells me a story about his high school art teacher that is so deliciously demented, I just have to share it with ya. Apparently, this art teacher salvaged her daughter's hair after a hair cut and, wait for it, knitted it into a sweater.

[I'll pause here until you finish with the dry heaves.]

But wait, there's more! Dude then proceeds to tell me that whenever you were working on your masterpiece, the art teacher, forever in her Hairy Hoodie, would lean over to offer advice and, when doing so, the hairs would tickle your face. 

[Again, I pause. Heave away.] 


"Because all art teachers are weird, you know," said that formerly tickled and tormented soul. "Even you!" Mind you, I just met this guy and he's already got me (accurately) pegged.

Why tell you this story? Because I remembered it when I was felting hairs into this dress. Not human hair, mind you, but that of some colorful sheeps and, well, maybe a rogue cat hair or twenty.

And I'm left with the thought: Will my sweet art-lovin' students tell stories of their Hairy-Dress art teacher?!
I scream at the thought.
According to my calculations, there here is my 12th Hairy, er, Needle Felted Creation. For my latest felted -n- foxy masterpiece, follow this linky-loo which will lead you down a rabbit hole of cheeseball needle-felting tutorials and a look-see of my Needle Felted Projects of the Past.

With that outta the way, let's chat about this here Munch-inspired Scream dress, ermkay? I gave ya'll a look-see (as well as a brief history of el Munch-o) in this What I Wore post. I've had my mind set on creating a Scream dress since my Adventures in Making an Artist-A-Month Dress began. And I've had my eye on this years-old (and slightly ruined from a formerly failed DIY) dress as the perfect canvas for this Scream-tastic adventure. I began by drawing my design out in chalk as it's easy to erase with an elbow or completely rid of with a toss in the wash.
Way back in January, when hubs and I took to the Smoky Mountains for some adventuring, I stumbled upon a knitting/weaving/felting shop that had this amazing felt roving. When I saw it, I immediately knew it'd be perfect for The Scream and scooped it up for a mere $14, ya'll. I thought the mix of colors would save me a lotta labor layering colors...which I spent a lot of time doing in this piece.
And in 30 minutes, I had a wee bit of sky in place.
Many more than 30 minutes later, I had made some progress...however, it's become apparent to me that I need to size-up on my needle felting tool as that little bitty pencil-sized thing takes For.Eve.Rrrr.
However, I was determined to finish this super hairy beast. So I strapped on my headphones, jammed out to some rando tunes (I ran the musical gamut from Mazzy Star to Siouxsie and the Banshees and some Lily Allen. I tole you, rando) and worked until the loopeyness set in...

At which point hubs came in to check on me (I wasn't responding to his hollerin' due to said headphone/jam-out sessions). He brought Ashie with him who we promptly styled with a rogue piece of roving. Question: Do you prefer the Conan O'Kitty on the left or the Cat-Faux-Hawk on the right? Let's be honest, this cat looks good in any random roving we put on her head.

When the dress was finally complete, it seriously weighed a ton. I totes wasn't  expecting it to be so hot and heavy, heehee. Ahem. To smash down the roving (and lock the fibers into place), I flipped the dress inside out, as seen, and ironed the crap outta it on the steamiest setting available.
This helped flatten the otherwise lumpy and bumpy look to the dress. Which is never appealing.
By the way, I saved the Scream-y face for last. I was certain I was going to mess it up. And that's like the most important part. Mess that up and you lose the image entirely.
And I did struggle with it a bit. Originally, I created the hallows of the eyes in brown. However, that appeared much darker than is seen on the original. So I toned down the hallows with a very fine veil of peach roving. This worked to push the eye sockets back a pinch and made it so the pupils could come forward. It was a happy accident and I'm excited that I discovered a fun way to play with value whilst felting.
Of course, no post about The Scream would be complete without a dorky attempt at The Scream. I had to channel my inner Home Alone/Macaulay Culkin. My sincerest apologies.

And there you have it! One felted The Scream dress that's hairy-feltedness is sure to tickle the face of some poor student who will live to tell about it to generations to come. And by "generations" I mean their many therapists.

Until next time, I hope your week is a Scream, ya'll!


Read more »

Wednesday, April 2, 2014

In the Art Room: A Guest Post While I'm Away!

Hey guys! Just back from the NAEA conference in San Diego...and attempting to recover from that awesome experience! I'll be back with you soon with plenty of photos and stories from this past weekend but until then, please enjoy this post written by fellow art teacher buddy Faigie!

I am so thrilled to be filling in for Cassie while she has a great time in San Diego. 
I like to bill myself as the art teacher with no art background.
I do have a Masters in Early Childhood Education and have always been extremely involved in the progressive art part of early ed, and have even given workshops to teach teachers how to incorporate good art into their classrooms.
It was only this year however,  that I became a bona fide art teacher, teaching in a new private school that only goes up to first grade so far.
Even though I have a passion for kids and their art, I've always  particularly loved collage. I really see how with a little bit of direction and some suggestive materials collage brings out the best of children's creativity.
This year I only have the first grade and Kindergarten and usually try to do different activities with them.
For this activity however, I decided to give both of them collage. For the first grade  I added a bit of a twist.
I cut out some basic shapes using the large shaped hole punchers to get nice round circles. I also decided to add some hexagons for interest. 


When the children came in I sat them down and held up each shape individually. We discussed what each of those shapes made them think of.
I wanted them to go to the table thinking and to  create "something",  not just a design.
It's obvious from their work that they really did try to use their pieces as part of a larger picture.
I also added their own descriptions of their pictures to their artwork which I find really adds dimension.


Some of course made one larger picture while others made a few smaller objects on their papers.
Then came the first graders.
When they came in I went through the same discussion that I had had with the Kindergarteners but, I added one thing.
I had found a bunch of patterned papers that I had with my art stuff and I told them that they had to pick out a piece of a pattern from one of the papers and incorporate it into their collages.

I found that many of the children got their ideas from their pieces they cut out and built on their artwork from there (which was the idea).
The one below was a squirrel trying to get an acorn from a tree.

 In this one, the little girl wrote her own description of what was going on in her picture. 

One of the things I love so much about collage is that there is so much variety that can be added to each collage activity that only allows for more and more creativity. There are also many levels of sophistication in many of them and I know this can be done with all ages.
And now for my disclaimer:
I can never compete with Cassie's wardrobe  and I don't intend to.
HOWEVER, I didn't think it would be nice to finish off a post on her blog without showing you a picture of what THIS art teacher wore (or wears).
So here is my picture below of what I wear (or change into) in EVERY art class.

Faigie Kobre is a new  art teacher in a fledgling private school . She also gives art classes in her home. She runs a blog called EduArt 4 Kids teaching parents and teachers how to give their kids  great art that will help them think. She believes that everyone  can and should do art. She has a FREE report that you can get  now called "The REAL reason most people can't draw a straight line, plus 5 tips to make sure your child will". Even if you are a real artist, a distinction that she does not claim to have, you will find it interesting and may even help you help the parents of your students.
Read more »

Friday, March 28, 2014

In the Art Room: Where the Party Pandas At?

Hey, Kids! I interrupt this post to let you know I'm at the NAEA convention in San Diego! I'd love to see you and have some dates and times we can meet up. Follow this linky-loo and I'll see you there!

Wuz up, Party Pandas, er, People?

I recently had to take a coupla days off and needed some quick -n- easy sub plans. From past experience, I know not to leave out our current projects for a coupla reasons: 

1. It freaks out the "I'M NOT AN ART TEACHER!" sub who seems to think my plans are written in hieroglyphs (which they usually are because I like pictures). Upon my return, I either get the stink eye from 'em which translates to "what in the world did you put me through?! It was like reading the no-words instructions from Ikea!" or the furrowed eyebrow/twitchy-eye face which means "I tried to explain what a "landscape collage" was but we couldn't figure it out. So we resorted to glue eating and sharpie sniffing. And it was AWESOME!" 

2. Because the kids, fully aware that their sub is NOT AN ART TEACHER! and, therefore, easy prey, pretend that they have no idea what the sub is talking about. From there, they use their kid-manipulation tactics to convince el subbo that it's perfectly normal to color our hands in marker and stamp it on their face. Like a Kid-Manipulatin'-the-Sub Boss.


Knowing this, and knowing I needed some sub plans for all grades in a pinch, I decided to leave some  step-by-step panda drawing instructions for the NOT AN ART TEACHER! sub. And, I'm excited to say, everyone loved it. 
I have no idea. Bob? Who are you and why are my 4th graders obsessed with you and mustaches? I can only imagine you are some curly-mustached hipster. In skinny jeans. Which should be banned form the dudes' clothing department. But I digress.

Why a panda, you ask? (okay, so you didn't ask but Ima gonna tell you anyway). Well, my students are currently learning about Asia and our panda friends reside in China. We're gearing up for a clay project/fundraiser (we want to help those pandas!) and I thought this would be a super fun way to get the kids in the mood. 
In my sub notes, I asked the sub to follow my routine of having the children gather on the floor. From there, I asked the sub to talk through and demonstrate drawing a panda with the children. These directions were big enough for the children to see once at their seats. However, just in case they needed a closer view, I did make photos copies of the same directions and had them ready on the tables.

I'm happy to say that each of my subs drew a panda...and was actually thrilled by their own artistic skills! Several left their drawings out for me to admire and hang on my fridge.
Just a couple of reminders from who the students and I have dubbed "Señor Roy G. Biv". The children were given only ONE SHEET of paper (make it work, kids! Tim Gunn's watching!) and a black oil pastel. This can be a bit dangerous as those oil pastels can get everywhere (I had one kindergartener unknowingly rubbed his chin and a buddy said, "you look like a hobo!") but I left out oodles of baby wipes and a warning of the danger of smears.
Since the kids were only given one sheet of paper (anyone else cringe at the sound of a paper being crumbled?! "Why you wanna be a tree killer, kids?!"), you can see this student practiced a couple of different ideas before giving it a-go on the front.

Now, one of the reasons I had a sub is because I'd taken my fourth grade on a field trip! When we returned from our trip, I had, like, 10 minutes before my classes started pouring. Since they had drawn the pandas the previous day, I simply had a coupla kids get watercolor paints on the tables and we were good to paint our pandas!

We chatted about a couple different methods for painting our panda backgrounds. My art teacher BFF's (hiya, Mallory!) has recently been doing this patchy wet-on-wet painting process with her students. You can see this in several of the pandas above. To do this, you paint a very small patch of color on your paper. I explain to the kids that a wash is a color light in value. From there, I show them  the wet-on-wet technique of adding those dots of color and watching the dots grow.

These paintings were completed by my fourth grade students. We've actually been doing a lot of watercolor painting lately so they are kind of experts. Many opted out of the wet-on-wet and did their own thing. Which is awesome. For more details on the kind of watercolor paint I use...and the specifics of how I teach those kids not to grind their brushes into their paper, go here.
And there you have it! I hope you'll give these Party Pandas a go...and if you do, please email me some photos, I'd love to see them!
Read more »