Showing posts with label art blog. Show all posts

Sunday, September 6, 2015

What the Art Teacher Wore #147

 A Purple-ish Monday: So, thanks to our fab-o kindergarten teachers, we're still dressing in colors! Monday was purple day and, as it turns out, I must not like purple because there is next to nuthin of it in my closet. Which is really saying something because my closet, as you mightah guessed, is jam-packed with clothes. So this lil purplish ensemble was as close as I could get! dress: vintage, Buffalo Exchange; headscarf: vintage, thrifted; shoes: my new favorite! Minnetonka

I hope all y'all are having a wondrous three day weekend! Just so you know, when I become Princess Cassie, Ruler of the Universe and BEYOND, I will make three day weekends the law. No longer will poor ole Monday be that dreaded day of the week. In fact, I'll have it's name changed to Mon-YAY! and change Tuesday to "Tuesday, You Suck!" It's a working name. Don't judge. 

In other news, since this is a What the Art Teacher Wore post, lemme tell you what happened to me on Monday. As I was putting my students on the bus, one fourth grade girl stopped, looked me up and down and said:

"Mrs. Stephens, I have art tomorrow. Can you try and wear something more crazy?" 

Me, stunned: "What's wrong with this?!" with a flourish of my hand going from my purple-bowed head down to my hot pink moccasin-ed toes. 

"Eh. It's just kind of, you know, bor-ing."

Y'all. My critics are not foolin' around. You better believe I did it up right on Tuesday. 

Speaking of doing it up right, my email inbox has been BURSTING with photos of the World's Best Dressed Art Teachers! The What the Art Teacher Wore/Back to Art Teacherin' Contest goes live on the blog this coming Tuesday. That means if you wanna see your sweet face here (and possibly in School Arts Magazine!), email me some snaps at cassieart75@gmail.com. Be sure to check back here on Tuesday and cast your vote for the best dressed! 
 Just a couple of sweet snaps of my first grade friends for y'all this week. I can't wait to share their masterpieces with you! All of my students are currently "in the jungle" and learning about the work of Henri Rousseau. If you follow me here, you've seen quite a few of  their pieces. I'll share the complete lessons here in the next couple of weeks so stay tuned! 
 Lovin' the focus on this sweet boy's face! Now that my firsties have finished their works, they are creating a jungle mural to place their artwork in. My plan is to have that up by open house. Cross those fingers for me, would ya?
 Bust Out the Brown Tuesday: I seriously think I just grabbed anything brown and threw it on that morning. I had that vintage skirt in my etsy shop for a hot minute before I decided I loved it too much to sell off. sweater, belt and blouse: vintage, thrifted; skirt: vintage, Buffalo Exchange; shoes: Minnetonka; sweater clip: etsy
 A Colorful Way to Wear Black Wednesday: I didn't wanna wear head to toe black cuz, ya know, I already did the "alternative" thang in high school so I'm over it. Isn't funny how what we called "alternative" has gone threw so many name changes? There was goth then emo and now, what do they call those all-black-wearin' kids? Hipsters? Goth-Hipsters? Gothsters? Yes! That's it! dress: Modcloth; polymer necklace: Charleston; shoes: Swedish Has-beens, Anthro; Rainbow Brite belt: Buffalo Exchange
 White Day is Not a Good Day in the Art Room: Yeah, so who guessed that wearing this all white number was gonna end badly? I didn't even realize it did until I got home, took it off and noticed I had green paint splotches on the butt of my dress. I'm guessing I sat in something fun-n-funky. Good times. dress: Anthro
 Fave Color Friday: C'mon. I'm the art teacher! I can't pick one FAVE color, I love 'em all! And, let's be real, they all look SO GOOD TOGETHER, right?! You don't have to answer that. top and skirt: thrifted; bow tie and suspenders: gift from my bro; belt and crinoline: Amazon; shoes: Minnetonka

 photo signature_zpsd10b3273.png
Read more »

Tuesday, August 25, 2015

DIY: Printmaking Made Easy

I mightah told y'all that when I was a kid, I was addicted to attending Vacation Bible Schools. I didn't care what the denomination, all I needed to know was: Will there be Barrel Drink and will there be Macaroni Art? 
The school I attended didn't have art class so my only experience in arts -n- craftin' came in the form of a lil Bible learning and a whole lotta popsicle stick art (you shoulda seen my popsicle stick Noah's Arc, y'all. Best o' Show.) As an adult (if that's what you wanna call me), this translates into me being addicted to taking art classes around town. Luckily for me, our local art museum The Frist always has the best of offerings...even if they forgot to serve Barrel Drank. 
The Frist doesn't have a permanent collection and I think that's pure genius because it means no stale art that's been hanging for years. It's an ever-changing canvas of art history, culture and contemporary art that keeps locals like me coming back. One exhibit they currently have is the work of Jaume Plensa (that's his surreal sculpture there) whose work is phe-nom-in-alll. 

The last class I took at The Frist was the awesome hat making workshop where I made my donut hat! And I'm excited that I'll be leading a workshop at The Frist on needle felting soon. But enough about that, let's talk about these two wild -n- crazy guyzzz: 
Meet Nieves Uhl and Chris Cheney, owners of the letterpress and design studio Sawtooth Print Shop! Both met at Hatch Print Show and opened their place about three years ago. Not only do they offer their design services and prints but they also offer classes (guess who is dying to sign up for that?! GUESS). Sadly, as you can tell by the photo above, they are both entirely too serious to be any ounce of fun. 

Bwaha, I kid! I loved 'em so! I mean, how could I not when what comes out of their studio are masterpieces like this: 
You better believe I whipped out my credit card and purchased this beauty. It now hangs proudly in the Masterpiece Gallery in the art room!
 So Chris and Nieves carve on linoleum blocks. Which is pretty hard to do for us newbies. So we worked on Softoleum which was like carving in butter. We began by copying our design onto our blocks. 
Graphite paper worked well for this but several attendants found that simply rubbing the back of our pencil design very firmly easily copied the design onto our surface. Who knew? Well, apparently several folks did. One of them NOT being me. 
I didn't take printmaking in college (a regret. One of the many.) so my only experience was a woodblock carving print-stint in high school. Which sucked. Wood carving is for beavers, y'all. But this stuff I loved because of the easy which you could carve into it. Not to mention that if you don't carve too deep can you flip it over and carve on the backside! So filling up my virtual shopping cart with these bad boys. 
I'm on this Tiki kick. So that was my inspo. I'm dying to print these Tiki blocks onto the bottom of a dress or a skirt kinda like I did here one million years ago. 
Tho, I gotta tell ya, I'm not as in love with this block. Hence the reason my virtual shopping cart is loaded down with s'more blocks. 
I did treat my paper before printing. Instead of using white paper, I rolled a lil gold and a lil blue onto several sheets before printing my blocks. 
I wanna host a Tiki Party just so's I can send these out as invites! But what does one DO at a Tiki Party? Aside from drink fancy barrel drinks with umbrellas? 
I attended this class with a coupla art teacherin' buddies who made the cutest of prints! Check out my friend Virginia's portrait of her dog and my buddy David's Mickey-inspired print as well as his sailor-themed print of his last name. I have smart artsy friends, y'all. 
But, seriously, what made the class so special was our awesome host Rosemary Brunton and our instructors Nieves and Chris! Can't wait til the next class, I'm already signed up (um. Actually, I think it's my class. So, never mind)!
 photo signature_zpsd10b3273.png
Read more »

Tuesday, August 11, 2015

In the Art Room: First Day(s) of Art!

Hello, cats and kittens and welcome to the very first day(s) of art! It's been a wild -n- crazy week so far and, y'all, IT'S ONLY TUESDAY. Which means we're having fun, right?! Well, somebody is, anyway. Glue sniffing will do that to a gal. 
For the last couple of years, I've shared with you what my first day(s) of art class look like (go here and here for that, y'all) . I keep saying "day(s)" because my schedule is a lil different than the rest of the art teacherin' universe (I ain't complainin', I'm just sayin'). I see my first and second graders for 30 minutes, twice a week; my third and fourths for 60 minutes, once a week and kindergartentown (who don't start until next week) for 40 minutes, once a week. So! What I've got for you today is what I teach the youngers over the course of two classes and the olders in one class. Make sense? 

Before we get started, lemme just tell you a couple of things I decided at the start of this school year:

* My room doesn't have to be perfect but it does have to be functional on the first day. Y'all, I used to spend entire summers in my art room. Rearranging. Organizing. Making visuals. It was exhausting, time-consuming and I never gave myself a break! This year, I seriously spent a handful of days in my room preparing. I always redecorate my room with a theme (see my Paris-inspired art room and my Asian-themed art room) but this year, I've only just begun updating my decor. Mostly because I knew I didn't need it at the start of the year and I was enjoying every last drop of my summer!

* Introduce the art room, routines and other new stuffs gradually. I used to try to cram in everything in the first couple of art classes. What do you think the kid's first impression of art class was? Rules, Do's and Don't's, Procedures and Zzzzzz-snoozefest. I think that whole deal is flawed. The kids only hear about the first two minutes of whatever it is you are talking about anyway. You go over one million boring-ish things with them all at once and you've lost them! I want their first impression of art class to be a fun one so we are covering those necessary things in baby bites, over several art classes. And doing some fun stuff everyday, like painting on the first day of art class!
So, speaking of talking too much, here's a clip of me talking too much TO YOU about what goes down that first day. I go into more detail about what you see here in the post...but if you have any questions, you can find me in the comments, y'all. 
Those flash cards I mentioned? They say: inspire, art, artist, create, creative, imagine, unique, etc. All words that describe the kids, art class and what artists do! My first thru fourth grade students read these at the door. For kindergarten, I show them shape flash cards. More in this vocab blog post. 
This is the view of my art room from the doorway. This is what the students see when they enter my room. The "teacher chair" is on the right and the other students are to sit on the floor in rows in front of the "teacher" (the quotes are cuz the teacher is a student I picked at the door to both monitor student behavior and play the game "see, think or wonder".)
Here's what the kids seated on the floor see. A view of my giant telly with an image from our Artist Inspiration, Henri Rousseau. When I am finished quizzing the kids at the door, I ask the "teacher" who was the best behaved boy and girl. Those two kids will get to be the host of our end-of-art-class game The Smartest Artist
At this point, I take over and introduce our Word of the Week. What the kids don't know is that I am secretly introducing them to our art class routines as we do this each and every art class! Whenever they hear the WoW, they are to "whoop! whoop" which is one part annoying and two parts fun, depending on your mood.
After talking about our WoW and our Artist Inspiration, I (re)introduce my students to Jes, our mascot/traveling tiger! I made a Jes a couple of years ago (details here) and he traveled around the world like Flat Stanely. It was so fun, the kids loved it...and then the poor dude was shipped to China never to be seen or heard from again (in my imagination, he took a turn to Bangkok and decided it was so fun he never wanted to leave!). So I made a new one and the kids are so excited to send him packing. I'll keep you posted on how that goes as I'm going to need your help!
Then we made a list of all the places we thought Jes should go!
After a quick stretch, we talked about rules. Oh, rules. Double snooze. But we made ours all sorts of wild and crazy which I think I explained in el video. So, we'll just leave it at that!
 We have a new incentive this year with a sticker chart! I've never EVER done a sticker chart, y'all. I'm seriously the most unorganized and inconsistent person you will ever meet in your life. However, I juuuuust might be able to do this one. All the special area folk in my school are on board so we are hoping to do it together. The kids have the chance to earn two stickers by following the two thoughts above. 
At the end of a quarter, whatever grade level class has the most stickers is rewarded with (a super cheap/easy) party! Like a 5 minute dance party at the end of class, popcorn party(tho we have so many allergies, y'all. It might have to be peanut-free/glutenless/flavorless/why-bother-living candy of some sort), you get the idea. Who else does this? Has it worked for you? TEACH ME YOUR MAGICAL WAYZZZZ.
At this point, I wanna hear the kids talk because I'm tired of hearing myself. So I call roll. The kids are to respond with a "Hello, Mrs. Stephens" (which helps the newbies learn my name, to hear it said 20 other times!) and then I ask them a silly question like those seen above. Yesterday, I asked one boy, who was new, when his birthday was and he replied "Today!" So, OF COURSE we had to stop, drop and sing Happy Birthday. The kids love these questions because they are random and ridiculous. Which is always a good time, says me.
 Oh, lookie! I can's! I changed up how I post these and I'm really digging it. Let's zoom in, shall we?
 Big, simple, kid-friendly and with visuals! Thanks, Dollar Tree.
This will also help the kids know what supplies to gather for art projects of the day.
So this was the beginning-of-the-school year decorating that I did which I felt was necessary for that very first day. The cute stuff will come later. And when it does, room tour
Another new thing for us this year, the Look What I Learned Today board! I call on three kids to tell me one thing and jot it down. While I do, the kids do their "ooguh, ooguh, OOOOGUHHH" chat. It's fun to see what sticks with them! 
Our wrap up game at the end of class is The Smartest Artist. The Masterpiece Gallery is for the fun art the kids like to bring in to share. 
 Now, for the younger kids, that was the end of art class on day one. But for the olders, the fun was just starting. I told them their table assignments, sent them shopping at the store, had them drop their supplies off at their seats and meet me at my new demo table (seen in the center). After a quick texture painting and printing demo, the kids set to work!
This year, at Tennessee Arts Academy, the super awesome Laura Lohmann of Painted Paper, talked just about everyone into painting with our students on the first day of art. So we did! 
With a limited palette of yellow, blue, turquoise and white, we painted and mono-printed as many papers as we could until it was time to clean up.
We now have a huge stack of these beauties to use for our upcoming jungle-themed projects! Henri Rousseau, eat your heart out...
 So much happiness.
And a beautiful mess at the end of the day! I can't wait to share with you what we do with our papers but that will just have to wait. Mama needs to soak these feets! 

 photo signature_zpsd10b3273.png

Read more »

Saturday, July 4, 2015

DIY: Artsy Sew Along 1, Pattern Cutting/Pocket Making

 
Super cute sewing fabric from fabric.com.

Hey, my stitches! I hope all y'all are doing swell and, if you are stateside, having a lovely holiday weekend! It's been a rainy one here so I doubt there will be much of a fireworks-y celebration in my neck o' the woods. To that I say, c'est la vie and pass me my cuttin' scissors. I've got a skirt to stitch!
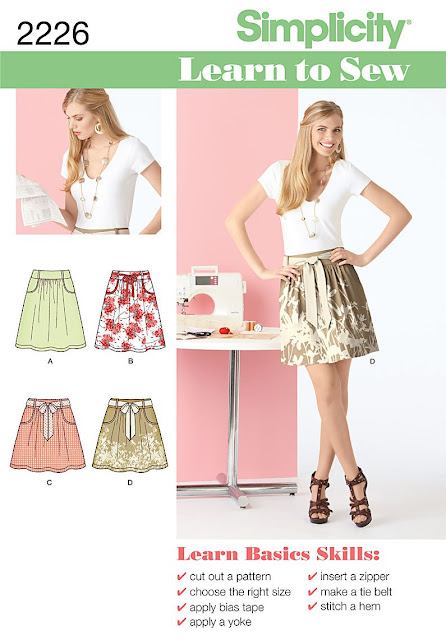
The pattern we're using: Simplicity #2226.

If y'all have joined the Artsy Sew Along, hurray! I'd love to see the fabric you are stitching with. Please post away on that page or share on Instagram #artsysewalong. Since many of you have mentioned that you are new to garment sewing, I thought some videos might be of some help to y'all. Granted, these are my videos, so take my tips and tricks with a big ole grain of salt. In fact, invest in a salt lick, ermkay? 

 In this post, I'll chat with y'all about:
* How to prepare your fabric and your pattern pieces for cutting.
* Just how to go about cutting your fabric properly and making sure to get all of your markings correct.
* How to stitch those super cute pockets onto the skirt!
If all goes well, this post should help you get this far! You'll notice I opted for a contrasting fabric for the pockets...y'all know me, I'm totes tacky and love to play with patterns. By the way, I'll also be throwing in some of my fave sewing fabrics with links for some sewing-inspo in this here post! 
This clip is all about preparing your fabric and your pattern. It's super important to read through all the pre-stitching notes in your pattern as they are chuck full of sound advice. Don't just listen to this clip featuring my lovely voice. Which, by the way, sounds like angels singing. While chewing on broken glass.
Just incase you missed my clip about finding your correct size according to the pattern envelope, here you go!
I love the colors in these prints. Rulers and spools
 
If you're new to sewing then I know how overwhelming those pattern pieces can be. Lemme help ya navigate that territory, kay?
 I really enjoyed this beginning process of skirt making. I love when a project is simple and gives immediate results: yay, pockets! If you have any probs at all, please drop me a line in the comments, on the Artsy Sew Along page or on my Instagram (where I've been annoyingly popping up photos of the skirt progress).
Now, I will say, that I've been reading what some other sewists have said about this pattern and I'm a lil concerned. Many have mentioned that the waistband is too big. What I plan to do is create a muslin of the waistband (this is practice sewing, following the same pattern, but with inexpensive fabrics). This way I can do a little trouble shooting for y'all. I hope to be back with the second portion of stitching -- adding that waistband -- soon. 

Until then, be sure to share what you're up to and drop me a line about your progress, y'all! 
 photo signature_zpsd10b3273.png
Read more »