Showing posts with label art lesson. Show all posts

Monday, May 6, 2013

In the Art Room: Royal First Graders

 Well hello there, your majesties! Long time, no bloggie'ness. I know you might have been expecting some Parisian photo-heavy post but, to be honest, I'm kinda overwhelmed by just the thought of downloading all two million of the photos that I snapped. And that was of the Eiffel Tower alone! So you're gonna have to wait for the European Vacation Slide Show and check out these amazing first grade self portraits. Cuz they're royally awesome, dude.
 This project involved many mini-lessons as most of my projects do. I just can't seem to do a weaving project or a lesson on symmetry. No, it's gotta be a self-portrait-drawing-, symmetrical-crown-making-, textured-paper-weaving-, analogous-color-mixing-, and pattern-designing- kind of montage.
 Wanna attempt a project that involves that many steps? You sure you can handle this kind of party? Cuz it ain't for the short attention-spanded. But if you and your little friends are up for the challenge, here's how we went about mastering these pieces:
  • Week 1: As you may recall, as it's mentioned every blog post, I only hang out with my wee artist friends 30 minutes, twice a week. So I'm going to break this down by week. Now this lesson was apart of our unit on the United Kingdom. After a chat about their monarchy and a close look at several paintings of royalty of the past, the kids were introduced to the idea that they'd be portraying themselves as kings and queens. This was met with the usual squeals of delight that one only hears when teaching the littles. To start, we used 8 1/2" X 11" sheets of paper, traced a head shape in pencil, added a neck and ears and proceeded to paint using colors that matched our own skin tone. Once those dried, we used oil pastels to create out likeness. That's after a pretty extensive how-to-draw-a-self-portrait chat, of course.
  •  Week 2: Once the oil pastel self-portraits were completed, they were cut out of the small sheet of paper and glued onto a clean sheet of 12" X 18". Once glued down, the kids used mirrors to check out their 'do and painted hair onto their self-portraits. For the boys, hair painting, as we called it, took all of two seconds. But for the ladies, well, let's just say we enjoyed the beauty salon time. During the second half of our weekly art lesson, we used metallic paint to paint and add texture to small 6' X 9' pieces of colorful construction paper.
  • Week 3: With our fancy paper, we created a loom for weaving. To do this, I have the kids fold the paper in half and fold a small crease at the top open edge. We have a mini-math lesson that involves cutting the paper almost in half, making sure to stop at that top crease. We then proceed to cut the paper almost in fourths and then eighths. Once the paper is unfolded, it creates a loom. The following art class was spent weaving on our looms.
  •  Week 4: Crown making! This proved to be a bit hit with the kids...and it also helped me empty out some contents of my storage closet. After cutting out their preferred crown shape (the kids were given three different crown shapes to trace from), they added foamy shapes to create their design. They were informed that they only had two rules to follow: the crowns had to be symmetrical by shape and they could not stack more than three shapes on top of each other. Once complete, crowns were spray painted gold and more foamy shapes could be added on top.
  •  Week 5: We began the process of putting it all together. Crowns were glued atop heads. Weavings were glued under chins. Sleeves were added with rectangles of paper embellished with metallic oil pastels. Fancy collars were coffee filters folded in half with the center circle cut out. And necklaces were created with construction paper and metallic doilies found in my storage closet.
  •  Week 6: Finally, we began to approach light at the end of the tunnel. The kids were given water soluble oil pastels. They were asked to use two analogous colors and create lines that radiated from their self portrait. The following day, water was painted over their line drawings and their masterpieces were complete. Finally.

 I don't know if you noticed, but some of the kids took liberties with the coffee filters, creating fancy sleeves. And some of the ladies added earrings with the metallic doilies. Who am I to deny royalty of their magnificence?
I do believe the kids fave part of this project is when I passed their work back. I called on the kids as "Your Royal Highness" and "His/Her Majesty" to which they always giggled, curtsied or bowed. And who can blame them? After all this hard work, they are most definitely Kings and Queens of the art room. 

Read more »

Tuesday, September 18, 2012

In the Art Room: We are the World

Okay, this is gonna totally date me, but I was 10 years old when a group of the biggest 1980's celebrities gathered together to sing "We are the World". That was 1985 and I remember so many things about that year: my brother was born, forever ending my "only child" status; Haley's Comet made it's every-75-year appearance; my fifth grade teacher encouraged my love of creating and I loved her for that; a month into 1986, we watched in horror as the Challenger exploded. And the rock stars of the  mid-80's lead us all to believe that we could change the world. That's a lot of memories to pack into one year.
A World of Artists

I'm sorry. Maybe it's the weather, but I'm feeling sentimental of late. And this mural created by the students, faculty and staff of my school reminded me of that song. I can still see Bruce Springsteen (my all time fave), Michael Jackson and Lionel Richie (who both penned the tune), Tina Turner, Cyndi Lauper and so many others singing and swaying. 

But silly me. This is an "In the Art Room" post, not a kumbaya/hand holding session. I best digress before I become a mushy mess of memories.


Let's talk about the map, shall we? Every new school year, the kids create one big school mural together. Last year, we did the Self-Portrait/Rainbow Mural that is all over pinterest. It was a hit. I knew I wanted to do another mural that would tie in with our travel theme. A map of the world seemed like the answer. To begin, each student created a self-portrait in pencil and traced over it in Sharpie on a 3" X 3" piece of paper.

From there, students were given either all blue, green or yellow colored pencils and markers to color their mini-portrait. After looking at a map, students understood that they were either going to be in the water, on the land or apart of the frame.
I did some (very bad) calculations to come up with the size of the map. I was off. Way off. I'll show you how I attempted to correct that in a moment.
As the kids began finishing their portraits, I began gluing them to the map. As it filled up, some kids volunteered to use half green and half blue to be apart of the coastline. I placed their drawings on the map and lightly drew in pencil where the blue and green should be.

As you can see, once the portraits were glued, it was difficult to visually separate the land from the water. This had me seriously perplexed.
You might notice that some self-portraits were created on blue copy paper. Those were created by our faculty and staff in a pinch at a faculty meeting. The kids have loved seeing the drawings created by their teachers.
Thankfully, I've had this great group of art education students hanging out in my room a couple times a week. They volunteered to finish gluing down all of those little masterpieces. They also came up with the idea of outlining the continents to make them more prominent. That college education is really payin' off for them, don't you think?

Oh, look! It's Europe, our destination for this school year. Since having snapped these photos. I've made a little yellow dot with a string attached to show just where we are headed first. Paris, France, ya'll!
Those lovely college girls also crafted this nifty grid so the kids can (hopefully) find their self-portrait. Although they mostly just come up to me and say, "Where am I?" To which I reply, "Why, you are all over the world!"
Okay, so I did the math and came up with a 6' X 5' dimension. I drew out the map, painted it and was pretty proud of my mad multiplication skillz. And then, completely forgetting about my calculations, I decided to have the kids create this yellow border. Which lead to a whole lotta South Pacific emptiness. 

Solution? A compass rose. The kids learn about them later in the year...and it sure turned out pretty, if I do say so. Not only that, but I now have room for new kids to add their drawing to the mix. So, happy accident, says me.
Do you think we are just a little excited about our Parisian Adventure?
And there you have it, one We are the World complete. Thank you for indulging my memory lane stroll. Now I'm off to youtube to enjoy those mushy feel-good memories.


Read more »

Wednesday, April 25, 2012

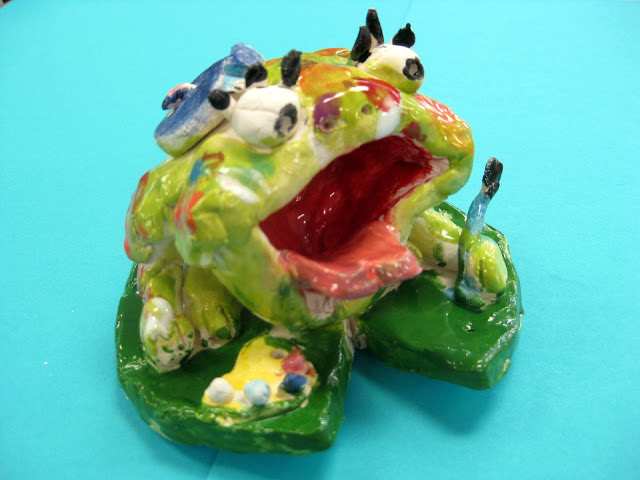
In the Artroom: Fabulous Frogs

Painterly Frog: This here is a froggy artist that really gets into her work. Notice the sweet details like the paint brush, palette, blue beret and, of course, the paint splatters.
I can't tell you how much fun it has been to go to school, open the kiln and be greeted by these guys each morning. While learning about all things Claude Monet, my third grade students contributed to our school's Mammoth Monet Mural with their frog-tastic drawings. When brainstorming their upcoming clay projects, I thought it would be good to continue our Monet theme. So my second graders created ceramic waterlilies and my third, these frogs!
Redneck Frog: Oh my, can you believe those teeth?! I am so in love with this backwards-baseball-cap-wearing, orange-eyebrows-on-the-outside-of-the-baseball-cap wigglin', mysterious-black-bug-eating Hillbilly Frog!
Obviously, the kids really enjoyed creating these unique frogs. They have been so pleased with them, as they should be. I loved this lesson because, once the kids followed the steps of sculpting their frog, they were free create any sort of frog imaginable. And they did.
Fashionista Frog: That was actually the name given to the frog by the artist. Apparently, Fashionista's hobbies include"being pretty, being sassy, hopping and teasing the poor fish." Hmmm, sounds a lot like the artist herself!
For this Fabulous Frog creation, we used the following:
Artistically-Inclined Frog: I was really concerned about the stability of this frogs easel that is precariously straddling the lily pad but it made it out of the kiln unscathed. Notice the little beret, the palette and the paintbrush.
Because I have half hour classes, I taught this lesson in several classes. On Day #1, we:
  1. Twisted our grapefruit sized piece of clay into two equal pieces. 
  2. With one piece, we pounded the clay flat into Oreo-cookie thickness and traced a template that was in the shape of a lily pad. We wrote our names on the bottom of this clay, wrapped it in a wet paper towel and placed it in a zip lock bag with our names written on it.
  3. With the other half of the grapefruit, we created a pinch pot for the frog's mouth and body.
  4. With the leftover clay from cutting out the lily pad, we rolled coils for the legs and attached them to the pinch pot with the toothbrush and water.
  5. The pinch pot with legs was then wrapped in a wet paper towel and placed inside the ziplock bag on top of the lily pad until next time.
As the kids were working, they were constantly coming up with names and quirky stories about their frog. So, once the frogs were out of the kiln, I had them do a little froggy biography.
Day #2:
  1. I demonstrated to the kids how to add eyes and a tongue.
  2. I explained to the kids that all things can be created out of clay with the use of a sphere, a coil or a slab.
  3. We brainstormed different ideas for frogs and froggy accessories and discussed how they could be created.
  4. Students completed their frogs (just barely in a half an hour!) and attached them to their lily pads.
Standardized Test Taking Frog: Yep, it's the time of year. Notice the #2 pencil. What you can't see is that this frog is also wearing a fabulous red and blue backpack.
Day #3 and 4: Once the clay projects have been fired, we begin glazing. I tell the kids I only have two rules for glazing: don't glaze the bottom (it will adhere to the shelf in the kiln) and no glazing your clay projects five thousand colors. We spend one day just blocking in the colors with at least two coats of glaze.
Rock Star Frog: Gotta love a frog that dyes his mohawk to match is guitar.
On the second day of glazing, we use smaller brushes and begin to add details like dots, stripes or just delicate lines.
Special Agent Frog: Ma'am, I believe I found the dragonfly you were looking for...

And here was our final task: writing about our fabulous frogs. The kids don't get to take their frogs home for a couple of weeks due to our school-wide art show. But they were dying to see them and chat about them. So, we filled out this sheet in pencil and traced over our pencil lines in skinny sharpie. This paper is actually a folded card. When we display the frogs at the art show, this little placard will sit next to the artist's frog.

Paint-Brush-in-my-Mouth Frog
This project really brought out the kids artsy side...which is why I think they created so many Artist Frogs! It also brought out more of their crazy humor...I learned that during this exchange:

Me: Hmmm...it says on your sheet that your frog loves to eat "pizza, sushi and ... frog legs?"
Kid #1: Yep!
Me: You do realize that you made a frog. And he likes to eat other frog's legs?
Kid #1: Yep, he's got cannibalistic tendencies.

Ya gotta love 'em!
Read more »