Showing posts with label art projects. Show all posts

Tuesday, January 5, 2016

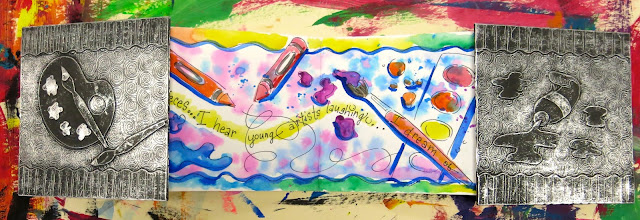
In the Art Room: "I Am" Books

Well, welcome back, my fave art teacherin' friends! I know most of y'all are back to schoolin' even if the kids aren't there. My most amazing school district has decided that we ease back into the routine by providing with us three days of professional development before The Return (of the Chillins). Today, one of my favorite art teacherin' buds Daryle Grenead came and demonstrated two awesome projects to bring back to the art room: I Am books (shown in this here post) and 3-D letter making (to come on Thursday, stay tuned). 

These books are a barrel of fun and so easy to make...not to mention they tie in so much literacy, it's enough to make your reading specialist's heart grow three times it's size! Daryle recommended doing this project with the fourth grade and up set. I can't wait to give it a-go with my favorite wee artists.
Let's start with the best part of this here accordion-style book: the cover. We used the same relief-style method that I've shared in this blog post where we used leaves. 
To start, we each had two pieces of square 5 1/2" pieces of matte board. Very thin poster board (or heavy weight paper would work as well) was used and a collaged design was glued into place with good ole Elmers.
Once finished, we used 8" X 8" pieces of foil. DULL SIDE UP (that's super duper importante, hence the ALL CAPZ), spray adhesive was applied to the foil and our collaged piece was placed face down. The edges of the foil were then wrapped around the backside of the matte board. 
Using a cotton ball, the surface was rubbed until our design appeared. To get into those hard-to-reach places, a q-tip was used. 
BOOM, y'all! Because heavy-ish gauge foil was used, designed could then be drawn into the foil with a dull pencil. And no foil was harmed in the process...an art makin' miracle!
Look, maw, no punctured foil! 
Using that super cheapo $1 black matte spray paint from your fave hardware joint, lightly dust those bad boys. 
And buff off the spray paint to reveal your incredible design. Prepare yourself for the oooohhhhssss and ahhhhhhssss, y'all. Cuz they're coming...
 Like, right? I done tole you.
 Now, let's talk about that writing portion. Daryle provided us with an I Am poem prompt that inspired our narratives. 
There are truck loads of examples of I Am poems online. If you ask Mr. Google, he can help you out. 
 Now, prepare yourself as I share my poem-writing soul with you. You're welcome. 
We used heavy duty watercolor paper for this portion. The paper was 5" X 30" (me thinks. Don't quote me on this. I'll deny everything). 
 Read on, my poetry skillz are pretty much unmatched. 
Just got the memo, I've been named Poet Laureate. Who is Laureate, anyways?
And there you have it! Have y'all done these kind of books with your students? I'd love some more ideas. And Happy Back to Art Teacherin'!
 photo signature_zpsd10b3273.png
Read more »

Tuesday, September 29, 2015

DIY: Needle Felted Postcards

Hey there, buddies! I hope y'all are doing swimmingly. Here in lovely Tennessee, we're in that moody in-between summer/fall phase which makes is impossible to dress without being horribly under/over prepared. Don't believe me? Lemme paint y'all a visual: Today it was 80% rain/80% sunny/99.2% cloudy/chance of sweating your butt off in the sunshine/chance of freezing your butt off in the shade. It's no wonder my sinuses are causing brain swelling. Tho with a brain the size of mine, a lil swelling never hurt nuthin. There's plenty of real estate between these ears o' mine.

During one of those moody fall days this weekend, I had the wonderful, super-duper, uber-exciting opportunity to teach a workshop at Nashville's Frist Center for Visual Arts! 
That's right, this crazy art teacherin' lady got to teach adult-sized artists my fave craft: needle felting! Our creations were inspired by the Postcards of the Wiener Werstatte which translates to the Vienna Workshop. The Workshop began in the early 1900s and was a means of turning your life into a "total work of art" (sounds fab, right?). Meaning they sold everything you could ever desire as a lovely artistic creation so that your life simply permeated art. The best seller at the time? Postcards! And that's the basis of this incredible exhibit. 
My buddy Rosemary Brunton, associate educator for community engagement at the Frist, lead us through the exhibit, filling us in on the history and allowing us time to explore and sketch. When we returned to the studios, this incredible group of art teachers, fiber-arts lovers and workshop-junkies (you know who you are!) were busting with ideas for their needle felted postcards. 
That's right, we created needle felted postcards! AND mailed them (more on that shortly). We created these little 4" X 6" masterpieces to tiptoe into the fine art of needle felting. It allowed the participants to watch me give a short demo and explore the medium in anyway they wanted. It was a fun and quick-ish intro for the crew. If you wanna catch a snippet of what they learned, you can check out these videos I filmed a while back that will walk you through the needle felting basics and supplies. 
Supplies purchased from Amazon:

*  Clover needle felting tool
*  Replacement needles, fine
*  Roving, variety pack of colors
*  Cushion. I prefer the Clover brand bristle brush but you could use foam in a pinch
*  Fabric to needle felt on. YOU CAN NEEDLE FELT ON ANYTHING. Seriously. Jersey, acrylic felt, wool felt, wool, cashmere, you name it. Shoot, sometimes even your flesh but that's usually after a glass or three of wine. Which I don't recommend.
Stabby-stabby-stabby. It's seriously a stress reliever! 

Exploring on an inexpensive material like acrylic felt or muslin will allow you to really explore the medium without getting hung up on doing it "just right".
These participants did a fine job of really trying out their new craft. I love this spiral!

You can simply use roving in needle felting or you can combine it with yarn like the example on the right. I've only used wool yarn when needle felting but was told that even acrylic yarns would work.
 I love the three dimensional quality of this piece! 
 And this one! This and the one above were created by my art teacher buddies whom I've dubbed my Pensacola Friends! These lovely art teacherin' ladies drove all the way from Pensacola to attend the workshop. They were so sweet and fun, I loved having them! 
I can see this being a great exploration of the use of line and shape for older students. This piece is just so happy!
Once the postcards were complete, we wrote messages on card stock and hot glued them to the back. We popped them in the mail...but, sadly, Rosemary informed me today that they were returned to her. She was kind enough to stuff 'em all in envelopes and resend them. Lesson learned...but it was such a great idea, I thought! 
Once our practice pieces were complete, we moved on to a larger format work of art. Some participants sketched their design in chalk as I often do. I love using chalk on fabric as it "erases" pretty easily (just look at any sleeve of any sweater of mine!).
Others just dove right in with the roving like this van Gogh's Sunflowers-inspired piece.
 Did you know you can needle felt felt to felt? Did you know I can use the word felt in one sentence three times? How does that make you felt, er, feel? I love this piece...just wait til you see it complete!
 I loved everyone's unique ideas and hearing about their inspiration. We had such a happy group that loved to share ideas, thoughts, awkward youtube videos (what WAS that hand-held needle-felting tool/vibrator thing?!). 
 I love the graphic nature of this piece.
And my Pensacola Friends were all about the texture! I love the idea of "yarn painting" with needle felting. I never thought of that!

 Text-ure, baby! Love all the feels!
 Didn't I tell y'all it was amazing?!
 Did I mention that there were art teachers in the house?! This one needle felted pencils onto a pencil case that she hand embroidered. Oh! AND made that wet felted button. WHUUUUT?!
Alright, art history buffs, can you spot the artist-influence behind this tabby-cat piece? If you guessed Georges Rouault, you are correct! I love the stained glass quality of this piece.
 Look how painterly this piece turned out?! I love it!
Seriously. I could not have spent my Saturday with a more fun (funner!) bunch. Thank y'all for making my workshop such a blast to teach. And special thanks to Rosemary and the Frist for allowing me to do so! 
  photo signature_zpsd10b3273.png
Read more »

Tuesday, August 4, 2015

In the Art Room: My Fave Landscape Lessons

Hey, y'all! Welcome to another installment of my Back to Art Teacherin' series! I kicked off this series with a lil What to Wear-ness and a Giveaway where y'all had to indulge me in your fave back-to-school-clothes shopping stories. I loved each and everyone but I gotta say, this one from Michelle was one of my faves:

My favorite, and most embarrassing, back-to-school memory involves my dad taking me and my two sisters shopping for back to school clothes...way back in the eighties! There was plenty of black and neon combinations, acid wash jean skirts, and at least one knitted cat sweater involved, which was my favorite thing. We were so proud of our gear that we begged our dad to film us putting on a fashion show - complete with commentary by my sister and some hilarious bloopers, including a particularly confident walk by my eight-year-old self, all the while with my hair tucked into the neck of my prized cat sweater (there were some quick dress changes!) and followed by three full turns at the end of the “catwalk” (I think I had figure skaters and fashion models confused at the time). My dad filmed it all on his old school video camera, the kind that was so large it had to be propped up on his shoulder and held a full-sized VHS tape! The evidence still exists!

Congrats, Michelle, on your grab bag of art teacherin' books win! Now, don't ya'll leave me hanging for our next fun-ness...don't forget to snap a photo of what you wear on your first day back to school! I know many of you either have already started (in which case, just snap a photo of any ole art teacherin' day, I won't tell!) or don't start back for a while. No worries! I don't plan to share the post until the end of Auggie/start of Septie. More details here
Now if all y'all are like me, unit planning, lesson writing and sample making are in full swing. This is also the time that I find myself getting a lil stumped and frustrated. And ain't nobody got time for that! So I thought I'd share with y'all a sprinkling of my very fave landscape and self-portrait lessons to kick off your school year! 

For starters, this landscape project you see above was created by my fourth grade students last year. I loved it because it was a color mixing lesson that produced the mostly lovely of hues as well as unique paintings. All the landscape-y color mixing deets here, kids. 
One of my fave projects my second graders tackled last year were these Chilean-inspired arpilleras. We used textured and printed papers, collage, origami for the houses, puffy paint and stitching for the border. So much fun in one project! 
After our big chalk episode this year, the classes that didn't participate were really interested in the medium. So I took advantage of that interest of theirs and introduced them to the artist Sushe Felix and her lovely landscapes! The kids loved working with chalk and thought this technique to be simply magical. 
I love meshing several art lessons into one project. I find that the experience for the children is more rich and the artwork lovely. If you think about it, artists don't usually create in one medium solely independent of another. Meaning, they don't make a collage with just paper or a weaving with just yarn but they mesh many different techniques and supplies. By introducing that style of art making to children we are showing them that the processes taught can be applied to the creation of something magical and great
I know, y'all. It ain't no wheres close to winter yet but this here is one of my fave kindergarten landscape lessons! It's always sweet to see their wintery scenes...and I'm convinced that each year, these babies bring us the luck of snow! 
Who says landscape lessons have to be taught two-dimensionally? This tree weaving is one of my faves of all time and can really introduce so many concepts on both landscape, scale, perspective and weaving! 
You know how people are always giving us the weirdest things? Like, toilet paper tubes, for zample? One year, when learning about Medieval times, the fourth grade used 'em to create these totes tubular castles
But even without the castles, these landscapes look all kinds of awesome, says me.
These Egyptian desert landscapes were created by my first grade artists. Can you believe the lil Leonardo was such a wiz with those camel-cutting scissors, y'all?! 
Introducing cultures with collage landscape is always a good idea (kinda like Paris). These second graders knocked this project outta the park! 
Tho this first grade artist did a pretty magnifique! Another use of those ole t.p. tube, y'all. 

Okay, now I'm all kinds of excited to start the year with some super landscape painting projects! Our theme at the start of this year is Henri Rousseau-inspired jungles...I can't wait to see what my wee artists create! What are some of your fave landscape lessons? I'd love to know!

 photo signature_zpsd10b3273.png
Read more »